Ikier K1 (possibly Atezr L2) absolute coord working with Z Autofocus?

I’ve been fighting this thing for a couple days now. It works fine in Current Position, but I can’t get over one hurdle. Possibly a mental block, but here’s what I’ve been trying to do…

  1. Home the machine and all three axes go to zero (of course). X&Y at bottom left, Z at top/highest.
  2. Get Position
  3. Set Origin
  4. Jog X &Y to workpiece.
  5. Autofocus macro [ESP500]

That’s where it falls apart. The Focus Macro resets all three axes. Get Position confirms this. Jog Head to 200, 200. Get Position confirms 200,200,0. Run focus macro, head moves down, contacts workpiece, then moves up approx. 8mm to focus height. Console confirms completion at that point. Get Position then shows 0,0,0…having never touched X or Y. So the focus macro zeros X & Y wherever the macro was triggered and zeros Z approx 8mm above the workpiece.

If I then re-home, using the LB home command, it homes all three axes and I’m back where I started…with Z zeroed at top of travel and focus position lost. Endless loop of fail.

Anybody else seeing this?
Got a viable workaround?
Am I doing this all wrong somehow?

I’m considering writing a simple macro to home only X & Y, but I would prefer to move the laser head up 20mm or so to make sure it clears any fixturing I may have in the homing path (but out of the design area)…I’m just not sure if LB and the machine can put all three axes back to cut position on starting the job. I tried setting the focus, then homing only X & Y (with $HX & $HY). That works. Unfortunately, if add any adjustment to Z, a Frame or Run command ignores Z (doesn’t return to zero/focus. I’m missing a piece of the puzzle but it’s closer.

I wish I could see the code Ikier uses in the ESP500 subroutine/macro.
Machine has latest published firmware, 1.433. Dated mid Apr '23.

Probably unrelated, but of note…
I reflashed a few of the values in the firmware manually.

$10 to 0 (was 1) and $131 to 750 (was 410). I added an extension kit, which increases X from 410 to 750. I’ve been back and forth with Ikier and they can’t seem to understand that changing the physical machine dimensions should mandate a matching firmware…so I just did it myself. Power cycle (pull power connector for 5+ min) and reboot LB with fresh $$ on reconnect confirms changes were written to EEPROM.
Did you change $10 for a reason other than to accommodate the extension? It should not be necessary if that’s the only change.

This shouldn’t affect what you’re seeing here but could have other downstream effects under specific circumstances. I wouldn’t expect it to affect autofocus but given the customizations from Ikier it’s not necessarily predictable.

Is “[ESP500]” the only thing you have in the macro?

What are you trying to accomplish with this?

If you run autofocus from the touchscreen what happens? Does it exhibit the same behavior as the macro or does it focus without losing position?

I changed $10 because the LB Docs (connecting and configuring) said to. I have no idea what it actually does and noticed no change from doing so.

I’m not at all opposed to changing it back.

I clicked Set Origin because it seemed necessary in my mind to sync the machine position with the software workspace. Thanks to Rich at LAHobby, I now know this was both unnecessary and detrimental.

[ESP500] is the entire macro, per Ikier. No idea what’s buried in there.

I haven’t tried to use the touchscreen while connected. Frankly, I’d just as soon ditch it altogether.

Rich has a K1 Ultra that’s working great with LB and he got me mostly sorted. Basically, using Set Origin was screwing everything up.

I still don’t have the kind of control over Z that I’d like to see, but I’m willing to bet that’s also my fault.

This is typically required if your machine homes to negative workspace and requires an offset. Setting to 0 will have the controller report position based on working position rather than machine position. You should probably be safe setting this back. But as you say, this likely wasn’t causing you a problem with your current setup.

Got you. It’s not necessarily detrimental. Just unnecessary when using Absolute Coords. I wasn’t sure if you were trying to do something with it.

Can you try this? I’d like to understand if the effect that you’re seeing is unique to using the macro or if it’s somehow inherent in the autofocus process.

I will try using autofocus from touchscreen in concert with my now outmoded original workflow in the morning. I’m currently at work.

If I omit the Get Position and Set Origin, it seems to behave more-or-less as expected using the Focus Macro. I want to try and figure out a streamlined workflow that will allow me to raise Z after focusing for material adjustment and such, as well as after the job completes, before returning to finish position. Just to keep it out of the way while traversing. Failing that, I may need to work on low profile (< 7.5mm) material clamping to ensure I never hit them.

Ah. Ok. So sounds like the original issue has been resolved. Then really no need to test from the touchscreen as I’d expect the behavior to be the same.

You could setup another macro to do this or just use the Move controls for Z.

This might be most easily handled by adding gcode to the Edit->Device Settings->Gcode->End Gcode field.

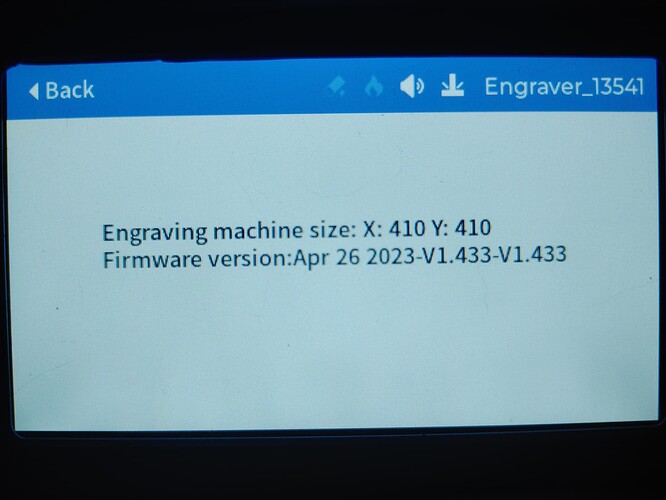
In another topic, I was encouraged to share my firmware version. This topic seemed more appropriate for it, so here it is…

Controller touchscreen reports:

LB Console reports:

Waiting for connection…
�-�ok
ok
[VER:1.1h.20220801:]
[OPT:VNZHDLI,254,2048]
Target buffer size found
ok
Homing
ok

I also thought my current machine parameters might be useful:

$$
$0=10
$1=25
$2=0
$3=7
$4=0
$5=0
$6=0
$10=1
$11=0.010
$12=0.002
$13=0
$20=0
$21=1
$22=1
$23=3
$24=200.000
$25=2000.000
$26=250
$27=4.000
$30=1000
$31=0
$32=1
$33=0
$34=10
$100=100.000
$101=100.000
$102=3200.000
$110=50000.000
$111=20000.000
$112=200.000
$120=4000.000
$121=1000.000
$122=100.000
$130=410.000
$131=750.000
$132=40.000
$140=30000.000
$141=20000.000
$142=200.000
$143=2000.000
$144=1000.000
$145=100.000
$150=6000.000
$151=6000.000
$152=200.000
$153=1000.000
$154=500.000
$155=100.000
ok

So was this issue resolved somehow??? I’m trying to follow the reply’s but I’m not accustom to the thread layout. I have an iKier K1 Ultra 36W and I’m having the same issue using the Autofocus with LightBurn. From the first time I set the laser up I noticed when I ran the Autofocus macro in LightBurn the first attempt failed but the second seemed to work? I was able to engrave a few small tests to practice. I didn’t realize the position issue until I tried cutting/engraving a template and nothing was lining up due to the Y, X being reset to 0. I tried setting the Z manually but any adjustment to the Z axis and the Y,X is reset to zero?

I will be try engraving from the controller alone today to see if that’s a possible workaround. My iKier laser/controller firmware is V1.499, Lightburn firmware is V1.4.01. I have a message into iKier support but haven’t received a response yet. Any help would be appreciated

Thank you

Here’s my process…

  1. Turn on laser. Pretend the touchscreen doesn’t exist. Never touch the laser again.
  2. Home. (via LB. Remember the touchscreen doesn’t exist. :wink: )
  3. Place material
  4. Frame to confirm
  5. If necessary, jog head to somewhere on the workpiece (multiple ways to accomplish this quickly from within LB…remember, never touch the laser again.)
  6. Autofocus Macro
  7. Start job.

I was fracking everything up by using the set user origin. If you did this, you may need to clear it. The layout grid in LB should have both red and green origin glyphs basically overlapping in the lower left corner.

I don’t need, use, or want the red cross hairs.

You can use the X & Y coordinates like you’d expect. 0,0 is lower left. The focus macro touches off the workpiece then moves up approx 8mm but for some reason it reports this location as 3.5mm on my machine. I use relative Z, so it doesn’t really matter.

Next step was to check/adjust stepper settings…

Jumping from here to keep my K1 journey somewhat collected:

Using a metric tape measure I previously verified against a calibrated 2 meter steel rule I have at work.

I thought I might be able to use my crosshair positioning laser but it was impossible (for me and my eyes anyway) to resolve a sub-mm positional change, so I used a skewer as suggested above. Thanks for that.

Bed size is 410x750.
My Y axis was off by about 1 mm at 750.
My X axis was off by about 0.5mm at 410.

I didn’t save the initial values, but I believe Y was about 751 and X was about 409.5

Not too bad, but plenty of room for improvement.

The Calibrate Axis tool is lovely. So much faster and easier than doing the math and entering the correction long hand.

I cycled both axes a dozen times after calibration and they’re spot on now. At least, as close as I can get it with the measuring equipment I have. I can tolerate <0.25mm error, which is about as precise as I can measure over these distances.

1 Like

This topic was automatically closed 30 days after the last reply. New replies are no longer allowed.