Lightburn seems to double my image size when importing (at least) jpeg images. I’ve basically tiled and set dimensions for a multi image jpeg, set the size to 8.5 inches by 8.8 inches (215.9mm x 223.52mm). The exif data seems right; every other image editor/viewer etc sees the file at the right resolution (2549 x 2639 pixels) but importing that image into Lightburn doubles the resolution size. I can just resize the image to fit.. but why the extra step? there’s 20 images in total, which means I have to resize all images on import.
I’ll try other file types (I don’t want lossy jpeg anyway) but that’s a real head-scratcher.
I tried to google search this, but everything seems to boil down to unresolved user error or Google’s increasingly poor search results.
I just don’t understand why LB would just choose to double the resolution of the file on import. I’m not using anything specific or image bypass. Just feels like extra work for nothing. If it’s a setting somewhere I’m missing, please let me know.
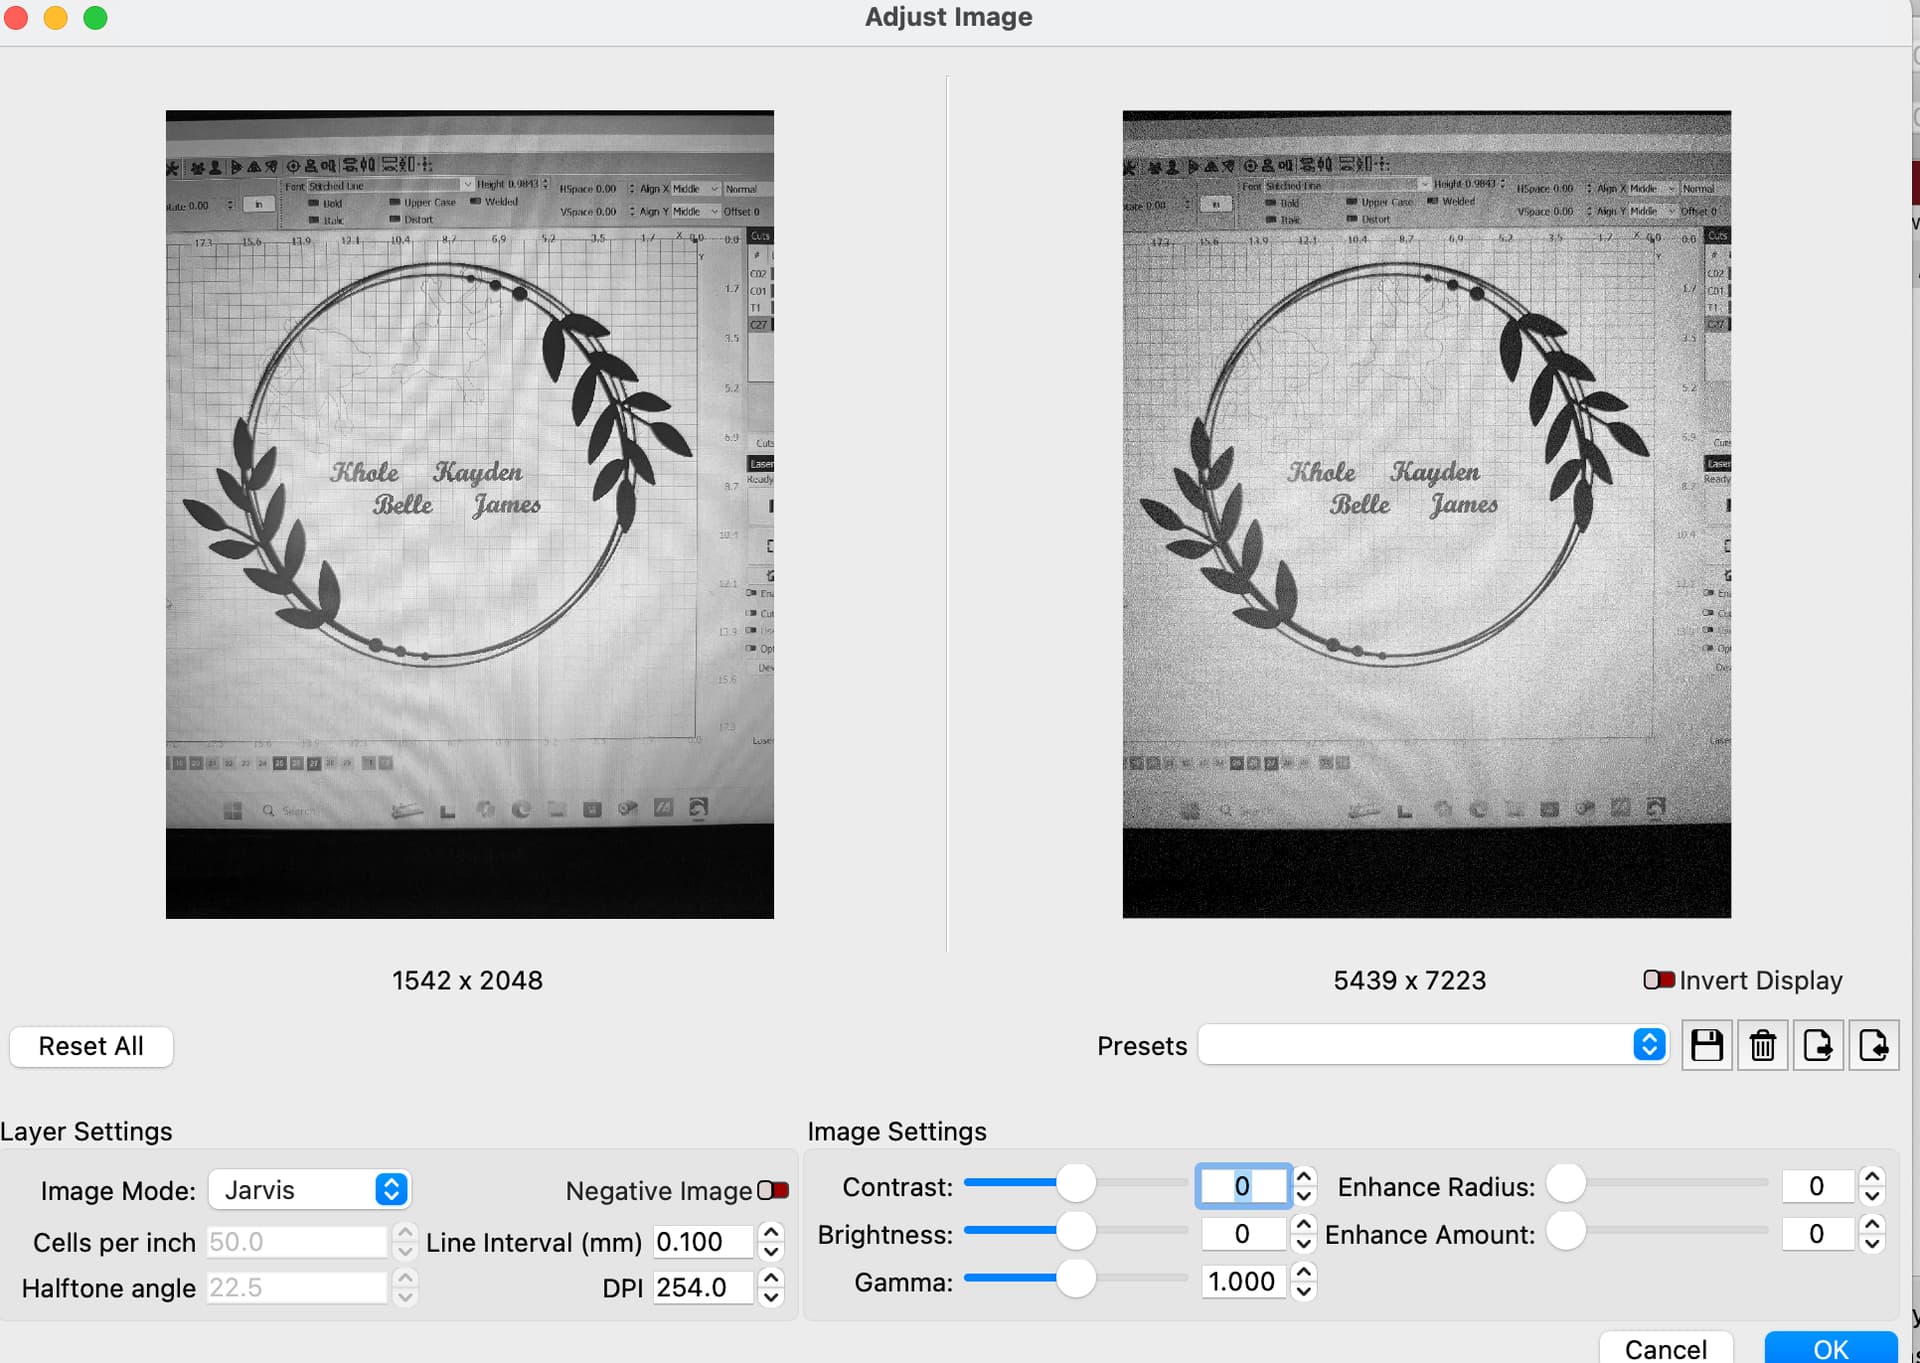
It has something to do with the DPI the image is created with and the default Lightburn DPI. What you can do is right click on the image and select Adjust Image, then change the DPI until your output image matches the original image.
Seems to me that would make the passthrough option useless for images processed outside of Lightburn, such as with ImagR, if Lightburn changed this data upon it’s loading.
I don’t know the reason and not sure how or if this would effect pass-through.
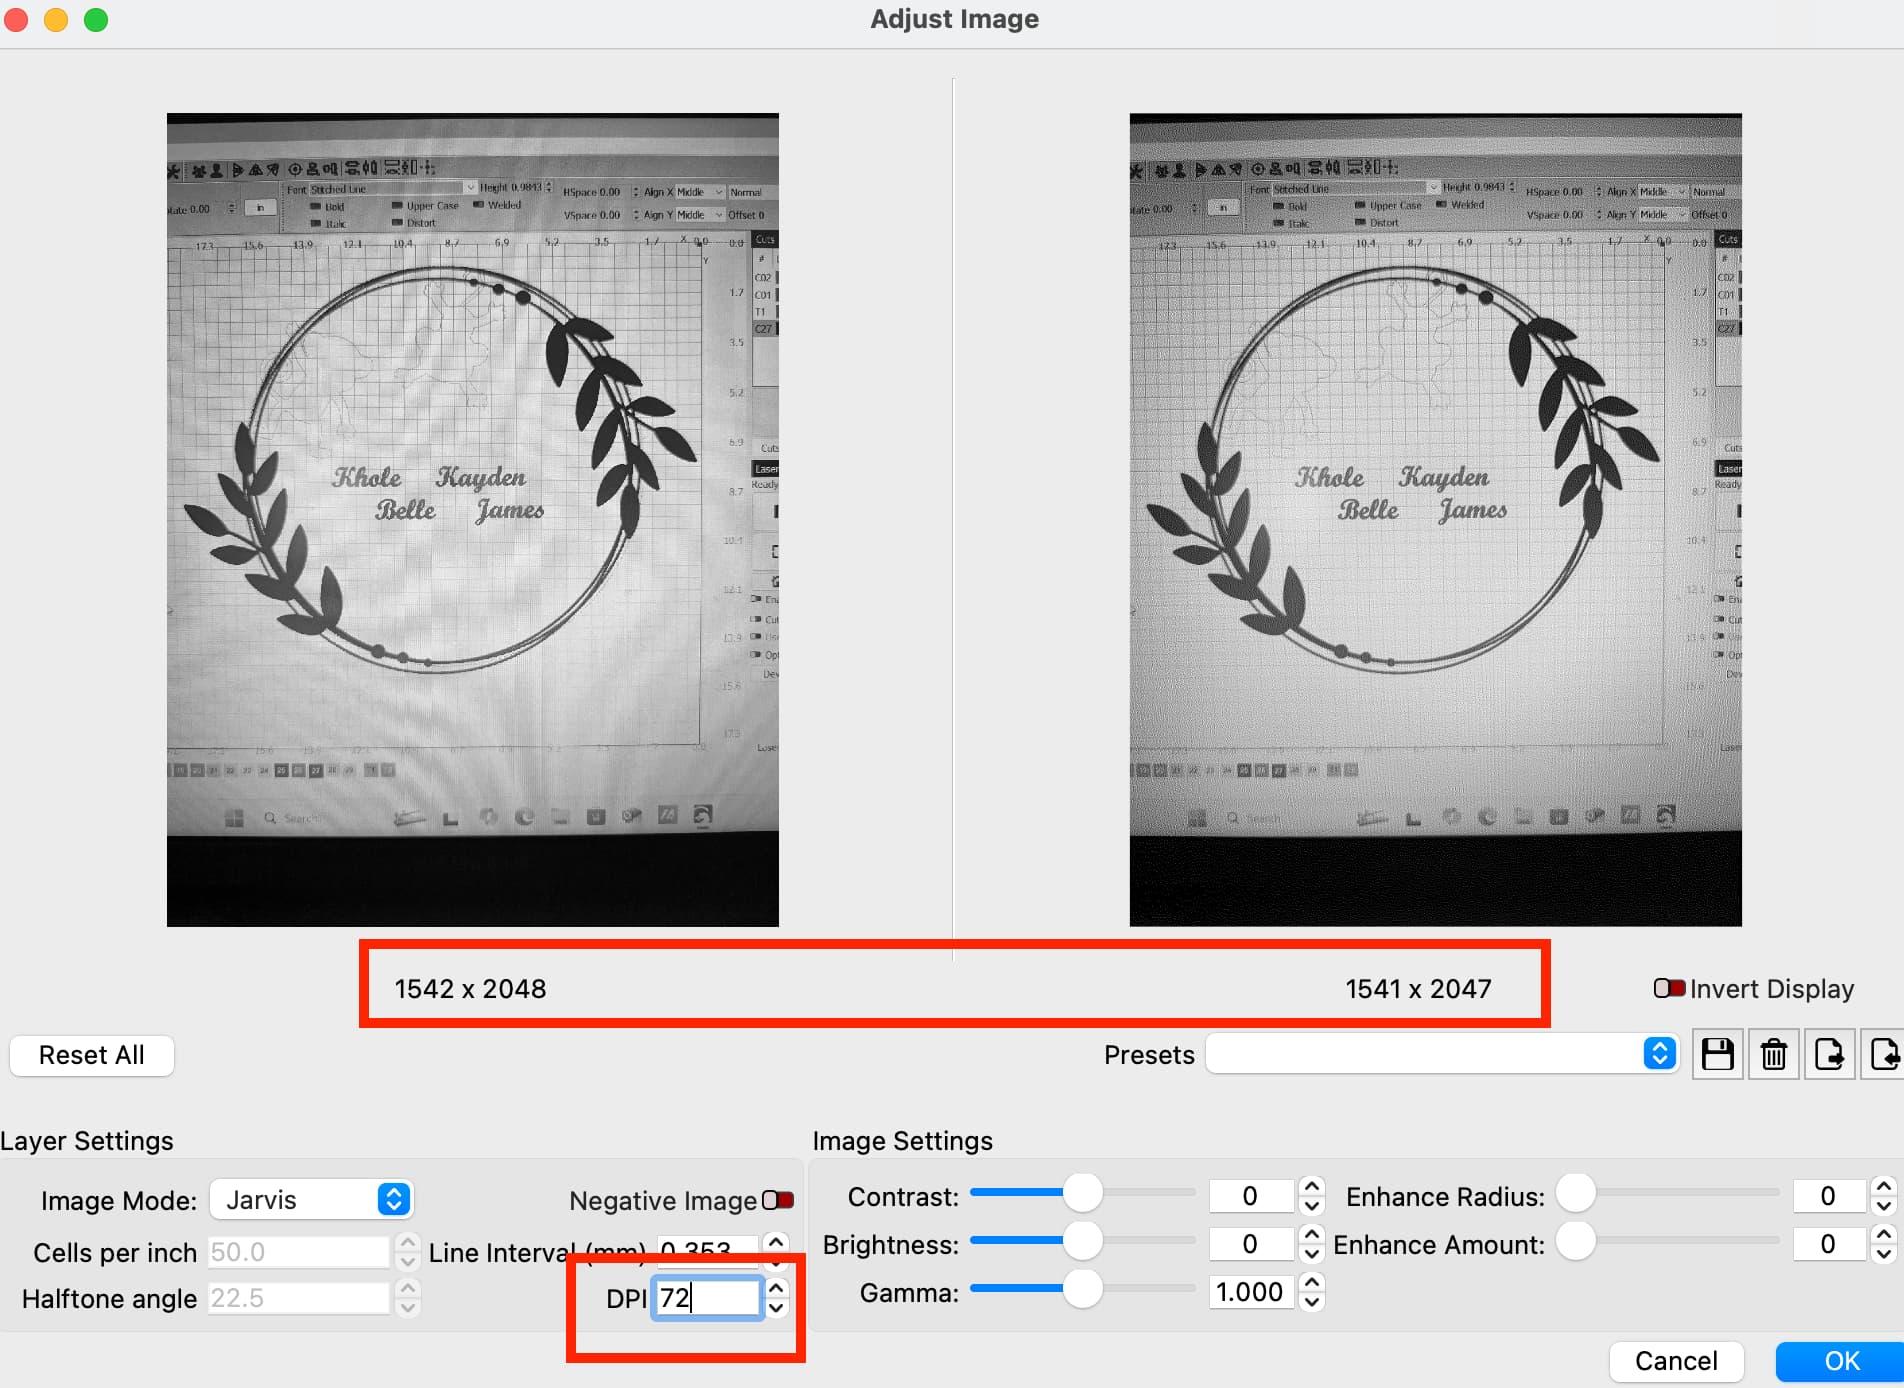
What I discovered in my testing of the issue is, it uses the default settings for the layer the image is imported to. In my case it was the Lightburn default for the 00 layer of 100mm/s, 20%, 254DPI and Jarvis image mode. When I opened adjust image you can see the jpg is consideribly larger than the original image. I had to adjust DPI to 72 to get it back to original size. I then saved 72 DPI as the default in the Cut Settings Editor, restarted Lightburn and imported the image again. It retained the 72DPI and size of the image.
I have an imported image, into the default c00 black layer, these set values such as interval, speed and so forth. The values are what’s stored in the default. On the right, the same image after clicking the c01 or blue layer, all these values have changed… including the dpi..
Maybe I’m not following you… or I’m missing something… this shouldn’t be that complicated. It could be something as easy as his export settings are incorrect… without his source image, we can’t do much.
Beats me.. I guess I’ll sit on my and see what happens.
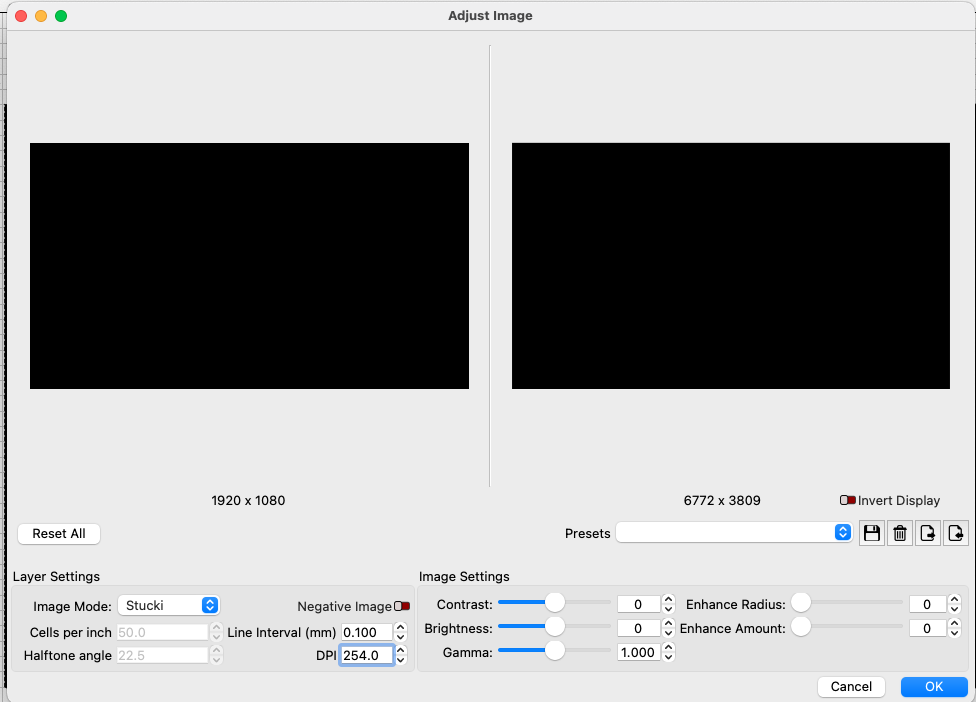
I imported a black rectangle. It is 1920 x 1080 pixels @ 72DPI. I did the math and that should equal 677mm x 381mm, which it does, or close enough. However, when you go to the adjust image dialog the imported size is 6772 x 3809 @ 254DPI. Resampling the image at 72DPI changes the pixel count, but doesn’t change the actual size of the image.What I just realized is that Lightburn is resampling the image at the correct size as created and adding extra pixels to get the resolution to the value for that layer.
There isn’t a default DPI for images - that setting is for SVG files only, and only when they are imported using “percent” or “pixels” as their unit of measure, which generally happens when exporting from Affinity or Adobe.
For JPEGs, we do actually parse the EXIF data in the image, so if you have one that’s not working, please email it to support@lightburnsoftware.com and include a link to this thread so I see it. If you put the JPEG in a zip file your email client won’t scale or alter it, and I can look at the original and see if there’s something wrong with our parser.
You said two different things here - you said LightBurn is doubling the size at first, and then you mentioned the “resolution size” - can you specify which thing is incorrect?
The resolution of the source image is basically ignored - LightBurn resamples the image to match the DPI you specify in the layer settings at the size of the image in your workspace. If you resize the image to be 1 inch wide, and tell it to use 254 DPI, the output to the laser will be exactly 254 pixels wide.
When you import an image, LightBurn looks at the EXIF data to determine the physical width and height to use in the workspace, and sets the dimensions to match that.
Thanks for all the replies. I’ve been fumbling around trying to find something that works. So the image size, resolution, DPI are all related. It’s the data that defines how to display, print or size the images. It sounds like it’s different, but it’s not. To keep it simple, I have a map that’s 34 x 44 inches, I split the file in PS, export the images into 8.5 x 8.8 inch image tiles, bring them into LB and it interprets the sizes differently for the images. Each image is the same size, DPI and resolution. LB brings some images in at 20 x 21 inches, some at 30 inches, and so on. If I do them one at a time or all together, it’s the same effect. This wouldn’t be so bad except that some images don’t import in at the right aspect ratio which makes thema completely different size than the rest of the tiles.
I’ve been working at examining the EXIF and JFIF data to make sure it’s not just a user error, but I can’t see any place I’ve made a mistake. Currently I’m converting between TIF, PNG and vector formats and trying to slice it up that way.
As a last resort I’ll upload the files for you. Currently they’re too big to just randomly upload samples.
I was more wondering if anyone had had this issue and how to get around it.
If you email one or two of them to support@lightburnsoftware.com in a zip, I can take a look. The importer absolutely does use the EXIF data in the JPEG file (or others). I think JPG, PNG, and TIF include the DPI, but BMP doesn’t. I divide the physical number of pixels by the DPI to get the size, and set it to that.
Thanks again. I’m running EXIFtool over the 20 images into a text file to see if something mucked up somewhere. When I get a minute, I’ll zip up a few files that come in at different sizes and send them to you. Maybe you’ll find out what I’m missing.
I figured after years of managing and image manipulation for print I’d have this down pat. Lol.
I figured it out. My version of Photoshop isn’t writing exif tags properly (not at all). I have no idea why and when I was examining the metadata in the files, it was displaying XMP data in Windows.
Photoshop was reporting the size to me as I wanted, Bridge showed me the true size and EXIFTool reported nothing in the EXIF data. How any of that happened… I have no idea.
I found out by saving as a TIFF the EXIF data was as expected and the images worked as designed. I probably could’ve used PNG too with the same results.
Thanks for the offers and suggestions. Turns out.. some weird user error?
I’ve never payed attention to the DPI when I was using vector graphics. I was more interested in the interval. The only time I care much for the DPI is dealing with raster images, like JPGs, PNG etc.
That’s just me. And mostly raster DPI to describe an output size. If any of that makes sense.