I’ve got one of the Mahoney laser power meters and mine is calibrated to produce a reading after a burst of 16.3 seconds.
My first thought was to set the layer config to 100% power, 1mm/sec and then have a spiral (ish) of length 16.3mm, but I can’t see any obvious way to tell how long the line is. It’s not in ‘shape properties’ or at the top of the window as far as I can see…
Failing that, any other ideas ? I’d like to spread the power around a little on the sensor surface (hence the spiral).
You do not use the focused beam to measure the power using the mahoney meter. Place it in front of the second mirror and hold the button down for 16 (.3) seconds.
[grin] Yep, I’m aware of that. I just wanted to use the software to time the period when the laser was switched on.
You can do a move at 0 power (which gives an indication that the program has started) for about 4 seconds, then the actual power-on cycle for 16.3 seconds, then another move (at 0 power) for 25 seconds to give an indication of when to actually read the meter. It’s all just convenience, but it does make it easier.
Not sure what you are after here but have you thought about the ‘Cut through’ option under the ‘Cut Settings Editor’ for ‘Line’? There is a dwell option for the beginning and end of the cut. Is this a delay that would work for what you are trying to do?
I think the dwell-time is for the stationary part of the line, though, right ? I really want the power to be absorbed over a larger area than a single point.
Since there’s no built-in measurement of the line length (at least, that’s what I’m understanding), I think I can do it anyway, just by not using a spiral. Russ was using a spiral in RDworks, and he measured his line-length to match his calibration; I was trying to duplicate that. I’ll do a series of straight lines instead, then I can get a spiral-ish pattern and easily set the individual line lengths to add up to 16.3mm. Problem solved.
[edit] To clarify what I’m trying to do: Russ covers it here and you can see the pattern he has the laser head go through to get the final exposure-time.
If you want to characterize the losses due to the lenses/mirrors in the system, it is in fact useful to be able to put all the power after the various optical stages, including the focus lens at the work-piece… otherwise I could just do a single line 16.3mm long.
Yes, but I want to make the length of the line exactly 16.3mm long, once you go around all the circles. That way, if I set the speed to 1 mm/s, it will illuminate the sensor block for exactly 16.3 secs, which is what it’s calibrated for.
That was why I was asking for “can you tell the length of a line”, because then I’d scale it to make it fit.
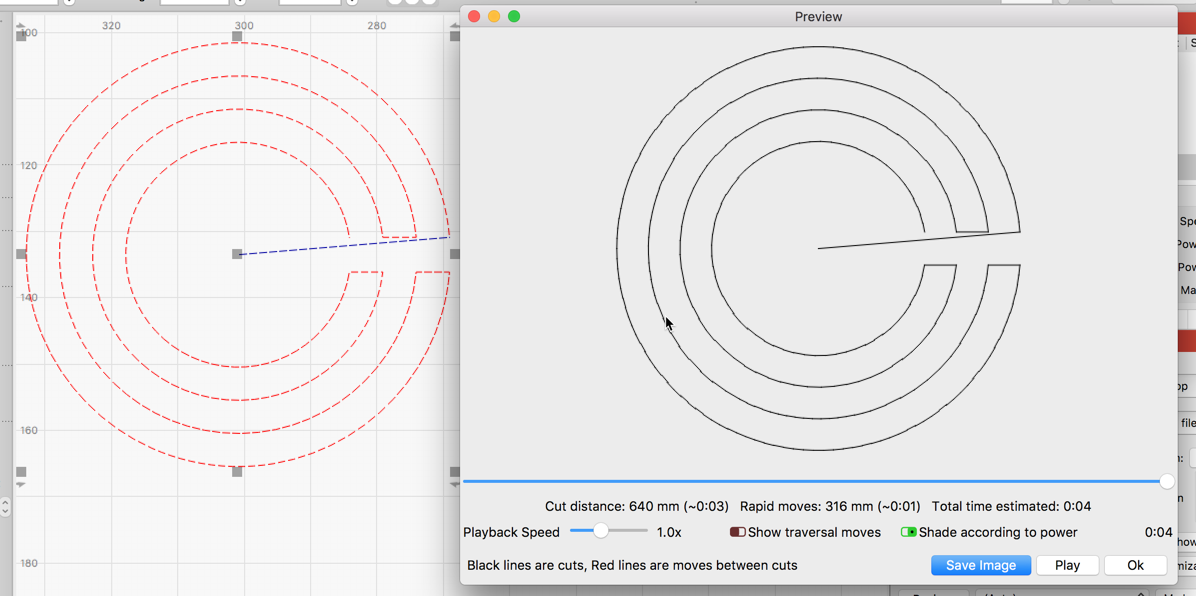
Edit: I see the preview shows the cut-distance. That means I can work out the speed for that layer to make the time spent on the figure 16.3 secs. Cool, that’ll do it.
I have a Mahoney power meter. As I mentioned earlier, none of this is necessary. You do not need to spread the cut over a larger area, as NO BEAM WILL MAKE IT TO THE LASER HEAD, if the power meter is used as designed. You place it in the path of ther beam in front of the 2nd mirror. Then fire thew laser for the 16.3 seconds. The head does not come into play, you do not care where it is going, all you need to make sure of is that the unfocused beam is hitting the black part of the meter for the required time. Hopefully I have explained it better this time.
I don’t really disagree with what you’re saying, as far as it goes, but I think there’s more to measuring the power output along the optical path than you’re saying There can be losses all along that optical path.
The first place to measure laser output is between the laser tube and mirror 1. That gives you the laser’s power output baseline
Then you measure the power after mirror 1, that gives you the loss-factor for mirror 1.
Then you measure the power after mirror 2, that gives you the loss factor for mirror 2
Then you measure the power after mirror 3 without the lens assembly attached, which gives you the loss factor for mirror 3
Then you measure the power after the focus lens, which gives you the loss factor for the lens assembly.
The first four of these, I agree you don’t care what the form of the output is, as long as it’s running for 16.3 (in my case) seconds, because you’re just holding the sensor-block in the path of the laser beam. The last one you do indeed care, because the path should be completely contained within the centroid of the sensor block (assuming that’s where the sensor is located) for best results.
Any and all of the above 5 can be significant losses (especially including the lens assembly because of the aperture, the full-width-half-maximum rating of the laser tube, and the cross-section of interaction of the laser itself at the 3rd mirror). Knowing where the loss occurs is critical to fixing it.
If you have a CAD system you should be able to create a line with the targeted length pretty easily in several types of geometry. If you don’t I might be able to create one and send you a DXF to run.
Circumference of a circle: C = 2Pir and the length of your C based on time would be based on your cutting speed setting: mm/s * 16.3s. So, the equation becomes:
mm/s * 16.3s = 2 * Pi * r
solving for the r(adius) of the circle based on any mm/s speed you set:
r = ( mm/s * 16.3s ) / (2 * pi )
That should give you the radius of the circle you can use to spread out the laser heat.
But as was stated earlier, if the design of the tool requires an unfocused point heat and then a delay before reading then they take into consideration the heat dissipation of the dark material.