This puzzles has one caveat to be taken care of at this time, working on it.
Omtech 60W/50W Speed 20mm/sec, Max and minimum power set at 35% two passes.
The ply had a slight rise in the very middle. I am using an American Photonics D20mm, 63.8mm lens in their lens tube for this size that will fit the Omtech specifications. I have a set-up that catches the puzzle pieces which I will show photos of in a later post. In the ramp test there is an area of at least 3-4mm change in height of nozzle from substrate with a cut that is the same. My “corrupted” mind tells me if I set the height in the middle of that, normal procedure, I should get a complete through cut if there is a “bump” in the plywood of no more than 1.5mm. Does that make sense?
Ramp test shows the nozzle height to be 10.5mm. The Photonics nozzle is shaped as an oval at the end. I tried half that distance, none in between yet, it cuts with a very wide kerf on the backside of puzzle leaving more smoke residue than I want. This puzzle was cut with nozzle at 10mm, absolutely no residue on the face of the puzzle which I face down in the laser, and very little on the top bare wood with no sealer finish applied. I sprayed the photo with preservation spray from Germany. The cut in the exact middle of the vertical across the width did not cut completely through, just little spots making it impossible to separate the pieces. Speed 20mm/sec, Max power 35%, Min power 35% two passes. Tried one pass with several speed and power settings, none of them cut all the way through unless I increased power and then the kerf on the top was way too big and dirty. Air assist at 20psi.
I can get almost every slab I have cut from my 5mm ply flat with my water application onto the back side. I allow the water spray to dissipate for 10 or 15 minutes before cutting. You can watch it flatten. I have a feeling that when I cut a large puzzle, unless I really soak it, the moisture will leave the ply before it is completely cut allowing it to deform although very small amount. I have tried gluing a piece of paper/photo paper onto the back side…Problem with that? If it doesn’t stay flat you can’t do much about it with both sides covered with photo paper or similar.There may not be all that many folks on the forum cutting or wanting to cut jig saw puzzles with a laser.
Any help or ideas greatly appreciated.
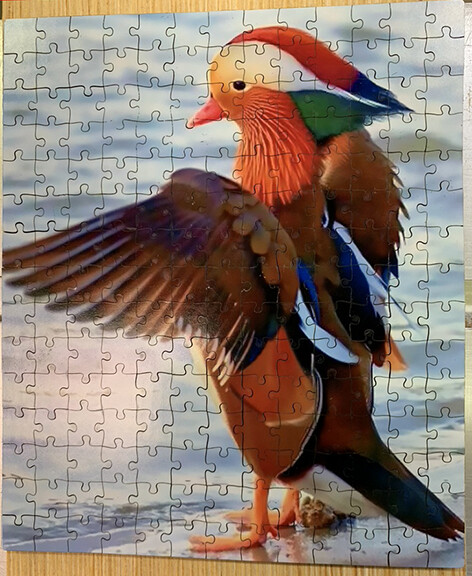
BTW: The pieces in this puzzle measure 1/2" x 1/2" or 13mm.
Looks really great. Love the colors
I assume you don’t ‘set’ a kerf on the layer.
What is the kerf on that 1.5"?
How snug do the parts fit?
–
Have you measured your lasers power with a meter?
I have a Mahoney and a ‘dohickey’, mine measures right at 44 watts. Or I should say it measure 22 watts at 50% power.

I have an OMTech 50 watt. I do puzzles also. ! glue inkjet printed photos onto photo mountboard from Amazon. I use 3M permanent spray glue and weigh the inkjet printed puzzle to the mountboard under the weight of a piece of granite tile 12x18. I do one pass at around 65 power and 60 speed, at medium air-assist pressure. I made a bed with spikes [also from Amazon] that people use in leather designs screwed through a sheet of aluminum from Lowes. I create bridges across rows and columns so that none of the puzzle pieces fall through and get burnt again. If you need specifics on anything I can add them later. I get a very little brown mess on the back. Just in some spots where a cut just happened to be on top of one of the spikes.
If unevenness is a big problem you could divide your puzzle into 2 or more parts. Let’s say you start with the first half while you have strong magnets in the bottom half to hold the plywood down with. At some point, you pause your job, remove the magnets, and start again. Of course, do not move the puzzle itself.
Kerf from a 2.5 “lens is slightly larger than a 2”, but the cut should be very straight over a reasonably long distance.
When I looked for my ammeter the other day, couldn’t find it. I haven’t had it connected to the laser.
Haven’t set a kerf, one of the things I was thinking about. Suggestion as to possible setting?
I am using a 2.5" Jack. Parts are snug on the front as in , if they were any tighter I couldn’t get them apart. Top side of ply has a wider kerf than I would like. If the top side kerf was made narrower I may not get the pieces apart.
Patrick,
I am not quite ready to crank up my speed as fast as you are. I realize it is a situation concerning economics. I don’t have the money for a chiller at this time. If I used your power setting for any length of time I would need to use a fire extinguisher on my container of water. LOL
I have 1/4" hardware cloth on my aluminum bars in the laser. The pieces fall onto the mesh about 3/8" below my system of supporting the substrate. With the mesh I have “0” residue on the photo side and very small amount on the “naked” top.
Bernd,
I have an idea I am going to try tomorrow for leveling the substrate once I have it on the laser bed.
Side cut has no angle with this lens and associated lens tube. My edges are half as dark as they were before this lens. Still too dark for me. I will fiddle with the speed and power. At my present settings I am getting a reading of 11mA on the meter in the machine which I can see from my computer.
I am getting close. The wire mesh has been a great add on. No flyback of the smoke or anything. I am running the laser with the cleanup door or the slide through door open. When I open the cover I seldom have any smoke in the cabinet.
I will get some pics of the set up I have when I get a minute. We have ice and maybe six inches of snow by tomorrow afternoon. That is a lot for us.
THANK you guys, for your input. Very much appreciated.
I do a lot of puzzles, and the best media for the base of the puzzles that I use is Dry Erase Board, 0.118 thick. Cuts like butter, stays flat, and easy to cleanup. ( Probably similar to masonite. )
Paul, where do you buy this economically? Do you have links for suppliers? Thanks!
I’m in the states, I buy this at Lowes. Fairly cheap.
Similar to 23.85-in W x 35.85-in H Dry Erase Board in the Dry Erase & Bulletin Boards department at Lowes.com
My 5mm plywood from Lowe’s is presently $26.00 per 4 x 8 foot sheet.
The erase board would in reality cost over $36
I agree with your statement. But, the quality of the cut on the erase board is far superior to plywood. The cut looks more like a commercial product. If you are selling the puzzles, then that is a big selling point, and you can embed the cost into the product. If you don’t, then price is certainly a mitigating factor.
Paul,
We used to make some products that used dry erase board.
I was curious as to what it is actually made of.
Masonite- possibly untempered since it cuts easier and with less nasty dust.
The material you bought is MDF core with white paint applied to both sides, that is why it lays more flat than plywood. If your material has a gloss finish there is a clear product applied in two coats to both sides which is a Polyurethane.
MSDS paper says: 100 g/L VOC
It seems the white coating on this board is actually Melamine. Think I read some notes on reasons for not using melamine, not sure though.
Further clarification of what I am wanting to accomplish.
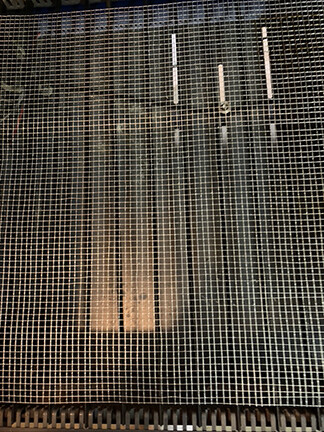

Top photo is my hardware cloth screen/mesh to catch the puzzle pieces as they are cut out.
Second photo is a portion of one of the strips with fender washers that my magnets attach to hold substrate level. Ply rests in the rabbit cut in the wood, magnets clamp onto washers which are glued in thus holding the plywood. I have the wood machined so the letters free fall onto the screen little more distance than the thickness of the substrate.
I have the cut program adjusted so the vertical cuts are done first, then left to right, lastly the circumference. No pieces are cut twice and they fall away from the laser beam.
Also: I don’t want my puzzles to look like commercially manufactured product. We like the look of the edge of plywood which has 99% solid internal veneer. Three ply plantation grown veneers in plywood. The support strips with the washers are of several different lengths. Two that are as long as my laser bed is wide and several other lengths to accommodate different widths of puzzles.
I have two pieces of the screen cut to fit the laser bed and allow it to be removed through the passthrough door. One is being cleaned and allowed to dry while the other is in the machine. I get very little residue on the screen. Surface of the puzzle, being the photo side, never touches the screen until the pieces are completely cut. I don’t slide the pieces off the screen. Screen slides out onto a heavy cardboard slab. I take the screen with the puzzle to a work table, lay another piece of heavy cardboard over the puzzle and turn it over. Photo side has no residue, flip side has very little to none.