Hi all,
Wondering if anyone has figured out a way to force Kerf outwards/inwards? I often nest multiple object inside each other which I am trying to apply Kerf adjustments to. Would this be the correct way to force the correct Kerf adjustments or is there a better way.
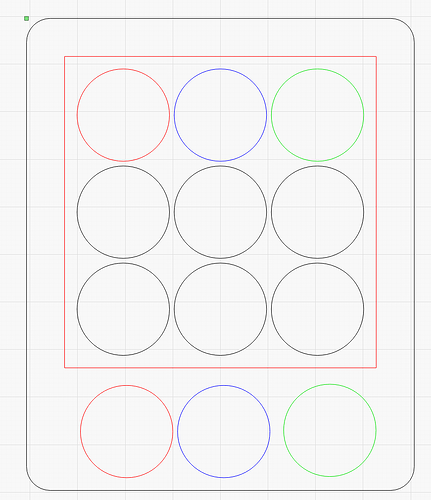
I have tried to create a separate layers in order to try force this: (No Kerf - Black, Out 0.07mm - Blue, In 0.07mm - Red, Out 0.07mm - Green) - To help understand what this is - Its an example of the 10 penny puzzle (circles are pennies and the square is the frame, so both need to be 100% accurate).
I need to set both the square line and the circles to have kerf offset outwards:
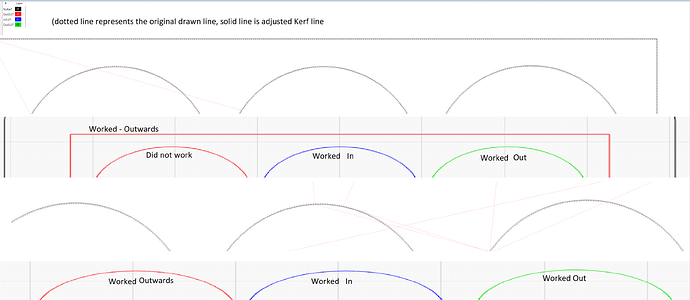
From my tests I observe the following:
- If you keep objects on separate layers you can force the offset inwards or outwards
- the Red layer did not work because the circle was within the square and therefor Lightburn automatically push the circle to be an inwards adjustment because it assumed in side of the circle was the waste object.
I think the issue is that the default behavior of assuming that an outwards Kerf adjustment in nested objects needs to go in opposite directions should not be a universal assumption. Personally if I set something as outwards I would expect it to always go on the outside of the line (it works in the Doughnut example in the user guide), and for box joints but nowhere else when trying to optimise design.
@LightBurn I know this topic has been discussed numerous times before and not trying to burden you but is there any work planned on the Kerf tools in Lightburn? A couple on the wishlist:
- Have a setting that turns off the automatic logic going in lightburn, so that if I set out its always on the outside of the selected object
- Having a way to preview the lines from kerf adjustment in the standard view.
Look forward to hearing how everyone is dealing with kerf adjustments.

