Let me take a couple and explain what’s going on.
The led module has power/ground and a pwm input. Power and ground should be obvious, the pwm only tells it when to lase. A ssl (diode laser) is only on or off, there is no 50% power, just like an led. The power on these is really power/time, so to get 50% power, the ssl is turned on for 1/2 the time and remains off for the other 50% of time. We call this 50% power… however, it’s 50% power only over a time period. PWM is not frequency, voltage or power dependent… It’s only on time related to it’s off time.
The laser module is simple, it’s got power and it’s got the controlling pwm signal…
Although I agree with @misken I’d first check, that the pwm is connected to the proper pin. This is the most common mistake. If the hardware isn’t correctly connected, it will never work properly.
The $30 variable is actually called the S-Value max, same as Spindle Max speed and is used to determine you’re maximum spindle speed and $31 is the Spindle Min speed and should be zero, since the you want laser off during transitional moves. 1 will only deliver 1/1000 power, but it should be 0.
Although many tell you to enter these commands via the terminal, I prefer to use Lightburns’ Edit → Machine Settings. I don’t have to remember numbers, you can read it in your native language.

With a spindle you don’t just move it to a new location when running, you move the spindle up via the Z axes so it clears the work, then move it. So there is no need to turn the spindle off between moves. The $32 variable tells the controller it’s now working with a laser, so it can turn the laser off between moves. Some older versions of grbl do not have a laser mode. I think it appeared on versions above 1.0
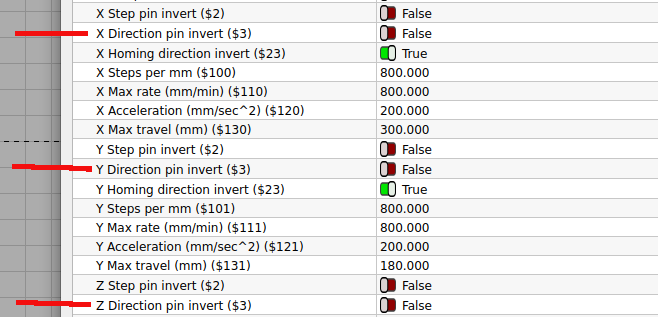
These are controller values. To work with a particular piece of software these values need to be the set the same for the controller as well as the software. Much like if Lightburn is set for inches and your machine expects mm, Lightburn will send the number of units, not the unit of measurement, inches or mm.
The screenshot of the machine setting come from my little cnc, it’s not a laser, this is why $32 is false. If it’s an Arduino based machine, it’s likely an 8bit machine. It might limit your setting of $32 to 255. If you can read the proper value back, you should be ok.
A 255 value means you have 256 steps available for selecting power out. Some of these controllers are now 16bit and the pwm is controllable over a >65,500 step range. I’ve yet to see anything produced on a laser that is even 256 shades of gray, let alone 65k+, so I think the 16bit machine in this relation is rather academic.
At this point, if the hardware is setup correctly and it isn’t working correctly you can follow @misken lead of breaking out the voltmeter and check the pwm output voltages.
If you’re running the power to the laser from the Arduino board, that’s likely an issue as most of these don’t allow much power through the power line to the laser.
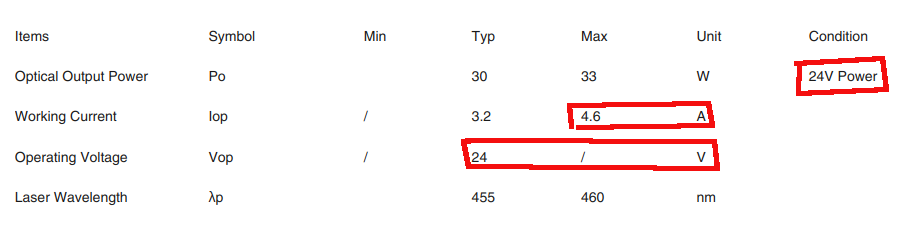
The laser module you have is a 24V model, are you supplying that voltage to the laser through the Arduino? The current draw of this module is about 110W peak. You would likely need to run a separate supply line from the power supply to the laser module so it can have it’s 4.6A supply it needs.
With other controller variables, you have to create a bit pattern to set them. The Lightburn gui eliminates these computations and handles it for you. For instance, this is for the $3 variable…
Lightburn Machine settings handle that manipulation without having to reference these useless details.
Make sense?
I’d plan on the laser module needing a supply 24V@5A then add current required for other items, such as the motors, lights or anything else drawing off the 24V supply.