Hello all, Thanks for accepting me to the forums. New user here and after some advice to get started on a project I am laser engraving text onto white acrylic painted black so the text shows as white. The panel is already cut to correct size & has a number of square & round holes for switches that are already cut out on the acrylic sheet so I don’t need the laser the cut outs or the edges of the panel. How do I get the edges of the panel on a separate layer so i can turn it on & off as I want to use the edges of panel to use the frame function to make sure I have the panel in the correct position to get the text to position in right place.I am using SVG files created from the models I created using Fushion 360. The panel is 145mm x 58mm so would I first create a 145 x 58 rectangle then import the SVG file and size it into that or just resize the SVG file directly. Also i have laser engraved this panel before using Laser GRBL which was ok but I could only get it to engrave the outlines of the text leaving the middle of letters black. How do I get the laser to engrave the entire letter. My machine is a 3018 CNC router using a 2.5W Diode laser. Sorry for being so long winded on my first post but loving this new activity and have many question.
Hi Martin, any chance you could upload a screenshot of the project and ‘cuts/layers’ settings.
It makes it a lot easier to help you… 
Welcome!
I am a novice as well but I think I might have some suggestions to start. A YouTube video probably shows this in 1/10th the time it will take you to read my ramblings, but here goes!
To engrave the whole letter, switch the mode in your cut list from “line” to “fill” for those letters. Don’t do that on any framing rectangle or you will be removing all your black paint 
For the “frame” you have options. Since you likely already have the outline created in Lightburn, you can do one of two things:
make sure you have set up the “fire” button correctly (youtube if unsure how to do this): enabled the option in setting and set the power to something like 1%
A) hold “shift” and press “frame” to see the outline of your work area with the laser firing at the “fire” power. Once the alignment looks good, select each component you want to “skip” burning/cutting/engraving and switch their layer “output” off (from green to gray) in your cut list. If everything is the same layer, and you need some on, some off, consider grouping items and setting those to a new layer (select item, click a new layer color at the bottom of the screen) to make this easier.
B) you can also use the ‘tool’ layers in lightburn for project outlines. For me, there are T1 and T2 far to the right end of my layer list at the bottom of the screen - orange and blue I believe. These layers have no “fire” output when running a job, but are useful in making sure your project stays inside a desired shape.
In general, selecting whatever grouping of items you want and setting them to the same layer (from any of the 26 at the bottom of lightburn’s main screen) will allow you to check the alignment.
The “shift + frame” option should work nicely for you to align the entire piece though. Just make sure you set the “fire” power to 1%-ish so you still see it but it doesn’t actually mark your work 
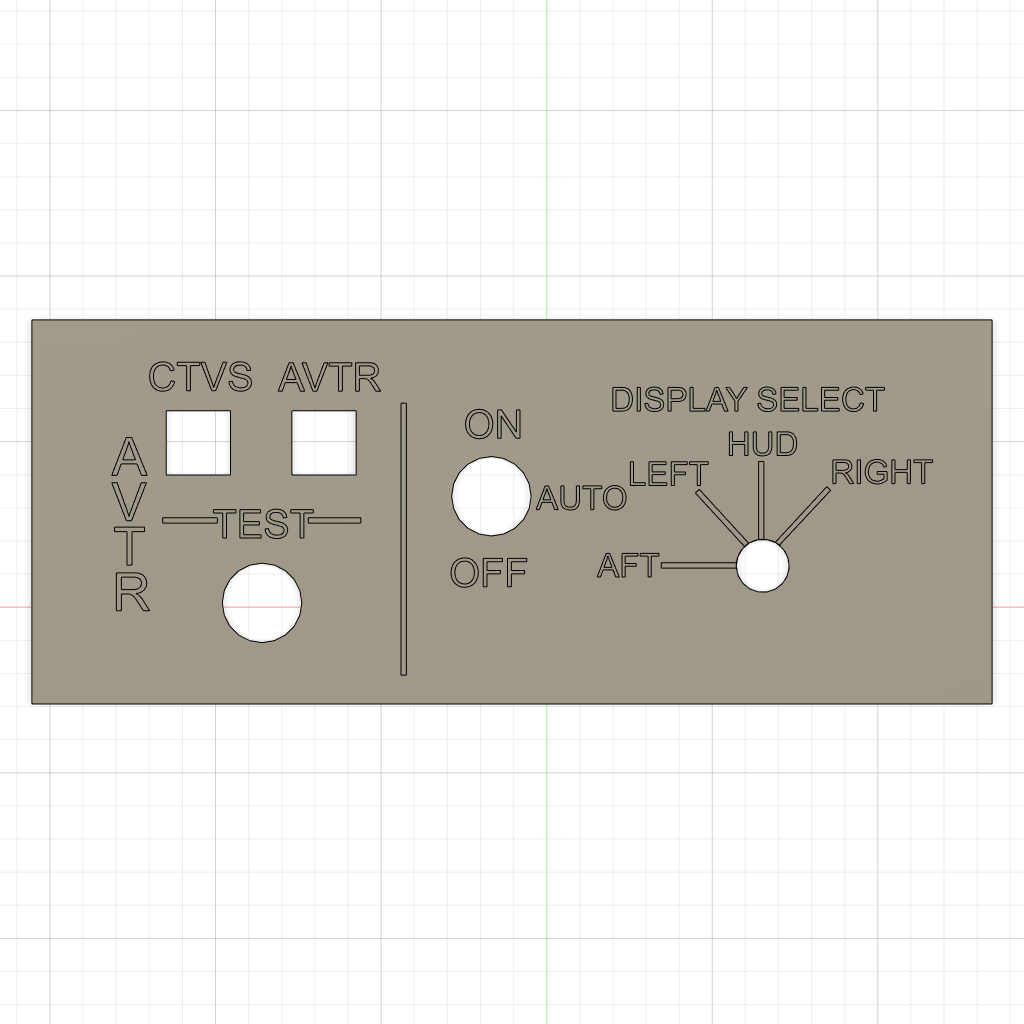
Hi Chris, have included a PNG of the panel. As to layers that’s what I’m trying to work out how to assign certain parts of the panel so i can turn them off or on. For instance do I assign the outline of the panel to 1 layer then the text to another so I can turn the text layer off then at low power engrave an outline of the edge so I can place the acrylic panel within that engraved outline so when I then turn the outline layer off then turn the text layer on to engrave the text in the correct position. Does that sound right to you?
Tim thank you so much for that, very helpful m8. The panel I am starting with is 145mm x 58mm so do I just import the SVG file and make sure it is sized at 145 x 58 or create a work space that dimension and import into that. Again many thanks.
Hi again Martin, it sounds right but just in case, select all the text and put as ‘black layer’, the ‘outline as red layer’, the ‘cut outs as blue’ (just examples) no need to turn off anything as you can assign speed/power to each layer.
Is the panel itself already cut? If not then leave that as another layer but leave as the last layer.
let me know if that sounds ok.
Thanks Kris, Yes the panel & switch cutouts are already done which is why i need to be able to position the panel so all the text & lines are engraved as shown around the switch cutouts. Am days off now so will give it a burn & see how It goes. Thanks for the tips, Cheers
This topic was automatically closed 30 days after the last reply. New replies are no longer allowed.