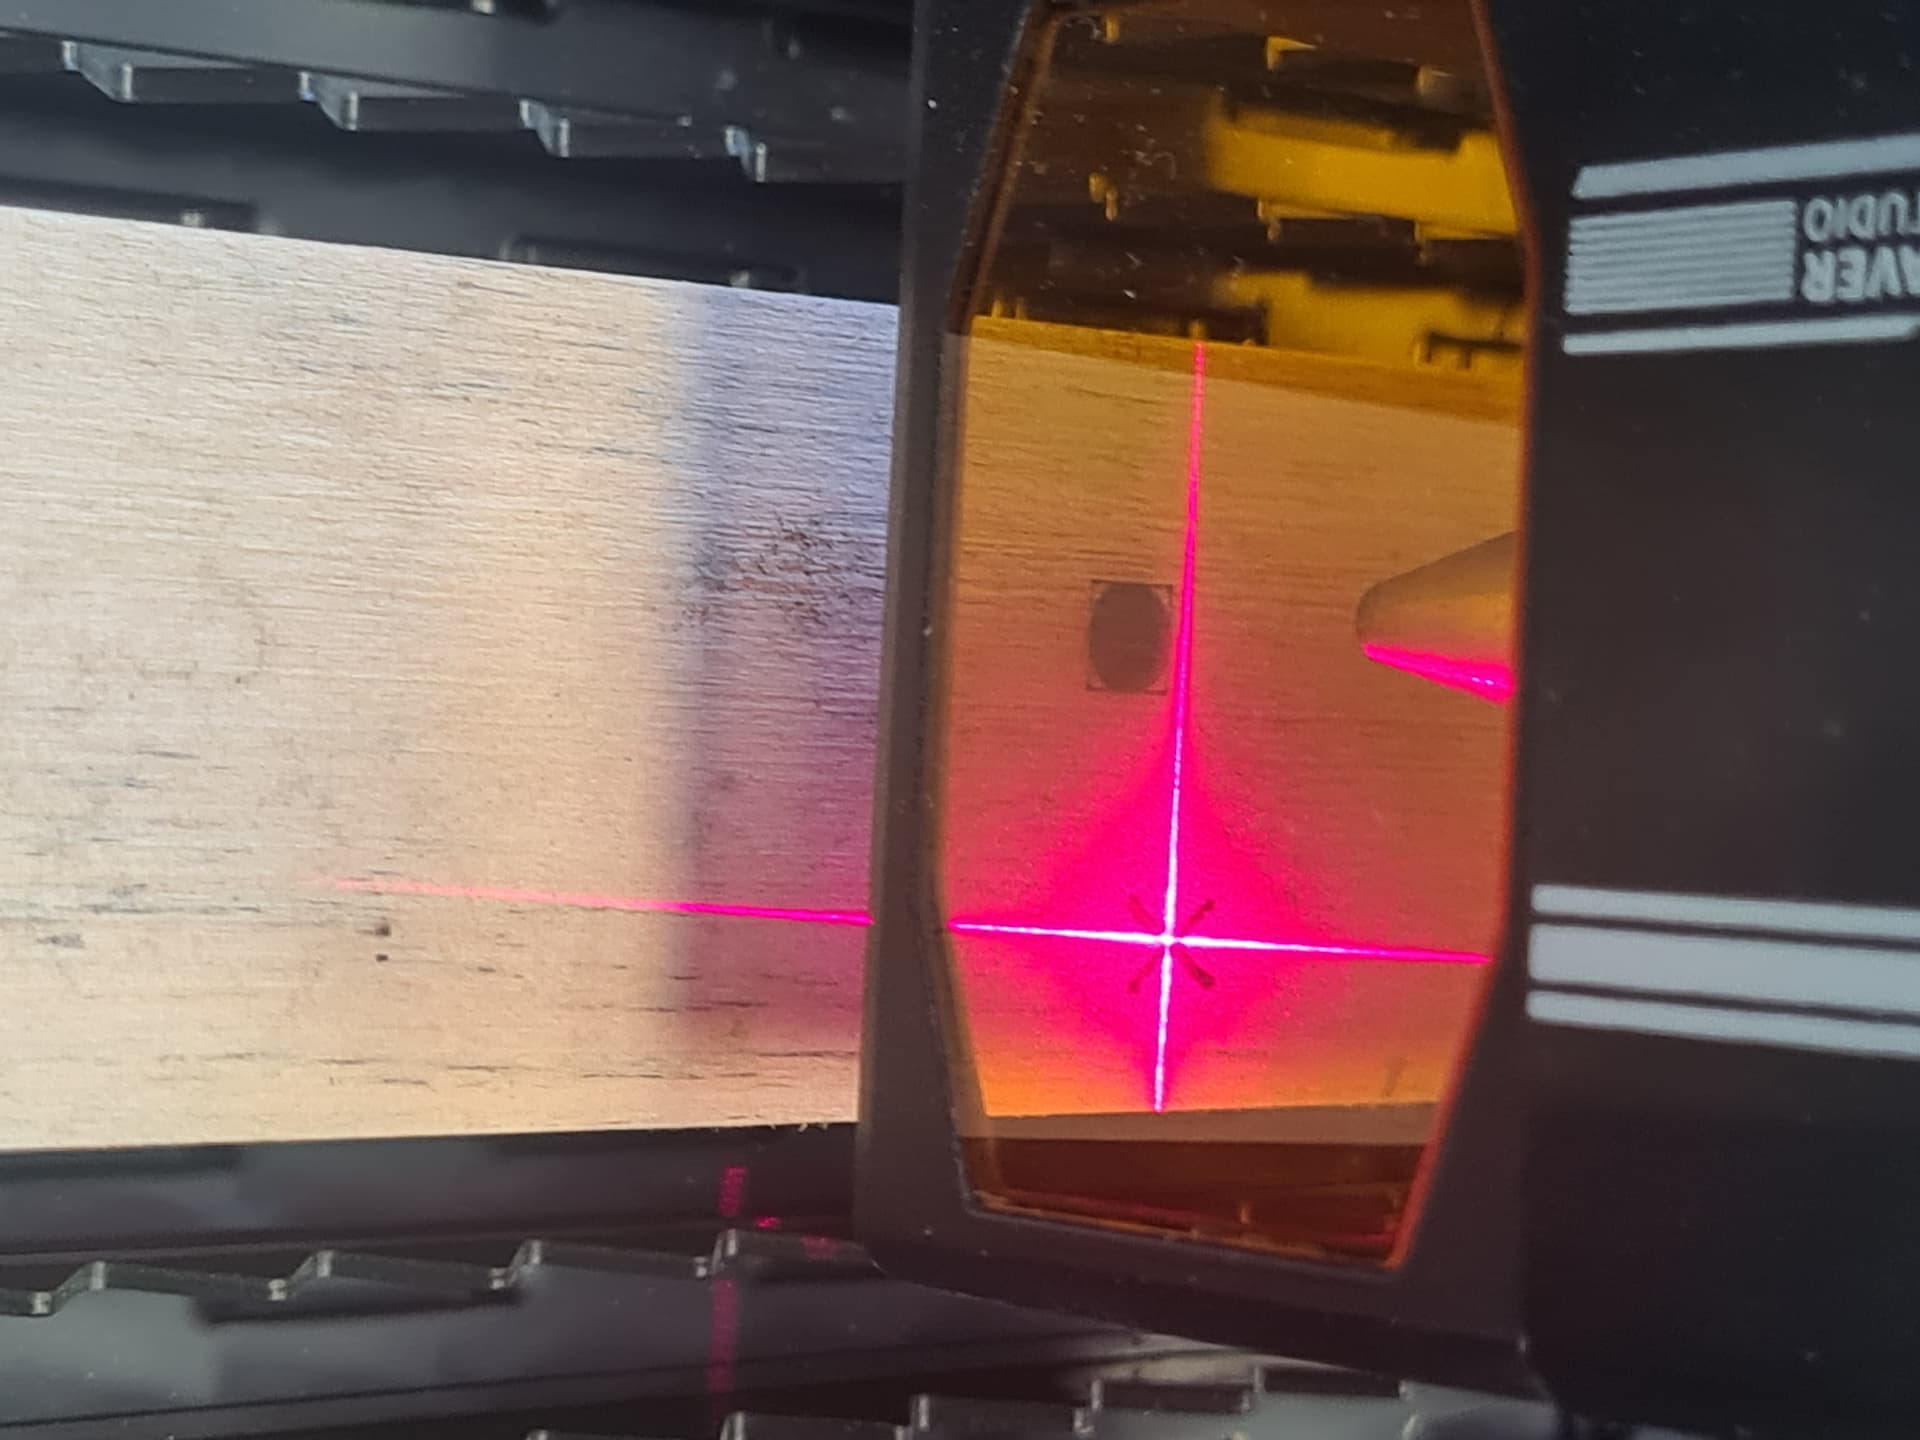
I am new to laser engraving. I bought Atomstack A70 MAX and I use Lightburn to engrave. I have a question and I would be really happy if anyone can help me with the issue. As you can see in the picture attached, my crosshair and laser are at different position, like 2cm apart from each other. When it starts engraving, laser doesnt start from crosshair but from the position which is 2cm far from crosshair. How to align laser and crosshair? Is it somewhere in the settings of Lightburn? Thank you very much in advance.
But this should be included in the documentation of the device as well, including the exact values you should put in.
Be aware that using the crosshair will reduce the effective workspace.
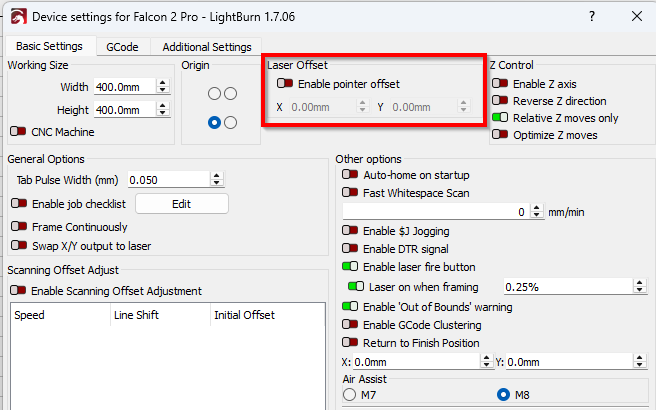
I have an Atomstack A70 Pro and here are the settings I used for the Laser Offset. Since the laser head is the same on the Pro and the Max these settings should be the same or pretty close. Try these setting and then make any adjustments as necessary.
Enable the Laser Offset
X = 19.00 mm
Y = 3.00 mm
And I don’t know why as mentioned above that using the crosshairs would reduce the effective workspace. Even if it does it would only be a few mm’s
To get your exact values fire the laser and burn a small mark on a piece of wood. Then without moving the laser head measure the X and Y offset between the burn spot and the cross hairs and use those values when setting the laser offset.
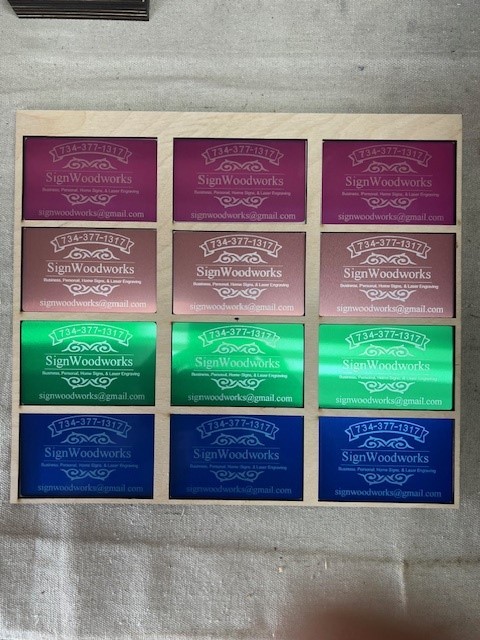
Then run a test. Make a box like 150mm x 150mm. Use Frame and Line up the box on your work piece using the Cross Hairs. Use a pencil to mark the outline of the frame on your work piece. Then burn the box on your work piece. If it does not burn at the correct position make adjustments to the X and Y offset as necessary.
From your picture it looks like your X axis offset is pretty close but the Y axis is off quite a bit. So the settings for your machine may be different from what i gave you
Sure, it’s not much. It’s precisely the values you set there. The x-axis is now 19mm shorter and the Y-axis 3mm. That’s because LB needs to frame there first, and then move the beam there. Imagine your crosshair is sitting on the top-right corner of your laser head. If you want to frame at the physical 0,0-position; it can’t do that, it will start at the 0,0 position of the crosshair (which is +19 on x and +3 on y), and move the laser head to that position afterward. So the new 0,0 position of your workspace is 19,3 in world coordinates).
But for most users and in most cases it doesn’t really matter
Here’s another explanation of how to Set Laser Pointer Offset:
Steps to Set Laser Offset:
Enable Pointer Offset:
Navigate to Device Settings in LightBurn, then locate the Laser Offset section. Ensure Enable Pointer Offset is disabled initially.
Prepare Your Workspace:
Load a piece of inexpensive material (like scrap wood or cardboard) into your laser’s bed.
Import a Test Pattern:
Import a simple design, like a square or crosshair, into LightBurn.
Set Layer to Line Mode:
Ensure the layer containing your test pattern is set to Line mode (as opposed to Fill or Raster).
Align Red Dot to Pattern:
Jog your laser to position the red dot pointer over the center of your imported pattern.
Measure the Offset:
If the red dot is not perfectly aligned with the intended laser cutting/engraving point, you’ll need to measure the offset. Mark the laser beam’s actual position on the material (you can use a pen or marker) and measure the distance between the red dot’s position and the mark.
Enter Offset Values:
In the Laser Offset section of Device Settings, enter the measured offset values in the X and Y fields.
Enable Pointer Offset:
Toggle Enable Pointer Offset to on.
Test the Offset:
Run your test pattern again to verify the laser beam now aligns with the red dot pointer.
As the previous posters adressed the frustrating (to me anyway) offset feature always associated with inbuilt laser pointers/crosshairs in budget hobby diode lasers, I’ll concentrate on the question I think the original poster really intended to ask.
Aligning the optical axes of the laser beam and the crosshairs is unfortunately impossible on these hobby diode laser heads with inbuilt cosshair leds.
There is a workaround though, but it involves a bit of knowledge about the cirquitry of the olriginal crosshairs, two line laser units, and a bit of tinkering.
The line lasers are installed along the X & Y axes on the laser head, the driver circuitry of the original crosshair led is moved to drive the line lasers, and the point those lines cross is adjusted to the laser optical axis.
That way the position stays always the aligned, regardless of the Z position (focus).
Any tinkering with the laser heads cirquitry will obviously void the warranty, so less invasive method to trigger the line lasers could be a LDR-transistor switch in front of the original crosshairs.
There is a mention about such an arrangement somewhere on these forums, but unfortunately I can’t find it ATM.
True, but he’s new on these forums, it’s been only one day, so lets give him a bit more time to respond.
He might be busy with the real side of life, or accustomed to the lack of fast responses on other such forums, or something else entirely .
Thank you all for help. I really appreciate it. I am deeply sorry for not responding earlier, but Ive been traveling for 2 days and didnt have time to test it. Today Im going to work on it, so I will post a feedback. Thank you very much again to you all!
It looks like the laser and crosshair are misaligned. Try enabling Laser Position in Lightburn and adjusting the Off set in settings. Use Find Home to recalibrate. Check the Atomstack manual for more details.
I disagree with the above. I think the crosshair adjustment is very simple and easy to do on Diode Lasers. If the Cross Hair points straight down, which mine does, I found it very accurate and does not need to be readjusted depending on the height of the Z axis. Not so with Cross Hair that go at an angle on some other lasers
Its working!!! As you recommended I enabled Laser Offset and did some tests. Now its perfectly aligned, X=17,2 Y=4 worked for me. Thank you very much guys, what a perfect forum full of nice people.
So my settings were pretty close. Good to know because a friend of mine just bought an A70 Max and we need to get it set up sometime this week . Glad you got it working
Well, I am not sure about the gentleman with whom you were sharing your knowledge, but you have been a plethora of help to me. I just got the Ikier Pro Max 70W today and had such a misallignment with the crosshare and the laser. Well, I am not sure about the gentleman with whom you were sharing your knowledge, but you have been a plethora of help to me. I just got the Ikier Pro Max 70W today and had such a misallignment with the crosshare and the laser. Frustration abounded and I was ready to kick it to the curb. Then I happened upon your suggestion for alligning it and voila’! She’s working like a charm. Thank you from the bottom of my heart for sharing your knowledge!
Glad I could help. I’ve never been called a plethora before.
Just to review my easy setup for Red X pointer
Disable Pointer Offset
Burn a small square like 150mm x 150mm onto a piece material
Enable Pointer Offset and plug in some numbers for X and Y. (Like X=17 Y=4)
Use the Red X pointer and position (Jog) it over the bottom left corner of the square you just cut
Burn the square again.
The square should burn exactly over the first square you did.
If it doesn’t, adjust X Y settings as needed and repeat until your happy.
You can also turn on the red pointer and blue beam (at low power) and measure the X Y offset with a ruler to get you started. Then try the test above again. This should get you close on the first try.
Here’s some other instruction i wrote you may find useful at some point.
Download the files then change the extension from .txt to .pdf