As of last week, my laser is no longer firing unless the default switch is toggled on. I know something changed but, I am not sure what and I have not idea what would cause this to even check. I have the most updated version, 2.0.05. I have tried researching what the problem could be but I am only getting information on diode lasers or much earlier versions of lightburn. For reference, I have an OmTech 100W Laser. I have not updated my software or computer in months. I switched out my lens several weeks ago. But, everything was running beautifully up until last week. Other than that there have been no changes. Help! I am fresh out of ideas!
More information will be helpful.
Which switch is the Default switch? Is it on the laser or in LightBurn? If the latter, a screenshot will be helpful.
Does pushing the manual fire button (generally labeled Pulse) on the machine’s display produce a pulse from the laser?
Does the machine go through the motions of running a LightBurn job, but without firing the laser? Or does it do nothing at all?
2 Likes
Sorry, I should have included photos… it is in light burn. As long as it’s selected, everything cuts. But, it blurs out the power. If I unselect the default, it will run through the project, it just doesn’t fire the laser.
Hi @Jayme0811
By using the Default toggle, you’re likely asking LightBurn to use universal defaults, which in this case probably have sufficient power or speed set to run your project. If you have not setup your own defaults that is.
We have a guide to using default layers here, it even has a video.
1 Like
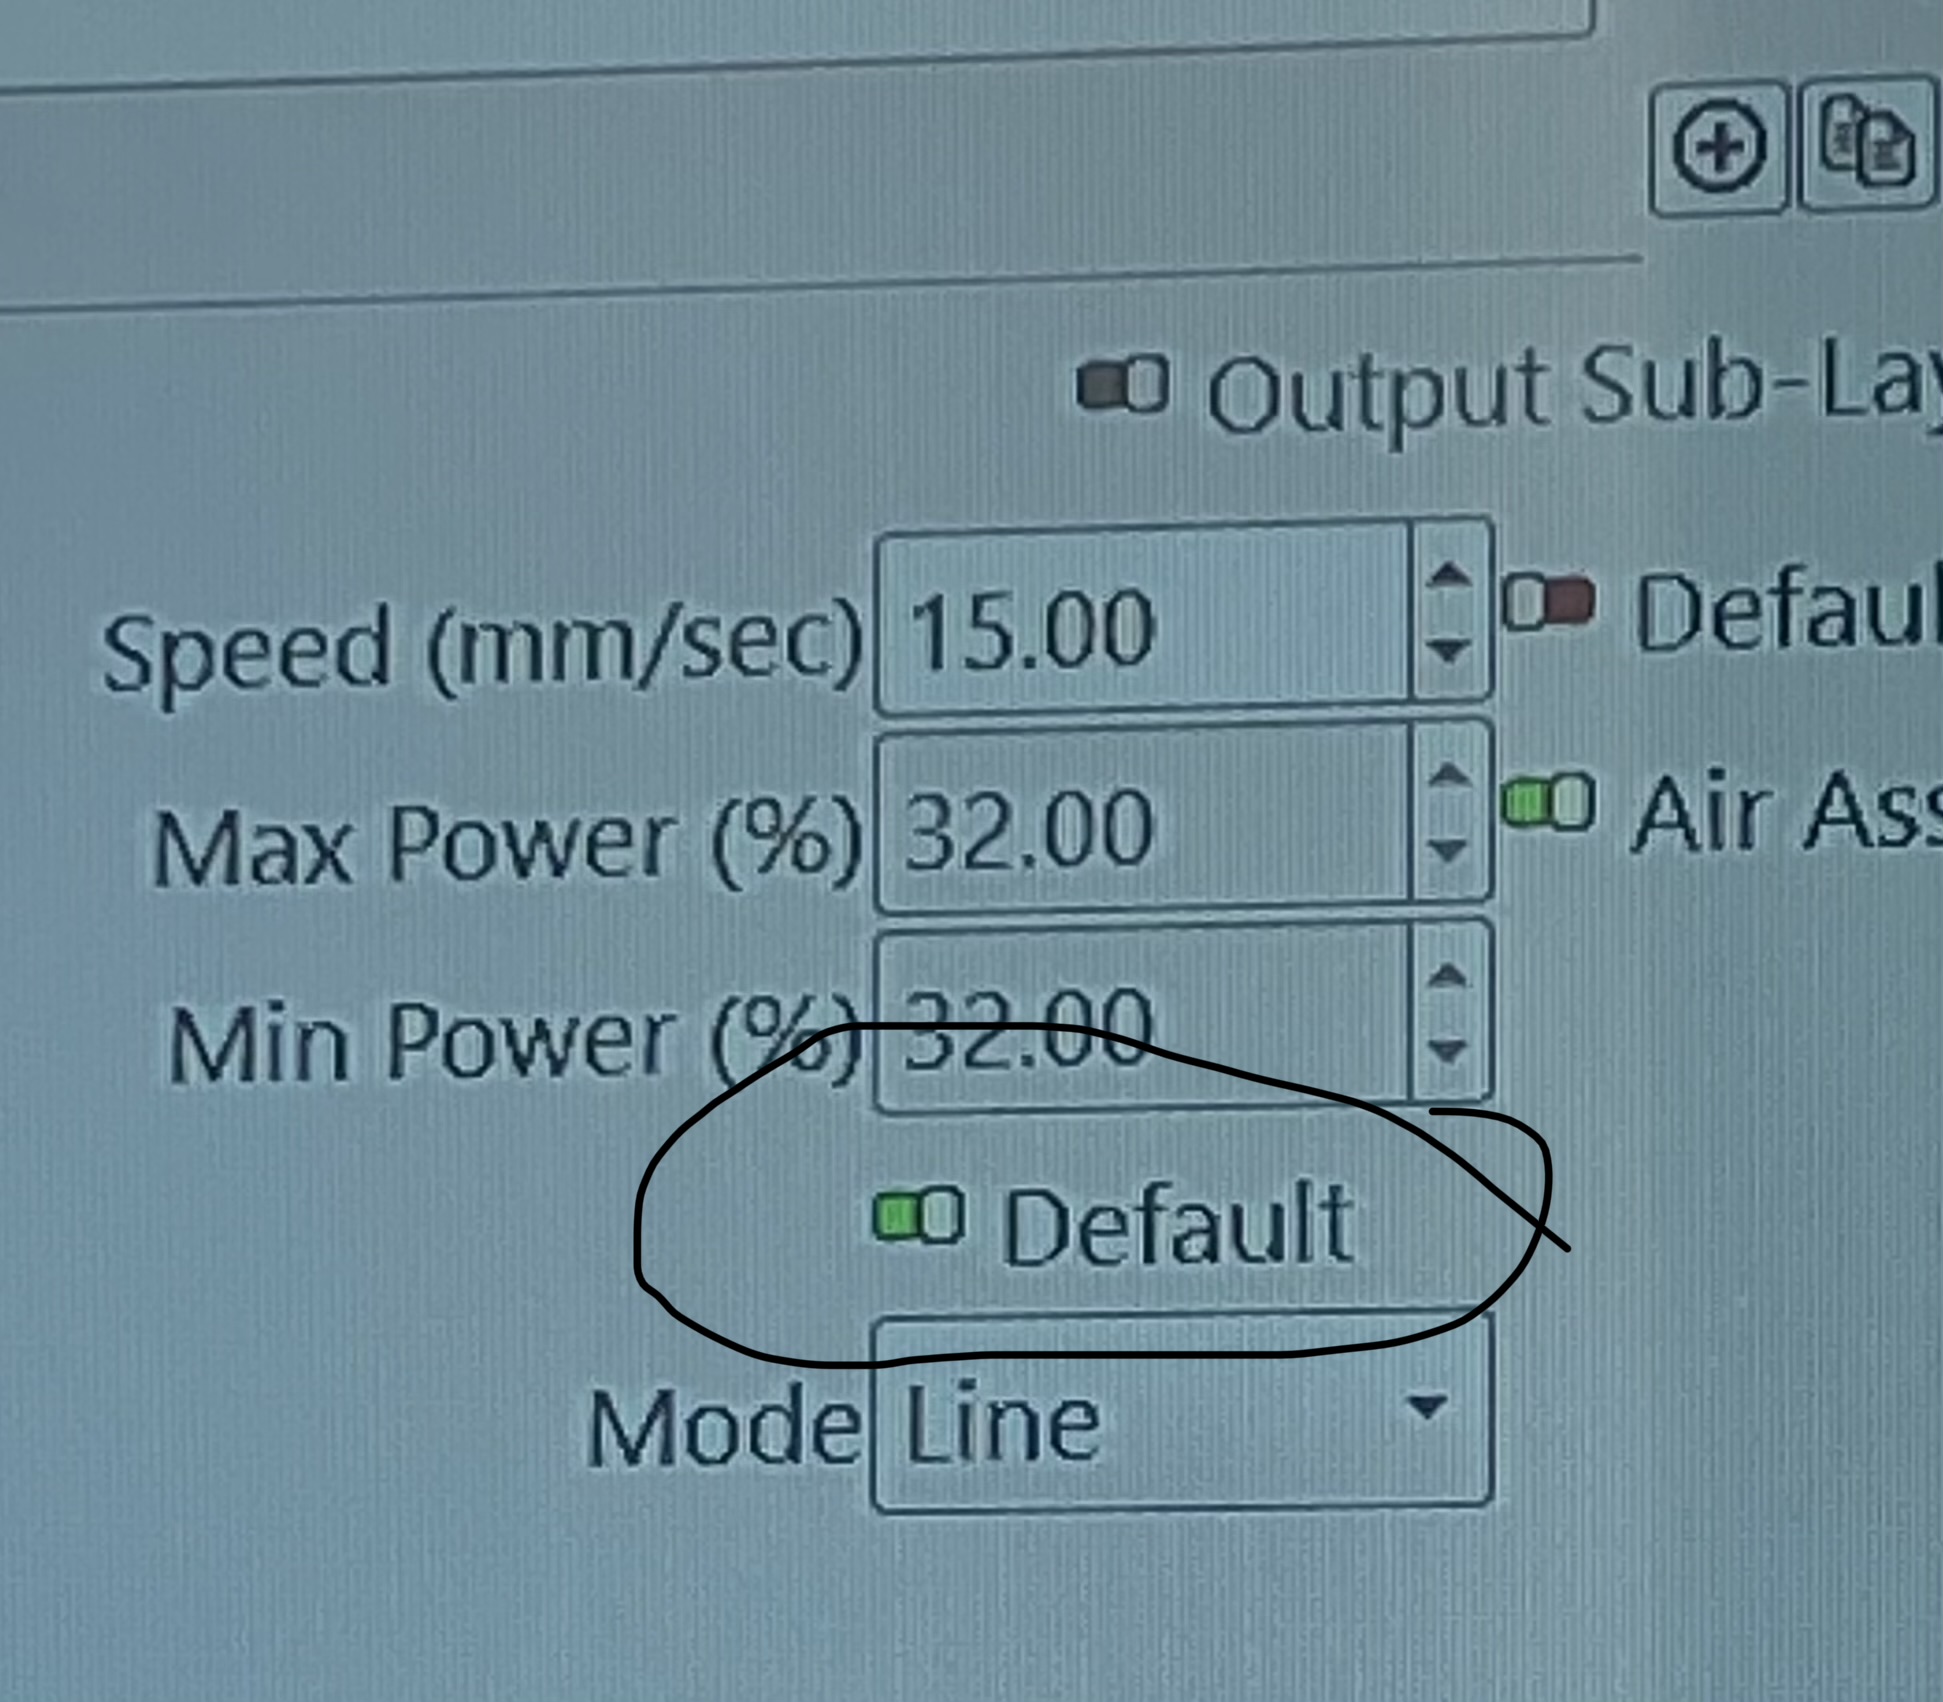
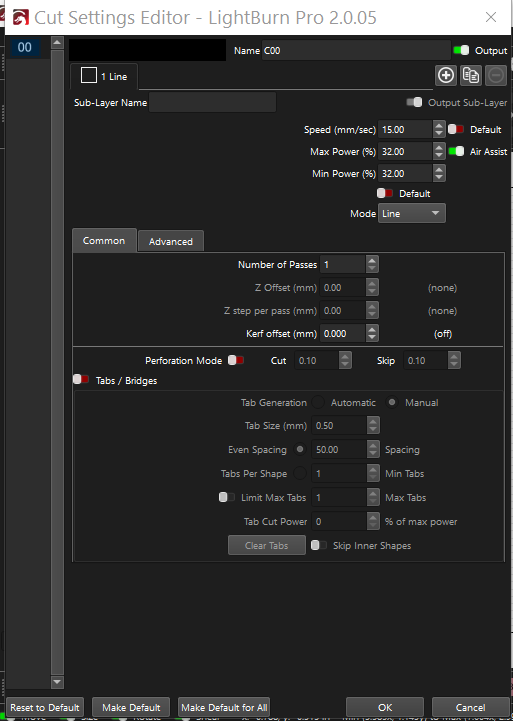
This is one of those little UI glitches:
- The
Defaultswitch forSpeedis immediately to the right of the numeric field - The
Defaultswitch forPoweris directly below theMin Powernumeric field
The tooltips correctly identify the switch functions, but their different locations imply they do different things.
The overall window isn’t resizeable, so it’s a deliberate layout choice.
Maybe have a UI tweakist move the Power switch up-and-over for consistency with the Speed switch?
2 Likes
I will have another look at that and make suggestions accordingly.
Thank you for this video! I did follow it, but it still has not fixed the issue.
The laser continues to only fire if i have one of the default switches (Power or Speed) toggled on. For the past two years that I have used my laser and lightburn, I have never had to toggle this switch on and have been able to use both the speed and power necessary to cut or engrave my material. If I have the default on, it cuts through, albeit, a little chared. But, If I engrave with the default on, it burns too much. I tried to upload a video so you can see what I am talking about. but it won’t upload. I don’t know if pictures would be helpful, but if you think they might, I am happy to try and upload pictures instead.
I appreciate you taking the time to help me! But, I am unsure of what you are recommending for me to do.
The laser continues to only fire if i have one of the default switches (Power or Speed) toggled on. For the past two years that I have used my laser and lightburn, I have never had to toggle this switch on and have been able to use both the speed and power necessary to cut or engrave my material. If I have the default on, it cuts through, albeit, a little charred. But, If I engrave with the default on, it burns too much. I tried to upload a video so you can see what I am talking about. but it won’t upload. I don’t know if pictures would be helpful, but if you think they might, I am happy to try and upload pictures instead.
Upload the lbrn2 file so we can pore over the settings.
Is this what you mean? I’m sorry, I am so not tech savvy. Up until this, I haven’t had any issues with Lightburn. Everything has been so straight forward. But, this has thrown me completely off.
Those are helpful, but the LightBurn file has all the settings & designs in one place.
You can drag-n-drop the file from Windows File Explorer (or whatever Microsoft calls it now); the file will be wherever you usually save Lightburn designs using File → Save, with whatever name you gave it.
The best way to do that is upload it to Youtube or a cloud file storage provider like Dropbox, make sure it’s readable by everybody, then put its link in your reply here. Awkward, but apparently video files take up far more space than the forum can handle.
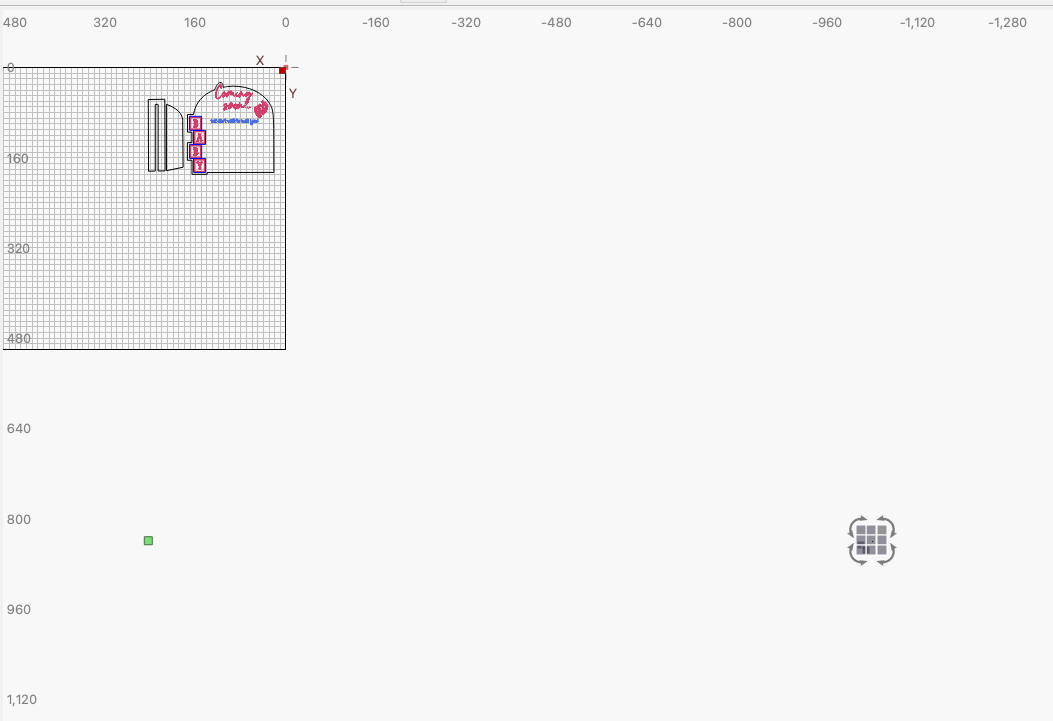
Baby - We can’t wait to meet you frame.lbrn2 (212.3 KB)
Like this? Ed, you are a saint! lol! I am so sorry this is so hard for me. I really appreciate your patience! Others have not been so friendly. (In other groups.)
Not sure if this will solve all your issues, but you have an errant shape way out in right field. See screenshot below.
Thank you! This was just the first file I grabbed; I’ve tried several different ones with the same outcome. But, I did remove the extra element at the bottom of the screen. Thanks so much for trying to help!
First time through is tough. After that, you know where the goblins hide … ![]()
There’s nothing obviously wrong with the file, so it’s likely two non-obvious settings interacting.
LightBurn’s Universal Default settings are:
- 100 mm/s
- 20% power
However, that doesn’t tell us what the defaults are for your setup.
Do this:
- Start a new file with
File → New - Draw a square of any convenient size
- Put it on layer
C00 - Repeat 2-3 for layers
C01,C19, andC20
Those squares will now have the default settings for those layers. Make a screenshot (please, not at cellphone photo) of the Cuts / Layers window showing all four layer settings and attach it to your reply so we can see what’s going on.
Start a new file, then run a Material Test to show how the machine behaves over a range of settings:
- Select the
CO2 - Engrave testpreset - Hit the
Edit Text Settingbutton, then:- Select
Fill(rather thanLine) - Set the speed to 200 mm/s
- Set the power to 10%
- Hit
OK
- Select
- Tweak the rest of the settings as shown
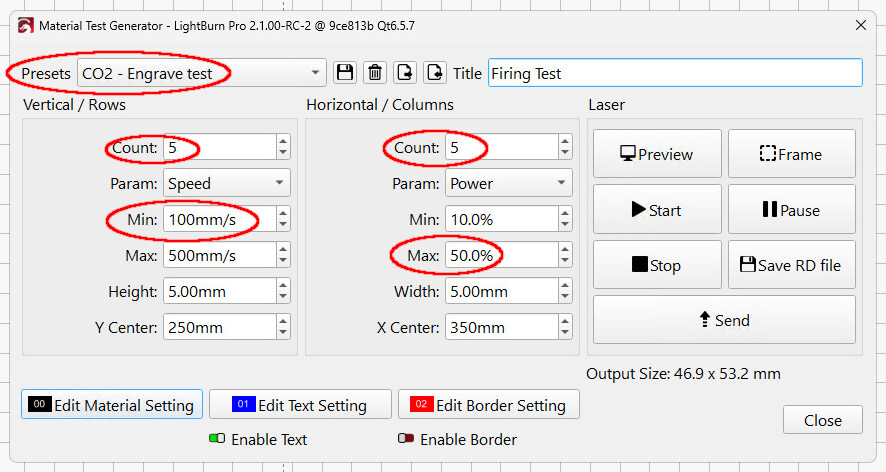
Lay down some cardboard and Fire The Laser:
Your 100 W laser will torch more of the lower right squares through the cardboard than my 60 W machine, so keep an eye on the laser and a hand on the water spritzer.
Upload a good photo of the results along with everything else.

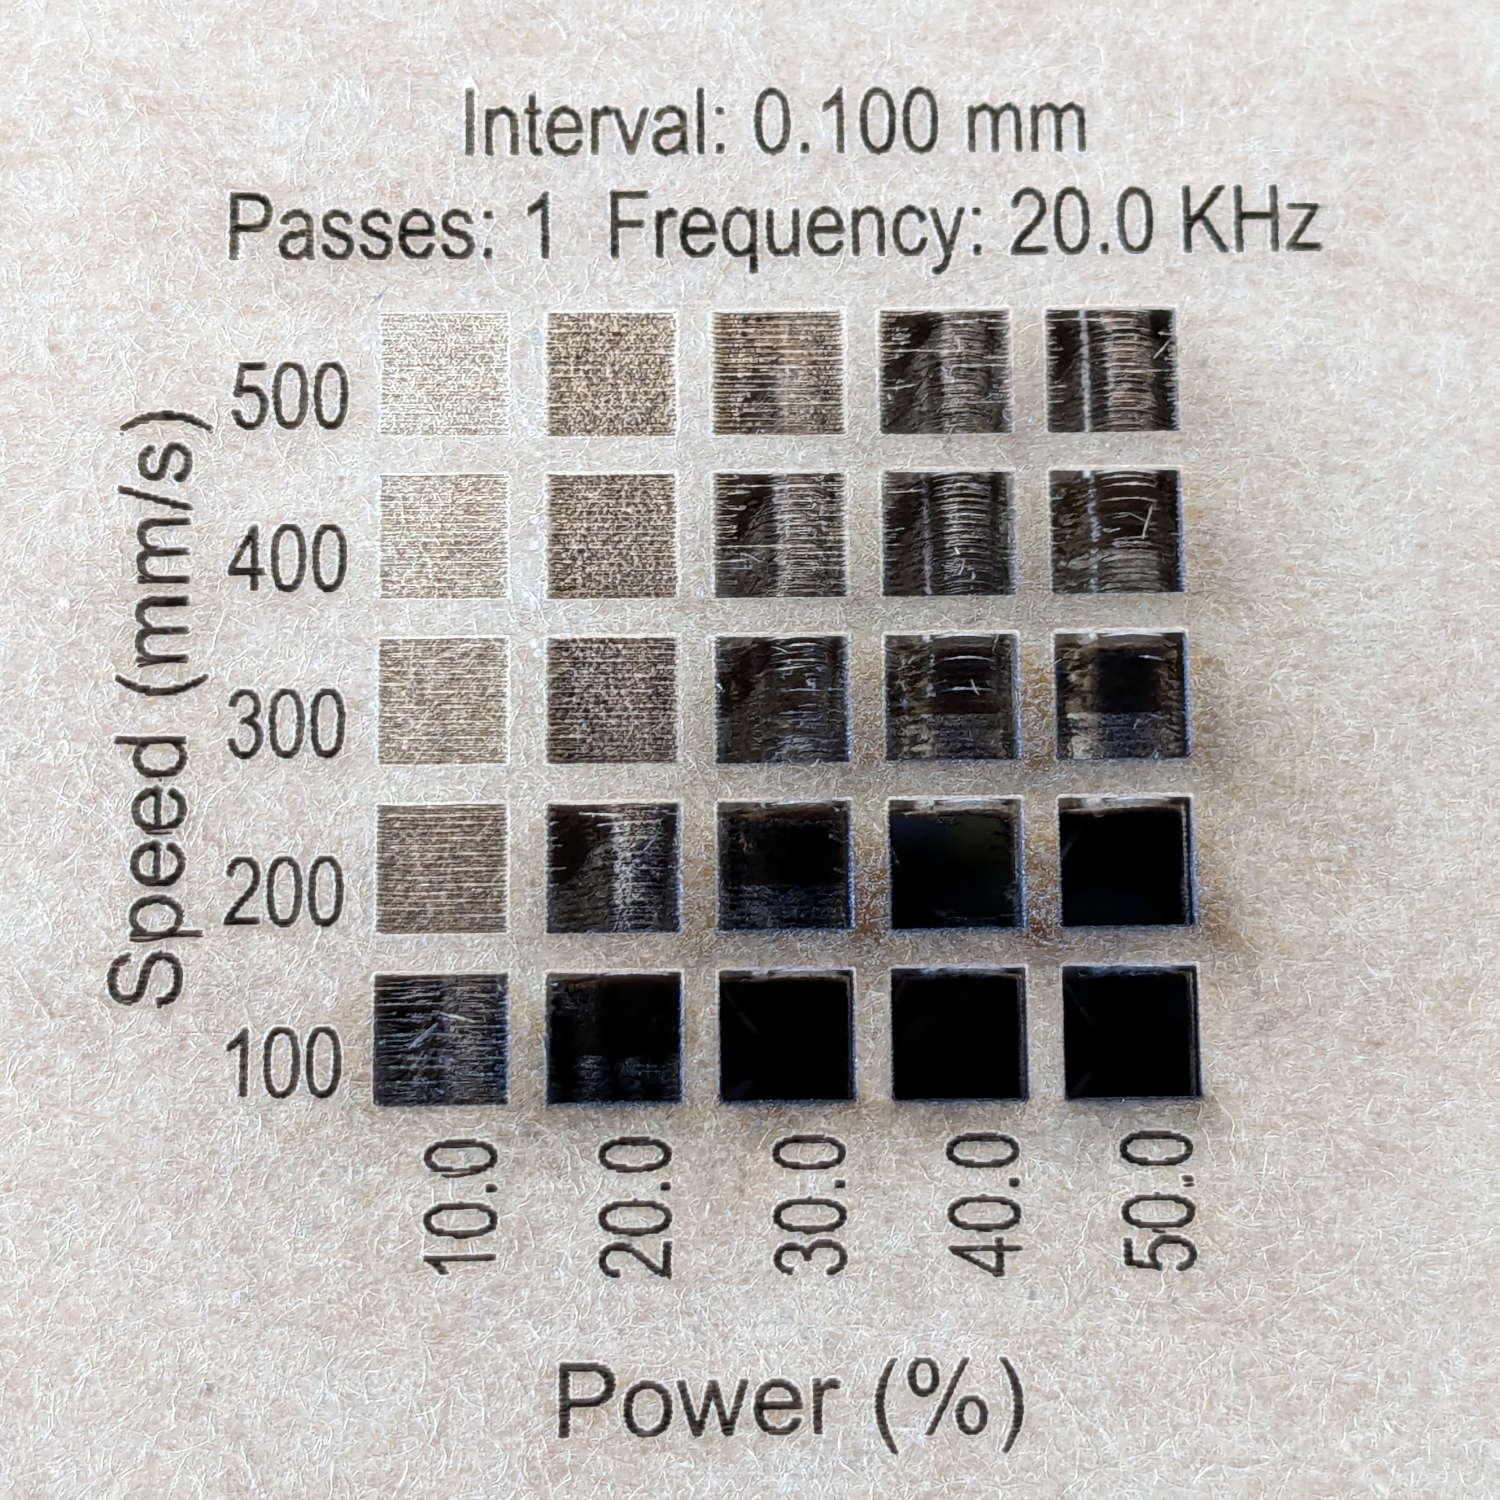
Taken together, (IMO) it’s a hardware problem, not a settings problem.
The Material Test shows the tube does fire, but a 100 W laser should torch cardboard at any power while running at 100 mm/s, which means there’s not much energy reaching the material. The question is whether the tube is not producing much energy or something is dissipating that energy along the way.
So you must get physical with the machine, because none of this involves LightBurn.
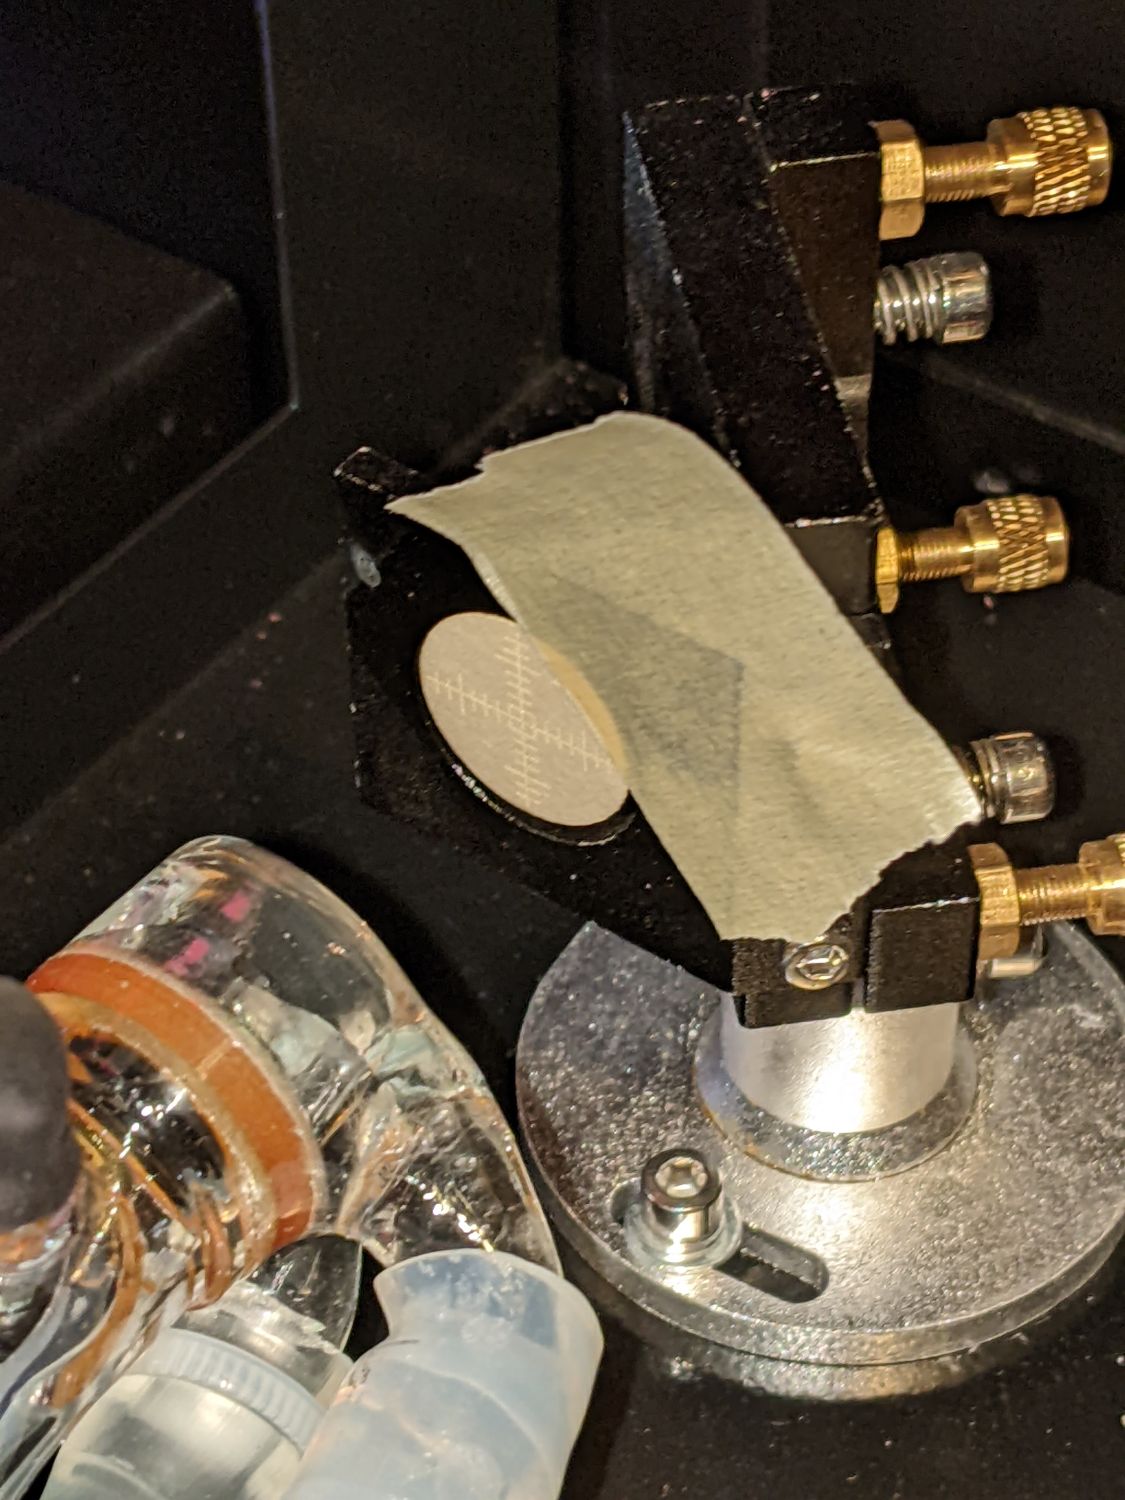
Start by cutting some one-inch squares from a manila file folder or similar heavy paper. Tape a square on the entrance to Mirror 1, which is the one in the back of the machine just beyond the end of the laser tube. I made round targets, but there are few style points for this task:
The controller on the machine has a button labeled Pulse (or something similar) to fire the laser; as always, with the water chiller running and the lid down.
CAUTION Close the lid over the laser tube before firing the laser. The beam should be nice and tidy, the high voltage should be well contained, but close the lid. ![]()
Press the Pulse button quickly, open the lid, and see what happened to the target paper. What we need is a brown scorch, not a crispy hole burned through:

If the briefest pulse you can manage blows through the paper, that may be good news. If it’s weak, repeat the pulse enough to make a visible mark. Then take a picture for show-n-tell. ![]()
For future reference:
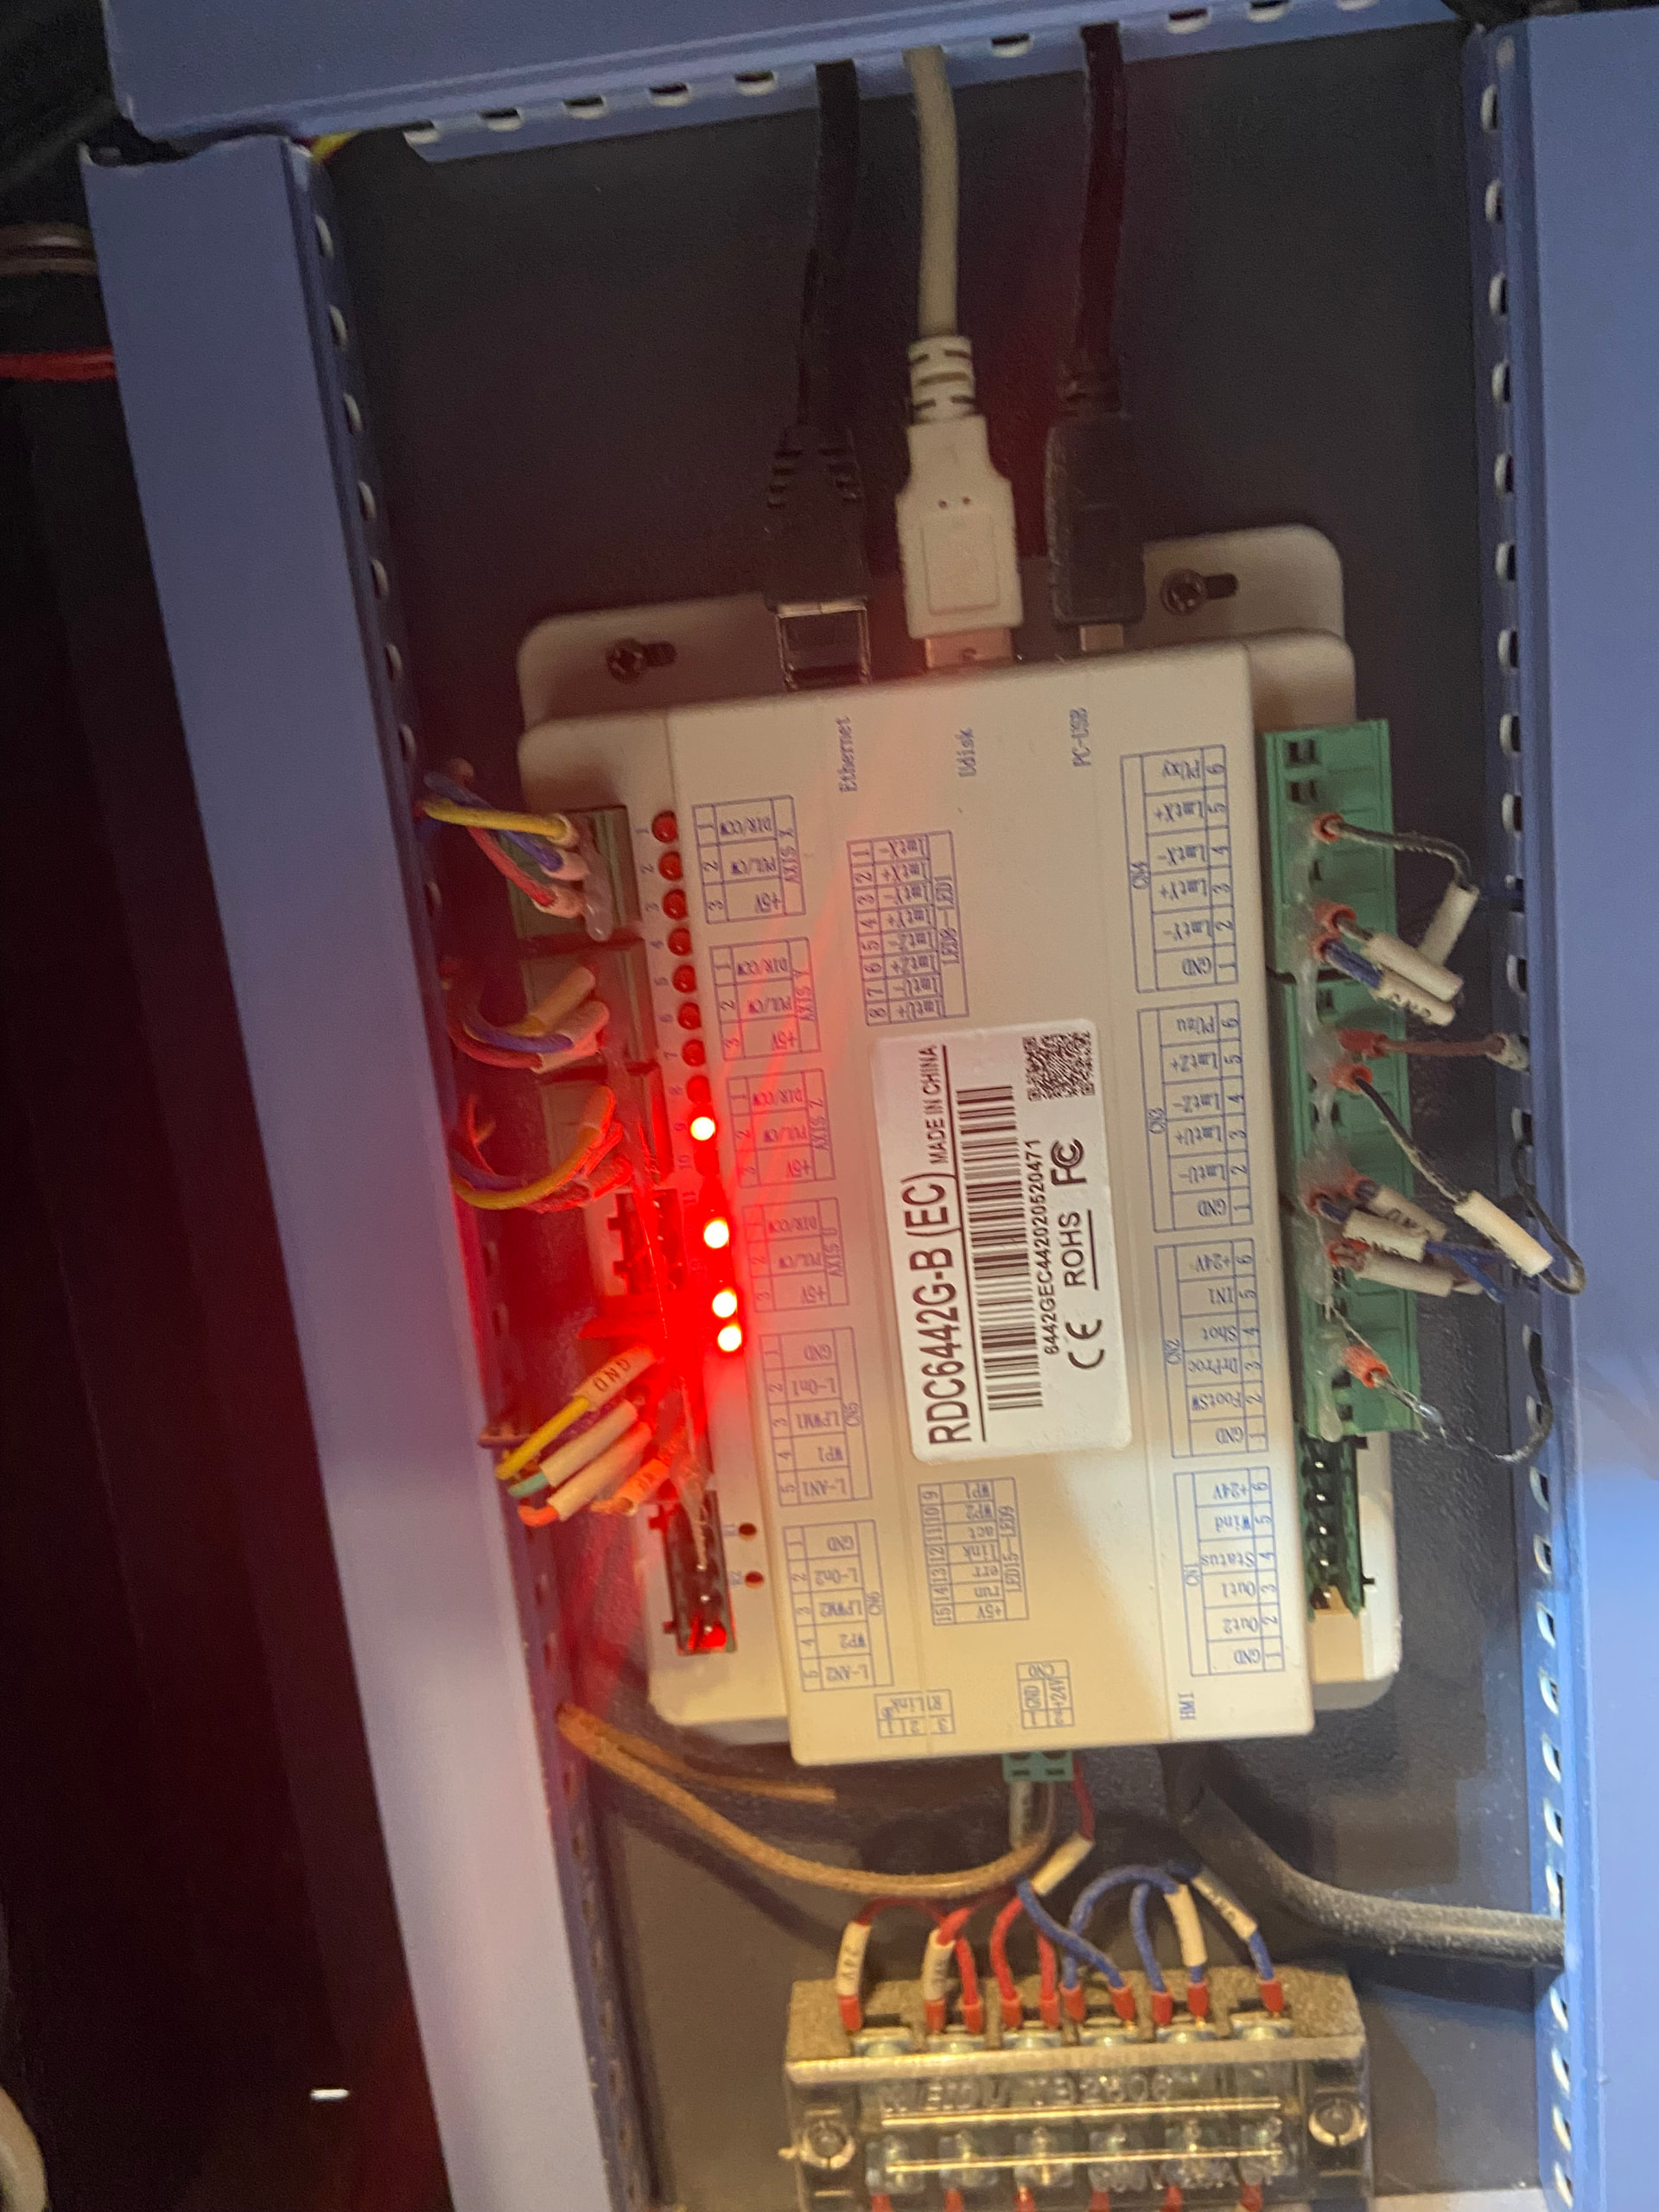
You can set the Pulse power and duration for consistent results, although how you do that depends on which controller is in the machine. Open the electronics bay on the side and the controller should be visible, typically hidden by a tangle of wires:

Tell us the model or show a picture.
Knowing the model, you can then find the manual online, perhaps at:
It will be difficult reading, but it’s a start.
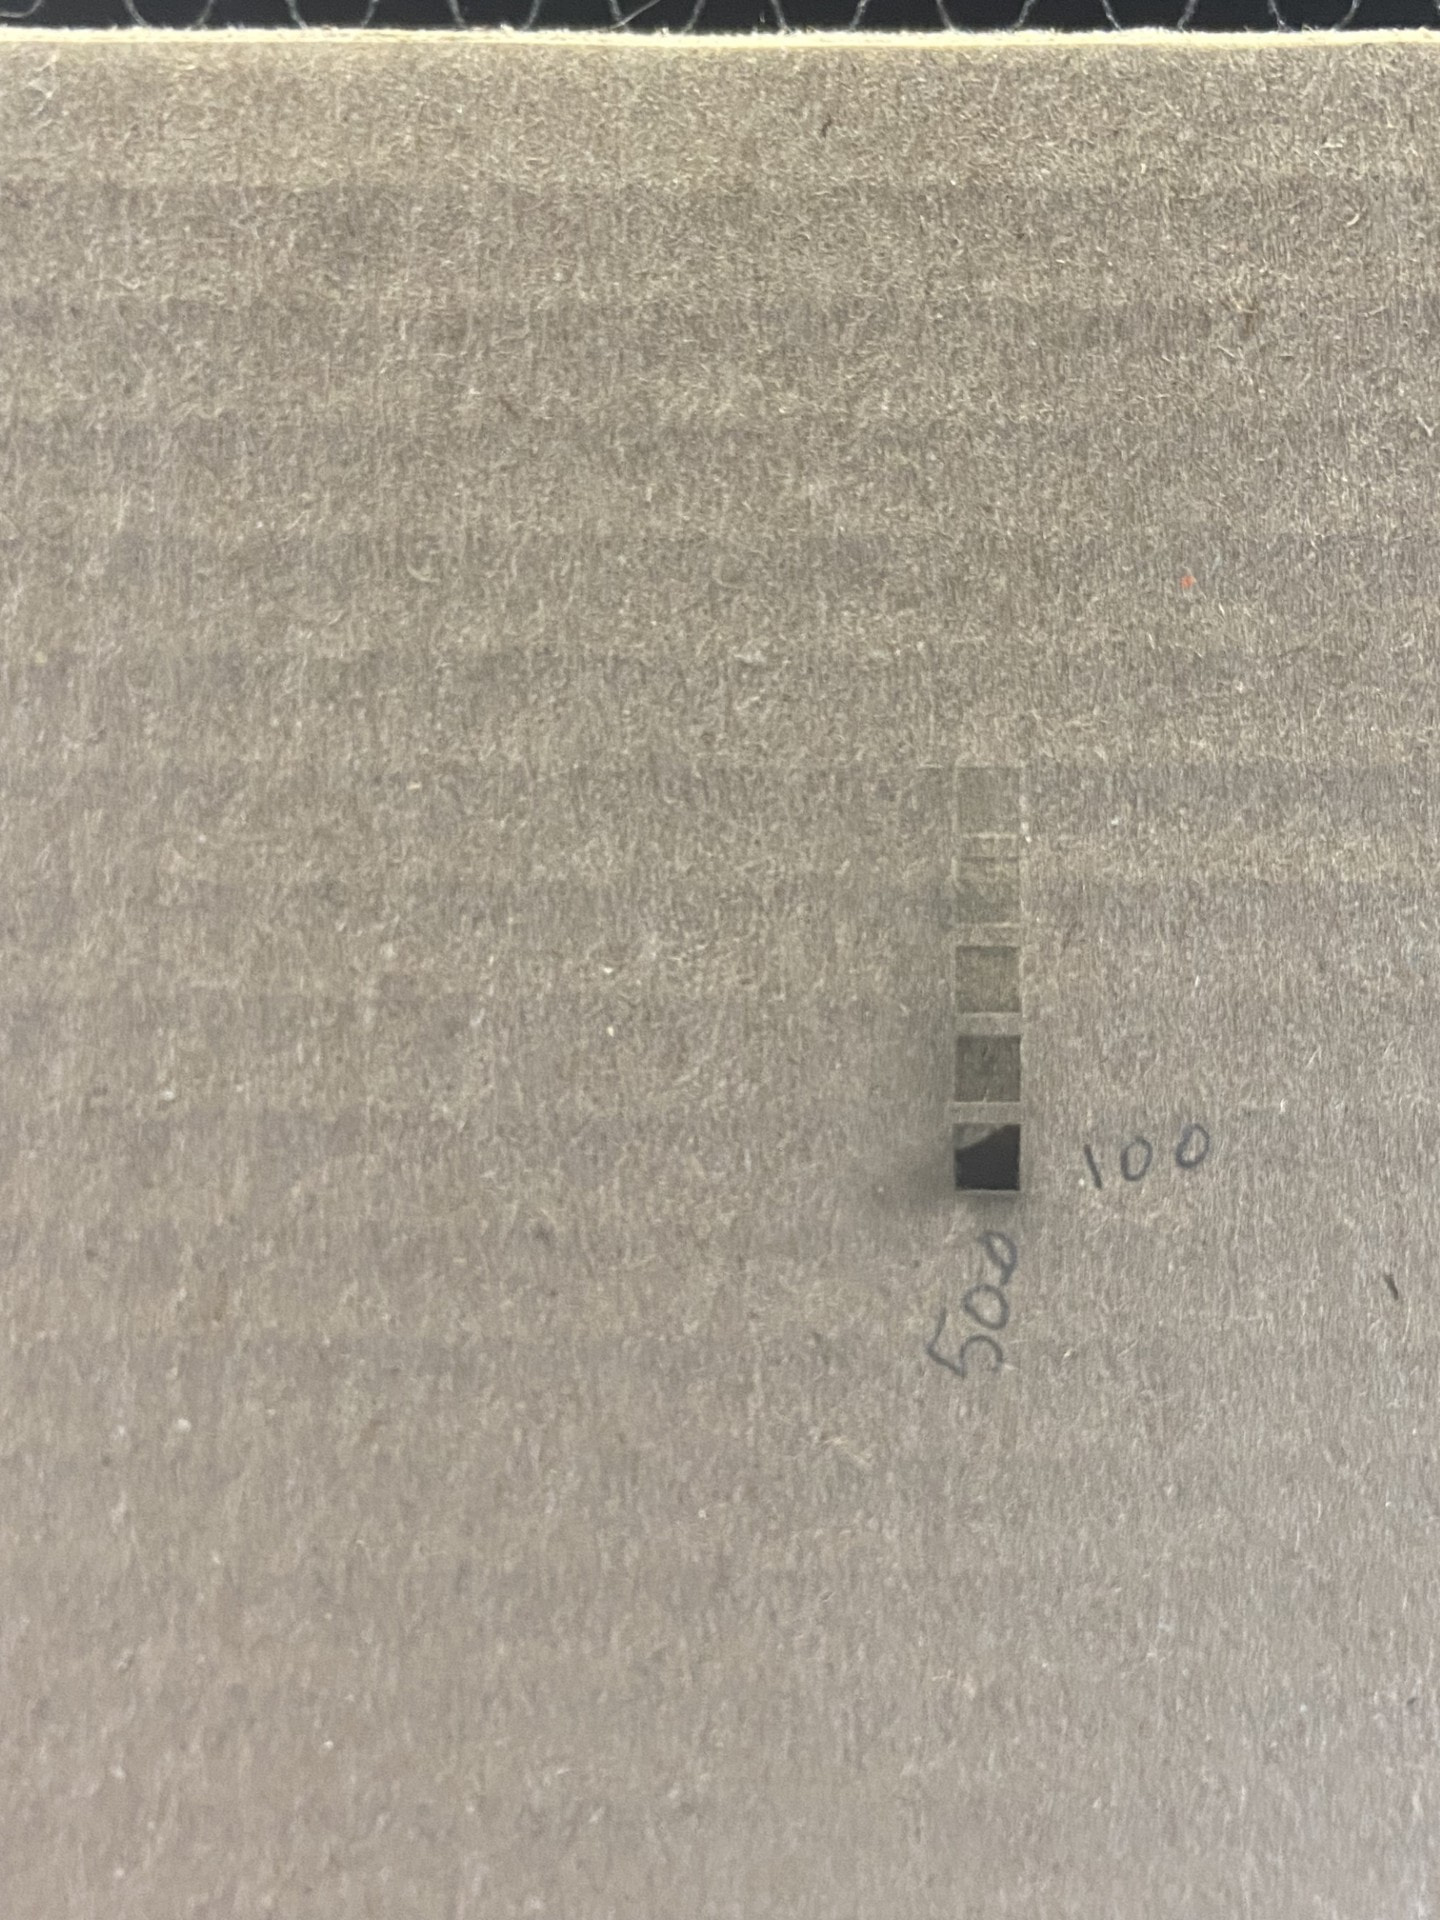
Hi Ed! Here is my show and tell for the day! ![]()
The laser blew through the file folder with just a brief tap on the pulse. Hopefully that’s a good sign… and here is my controller.
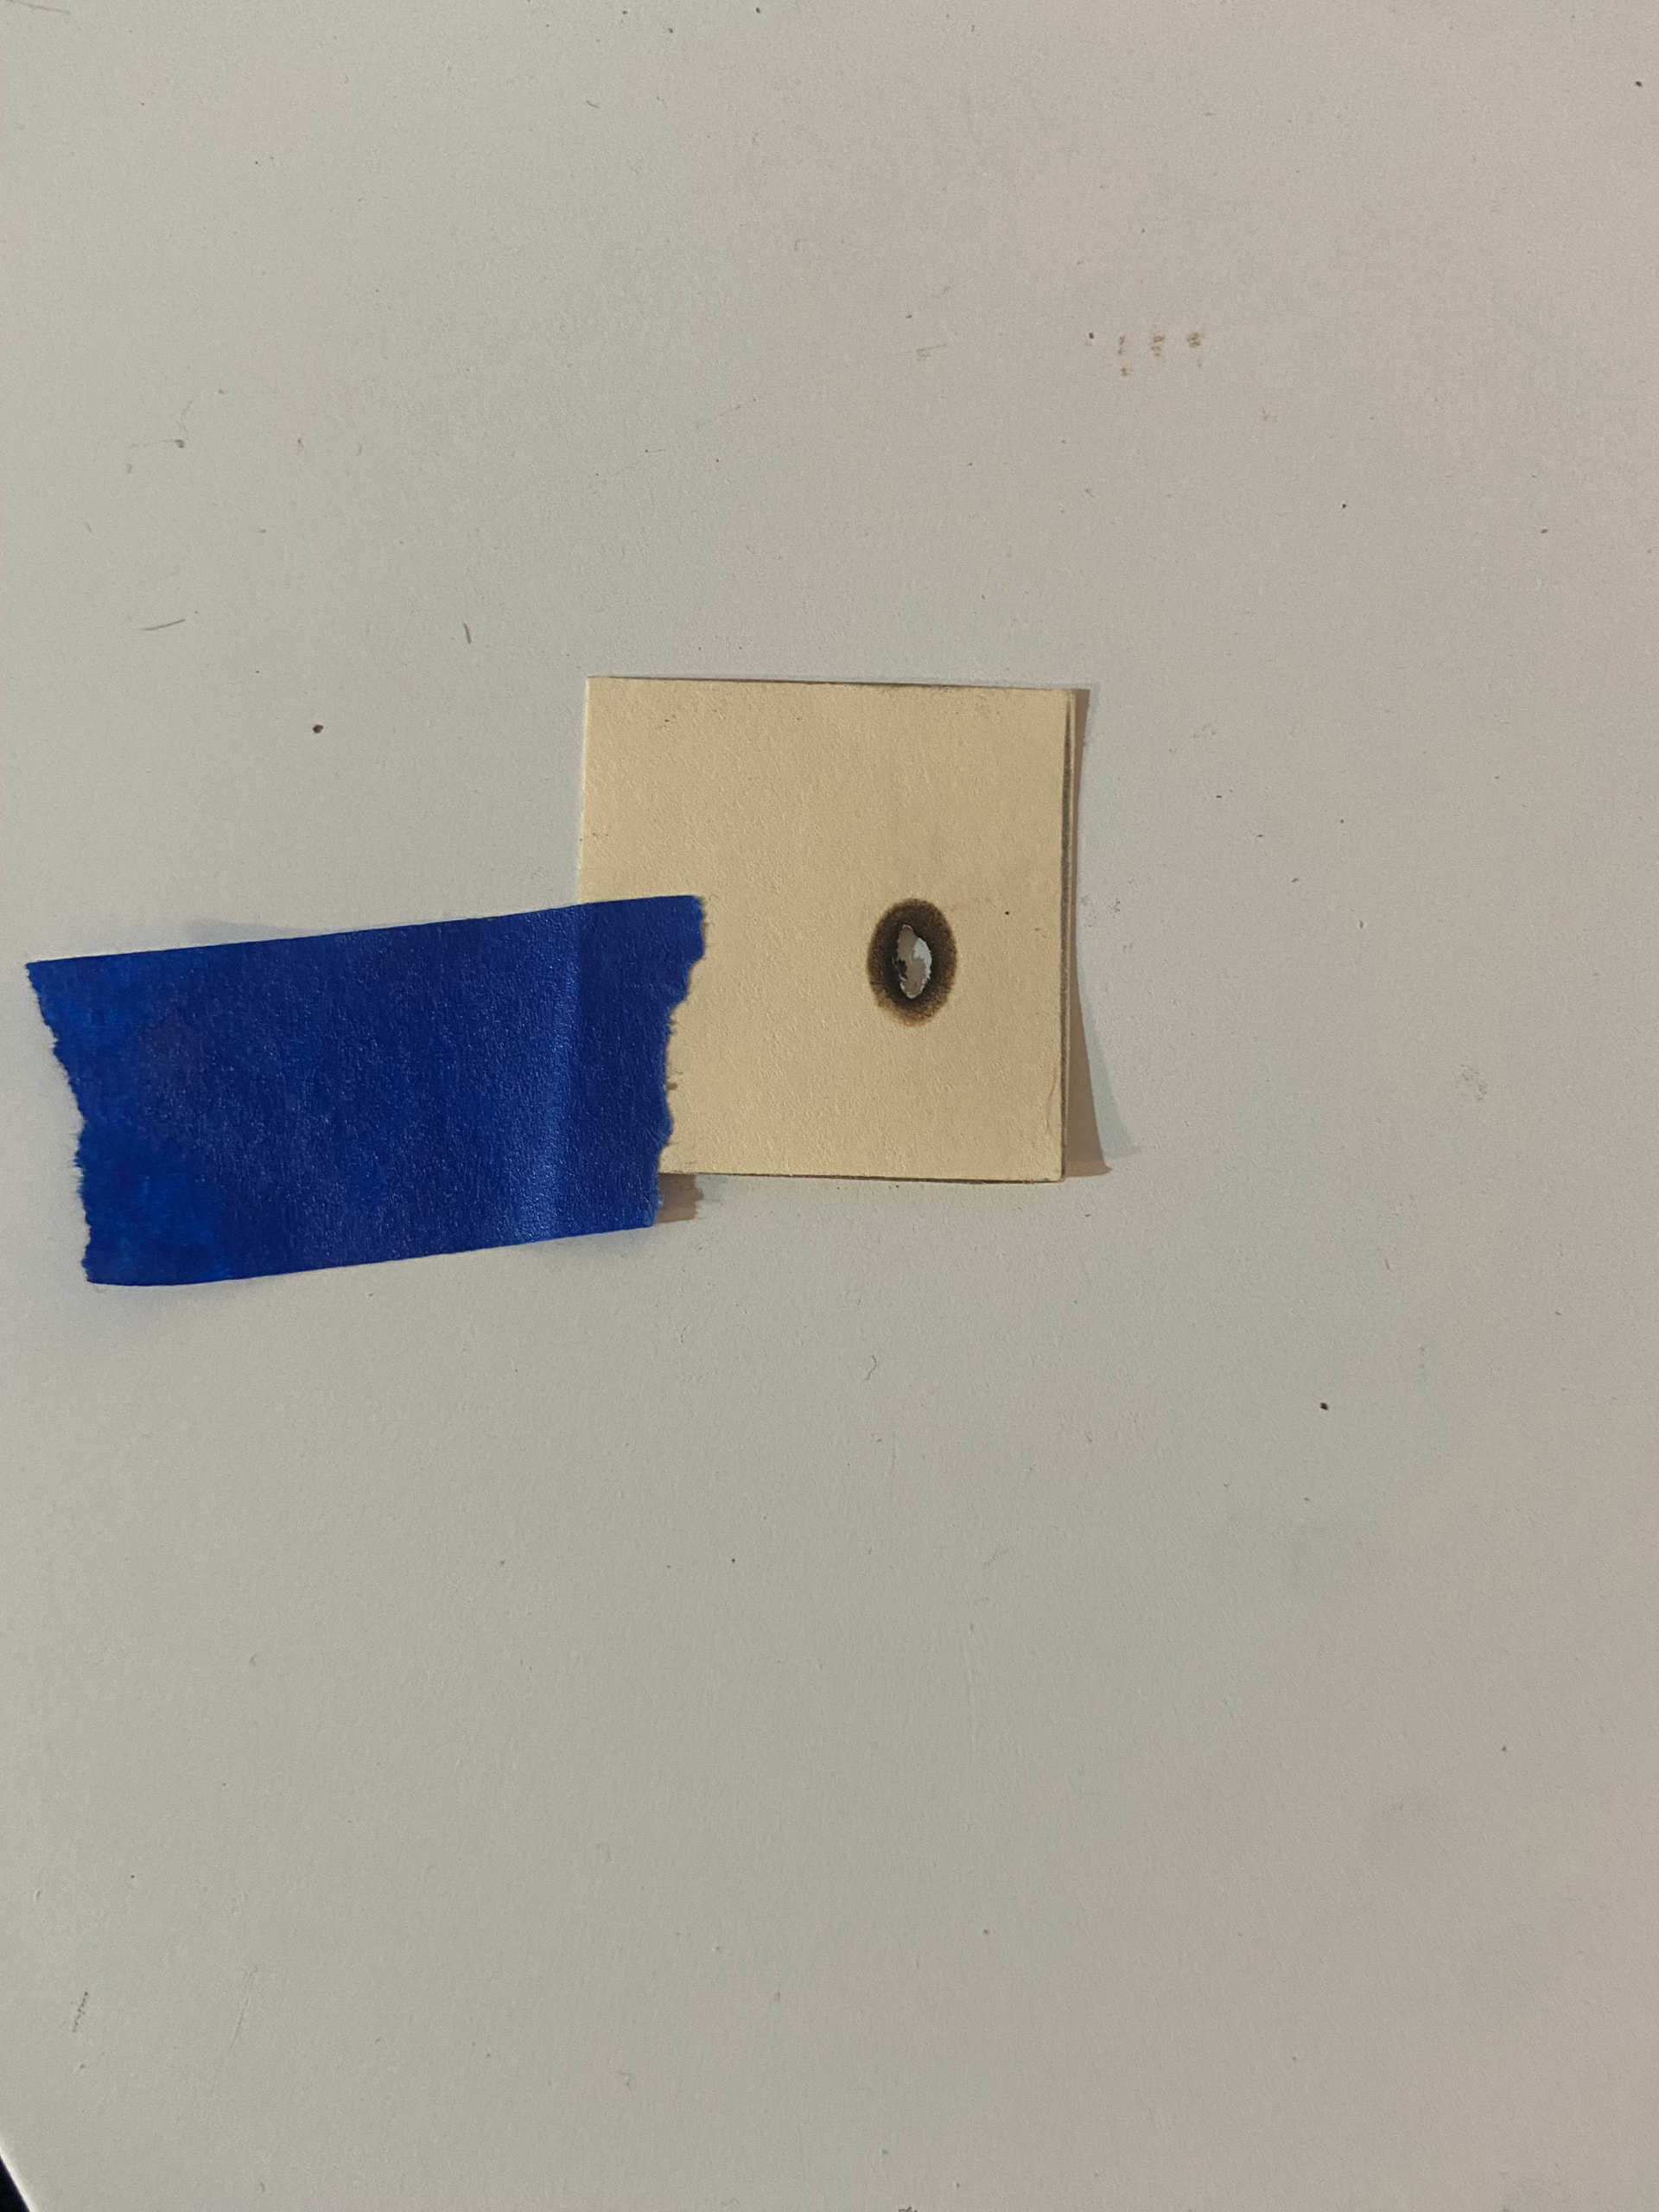
The oblong shape of the scorch suggests the paper was against the mirror, at a 45° angle to the beam. Is that correct?
The tube appears to be producing plenty of power and the beam shape looks good (assuming it was at 45°). That means there’s a problem between the laser tube and the nozzle.
Things to verify with the lens:
- Silicone ring / cushion between lens & lock ring
- Installed with the convex side upward
- Undamaged
- Clean
Close-up photos will help us look over your shoulder.
The next step will be verifying mirror alignment, so start by examining them to verify they’re all clean and undamaged. Again, photos will help us see what you see.