LASER section of Machine Settings for Ruida + Coherent RF 150w?

Remember “two steps forward, one step back”? Today is “one step back” day.

I’m in final stages of upgrading a (2002 Kern + Coherent 150w RF laser module) to use a Ruida RDC 6442x and Lightburn. Had it working two weeks ago, then got called away, and apparently forgot something important, and now it won’t fire. :frowning:

Yesterday I rigged up the little self-test connector that’s documented in the Coherent manual, and thankfully that does make the laser fire at 10% power.

Going through that exercise made me wonder if I have characterized the laser properly in Ruida’s Machine Settings. Coherent documents speak in terms of (PWM) pulse WIDTH and pulse PERIOD and duty cycle, whereas Lightburn and the Ruida just seem to speak in terms of PWM frequency.

Can anyone successfully using a Ruida RDC tell me how they’ve got their Machine Settings configured? Just for the laser itself.

I think it’s really the proper way to describe PWM as whatever the time it takes for the PWM to cycle. Many refer to it as the ‘base frequency’ PWM is really not related to frequency.

1kHz is equal to the period of 1sec/frequency, 1/1000 or 1mS, assuming my math is right… PWM only specifies that the ‘duty’ cycle of the ‘period’ is 50% or whatever. 50% power over a period 1mS, means it will be on at for 0.5mS.

Make sense?


There are others here that have similar or more powerful RF lasers. They will probably chime it…

IMHO, I would think that your machine should still fire, can’t think of anything that would change while it’s sitting there… The configuration could not have changed… ?

:smile_cat:

Hello Marty,

I have done a lot of tech work on these. What Coherent do you have specifically?

Ruida will implement the PWM out mostly as expected. Your tube may be duty-limited, if so we can put that limit into the Ruida.

The Enable pins on Laser1/2 are not useful here- they turn on only when the laser is commanded to fire. They disable when doing a rapid, and even in the extend space of rasters IIRC. The Coherent RF drive’s Enable-IN is more of an interlock and you would leave it high all the time a job is running. It’s not intended to be turned on and off instantly, that’s what the modulation-in is for.

1 Like

Hoping you’d drop by… You’re probably more up on these than us ‘poor’ people…

:smile_cat:

@Dannym, I’m glad to hear you have experience in this area. TL;DR question is what SPECIFIC Ruida machine variables should I be setting up through Lightburn, and what values are reasonable and proven to work?

We have a “G-150 Head Assembly” manufactured in 2009. The Kern table was built in 2002, and I’m told it had a 200w laser module at that time.

The Kern control system did include connections to the Modulation pins on the Coherent connector, as well as the Enable pins. I -did- have this working at one point, wiring the Ruida directly to the Coherent module. (Further examination of the Coherent documents indicate that I should include some TI differential-signal line drivers, but the circuit was working without that.) I’m pondering whether I should add in the indicated differential-signal line receivers, so that I can set up some LEDs to indicate the several error conditions that the Coherent module makes available to me. I’ve often found that “the truth is inside the box”, and taking advantage of diagnostic data seems wise, even though the Kern control system didn’t monitor those signals.

You DO need differential line drive to get correct performance, though it may fire on single-ended.

Enable, pin 3, must be grounded against pin 14, 15, and/or 16. Not +5v. So it’s actually enable_n. This means a purely mechanical lid switch with no other power can enable the pin by grounding alone.

That responds with actual power on/off in the 100KHz range, essentially instant.

It has a maximum duty of 60% and max pulse width of 1ms, so that will be the Ruida’s “Machine Max Duty”. If you exceed that, the RF stage will throw in a blanking interval to protect the system and assert the Duty Cycle Error pin while doing so. But you don’t want this to happen as it messes with the power response. Check error pin to make sure it’s not happening. The Ruida and the G150 don’t have NIST calibration, so it may be 68%-72% on the Ruida before erroring. I don’t know I’m just making up numbers.

The actual output power profile is a 90us linear rise time to a plateau, then 90us to fall to 0 after the PWM mod goes low.

The duty cycle error is too short to see on an LED. Oscilloscope, or make an Arduino test interface with a Command Line Interface so you can just open up putty and type “$stat” and get a readout of this stuff. Also some of the response signals are analog, so they’d go to the Arduino ADC.

The tube will put out a legit 150W or more if in good condition, and can be used at this power indefinitely. In contrast a “100W-130W” DC-excited tube is rarely going to produce 130W even on a testbench, and the mfg’s suggested “long life” current limits the usable daily output quite a bit.

Do you have a collimator? It does need it, the divergence is bad without one. Its beam is elliptical, its aspect ratio in XY is rectangular, and also the divergence in X is not the same as Y. But that’s fine just trim it out.

The tube does NOT need preignition pulsing. The RF supply should do that OK and provide weak internal pulsing all the time that ENABLE_N is asserted, which means it potentially could have laser output when not actually running, this could be a safety issue if that’s not the lid’s switch.

The Ruida “STATUS” pin might be a good reference for when you should enable, it asserts while running a job.

This is why I liked adding an Atmega 2560 board. You can do like “STATUS”, lid closed, and water flow sensor (you gotta use these) to assert enable. You can also just disable the lid for testing with a CLI command. You do want to feed it through a relay or opto so it must actually have power to pull the Enable pin low- by default, if the Arduino were off, the ATMEGA’s IO pins have shunt diodes that will load the G150’s pin, pull it low, and enable at the wrong time.

Thanks, @Dannym . (And anyone else like @jkwilborn still following this thread.)

  1. It sounds like I should set the Ruida PWM max frequency to 100,000, and maybe set the max power to 60? For sure I’ll add the differential line drivers on TX, and also on RX so that I can properly read status. The original Kern wiring did not appear to include those status signals.

  2. Yes, this rig already does have a collimator tube built in.

  3. So, is your recommendation of the Atmega 2560 based only on the presence/absence of the shunt diodes, or is it also a matter of being able to sample all the pulsed status signals frequently enough?

NEW ISSUE: This Kern is old/special enough that it does not have an enclosure box. :scream: At this instant, the E-stop only disables the Geckodrive G540 that drives X and Y. I have been debating adding the tube Enable_n line into the e-stop chain, with proper isolation, or else dropping power to the the dedicated contactor that switches the 3-phase power to the laser’s DC power supply. Any informed judgement on this choice would be greatly appreciated.

Thanks again!

Machine Max power should be 60% (might need to set to 59% if Duty Cycle Error trips, you need to avoid that). Then Layer can be 100%, because that means 60% at the LPS.

Add a high speed 5V differential drive transceiver like MAX485. Preferably near the Ruida if possible.

Max freq should not be 100KHz, even if the tube can. 1500mm/s / 0.2mm spot size= 7.5KHz means the pulses are overlapping anyways and start to blend. 20KHz is fine and gives time for the 90us ramp-up to plateau at 150W and ramp-down.

Atmega is fine because it’s a readily available Arduino toy and 5V. Both Ruida and that G150 are 5V interfaces, although you might want to opto them anyways. But both the Ruida and G150 are opto’ed anyways. There are some inputs like STATUS that are open-collector and generally OC against the controller’s VCC (24V) but that’s not well defined. And you need the STATUS pin to enable the G150 amp while Laser 1 PWM-OUT goes to the 485 transceiver and then the G150.

The STATUS pin would be wired 24V to a 22K resistor to opto-in anode then cathode to STATUS pin. Pin goes low, 24V on opto input through a 22K resistor, that turns it on. Opto transistor out is open collector pull of Atmega 2560 pin to ground, enable the pin’s weak pullup to save on components.

Plus you can add pulse-counting flow meters instead of a simple flow switch for the Arduino to monitor, add an LED stack, a command to disable the door lock, etc. Plus I’d recommend a test mode so you can type in a PWM freq and period and fire with a remote button. You’d need a way to switch to an alternate source for mod-in +/-. Since 485 transceivers can tristate, you could just put another transceiver in parallel and don’t enable them at the same time. Oh, add a 10K pullup to 5V on the mod- in- and 10K pulldown to mod-in+. This guarantees the modulation will be off if disabled, but it should still be fine.

E-stop can be added to the Enable-In. This is good because you are writing code, and could accidentally set mod-out +/- to active all the time. Also can disable the 48V power supply. But also that power supply could be left in standby mode and enabled when STATUS says a job is starting.

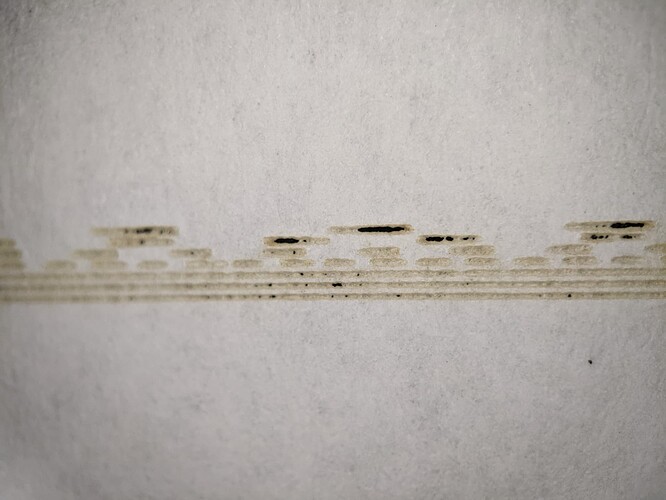
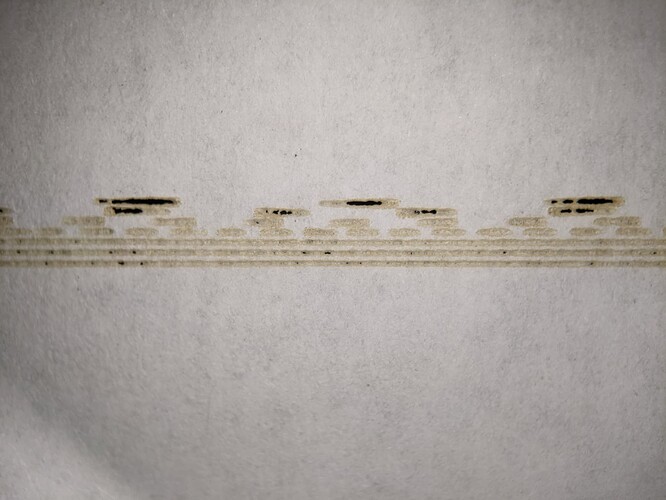
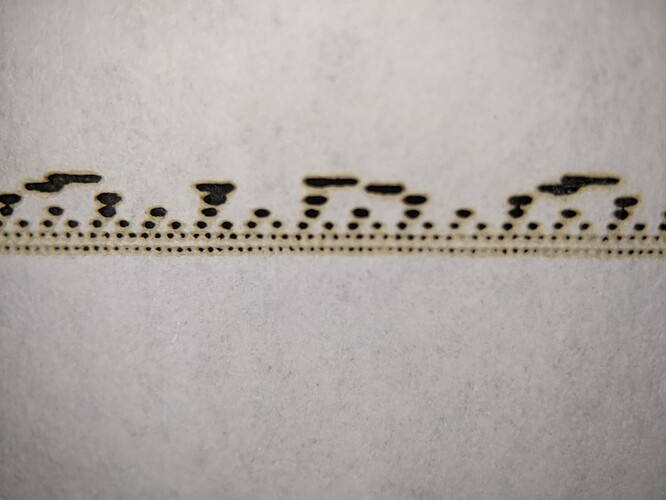
Ok here’s a GREAT way to illustrate! The eye chart for lasers. Line at 1000mm/s and 20% power, but the PWM is set much lower than the spot size so the actual PWM duty appears.

I just got home and realized I kinda screwed up the DC-excited one, because I didn’t take machine config min-power into account. This made 32.6% duty, so it’s going to be wider.

This is 200Hz, 300Hz, 500Hz, 1KHz, 2KHz, 4KHz, and 5KHz

The DC-excited is not responding so well to even the 200Hz. The pulses are slow to ramp up and ramp down, and the power is unstable all through it. Forth line from the top is 1KHz. It’s not reaching full power and the pulse is spread out a bit due to the turn-off lag.

The RF-CO2 output on the same freq- the duty is 20% as intended, though. A pulse reaches full power almost instantly and turns off just as fast. At 5KHz, we’re still resolving pulses very sharply. And that’s the process limit- the machine can’t go over 1000mm/s. At 10KHz, that would be a spatial period of 0.1mm. With a 0.2mm spot size from a 2" lens, the burn from individual pulses already overlap and merge. If you go with a finer engraving lens and/or increase axis speeds, then you would be able to make use of a higher frequency.

On the other hand, the DC tube really should be 5KHz- it can’t switch its power output any faster anyways. Note this is two different limits- the RF can switch even faster, but the spots from the pulses aren’t spaced apart so there’s no point, they’re going to merge. But it could come up again with other lenses and axis speed. The DC tube just can’t switch any faster no matter what you do.

Just wanted to post a better test photo from the W6 machine- this one has the correct 20% duty
The 200Hz dash is about 60% too long (is that even right?), which suggests the turn-off time is worse than turn-on. If it just took a delay to get the power on, then it would get shorter.

Consider line 5, that is 2KHz 20%. It is unable to get any significant rise or fall time within these pulses. So, it fires for 100us, and then goes off for 400us. But the beam output doesn’t decay in 400us, can’t even see it. And it’s reduced power the whole length of the dash. We can’t pick out a point where the 100us on-time starts, because 100us isn’t enough time to ramp up from the partial lingering from when the last fire command ended 400us ago. This is like a flywheel and a motor is trying to spin it up but can’t reach its full speed in 100us and won’t decay within 400us either.

I can’t superimpose the original 5V/0V command levels going from Ruida to LPS. But these are the same job and the photos are at mostly the same scale, and the RF laser should be the reference.

Actually lemme include a new pic of the RF laser output. The one from a couple of nights ago has pulses too slim, and I’m not sure why. This one is good.

Thanks again, @Dannym ! Your suggestions helped me a lot, it’s LAZER ON!

… currently functioning with MOD in single-ended mode, I’m gonna add in a line driver and see if that helps. I have a TI SN75172 in hand, and I see that Mouser is “not recommending” this chip for new designs. I will get some of those MAX chips, it’ll be interesting to see if there’s any performance gains over ther TI.

NOW I am left with a more general question, one of laser performance. Right now, with that signal single ended, I can cut 1/4" underlayment like a dream. I’ve tried cutting some 3/4" solid cypress, and also 3/8" constriction-grade plywood. In both cases, the cut went close to 99% of the way through, but there was an intermittent thin layer of uncut wood at the bottom. These “tabs” (for a lack of a better term) appeared wood-grain related. I can imagine several possible causes, but I’m hoping the hive-mind has already observed and conquered this kind of performance issue. Any suggestions or pointers to existing art is profoundly welcome.

The input to a G150 is just an optocoupler LED in parallel with a reverse 1N4148 diode and a 470pF cap, and both with a 332 ohm series resistor. Actually, it should work fine with single-ended +5V. The “differential” is just there to drive the opto to -0.7v to assure a sharp turn-off, but that seems unnecessary. As long as this is driven high and low and not just an open collector single-ended drive, the opto’s going to turn off sharply The RC time constant of 332ohm & 470pF is 156ns so that’s not a factor.

That’s not a true differential. Also, MOD+ or MOD- are isolated, neither has any relation to the signal ground for the other interface pins- which is already electrically isolated from the 48V negative lug.

So, if you DO single-ended drive it, MOD+ is the modulation, but you need to tie MOD- to 14/15/16 interface ground otherwise the opto won’t draw any current.

Oh, regarding not getting a consistent cut- are you certain you are not exceeding 60% duty or 1ms pulse width? If exceeded, the driver will gate off the pulse to limit it. And I’m not sure how that works- the 1ms limit is a fixed time, easy. But 60%? Is that an analog filter that looks back many cycles? Or did it just have a counter on the last “off” period, multiply it by 1.5x and that’s the limit of the current “on” counter? How fast does this reset? Hypothetically the blanking interval could potentially cut off even more on-time than intended, resulting in periodic dead spots in the cuts.

I do worry the Ruida might create output that could break the duty cycle filter. We do get to specify the pwm freq and max duty, but I’ve seen plenty of Ruida features that don’t always work in ways that make sense.

I could see that limiter may screw up a lot of things if you let it trip, so stay below it. Some margin might be needed- I can’t guarantee if it won’t trip at 59%. But you can see that happen on “DUTY CYCLE LIMIT” output.

If you already follow the 60% rule, the 1ms max pulse width would only be hit if you went below 600Hz.

That’s exactly the way I’ve wired it up now, and it works just fine! Happy happy. At this instant I have the laser’s Enable circuit jumpered at the Ruida end of the cable, but I’m likely to wire it up with an opto or relay connected to Status, as you’ve suggested. Many thanks!

This topic was automatically closed 30 days after the last reply. New replies are no longer allowed.