Laser wont cut or engrave under 10% power?

I have an Aeon Mira 7 CO2. When I first got the machine it was an absolute wreck. The machine was just short of a lemon. During one of the earliest troubleshooting steps, the Aeon Rep had me do some tests on paper. Though he sounded surprised, when the machine wouldn’t engrave or cut when set below 10% power, he said “Oh ya, That’s normal. Machines won’t go under 11% in most cases. (Nothing to see here)”

I thought that was extremely odd, but given the bigger issues, I put it in the back of my mind and forgot about it. I haven’t needed to go below 10% till now. I want to do grayscale images on Anodized aluminum cards using Dither. I know it can be down because Epilog
sent me a sampler kit when I was looking into going with the, and it included an anodized card with a grayscale image of a Tiger. First step I took is doing a grid test. This is when I realized, no marks are being made below 10%. So far as I can tell, to achieve a dither image, Id have to go between 0% and 4% if that, depending on the speed.

The reason Im posting here is that I need to know if this a Lightburn thing, or a Machine limit/glitch.

Hi,

you have a dc lasertube. This types needs highvoltage to generate the laserbeam. The tube need startpower to laser with low power. This part is different from lasertube to lasertube. Some tube needs 10% some 12 and someone 8% when they have low wattage. A 40 watt tube need lower startpower and bigger tubes need mor startpower.

You dont´s tell us how big the tube is. 40 watts starting faster with low power, bigger tubes needs more power.

Michael

You’re Aeon Rep was correct.

I have 60 watt. You say it needs a certain amount for “start power”. Is this referring to when the machine is turned off? I assume not, but then what is the “start power” in regards to the cut/engrave process?
Does this mean i will not be able to achieve the power levels to do the dithering effect on an anodized aluminum card? Or do i need to ramp up the speed to 1000? Even though its capable, because the desired engraving size is that of a business card, i doubt it would make a difference. Also, im sure the machine can handle it, but the header going back and forth so fast with such small space to engrave, i cringe thinking itll damage the machine. Supposedly it can go up to 1200mm/sec. But i think thats doubtful.

For now please forget any speeds or anything like that.

You have installed a glass tube that ignites at a certain high voltage. After ignition, the tube goes into working mode. The high-voltage power pack does all of this together.

So there are two different high voltages out :
Once to ignite
Once for engraving/cutting.

All of this happens monkey-like fast.

In order to ignite, the tube needs a certain voltage and so that the plasma stays in the tube, another.

All of this is expressed as a percentage.

Now there are small 30 or 40 watt tubes that work from as little as 7 or 8 or 9 percent.
From 50 or 60 watts more is needed, from me 10 or 11 percent.
Really fat tubes, on the other hand, need 12 or 13 or 15 or 16 percent. It always depends a bit on the tube and the high-voltage power pack.

Now the laser beam has to crawl out of the tube and then pass several mirrors and then crawl through a lens and then produce an effect on your material.

This way also costs energy.

Your part of the task is now to find out when you see the first small dents on your material, e.g. wood, using test shots

This is the lowest value you can work with when you move the laser head very slowly.

If you give a little more power (percent), then you can also proceed faster (e.g. light engraving) with a little more power you can cut the first thin things.

A DC tube doesn’t behave like an RF tube, which is much more expensive and can be regulated from 0 to 100%.

You shouldn’t operate a DC tube up to 100% either.

A: Does it age faster then?
B: Does the performance even decrease from a certain value (80% e.g.)

If you want to learn more about a DC tube laser cutter, please watch Russ’ video series on Youtube ( RDWorks-Learning Lab ). He really explains everything very well.

I hope I could be of some help to you

2 Likes

ok, thank you.

If you’ve ever seen a Jacobs Ladder, you’ve already seen this effect in action:

  • At the base, where the wires almost touch, the arc starts.
  • That arc ionizes the air it’s arcing through, and heats it up.
  • The heated / ionized air rises.
  • The ionized air is a better conductor of electricity than the non-ionized air around it, so the arc rises with it.
  • When the gap is wide enough that it’s less effort for the arc to form through non-ionized air again, the arc re-forms at the bottom.

A laser tube is similar - When it’s ionizing, it conducts better, and takes less voltage to keep it firing than it does to start it.

1 Like

IMHO, keep the speeds down. At 1000mm/s you are probably outrunning the lps response time. I’ve found that the 200 to 400mm/s are about the best for what I do, which is mostly engraving on things.

My machine will do 1650mm/s, but it not useful for anything but ‘fooling around’.

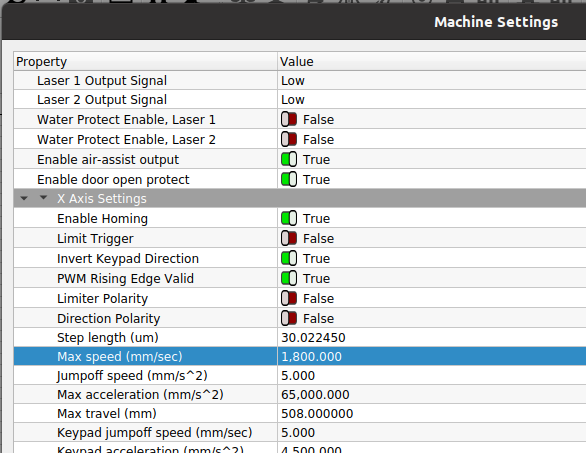
The Ruida also has a ‘speed limit’ built in as the maximum speed for that axes. You should check that value … that axes will never exceed that speed.

Screenshot from 2022-09-16 12-29-50

You’re not going to harm the machine running at high speed. It will require a much larger ‘slop’ or overrun area to slow down, change direction and speed back up, but this is computed by the Ruida and it it doesn’t complain then it thinks it can do it. However the ‘max speed’ setting in the controller will limit the speed.

Even if you increase some of these settings too far, it’s usually the field moving faster than the mechanical parts can keep up with. Sounds terrible, but for short periods I don’t think there is any real harm.

All of the items in the Vendor settings are what you lose if you have a controller failure or a factory reset is done… Make a backup now, if you change them or not, you will have a copy of your factory Ruida configuration…

My values are probably not compatible with your machine.

Good luck

:smile_cat:

Thank you everyone. I am intelligent, but some of this science you all are throwing at me, as helpful as it may be, is hitting a brick wall. I’m like Homer Simpson over here when it comes to the science and scripting stuff. I’m far more graphical.
Sadly to add insult to injury… I was going about it wrong the whole time. I am trying to do photo engraving and thought I needed low pwr, only to find out I actually need to invert the image. But, that opened Pandora’s box for me navigating all the possible combination of image settings (contrast, brightness, etc.) and Lightburn settings. I found that Dither, 700spd, 28.5/28.5 pwr, and 600 DPI seems to work decently. But Im working with Anodized Aluminum and 3 different colors. What works for a black card doesn’t seem to show up the same on Blue.
But this all for a different conversation.
I do promise I understand at least this much, and that’s that each tube outputs different power, mine starts at 10% And that helps immensely! I thank you all deeply for your help and consideration. Im sorry if a lot of your time was wasted.

IMHO, I’d suggest lowering your speed, I rarely run over 300mm/s … I can not maintain a ‘dot’ size from my laser to attempt a 600dpi image even with my compound lens… About the best I get is 508dpi and the speeds must be kept low.

Add to that, you have picked the most difficult ‘object’ to lase, an image… and I don’t know what material you’re attempting to lase, which would help…

Don’t hesitate to post if you have problems…

Good luck

:smile_cat:

I have a Chinese CO2 80 watt and mine will fire at 6% power.

And I use Lightburn.

That is different. As power goes up it requires a higher voltage and faster lps to lase.

What I normally see is that larger tube lase at higher values than smaller tubes.

How long is your tube?

What size lps are you using?

:smile_cat:

1 Like

Wow. I learned a lot from browsing this thread and I don’t even have a CO2. I just watch some on TV, erm, I mean YouTube and drool for now. I specially like the advice about the RDWorks YouTube channel. Gonna check that out as part of my ongoing product research to help my understanding of what I should be looking for. For now, I will plod along with my Diode.

1 Like

If I try speeds less than 600mm, The image starts getting blown out. I’ve gone through 26 cards ($44) with 2 tests on each side (approximately 104 tests), and I’m absolutely NO closer to figuring this bleep out. The only setting that’s come close to producing an acceptable image is 600mm 28.5/28.5 600DPI.

and then this video that explained how to do dithering right in Photoshop.

There seems to be a lack on continuity in Russ videos, and he completely skipped the process of getting the image he’s made in RDWorks into Lightburn, and then out to the machine. I mean, what did he even save the image as? what were the settings in Lightburn? Did he use dithered mode on an already dithered image? or did he use pass through. I don’t have RDWorks and don’t have any interest in it (like using Gimp on top of Photoshop when Photoshop already has all the tools), so I found the 3rd video about turning an image into a dithered image in Photoshop… but even that one completely failed to explain how to process the resulting image through lightburn.
Im frustrated and angry. I’m going to sleep.

If you ‘dither’ it external to Lightburn then you should use pass-through. If you have an image set that is dithered and you disable pass-through, lightburn will dither it again.

If you use sites such as https://www.imag-r.com/ you should to use pass-through as you have processed the image…

There is no reason you can’t dither a dither on an image, but the results may be unexpected.

Make sense?

:smile_cat:

Spot on. Bingo.

Thanks, that’s good to know. I assumed that I do pass-through, but its nice to get confirmation.
I fee like I should start a new thread at this point since it’s diverged a bit from the original point. Please let me know if I need to do that.

Attached is a link to a folder that has source images, Source Images Black and White, Source Images Dithered, and resulting PhotoEngraves. I thought about providing the document that lists all the different settings, but it occured to me that maybe itd be better if you saw source images I am using, the Black and White images I create (and dithered) and then show the result of the engraving. At this point maybe the best thing for me suggestions on light/contrast balances, and if any of the results look like they are are close to best results. Maybe my expectations are too high for such small material (business card), and maybe one of these are as good as Ill be able to get. Generally speaking Id stick one image until I get it right. But I started feeling like Sora and Kairi 2 had too much white to get good results. and Sora and Kair 3 had to much black. So I ended up focusing on Sora and Kairi

All 3 Kingdom Hearts renderings were created by Baka-neearts

This topic was automatically closed 30 days after the last reply. New replies are no longer allowed.