Bit of a niche question, but is there any way to have a lead-in or lead-out where the laser only fires where the drawn cut should be?
Context: I’m running a line cut where speed and power have to be extremely precise–this is an issue at the beginning and end of the line where the gantry hasn’t gotten up to full speed or is starting to slow down. Assuming my drawing consists only of straight lines, I’d like the system to have a lead in and out such that the gantry is running at constant speed while cutting. Is there any way to do this?
–Note: Letting the power decrease with speed doesn’t work here–I need both speed and power locked while cutting.
Running on a Thunder Laser Nova 24 (Ruida 644XG) on Lightburn 0.9.20.
@Burgs04 Doing so causes the laser to fire before and after the line I’m trying to cut. What I’m looking for is how to set it up such that the laser only cuts the line itself, and not the lead-in.
Ok. Straight lines will be you easiest. Curved is going to be a bit more involved as I don’t know that there is an easy way to do it and if there is I don’t know it.
With any cut that has a straight line in the path you will want to do as follows.
Make sure you have select tool highlighted or press esc.
Left click the shape once
Right click the shape and covert to path.
If it’s already a path then this will be grayed out.
Click edit nodes. Under hexagon tool.
Hold ctrl and click middle of a straight line to add a node.
Click set shape start point. Above the radius tool.
Hold shift and click the node you just created.
An arrow should show up at that point.
Double click your layer setting and go to advance tab.
Enable lead in.
Angle set to 0.
Length set to the amount you want like.
Click line bubble.
Click ok.
Check preview to make sure you did everything right.
Sorry, maybe I’m not being clear. I have the lead in and out on the exact path that I want already. What I need is for the laser to stay off during the lead in and out.
For example, let’s say this is the line I’m trying to cut: ----------
Then with the lead in and out, the path the laser takes is: xxx----------xxx
I want the laser power to be 0% in the “x” part of the path, and 20% in the “–” part of the path.
Hope that makes sense. Thanks for all the explanation so far though!
Hi i only have a diode laser but doesn’t the ‘lead in’ and ‘lead out’ just give the laser head time to stop and start at the beginning and end of each pass so it doesn’t have to come to an abrupt stop.
Doesn’t the laser turn on when it reaches speed at edge of project and turn off when it reaches other side of project, then slows, turns back, gets up to speed and fires again when it reaches the project etc?
That’s my understanding, probably wrong but trying to learn a bit more.
(following your write up)
Maybe try creating the same path on a separate layer that is back to back to. Have one layer cut at 0 percent then the next layer cut the exact same thing at your normal power.
@Burgs04 Thanks for the input! Great idea on the back to back layer approach. Really time consuming though so hopefully I can find a different workaround.
I’m a bit confused by your first comment with the start/stop pause. Doesn’t that force it to stop right at the beginning and end of the cut? Sadly negative values aren’t allowed, but I’m curious what you were going for there in case I can use the same trick elsewhere.
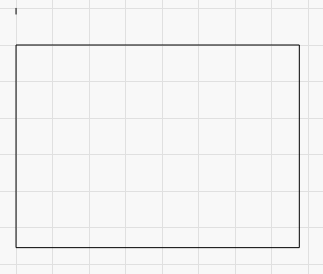
There isn’t a way to do this at the moment. The only thing I could think to try would be a small (tiny) mark off to one side of the starting point of the shape, so the laser would move from that point toward the shape in the correct direction, like this:
If the small tick mark above the upper-left corner was cut first, then the laser would have to move down to start the rectangle cut, and would already be moving in the proper direction and speed when it began the vertical line.
Ruida controllers are very fussy about the content of the jobs. I can’t insert multiple non-cutting moves into a job in a row or the controller assumes it’s an error and rejects the file.