Ok, so I have recently purchased an Atomstack A20 Pro and having got the trial version of Lightburn (Recently updated) I cannot for the life of me understand what is going on. The laser finishing is awful. When I had my A5 Pro, the lasering of text was pin sharp and nice and dark just as I wanted it. I went for an A20 as I want to do some Acrylic work (Yes I know, Black acrylic only) but I cannot get it to laer text into 3mm ply anywhere near as nice as my A5 did. Lightburn will NOT let me do a material test as it does not do anything except for randomly pretend its engraving all across the work area in all manner of shapes and directions and literally engraves nothing despite the laser dot being visible ! I tried Atomstack Studio which started to create a test pallette but only random squares with no font around the edges of the table. I have only managed to get this laser to work in Atomstack Studio and just cannot get the text (Line and not fill) nice and sharp and crisp. I am using air assist at around 25% on 3mm ply but it just comes out as if it is blurry. I have checked the Frame and Gantry for any movement in the wheels and the belt tensions and all seems ok. Any suggestions please and any suggestions on the best settings for a nice crisp, clear line on 3mm Ply (Basswood)
It is driving me absolutely insane ![]()
Without you showing your screen or any other pertinant information other than the laser model my guess is you are operating in the wrong speed mode. Should be mm/min.
Hi - Thank you for your response. I shall double check that tomorrow, thanks for the tip ![]() I have manually tried all sorts of speed and power combinations with and without air assist, I shall post a photo tomorrow of my tests but none seem to be a nice finish text which I had with my A5 pro. Thanks again, I shall update you tomorrow
I have manually tried all sorts of speed and power combinations with and without air assist, I shall post a photo tomorrow of my tests but none seem to be a nice finish text which I had with my A5 pro. Thanks again, I shall update you tomorrow ![]()
Oh my Gosh !!! I just read that an Atomstack A20 pro is not suitable for engraving or cutting wood ! Is this true ?
HEEEEEELP !
No, that is not true. It’s a 20 watt diode laser and should have no problem with wood of suitable thickness. I wouldn’t try to cut through 3/4" material, but 3mm to 6mm laser plywood should work great.
Hi Anthony
I’m not saying it’s wrong to use air assist for engraving in all circumstances but I don’t use it because the engraving is neater without it.
Also, if the A5 is as I suspect, a 5w module then the comparison with the 20w - 21w output module would be as a sharpened pencil is compared to an unsharpened pencil. I use a 20w and a 2w…delighted to have both but sometimes long for a 40w.
Compare the focused dot sizes of the machines and you will see why they are different. You will also need exact-on focus to get any detail from the 20w machine.
You would want to keep the power down as well. Think propane torch compared to a flame thrower.
Hello All - So I have been having a deeper dive into Lightburn after reading some things online and I finally figured out why I cannot get Lightburn to work with my A20 ! It was the damn settings. I checked and yes it was set to Diode MM/MIN which I believe is correct but then I noticed that after typing the $$ into the console and it showed a 1000 the actual settings panel was set to 255. I changed that and it is now letting me to a test on 3mm Ply…whhhooooooppppp ![]() Now then, upon another subject of mine where I stated I cannot get the text as clear as I did with my A5, I noticed that whilst it now running a test for the A20 the text on the graph is small and it is nice and clear and so this laser must be capable of engraving small clear text. So I also note that the test settings for engraving are in the higher range of numbers. Should I lower these parameters to run another test or is this test standard and the norm ? I will be doing a cut test next although when I did a cut just the other day it cut through 3mm ply at 100 Power and 400 speed with 1 pass like a knife through butter with no charring or burning but then I did have air assist on around 50%. You guys are awesome and your help has prompted me to get deeper into this today to try and figure everything out as I was getting quite frustrated after investing heavily in a new laser and not getting anywhere. Naturally photos are still coming and any hints and tips with regards to getting lovely engravings rather than
Now then, upon another subject of mine where I stated I cannot get the text as clear as I did with my A5, I noticed that whilst it now running a test for the A20 the text on the graph is small and it is nice and clear and so this laser must be capable of engraving small clear text. So I also note that the test settings for engraving are in the higher range of numbers. Should I lower these parameters to run another test or is this test standard and the norm ? I will be doing a cut test next although when I did a cut just the other day it cut through 3mm ply at 100 Power and 400 speed with 1 pass like a knife through butter with no charring or burning but then I did have air assist on around 50%. You guys are awesome and your help has prompted me to get deeper into this today to try and figure everything out as I was getting quite frustrated after investing heavily in a new laser and not getting anywhere. Naturally photos are still coming and any hints and tips with regards to getting lovely engravings rather than cuts into the wood would be greatly appreciated.
Thanks ![]()
If you’re using the presets for the material test, it is a wide range to cover most possibilities. You take the results from that test and narrow it down to the range that looks best for your particular machine.
Another thing that can muddy an engraving is scan line offset. Once you know the speed power range for your machine run this test.
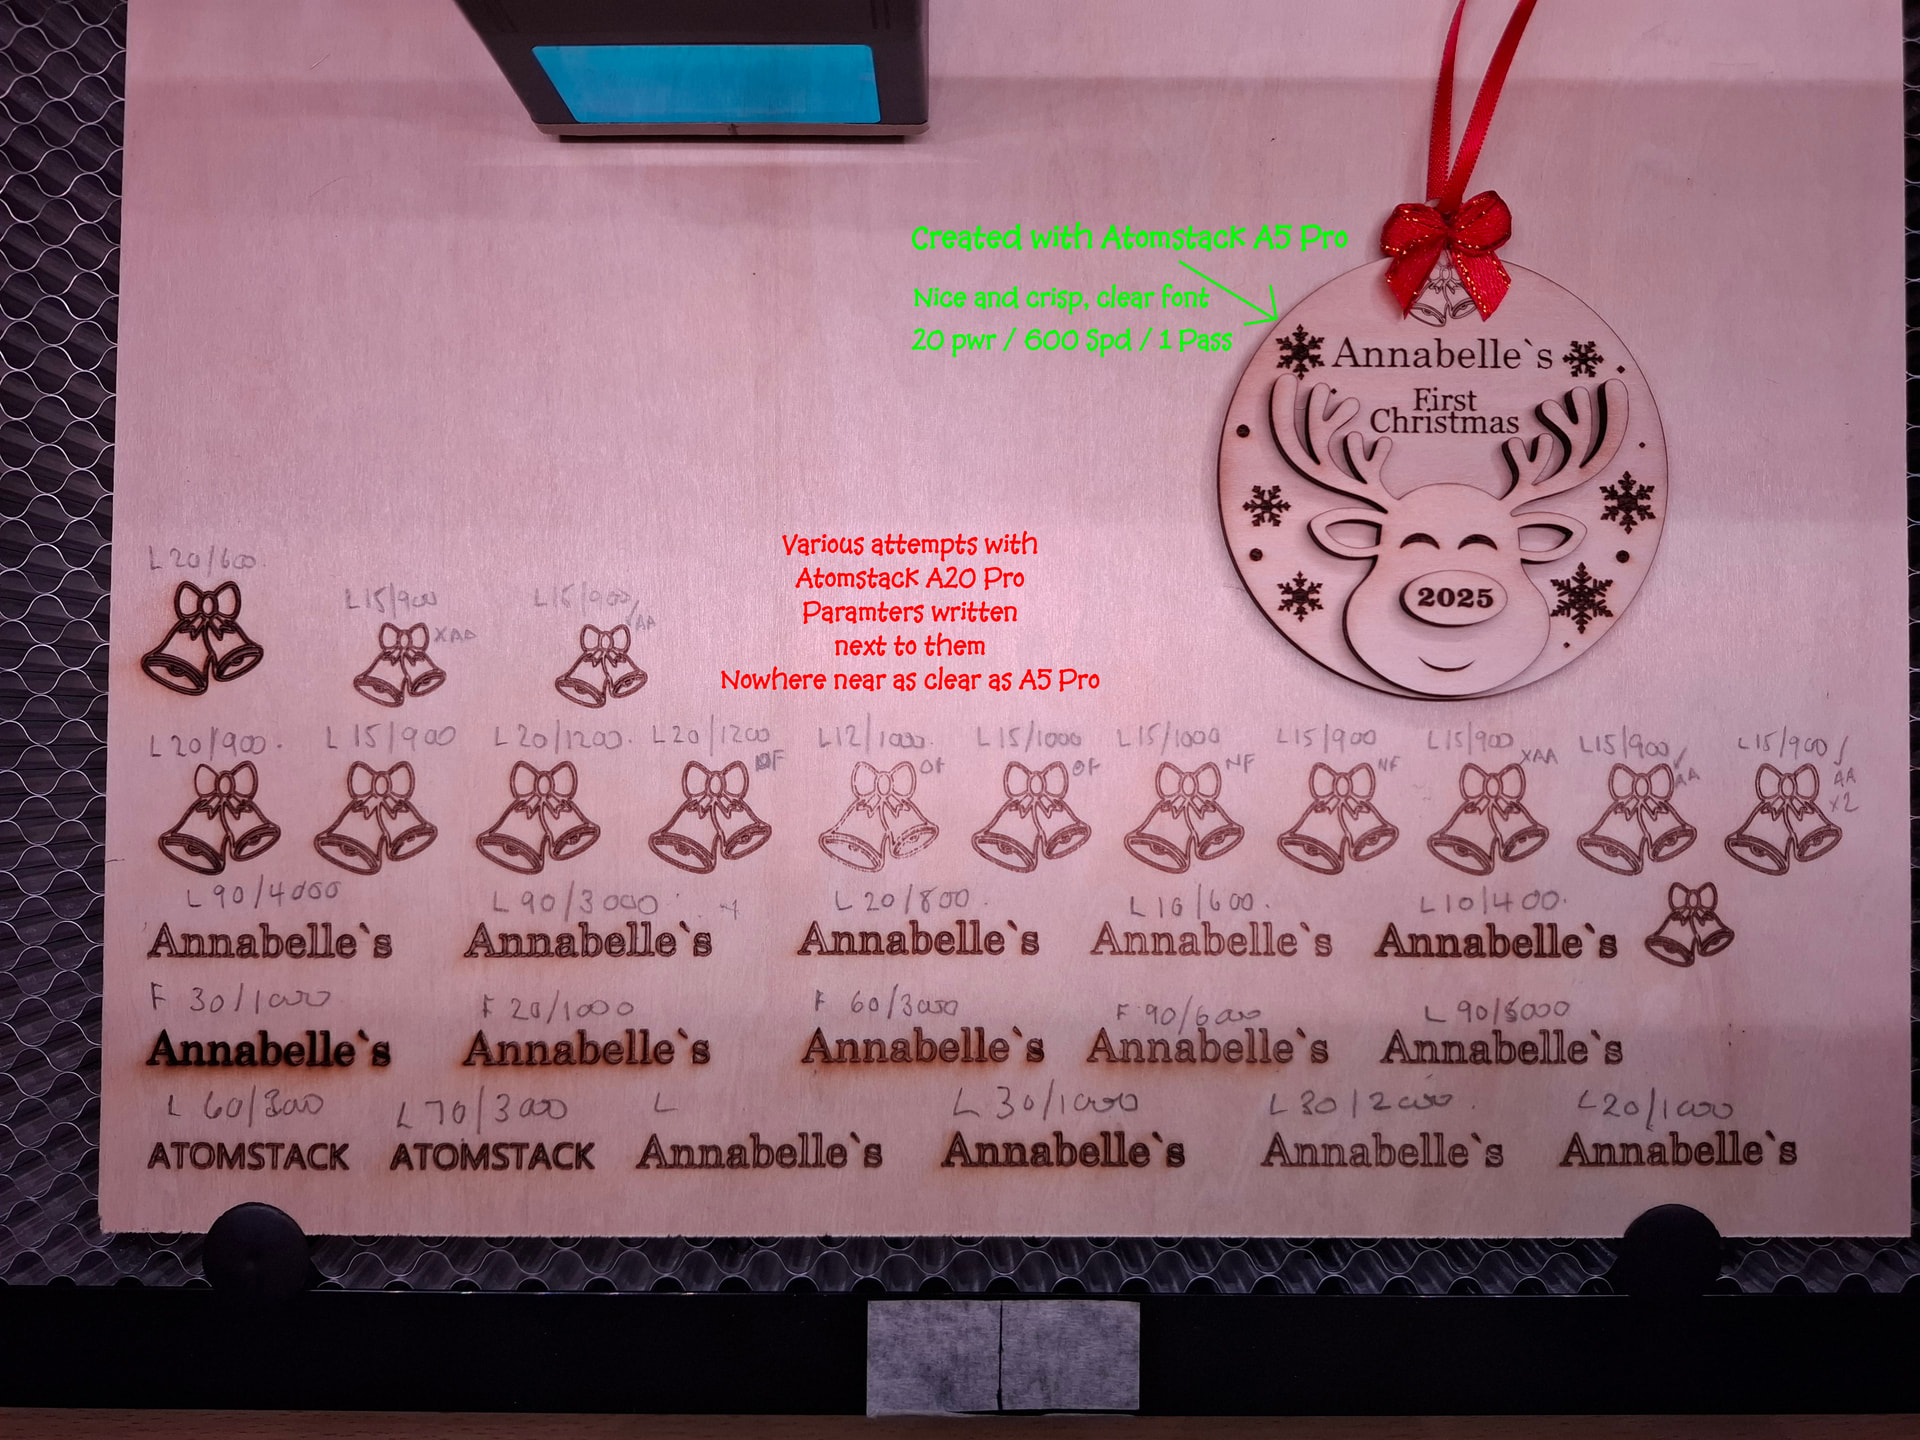
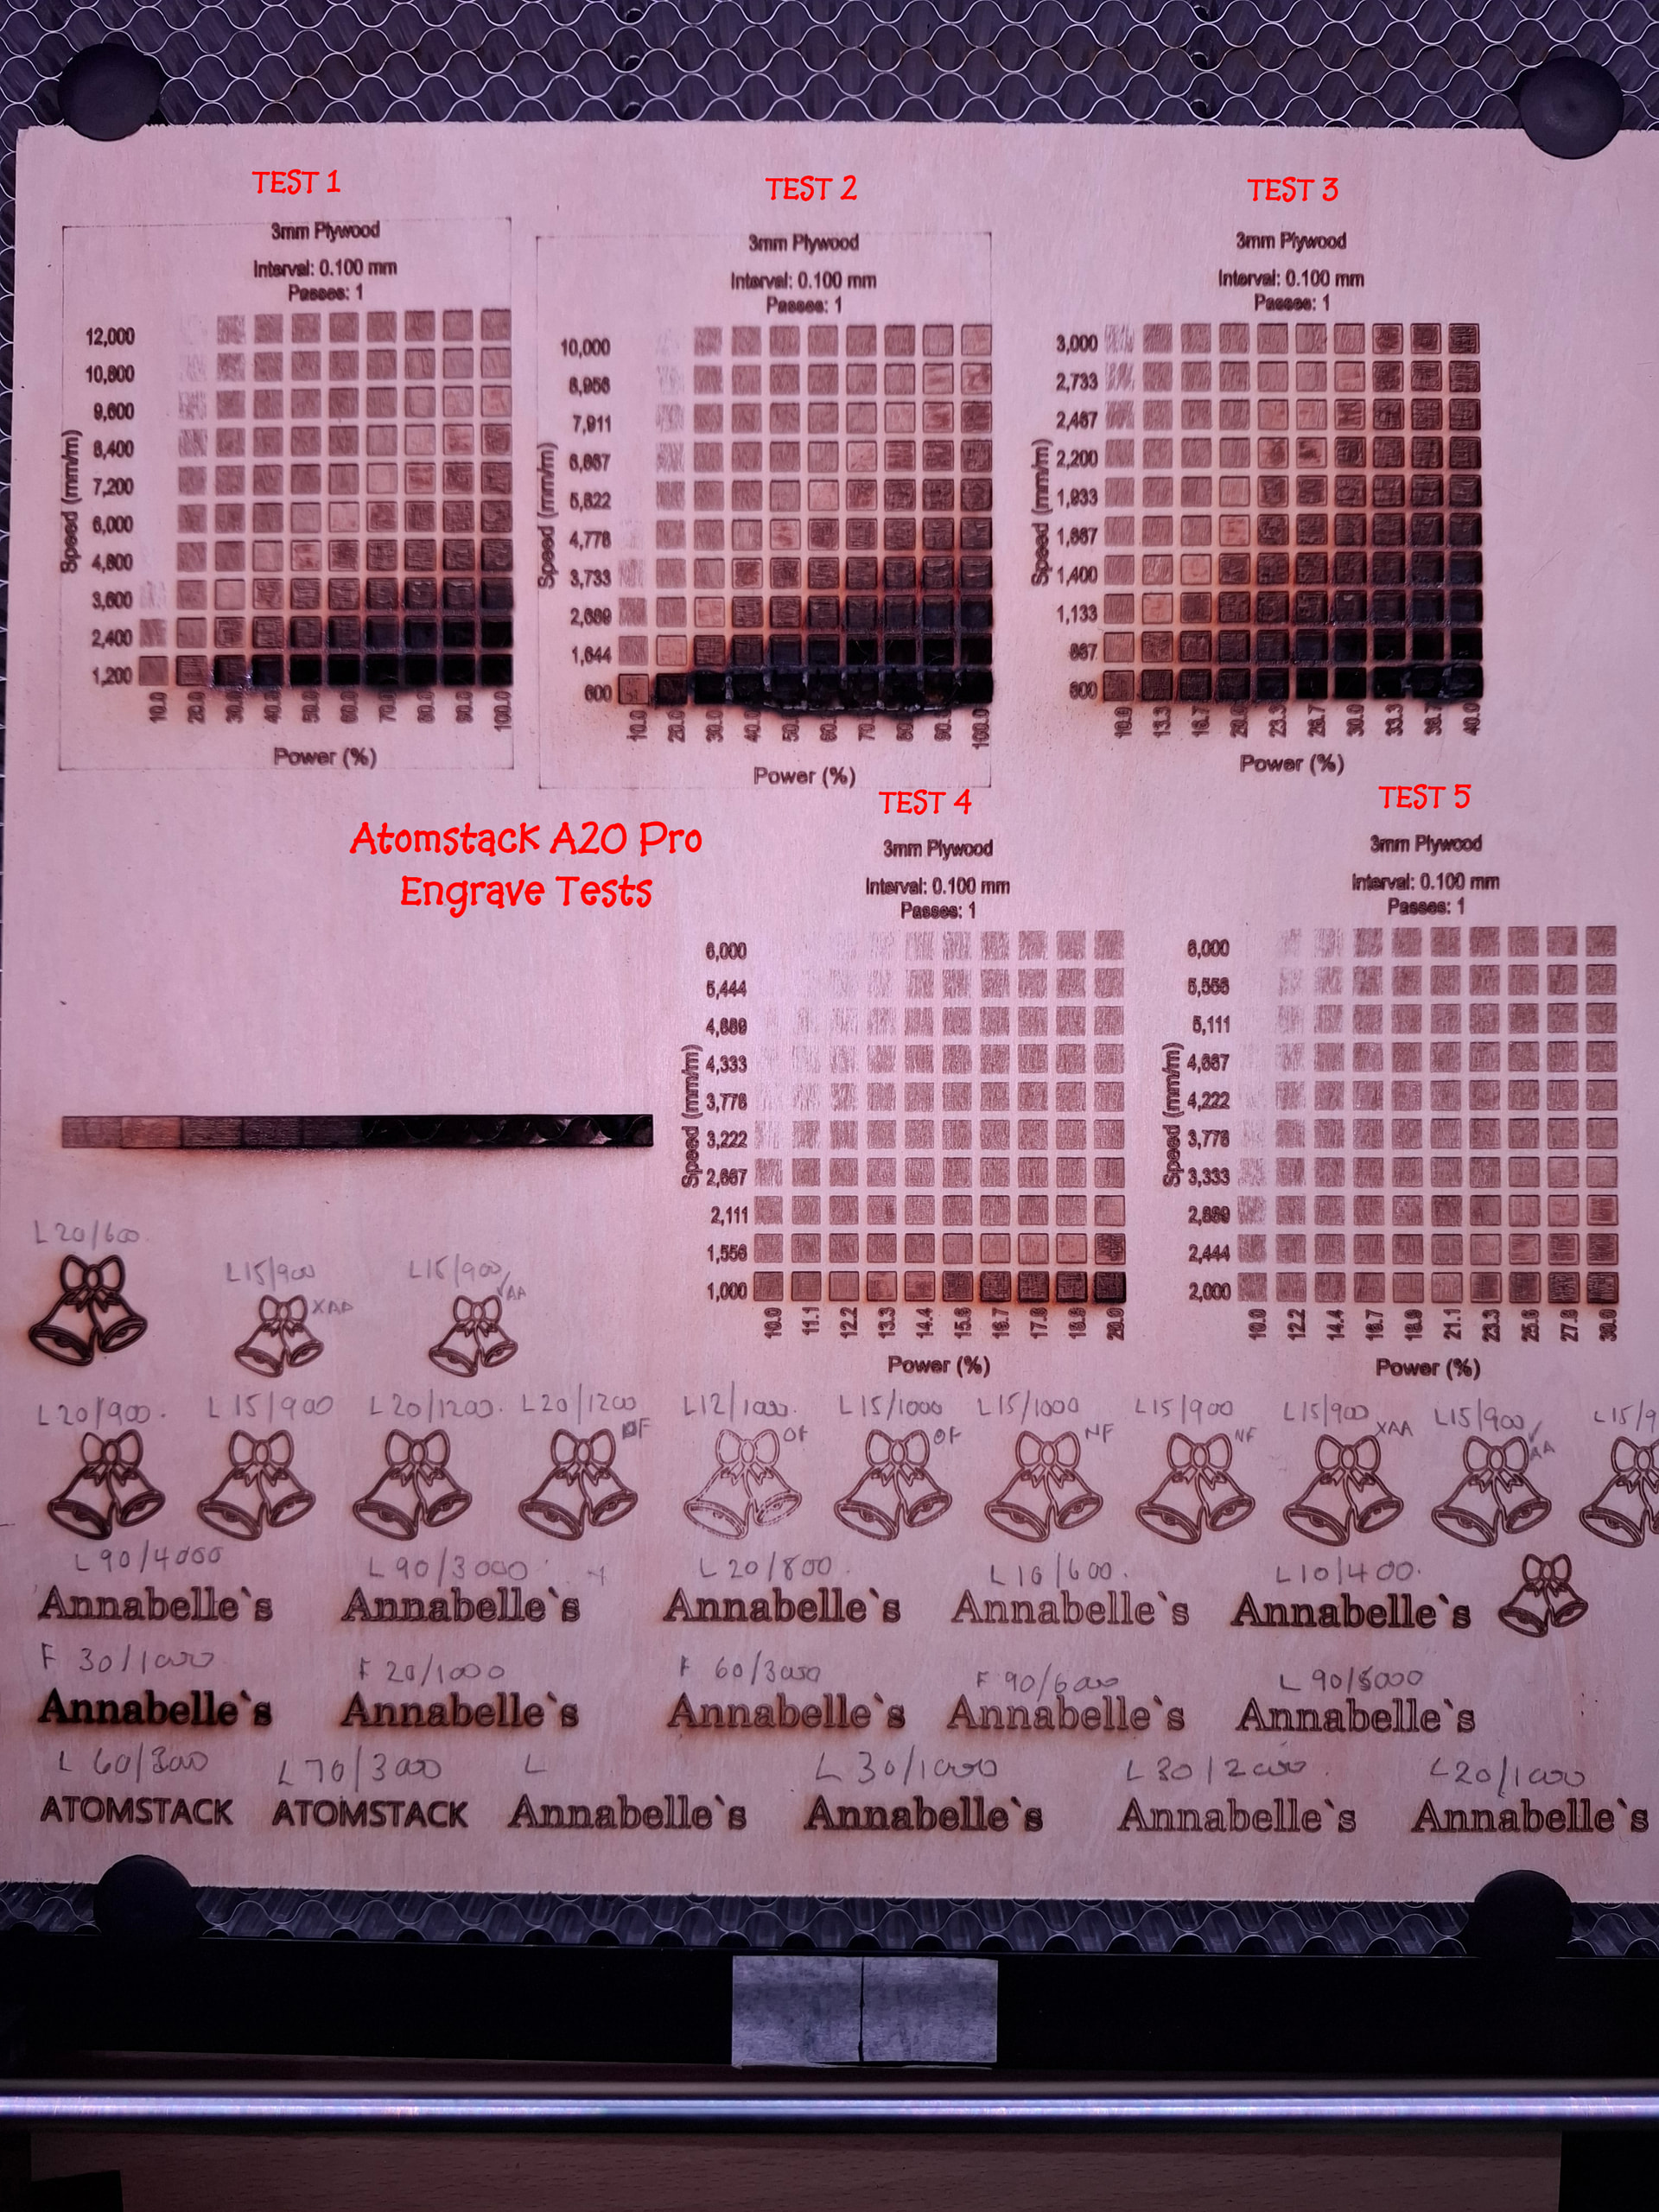
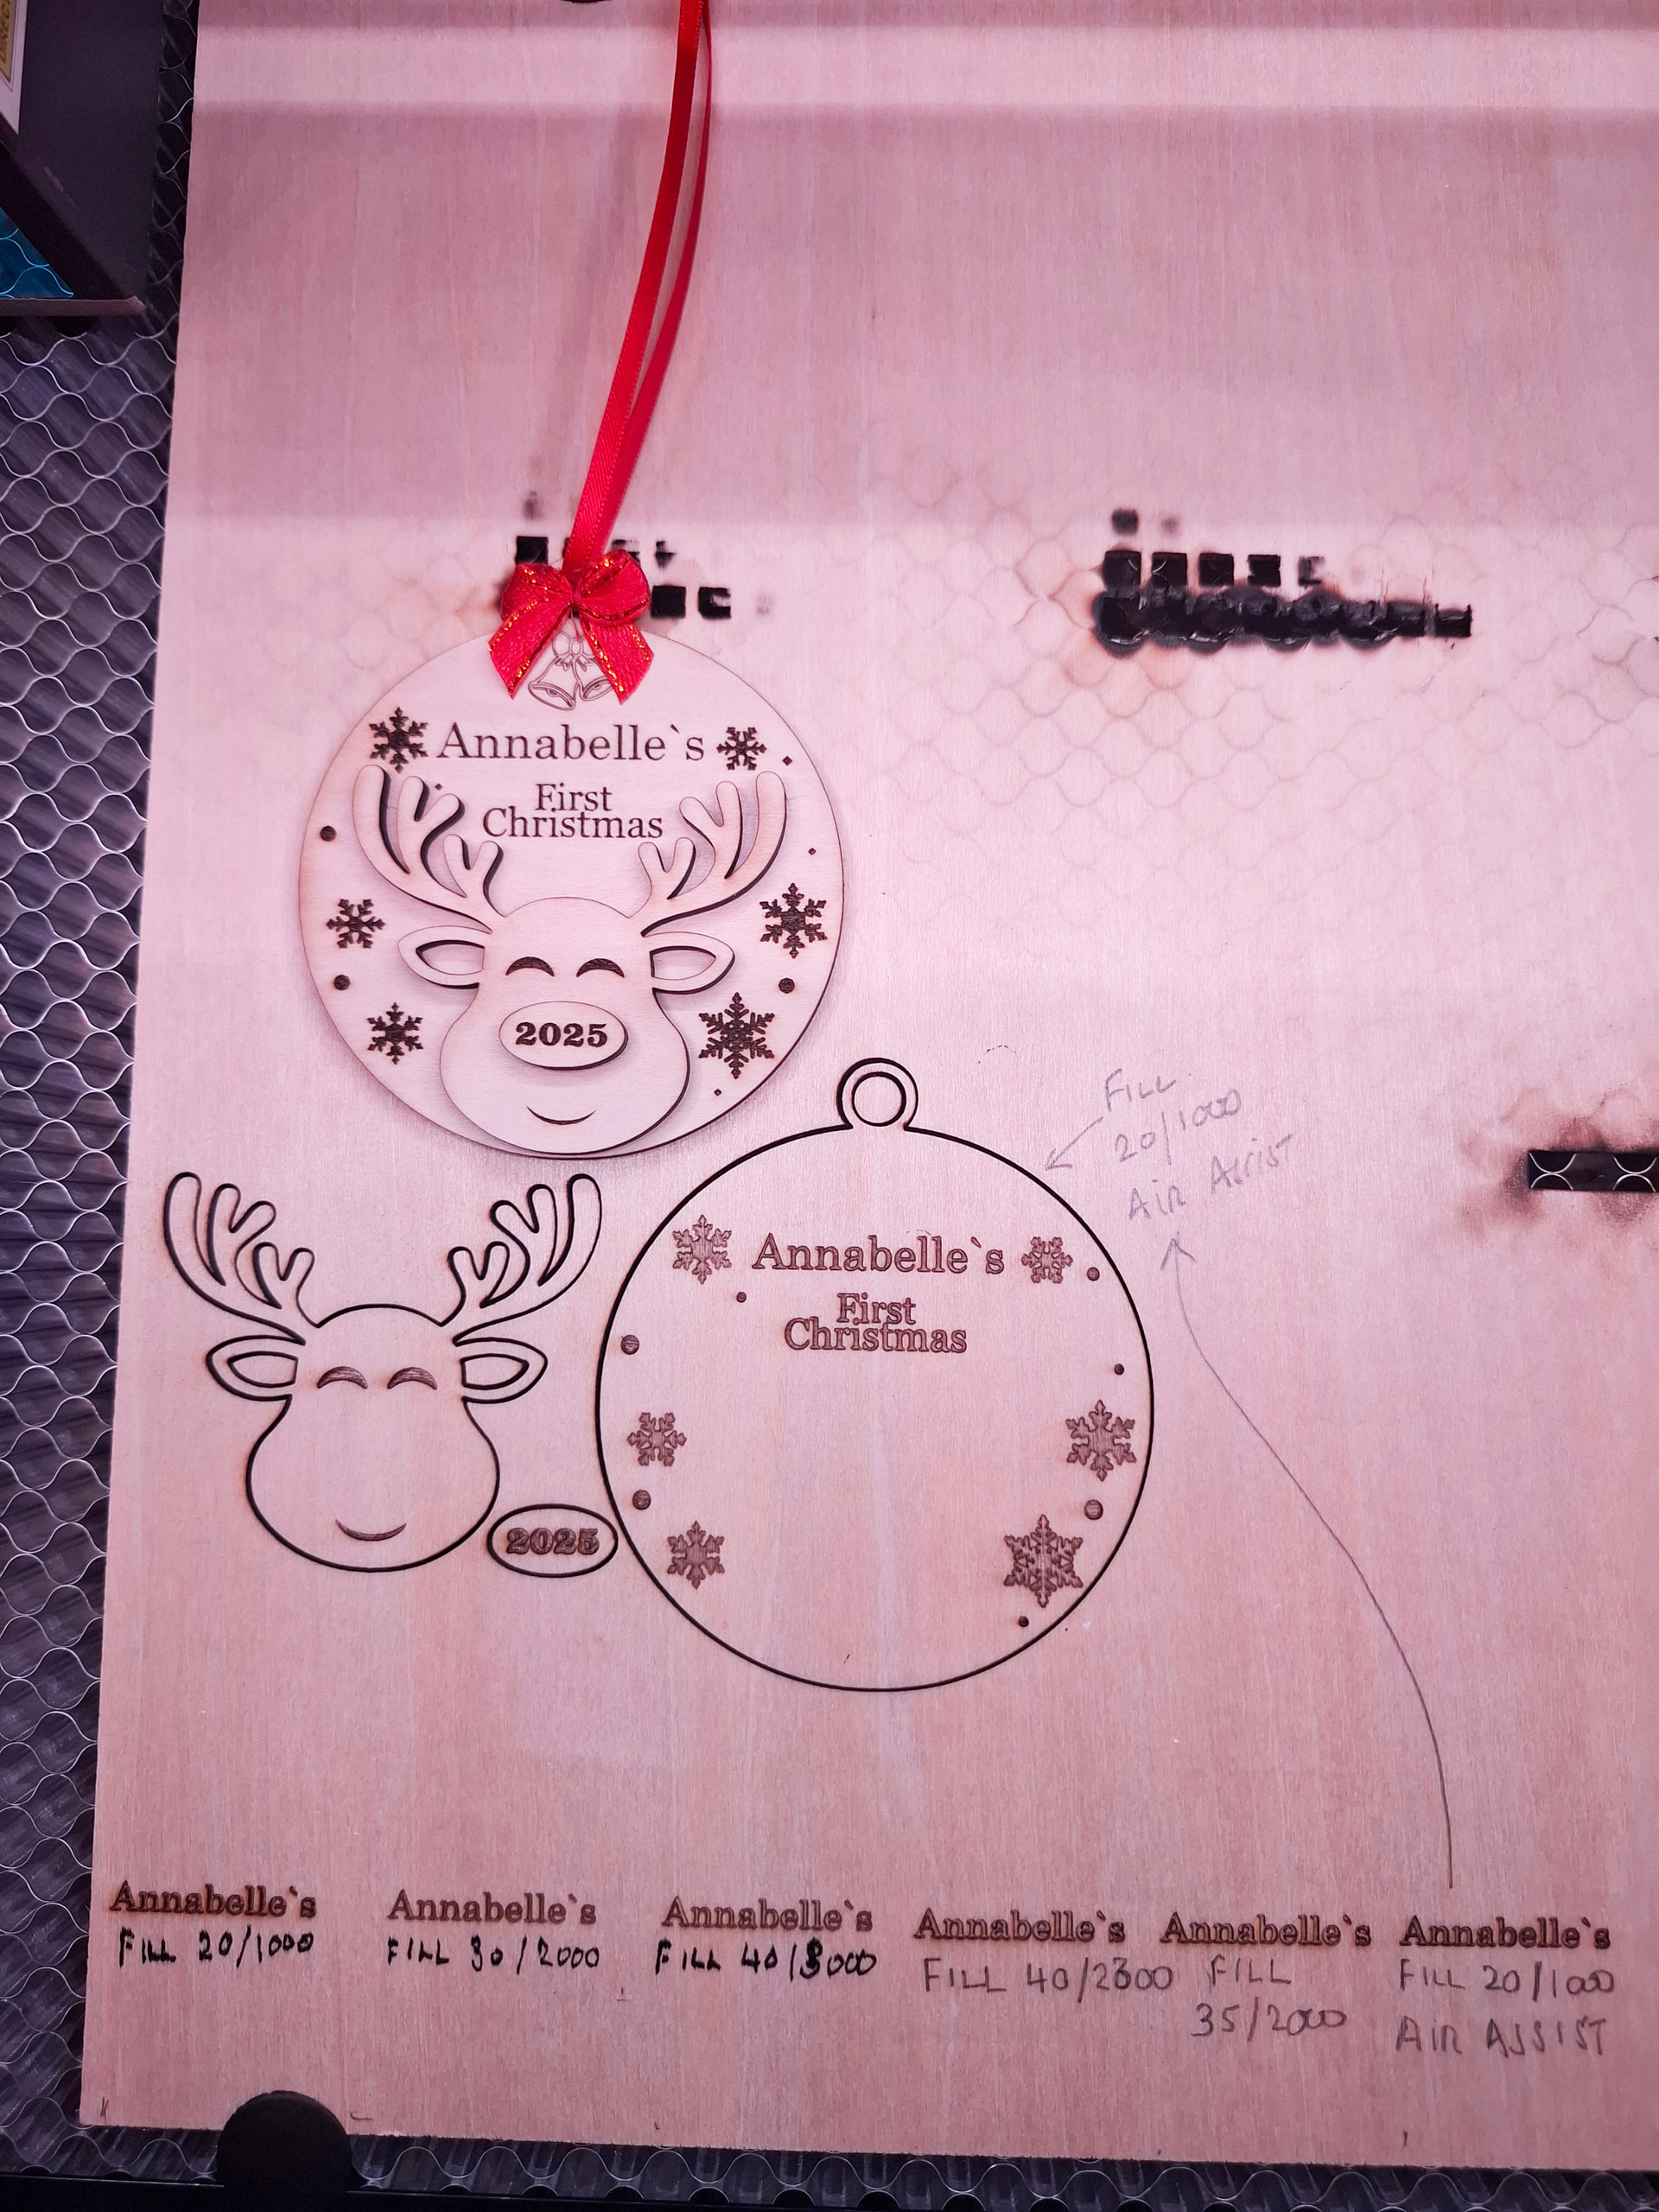
Thank you so very much. Oddly enough by the time you sent this message I did spend a bit of time carrying out the engrave tests on 3mm Ply now that I have Lightburn working lol ![]() I did 5 tests and I am happy with the final 2 but the truth will be when I engrave some lettering shortly. I shall of course take a look at what you have attached for me to see if there is anything wrong with my set up. As you can see in the first image, I made a small product with the A5 Pro and it turned out quite nice. I cannot seem to however, get the font like it is on the A5 with the A20 Pro but I will persist lol. If you look at the parameters graph that Lightburn printed around the table they are nice and clear so the laser is obviously capable. Would like to know what speed and Power Lightburn use to get the font to engrave like that
I did 5 tests and I am happy with the final 2 but the truth will be when I engrave some lettering shortly. I shall of course take a look at what you have attached for me to see if there is anything wrong with my set up. As you can see in the first image, I made a small product with the A5 Pro and it turned out quite nice. I cannot seem to however, get the font like it is on the A5 with the A20 Pro but I will persist lol. If you look at the parameters graph that Lightburn printed around the table they are nice and clear so the laser is obviously capable. Would like to know what speed and Power Lightburn use to get the font to engrave like that ![]() It would appear that the last 2 tests are about as good as it gets. Any hints and tips greatfully received
It would appear that the last 2 tests are about as good as it gets. Any hints and tips greatfully received ![]() Thanks everyone
Thanks everyone
I may be wrong, but it appears like you’re running your text tests in line mode rather than fill. It may just be the way the photo shows on my computer, though.
Hi - Thank you, yes it was set to line following a bit of reading across Google but it is clear I have a lot to learn ! I changed it to Fill and had some pretty decent results this time with the font as you can see along the bottom. Looking at the example image provided you can see that whilst not identical I can cope with the font as it is now on the Bauble part but that 2025 still turns out hideous ! I put the original product I made on the A5 Pro above the one just made as an example for you. Do you think lowering the power to 10 and speed to around 600 would help it. Looking at the original it has Surface engraved more or less which is fab and obviously why I have a much more clear and legible finish and running a finger across you cannot even feel it. The A20 Pro however seems to have literally carved the wood rather than engraved. Do you know of any fixes for this please ? This learning curve is fantastic and I really do appreciate the input from this topic already ![]()
It looks like you’re on the way to finding the sweet spot. It takes a good amount of experimentation. One thing I will say is only change 1 parameter at a time. When you change multiple parameters you don’t know if the speed or power made the difference.
I can’t offer advice for exact speed/power for your machine, but I do know a 5 watt diode has a much finer dot than a 20 watt. You also don’t say what line interval you/re running at. That makes a difference as well. If you run too high an interval you’re hitting the same area multiple times. There is a tool for testing line interval as well.
What I see in your image is a deep engrave. 20/1000 is too slow a combination. Try reducing the power or increasing the speed. I think 30/2000 gave the cleanest result on your sample. I would run some tests around those settings, but figure out line interval first.
Hi - Wow, thanks again for such an informative and helpful reply. I did notice that the interval is set to 1 I thing, I would need to double check but I have seen rumblings of some lowering this to 0.1 so I am not sure if this is correct. Also I completely agree that after I sent this image last night I took another look at it myself and agree that the 20/3000 did give a cleaner result but I would like it to look a little darker so may experiment with increments of 1 lol
Naturally when doing this I will change one parameter at a time as you have advised. After running the 5w I seemed to think I had this in the bag but now I am running the 20w instead I think I have to admit that I aint so bright after all lol When I do finally conquer this I am then going to attempt a cut test lol. Suppose I had best get the Fire department ready. Then when I have all my wood settings clearly noted it is time to start on my black acrylic ... I see lots of melting ahead although I did a test cut on one of those little sample pieces they give you with the laser and on first attempt I made an awesome little square cutout. This was after many failed attempts which included melting, bubbling, popping and not getting through the top layer at all. That was 3mm acrylic I ordered on Temu ...... NEVER AGAIN ! I was almost going to give up on acrylic but then I read up and did not realise that there were two diffenet acrylics, cast and extruded. So after doing the successful cut on that sample piece I have just taken delivery of a lovely 12" x 20" sheet of 3mm Cast Black Acrylic. This is what I am calling my Messing around sheet` ha ha. I would like to make some projects with cutouts to bond a white acrylic behind the black to look like white lettering but I am not sure if this laser would handle white acrylic, any advice there would be greatly appreciated.
Anyway back to the laser I go and will update you, however please do advise if the 0.1 interval is decent to try or not.
Thanks again for being such a great teacher ![]()
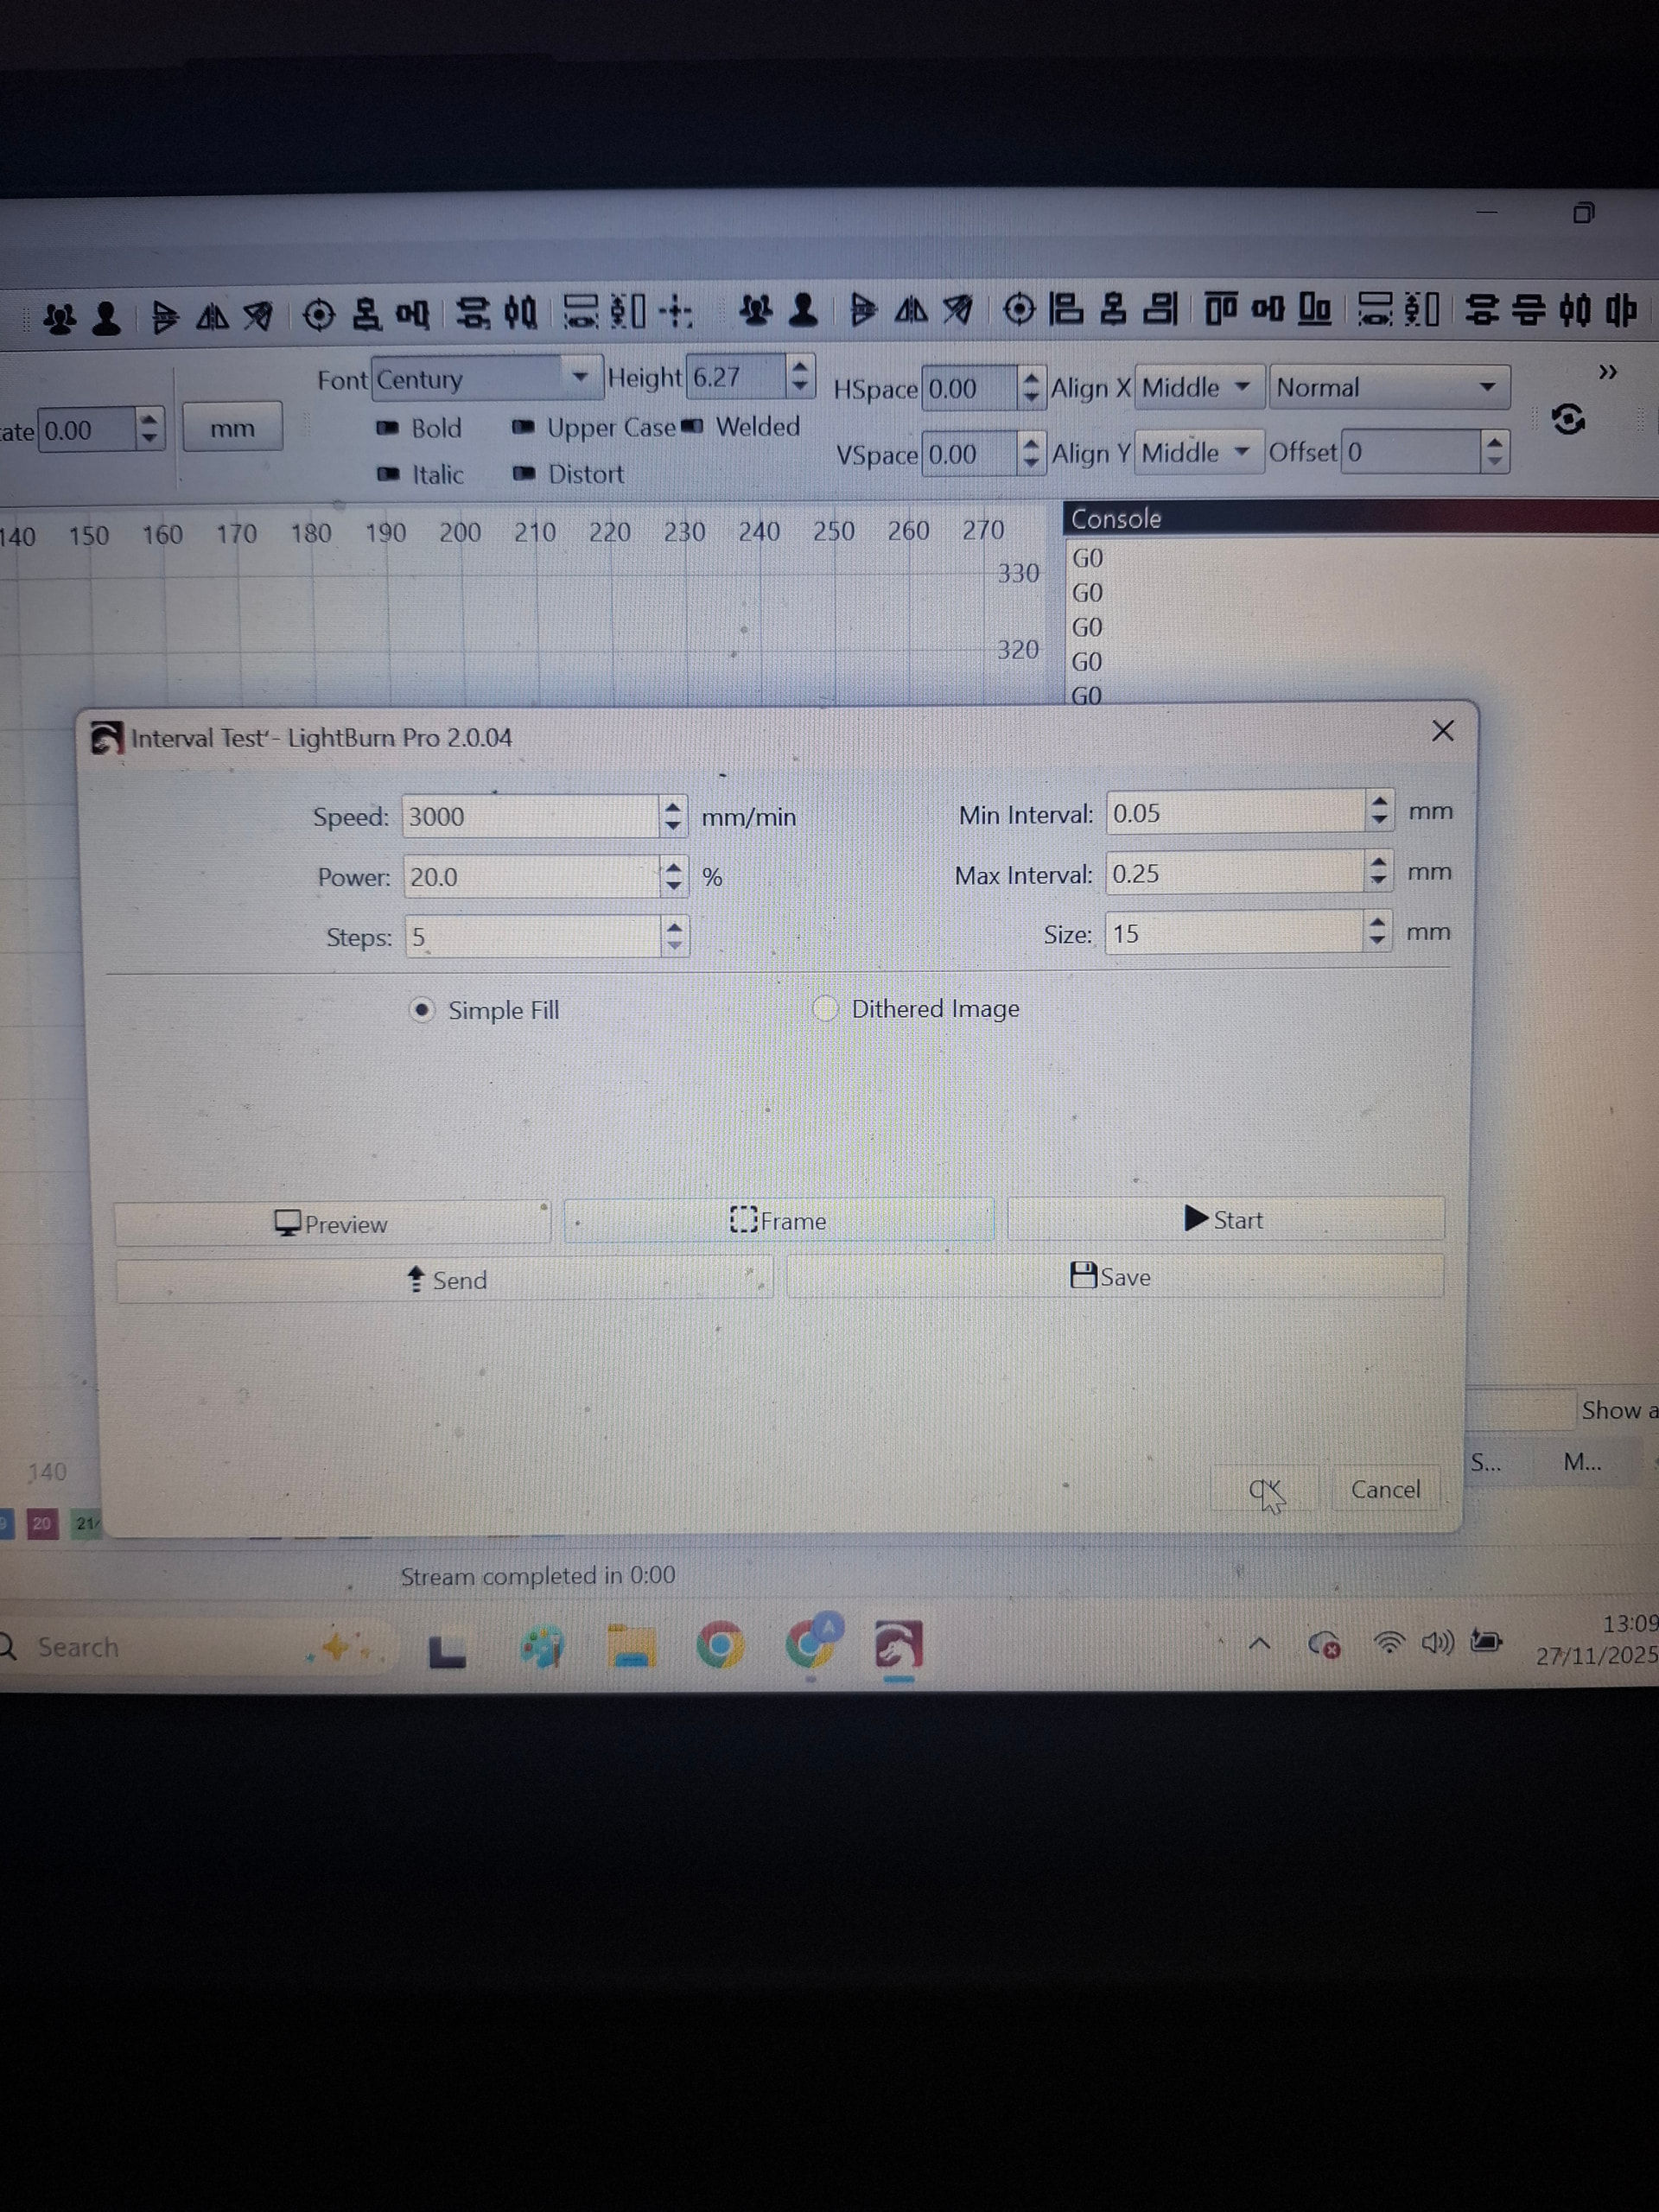
So I have followed your advice and carried out the line interval test and the results are in the photo. So originally my machine was set to 0.1 and so I entered the range and the same speed and power settings as the preferred font from the previous engrave tests and it appears that my setting needs to change ![]() Hopefully I am correct in my assumptions. I have yet to try engraving with this new setting so will keep you posted.
Hopefully I am correct in my assumptions. I have yet to try engraving with this new setting so will keep you posted.
Thanks ![]()
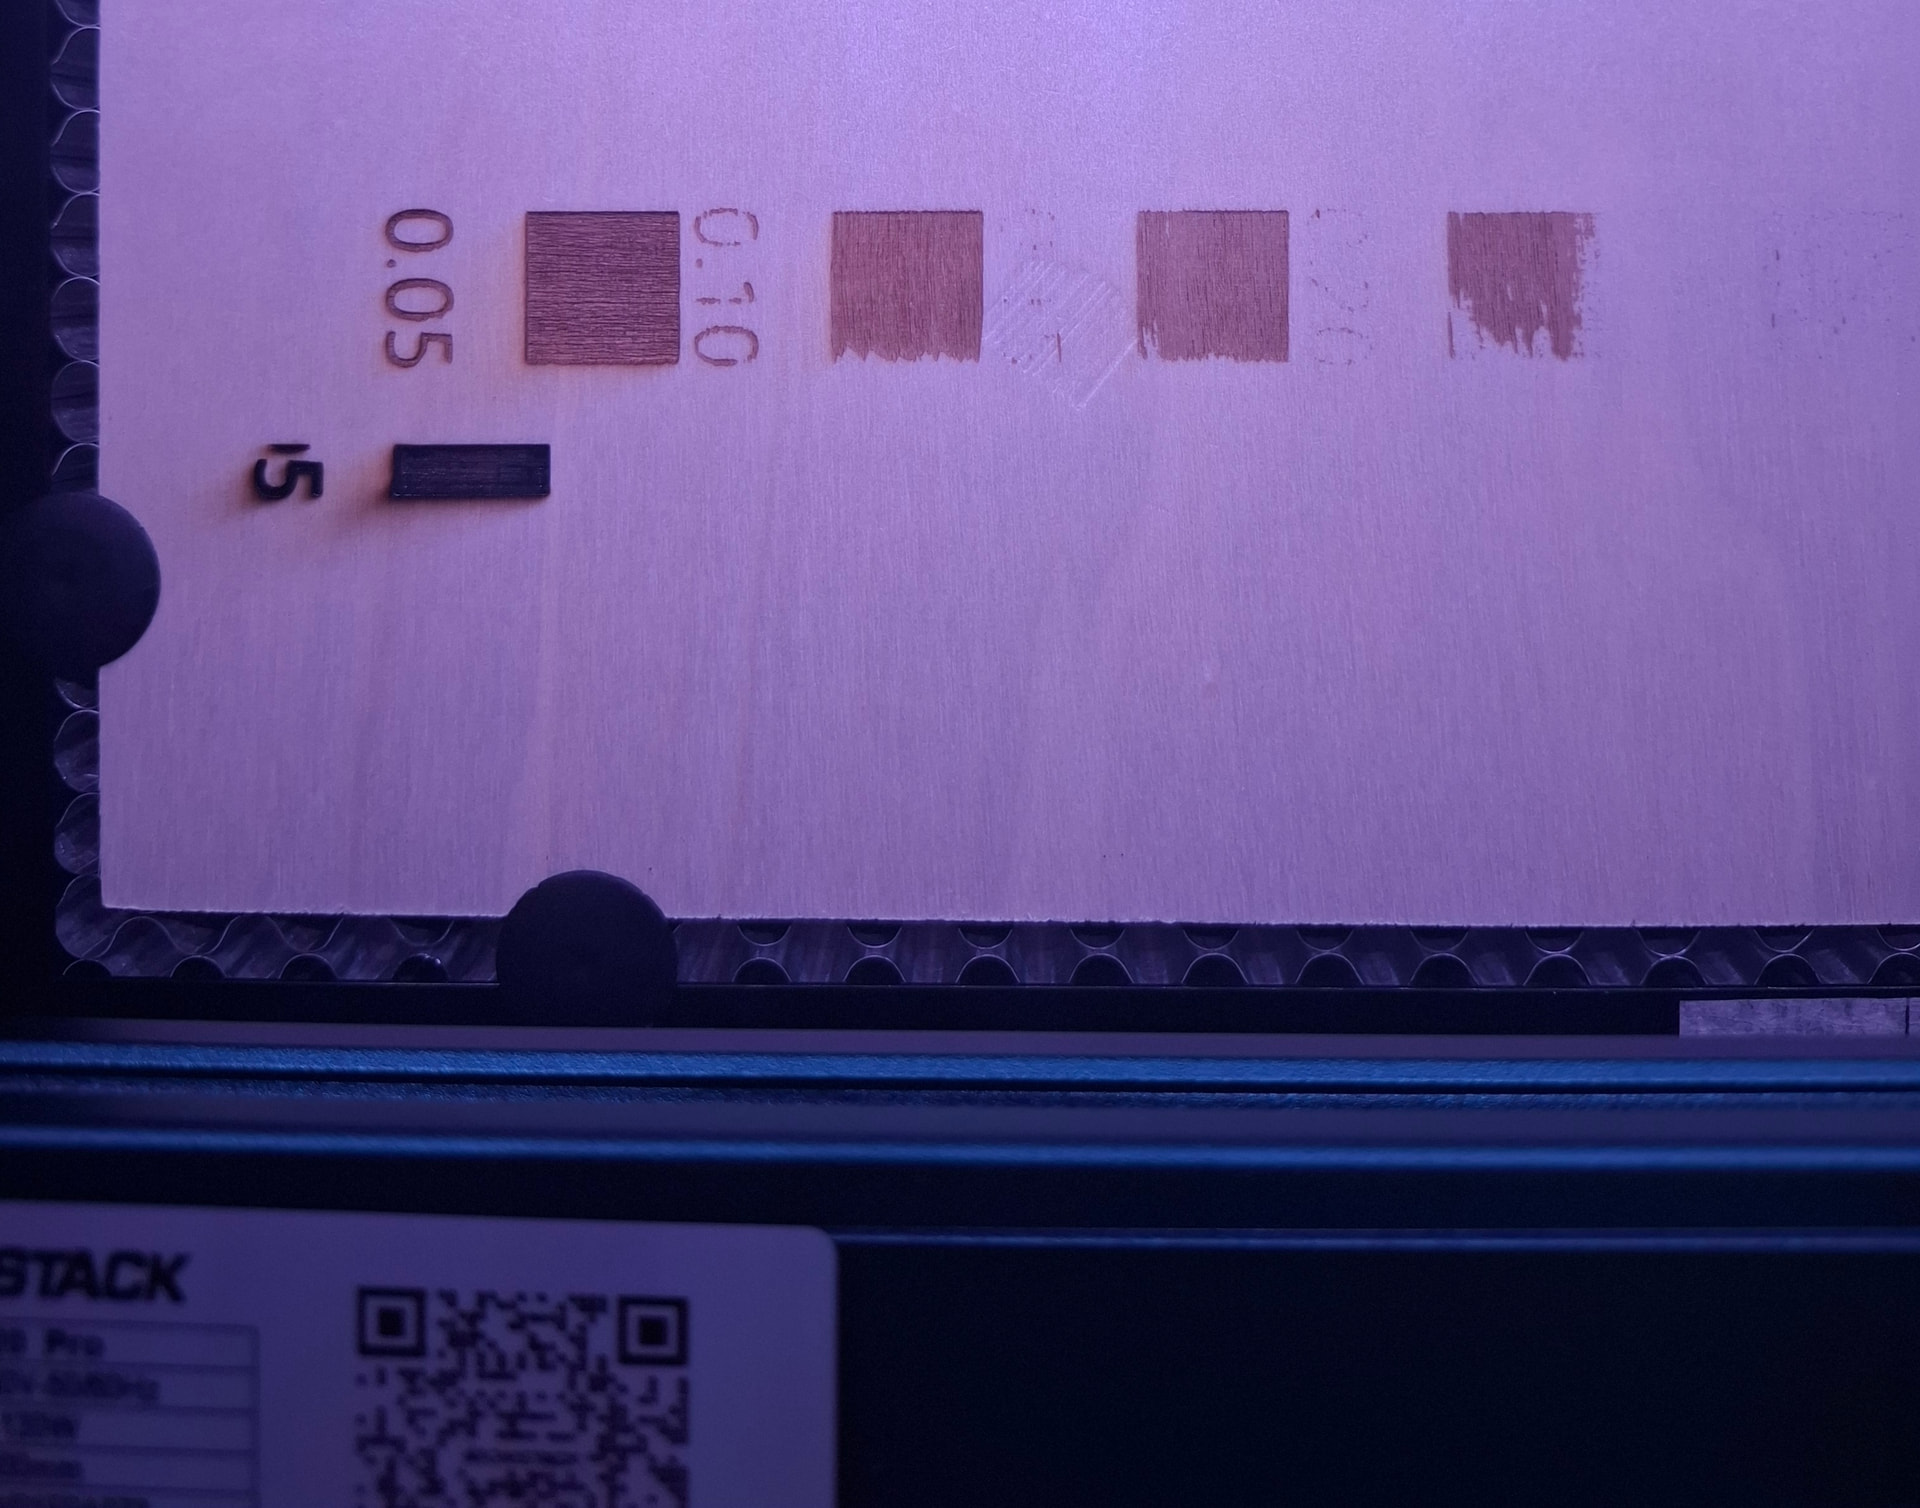
It looks like your material is warped and your focus isn’t consistant. I would expect to see consistant egraving on all squares, just a difference in the straight lines. Definitely not patchy like this. It may also be the actual material just doesn’t engrave well.
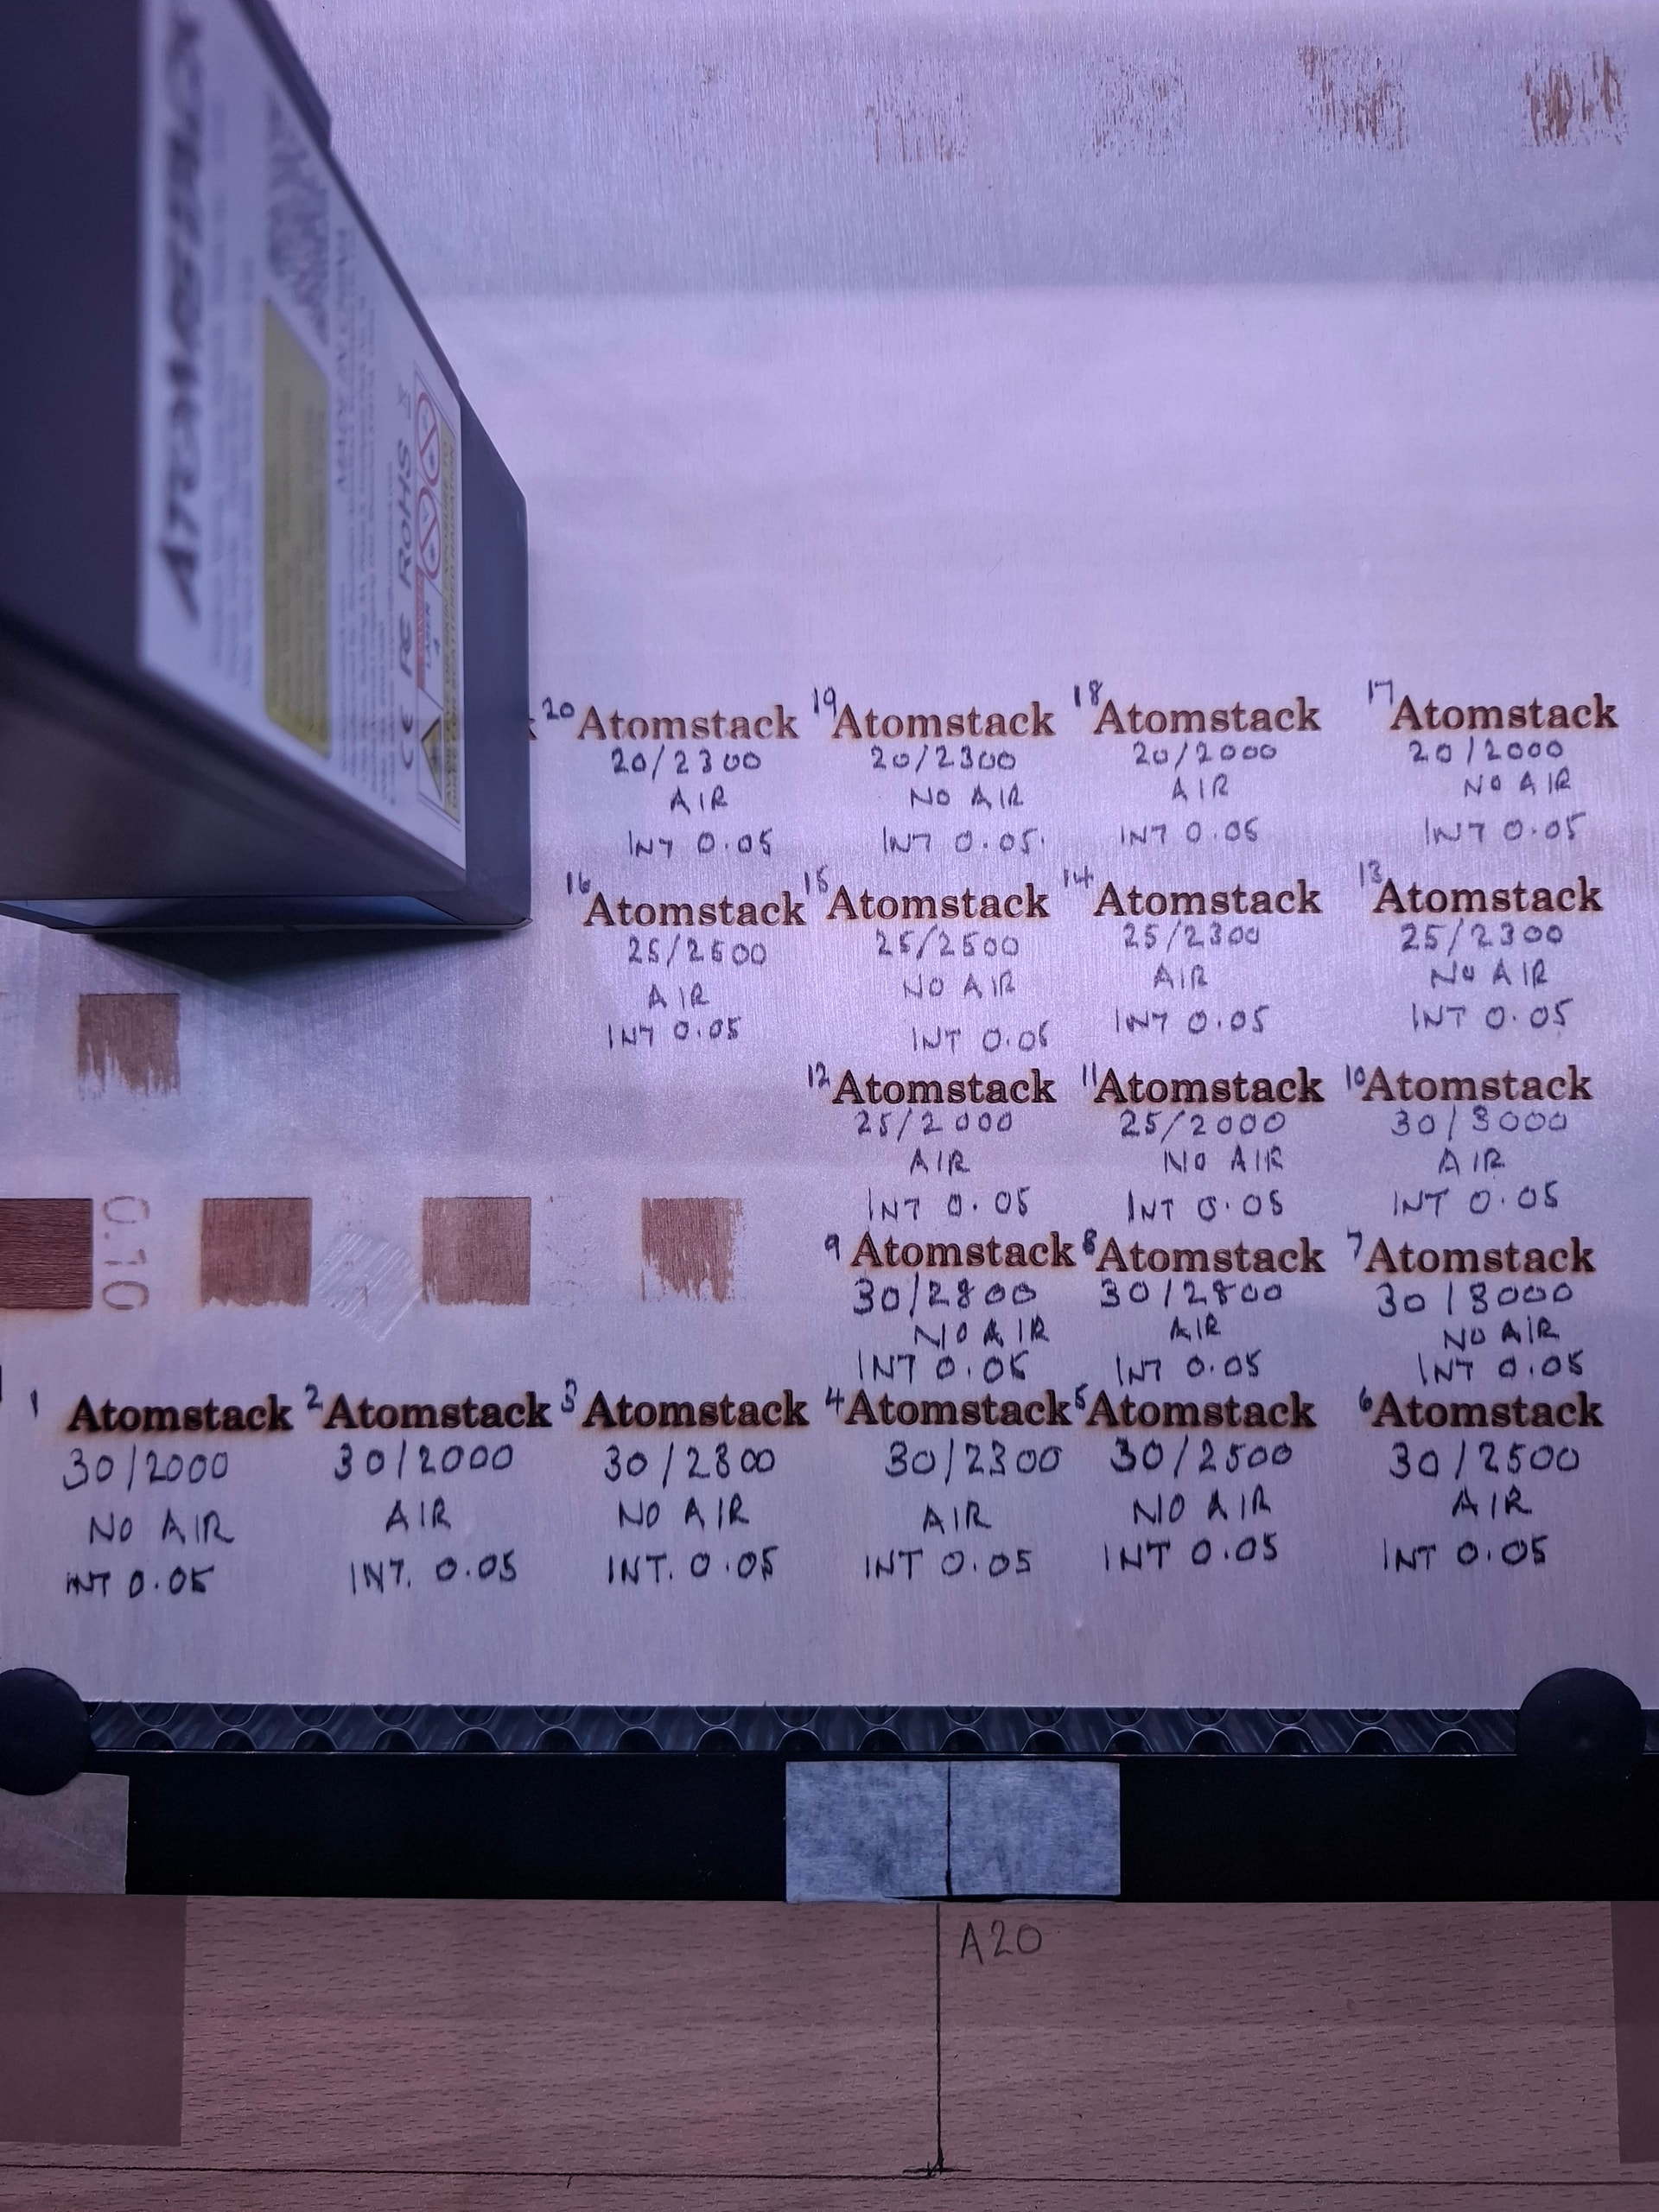
Ooooo - These are the 2mm ply that I am just testing this out on so maybe I should try the 3mm. Since changing the Interval, I think I see an improvement in the font. I have run about 20 tests today which I have uploaded here for you to see. Let me know your thoughts ![]()
Now I am off to do an interval test on 3mm Ply ![]()
Thank you
I think you’re doubling your line count at .05. The advertised spot size on that laser is .08 x .1. I don’t know which is x or y axis, but manufacturers tend to exaggerate specs like this. I would back down to .1 and adjust speed and power for that interval.
Another thing to take into consideration is you haven’t sanded any of these results. There is always smoke/soot/tar on the surface surrounding an engraving that needs to be cleaned off.
You Sir are a wealth of valuable information. As you know much much more than I about this I am going to take your advice and ramp the interval back to 1, thank you. With regards to sanding maybe I should just get my Wife to lick the surface ![]()
Thank you once again and will of course update you ![]()
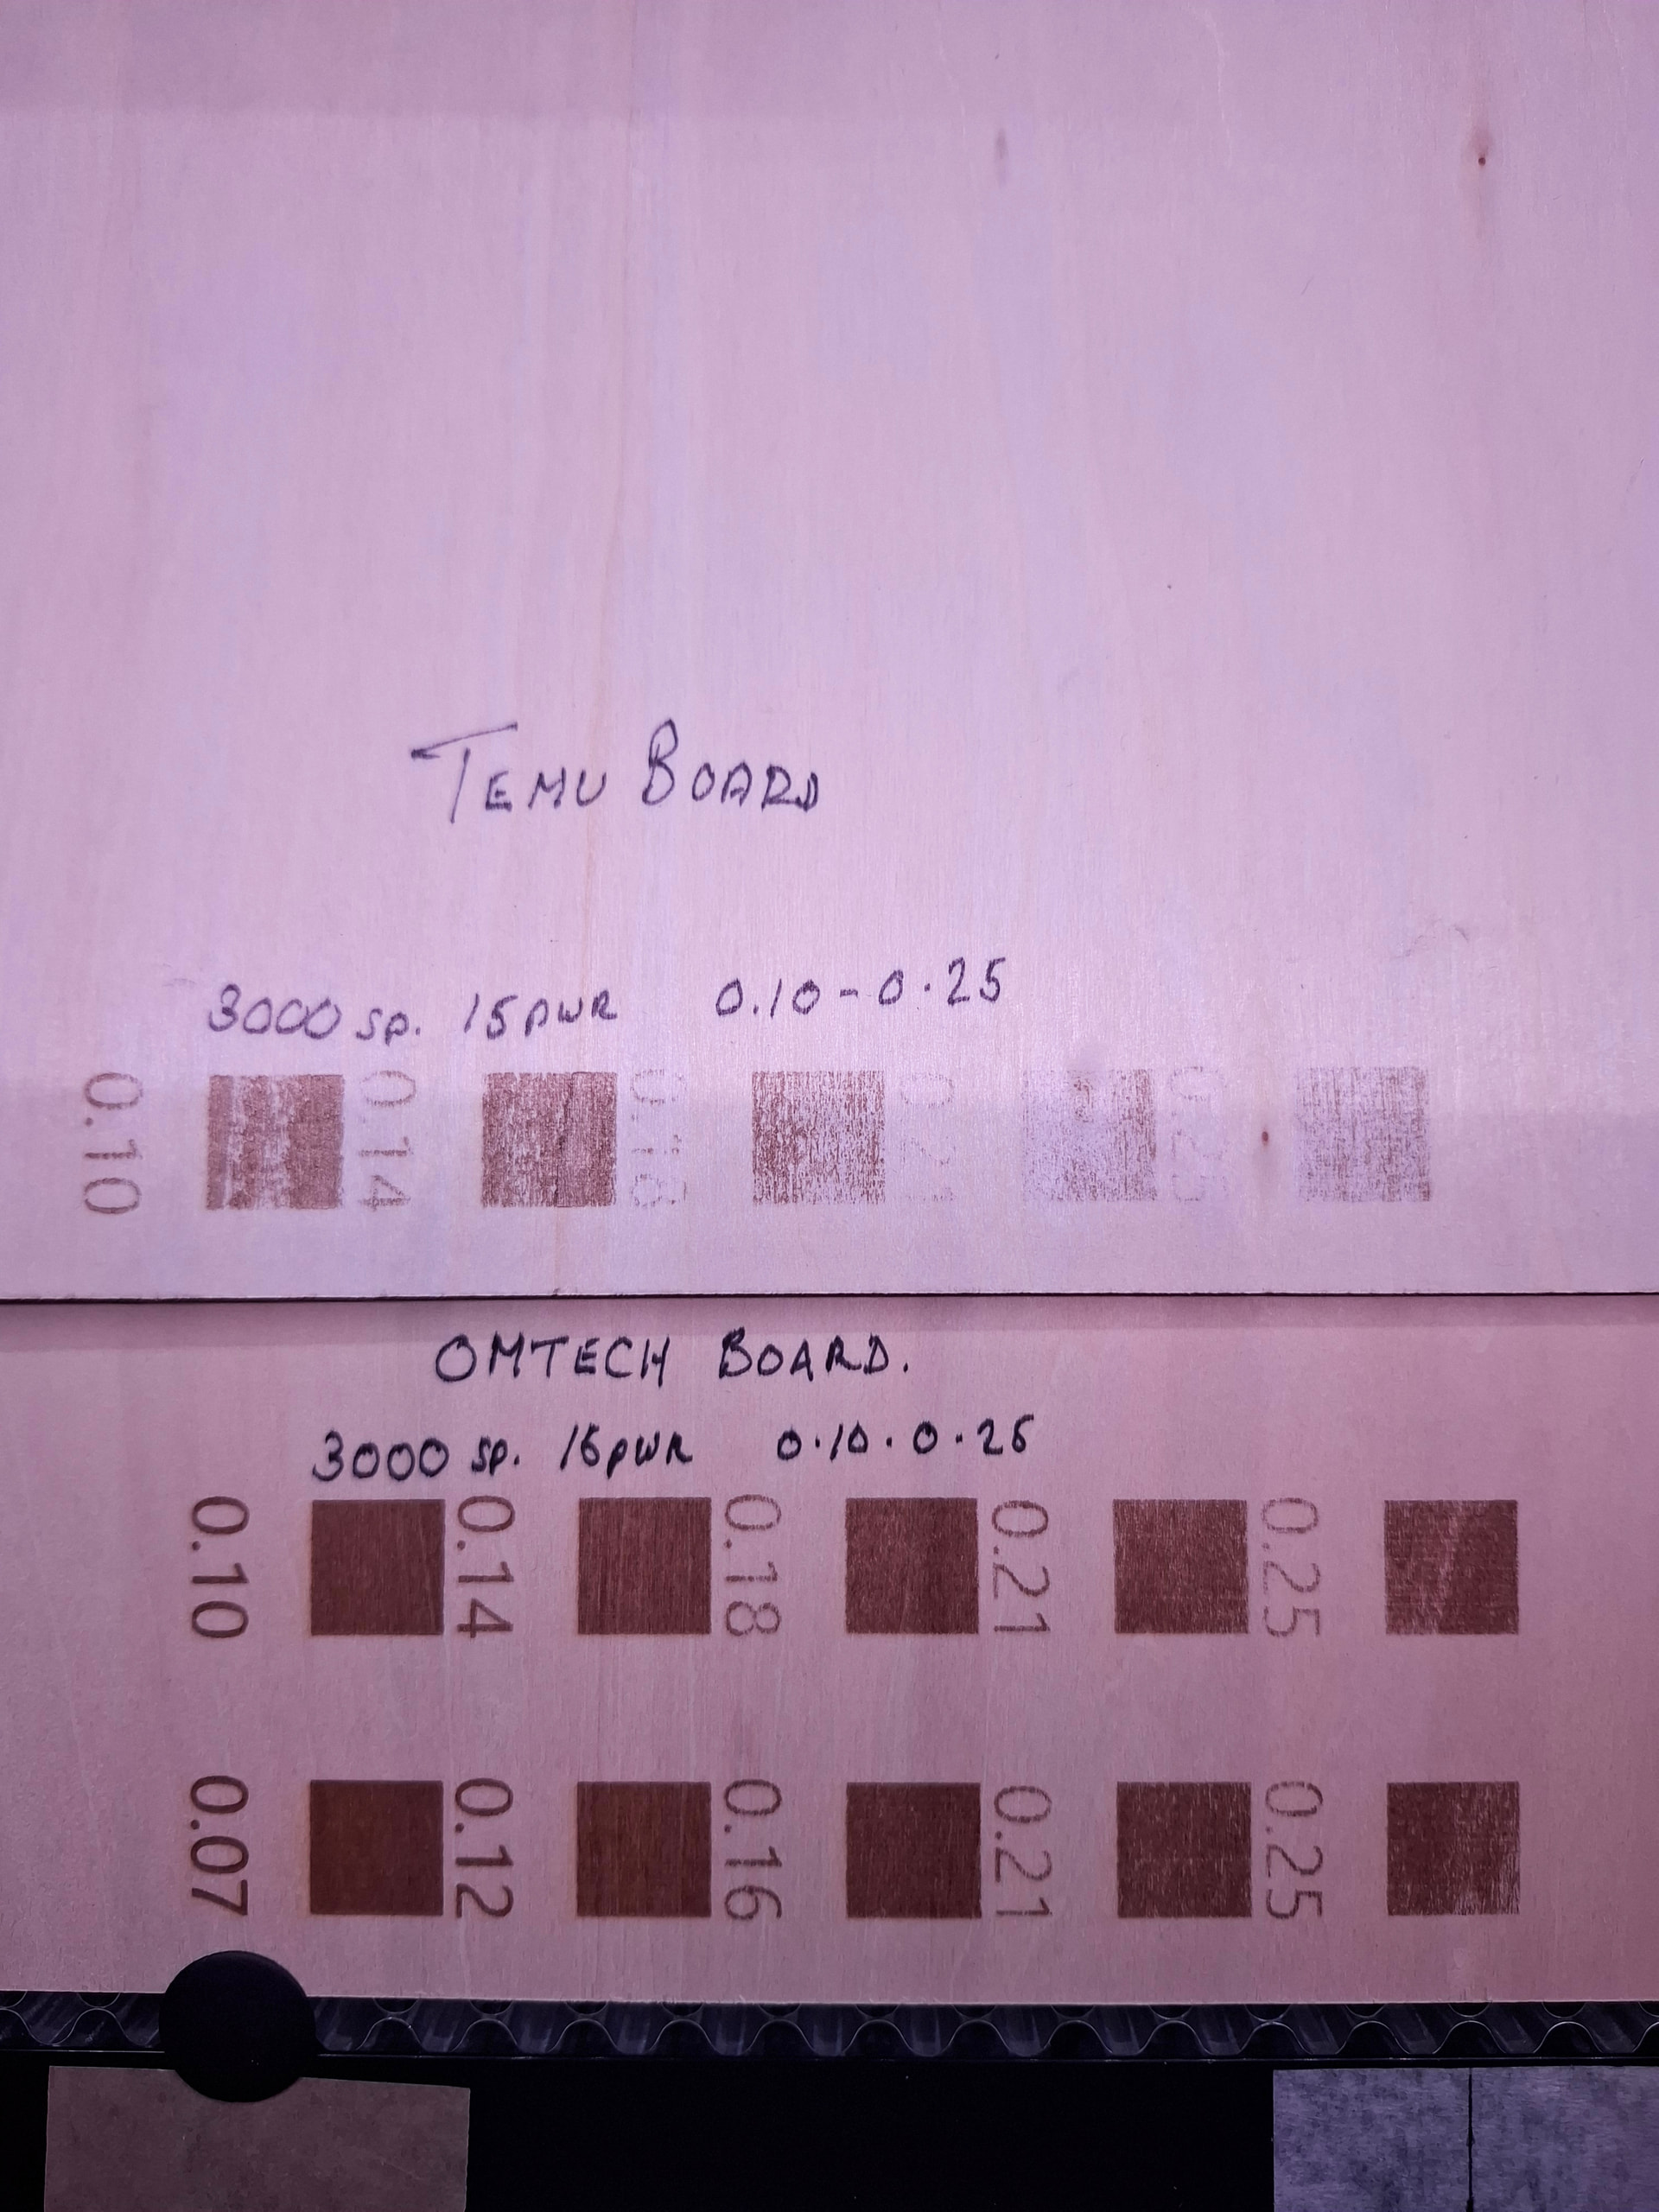
Ok - So once again, thanks to your drive in helping me with my issues I proceeded to run another interval test with the .1 setting again. It was not good and so I started getting a bit worried. Then for some odd reason I had this sinking feeling and started wondering that if the Acrylic I had originally sourced on Temu was crap then could the 3mm ply be too ? Luckily just the other day I decided to top up my supplies but I decided it was best to spend more and wait less for delivery from Temu and I ordered a pack of 3mm Ply from Omtech which I was going to start using once the Temu stuff ran out. Oh my word !!! I ran the same test on the Omtech ply and Wow ! Whilst it was actually engraving I could not believe what I was seeing, what a difference and as you can see in the comparison photo it is clear that ply should NOT be ordered from Temu and from now on I will stick to Omtech, a much more reliable source it seems.
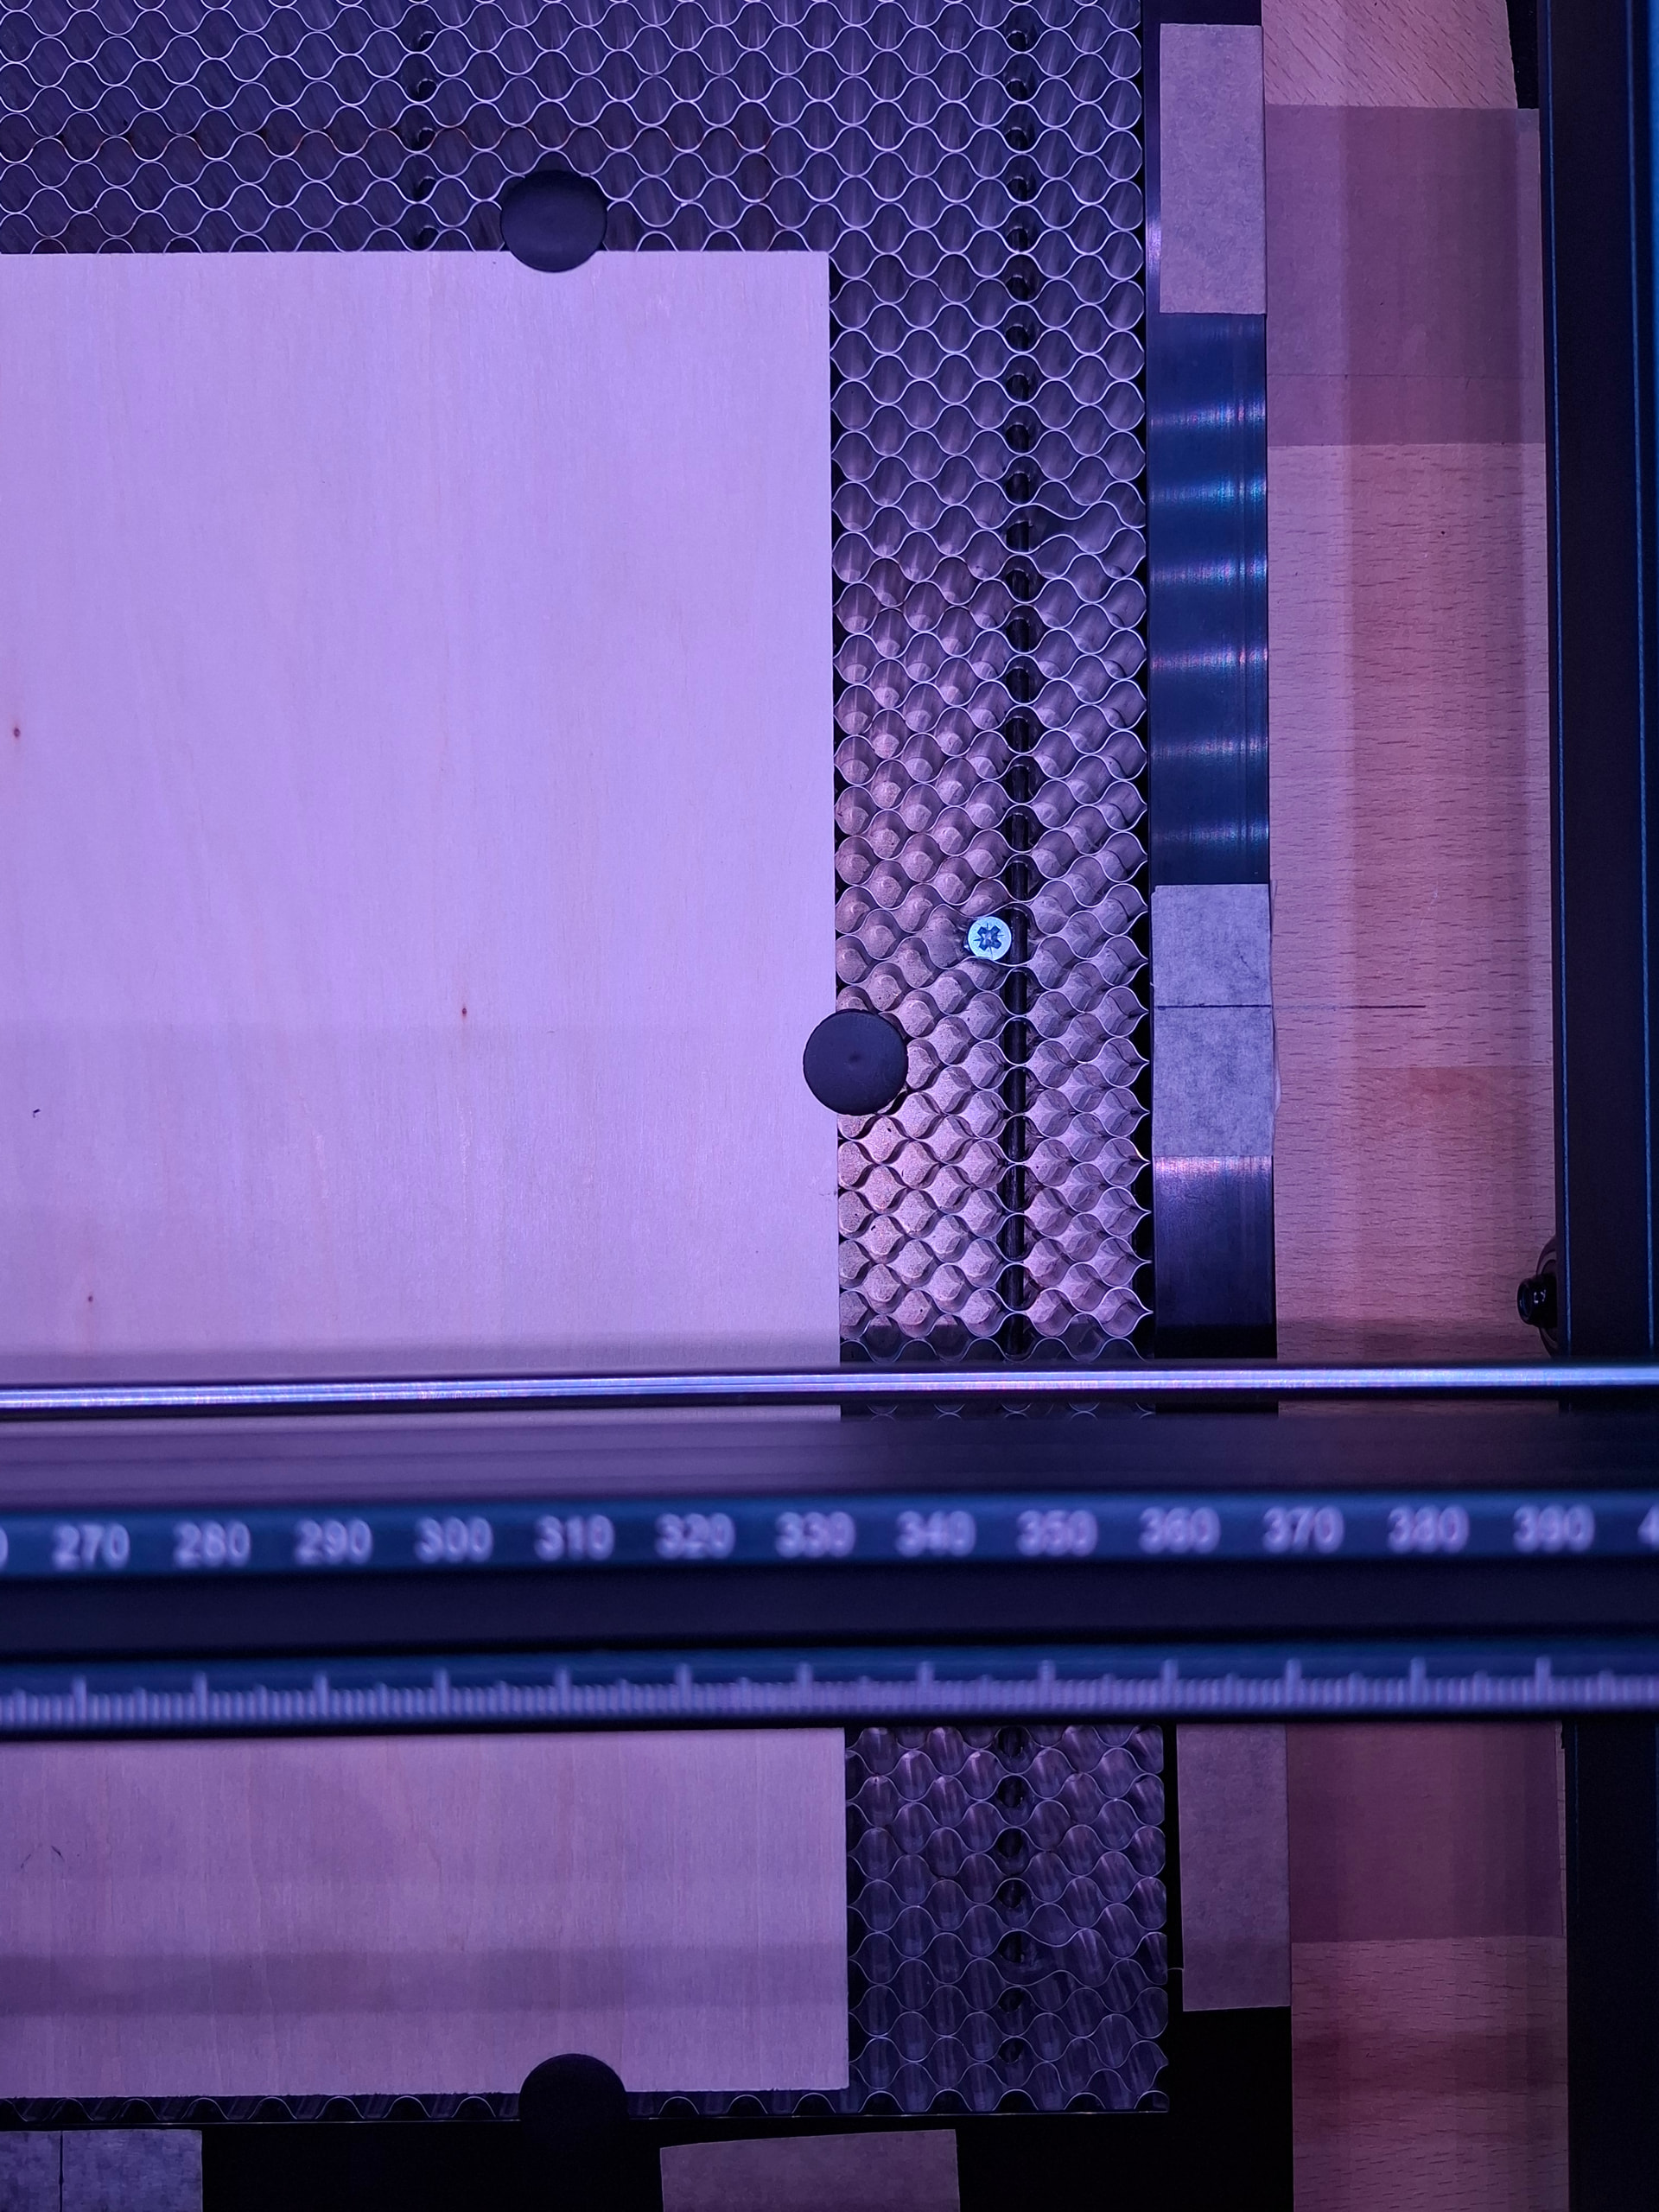
Now I am just tinkering with settings to get the font right and with these tests all done, should make my task a little easier. I have also enclosed a phot of my Honeycomb base as I did note also a slight bow in the middle which as you stated could make the laser not work at its proper capacity. So I have placed screws through the base and against the rails into the workbench and it is now dead level so hopefully that will be that problem fixed too. You have been soooooooo much help you just would not believe. I will be back ![]()