I suspect you’re making this much more complicated than it is. Is it frustrating? duh, been there done that…
Wild theories about how signals could interact and cause idiosyncrasies is a waste of your time and probably ours at least at this point… although you should never should say never
There are thousands if not more of these out there, very few actually have issues with emf.
EMF issues are pretty difficult to impossible to prove, without the proper test equipment or changing the hardware with add on components. This is why it’s one of the ‘feared’ problems when a solution doesn’t present itself. Usually these are cured by a minor change in cable routing.
More likely are the controller components themselves are having an issue, but I doubt that also.
It probably wouldn’t, that’s my point.
If the controller can produce this error via software, I’d look there.
If an actual hardware trigger must occur, that points you to the hardware. Because of the accuracy of the failure, it’s probably software related… generally meaning the controller firmware.
I wouldn’t mind swapping out the controller board if I could find one compatible with my hardware that controlled an air assist pump. I searched quit a bit & couldn’t find one. Seems strange with how important air assist is, especially with the feature available on Lightburn. It’d be great to be able to let an entire project run, with air assist toggled by the layers that need it.
It took more than 8 hours of use, but the Hard Limit error eventually presented itself again. Since there’s no definitive reason why it’s happening, I’ve resorted to adding $21=0 to the Start Gcode and $21=1 to the End Gcode in the Device Settings Gcode tab. This will allow me to home the head using the switches, and then disable them during the job. I don’t have the means of monitoring the switches while jobs are executing to know if it’s a hardware related issue, and I don’t know of a way to capture what the controller board is sensing either. I just want to be able to use the engraver and be productive, rather than spending all of my time chasing a mysterious glitch that I may never find.
I can see myself upgrading to another laser down the road. With nice weather upon us, it won’t be used a whole lot until the fall, so I can’t justify upgrading now.
Can you cause the error while it running with these settings, by operating the switches?
It’s easy to eliminate the switches and wiring. After it homes, pull the connectors off the board… No switches or wiring, and no way for the hard error from switches to occur.
You also can turn homing off and use the manual home method and see if that generates the error.
It sounds like it’s failure has changed to random in occurrence?
Hard limits should not be required for homing to work correctly. Hard limits should only alarm on non-homing operations. Did you try homing with $21=0?
I don’t think that’s bad. The concern would be that the issue pops up in a different way later as it progresses.
Well I’ll be! Homing works with $21=0. I thought that $21=1 had to be set for the switches to be “active” and that without them, the machine wouldn’t recognize them when homing. That simplifies things a bit. Thanks!!!
Hey stranger! I’m finally getting back into it. I retired Jan 1st so now I can concentrate on the fun stuff!
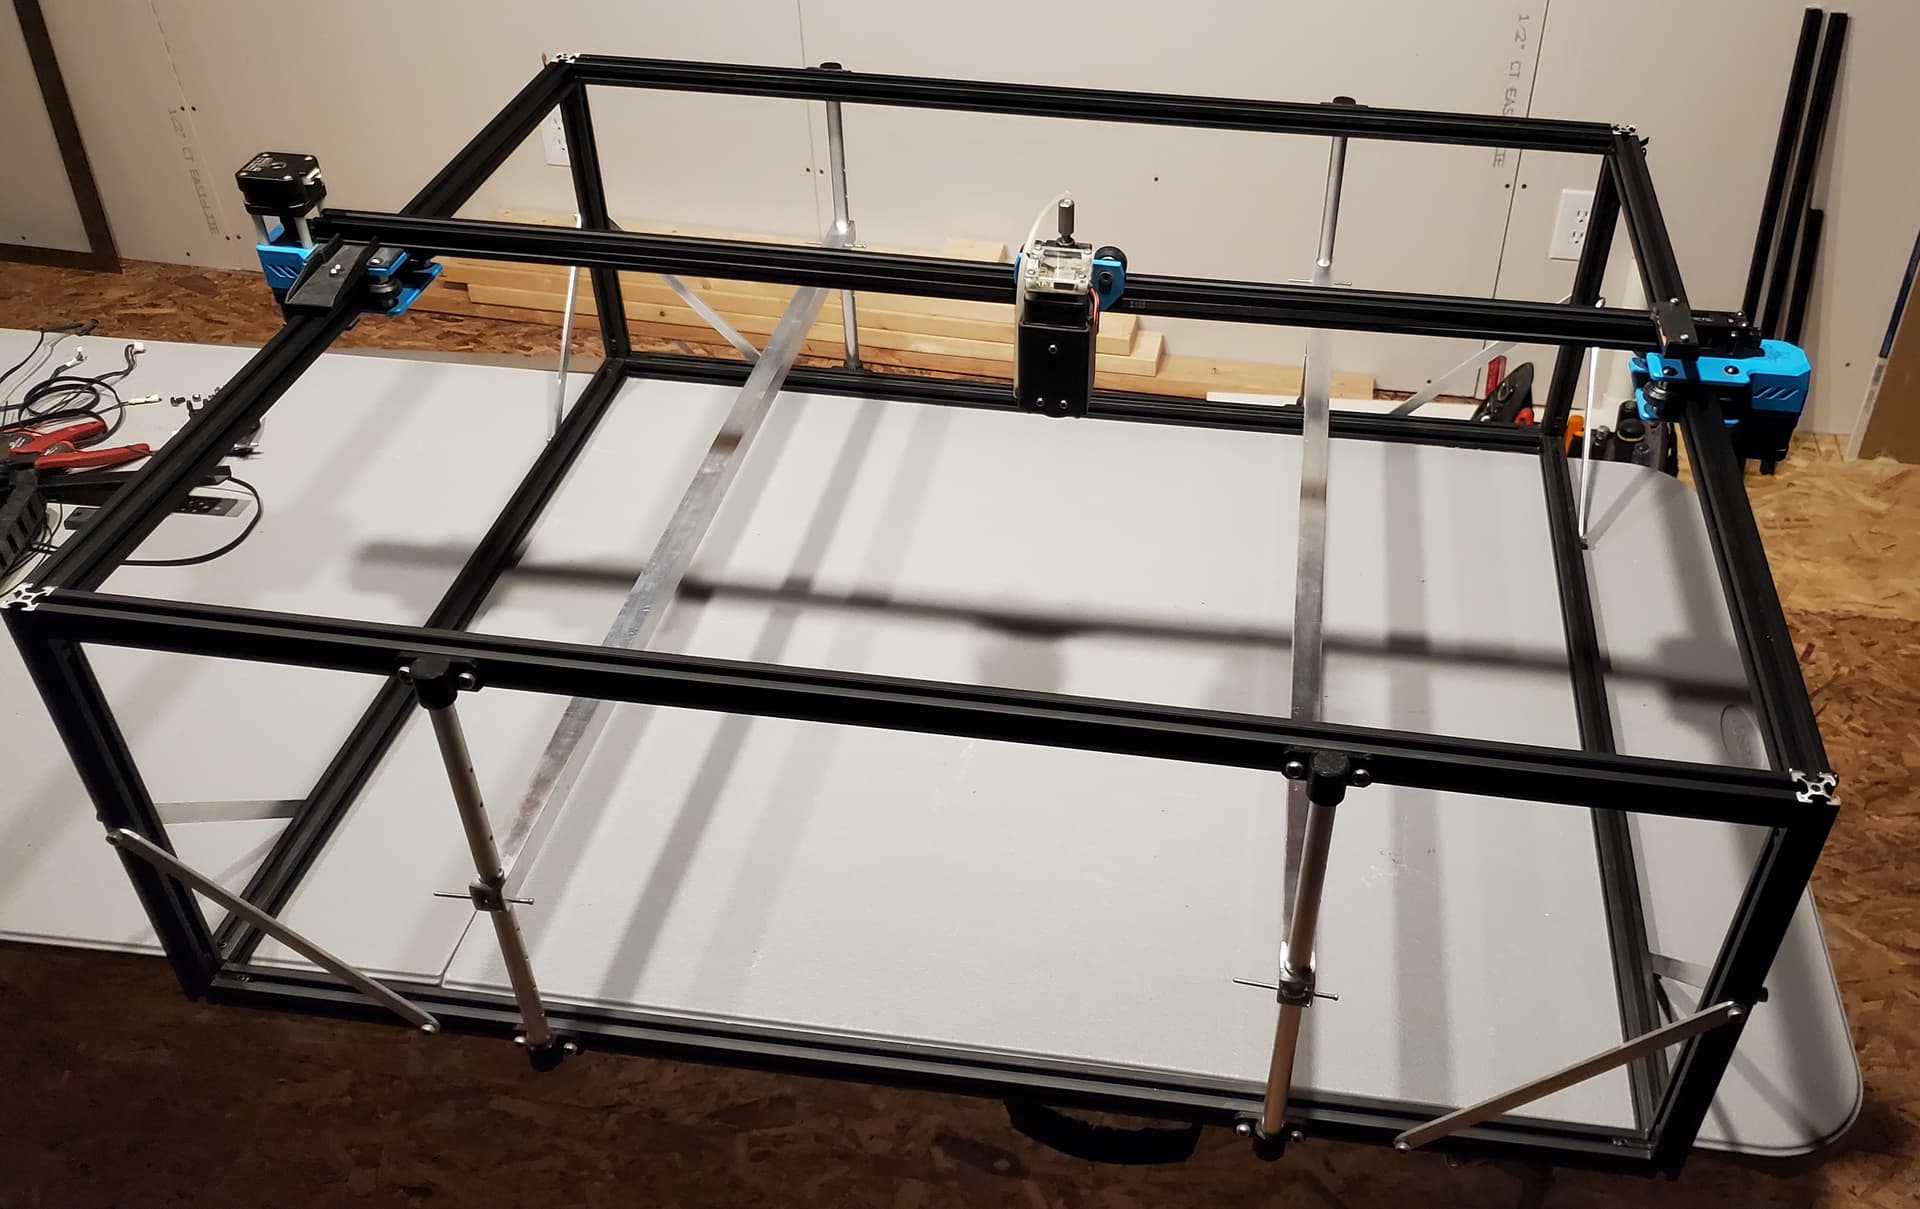
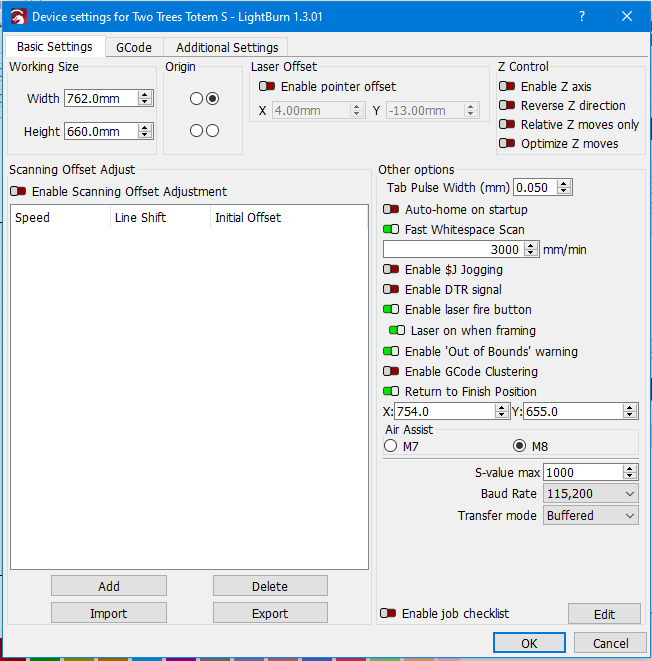
I’ve rebuilt my laser, making it MUCH bigger so that we can engrave kitchen cutting boards, whiskey barrel ends, etc. Everything is functioning as it should except that when I increase the working size & change the “return to finish position” coordinates, it’s not moving correctly. The head moves in the correct direction, but it ends up over driving the right & top limits. It’s not making sense because I’m using all of the same components from the original laser, it just now has a much larger working size. I’m trying to picture in my head what could be wrong, but nothing is coming to mind.
I should have thought of that. I’ve been away from it for quite a while. My last year at work was pure hell. So happy to be done with that phase of my life!
The other change I made was installing the MakerBase board & display. The Two Trees constantly locked up and did other weird things. I just made the changes and now it appears to behaving properly. I still need to experiment and obtain the exact size. The values I’m using right now are from simple measurements.
It’s been a while, but I’m not recalling the grid in Lightburn being inverted where “0,0” is in the upper right corner. I thought “0,0” was in the lower left corner even though it was homing in the back right corner. My wife uses it too, so I’m trying to keep everything as sensical as possible.
Just pulled up the device settings and I must have changed it to the upper-right somewhere along the way. I just changed it to the lower-left, and now the grid displays like it used to. Sheesh!
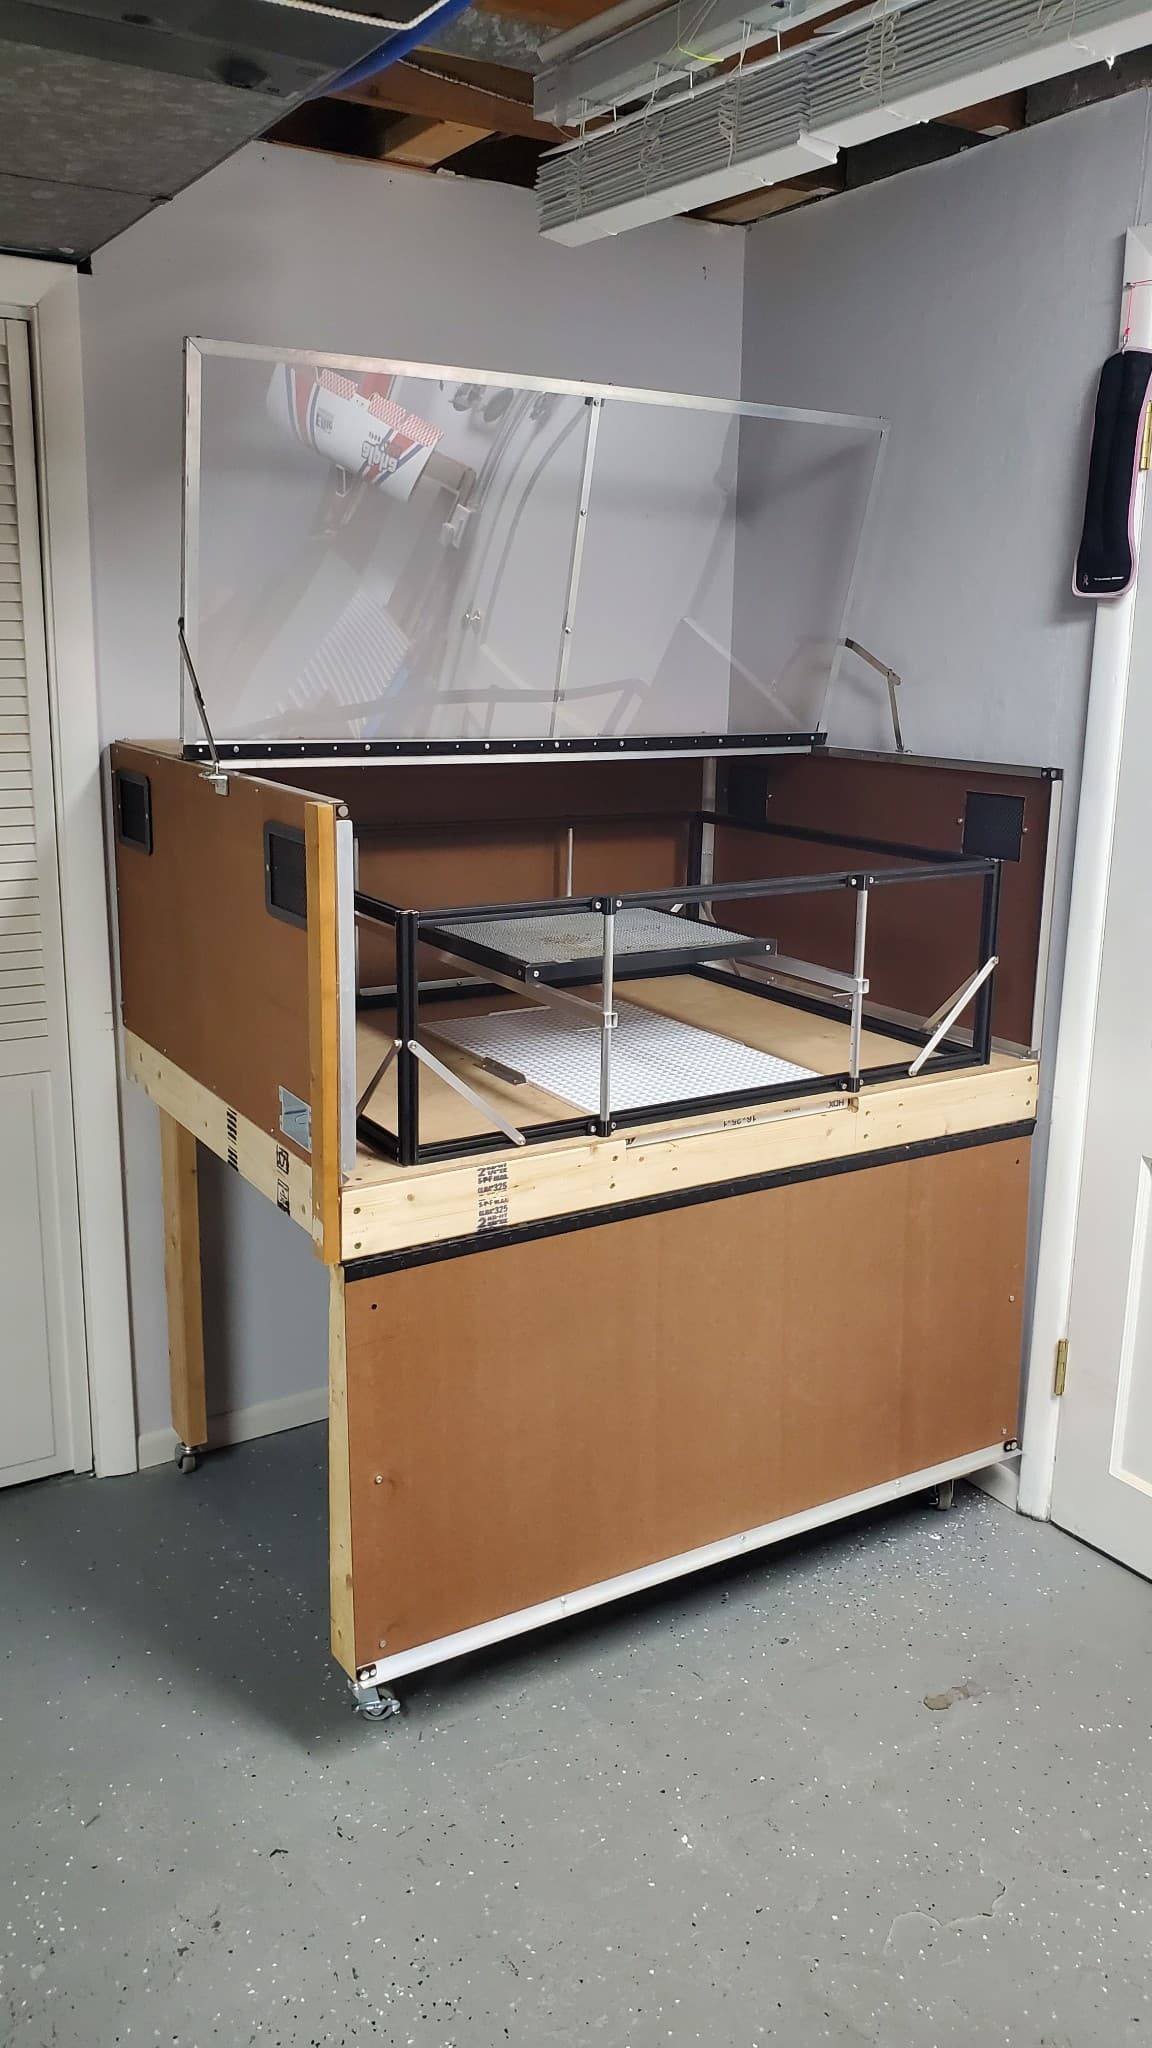
I also built a new enclosure for it. The wall behind it is the furnace room. We had our ancient oil furnace replaced a couple of years ago with an electric air handler. The HVAC guy capped the old vent tube that ran up the chimney. I installed an exhaust fan to the bottom of the enclosure that connects through the wall to the old furnace vent tube, so now the laser will vent up the chimney!
One cool thing is that I’ve been using my 3D printers to make parts for the new engraver. I designed it like I did so that the laser remains stationary. The platform below is adjustable depending on what’s being engraved. I have a rotary unit as well so now it will be much easier to use. Before, I had to elevate the laser. The slot in the front of the enclosure is for a 16x25x1 furnace filter. The laser generates a lot of dust and the filter will keep it from passing through the exhaust fan, potentially causing problems over time. I chose that size filter because it’s the same size our furnace uses.
I’ll experiment more tomorrow morning. I’ve been up since 4:30am and going non-stop all day. Though the laser rebuild has been a big project, I’m also working on a bigger project at the same time: Refinishing our basement. We had to unfinish it last spring to get the foundation repaired and a water issue resolved. That was done early last April and the basement has been in total disarray ever since. I decided to wait until I retired to tackle it because I was badly burred at work. I now have the time to work on it as much as I want and do things right!
Thanks again for your help. I should be able to get everything with the laser buttoned up over the next day or two so that we can start using it again.
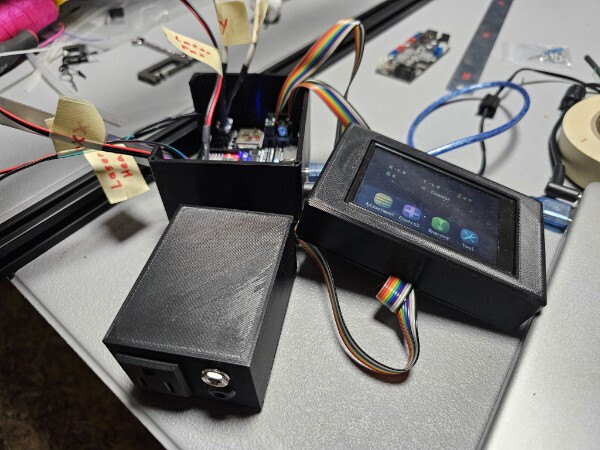
I designed and 3D printed enclosures for the MakerBase logic board, display, and for a relay to control the air assist pump. The pump is the last piece of the puzzle that I haven’t tried yet.
I’d also like to find a way to have these values sent to the laser automatically. Currently, I have to click a button I programed in Lightburn to do it.