I’ve been tweaking some parameters in prep for image burning on tile (Ti02).
I have the speed/power down, line spacing good, and am now working with dot size compensation.
I created a 5mmx5mm black square (GIMP) at the target LPI and save it as a bit map.
Imported into LB and arrayed as a grid to check line start/end alignments.
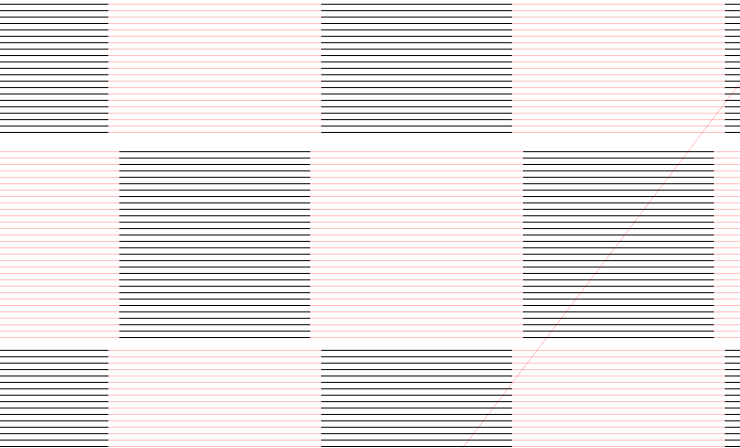
Here is a screen shot of the LB workspace. Squares measure 5x5 and touch at the corners as I wanted.
(zoomed in)
This is what shows up in preview and is also what was etched on my tile except the tile has proper vertical spacing, only the X-axis appears “short”
The squares appear good vertically (Y-axis), but the horizontal line length seems shortened at the start/end by about 0.2mm.
With the Line Offset tool the line length can be extended so each line ends at the desired spot, but the start points are still offset.
Where should I look to fix this? I assume it is a simple user error
EDIT:
Upon closer examination, there is what looks like a missing line scan on the top/bottom of each square. Should mention I added a hopefully generous overscan of 5%, but the results are identical compared with the default 2.5%
(LM3)
Thanks people!
The goal is grey-scale images (Jarvis dithering) so I need to be sure that the laser fires and creates the necessary dithered “spots” that are properly dimensioned.
Could it be related to the “Pass Through” option (it’s off)?
It’s definitely something to do with the image processing but this specific behavior is a bit of a surprise. If you could pre-process the bitmap then you could indeed use pass-through to bypass any additional processing.
I’m a little confused about what you mean by this given that Jarvis and grayscale are mutually exclusive options but if you have very specific behavior that you’re expecting then probably best to create the bitmap as a whole exactly as you expect and use pass-through.
Thanks for your quick look into this berainlb! Much appreciated.
Basically a greyscale image needs to be dithered since the TiO2 method can only print black on the tile. The dithering lets the density of the black “dots” trick the eye into seeing a shade of grey (I know you already know this, but just for completeness…)
In this case, I creat a solid black square (5mx5mm) and export it at my machines optimum 160 DPI as a bit map image.
I’m then relying on the LB image processing to convert the grey scale into a black/white dithered image. Of course I’d expect that the LB Jarvis dithering would just let it go as a continuous black, always laser on line.
Your idea of possibly creating the image as a bit mapped, pre-dithered image and present it to LB as an image containing only black/white, no grey scales and either use the LB threshold (which should do nothing) or let it go raw knowing that the laser will be full specified power or off.
Still curious as to why the preview shows what I get as a tile, but the LB workspace reflects something different. Maybe some kind of LPI aliasing?
I’ll see what happens tomorrow if the honey-do jar is sufficiently emptied.
The workspace represents what’s provided to the rasterizer for processing. Somewhere in the rasterizing process you’re getting this behavior and that is what is shown in Preview.
I do find the specific behavior a bit odd. Initially I thought it had something to do with dot size correction but changing that didn’t seem to make a difference there.
Let us know how your experimentation with pre-processing goes.
Sorry Franco, I’m not sure what you are indicating?
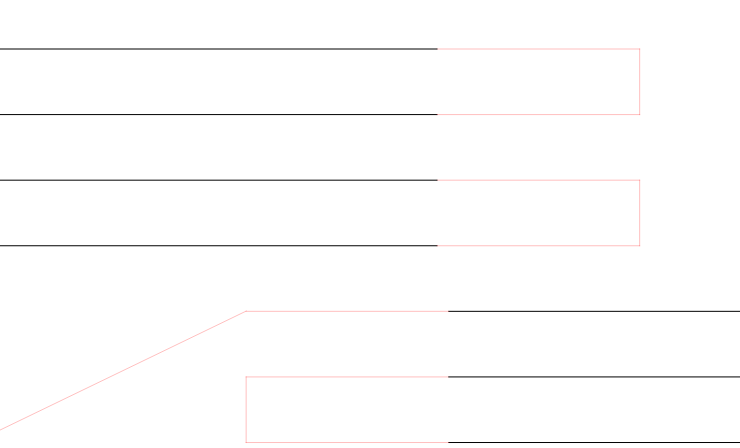
So, I went back to my original image, a 5mmx5mm bit map (.bmp) square.
I believe the “odd” deviations at the start and end of each scan are artifacts from some DPI related interpolations going on between LB and the file I saved.
This time I made sure to specify a .bmp with dimensions of 5mmx5mm at 6.00 DPmm (dots per mm). This resulted in a .bmp with pixel dimensions of 30x30 (6DPmm * 5mm)
This works out to 152.4 LPI. If I use that value in LB, things look much better horizontally (X-axis). I can see the possibility of interpolation resolution causing the length problem when I tell LB 160 LPI.
If I use the .bmp and also choose “Pass Through” in the layer controls on LB (LPI becomes disabled as expected), I get proper X alignment. According to the G-code, the Y step size (G1 Y0.167S0) matches the .bmp resolution of 6 pixels/mm) There is even the occasional (G1 Y0.166S0) to compensate for residuals so long term the 6pixels/mm is maintained.
Accordingly, preview shows my “Dot Compensation” (here set to 0.03mm) is the only gap remaining.
If I set DC to 0.00, the gap disappears.
Still curious is the gap (single scan line width).
Of course since each square is touching at the corners, there should be no overlap in either X or Y but it seems to jump a full line width (based on the LPI) versus a probably more appropriate zero jump.
Each square was scanned individually so something moved the start point. Of course if the start point (Y axis) was maintained, the squares would slightly overlap by 1/2 their actual burned width.
Maybe somewhere there is a <= where just a < would be correct?
Anyway, that is picking nits so no problems for where I now sit.
I’ll get some burned results up in a bit showing what I found out as far as selection the best settings for my setup in case others are interested.
Hi Brewster Imag-r.com is a website that offer a free service to prepare your photos for laser engraving. www.imag-r.com
I was just wondering if preparing your photo with them might fix your problem. They have a choice of materials that you will use for engraving and all kind of other settings. Best of luck and I hope it works for you.
Take care