When I send a file from lightburn to my ruida controller, anything set as a line shifts 1/2in in the y axis. Why would this be?
Shifts relative to what? And when it does shift, is it a consistent shift? Or are you saying for each time it goes to a different line layer?
Does the line shift change with speed settings?
Is this a new behavior?
A photo of what you’re seeing and a full screenshot of LightBurn would be helpful.
The line shape shifts down the Y axis by about a half inch compared to a fill or image shape. I’ve had the laser less than a week, so I’m not sure. I’ve had successful prints in that week but I’m not sure what has happened.

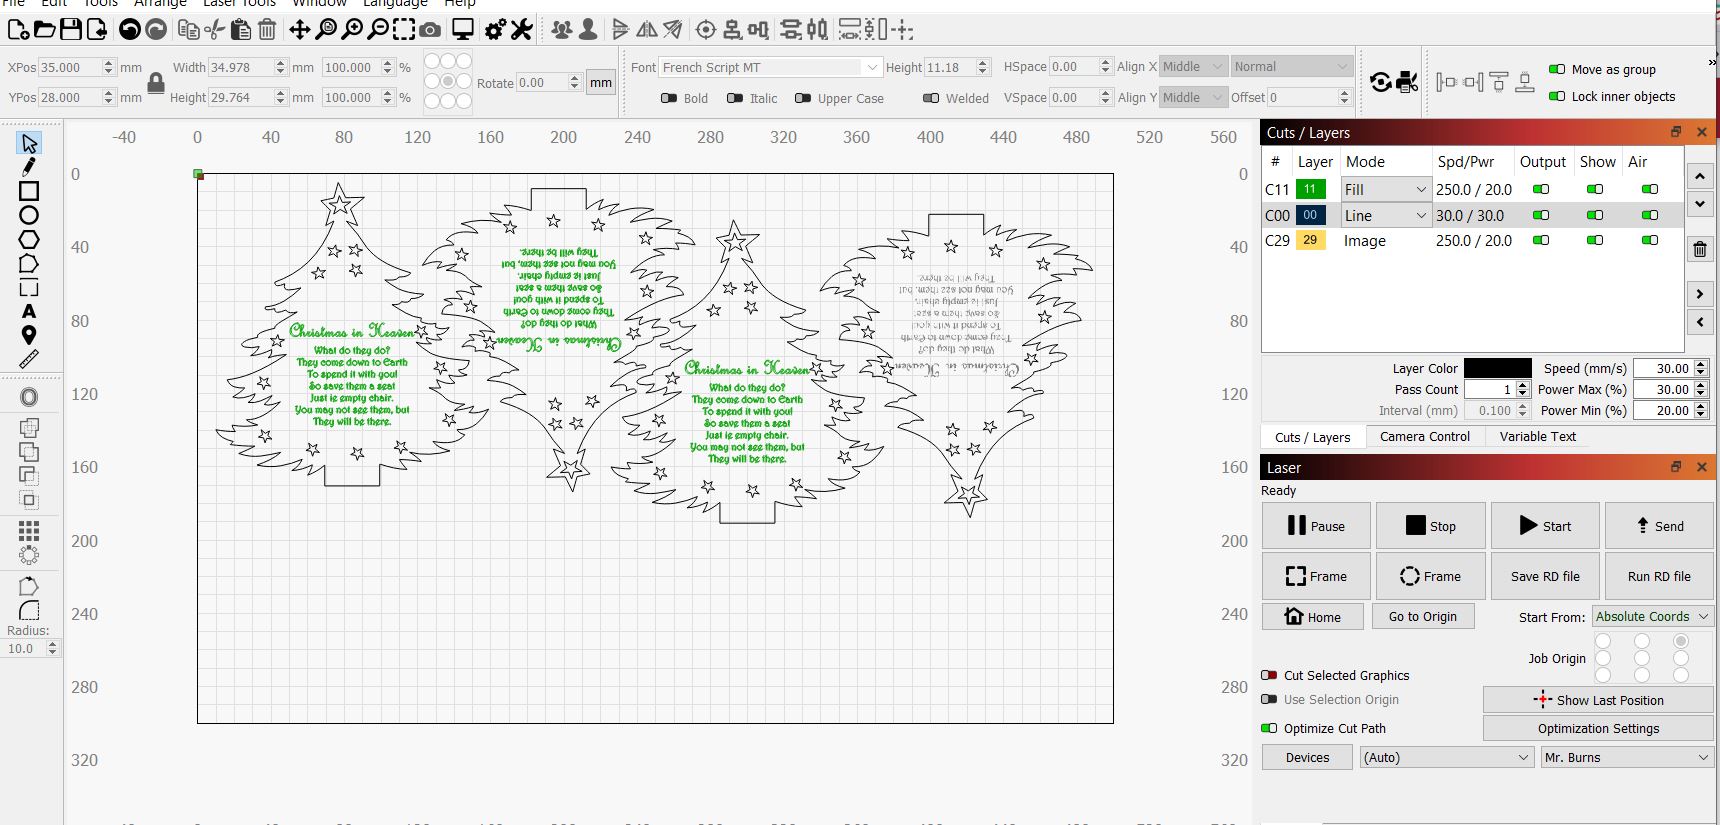
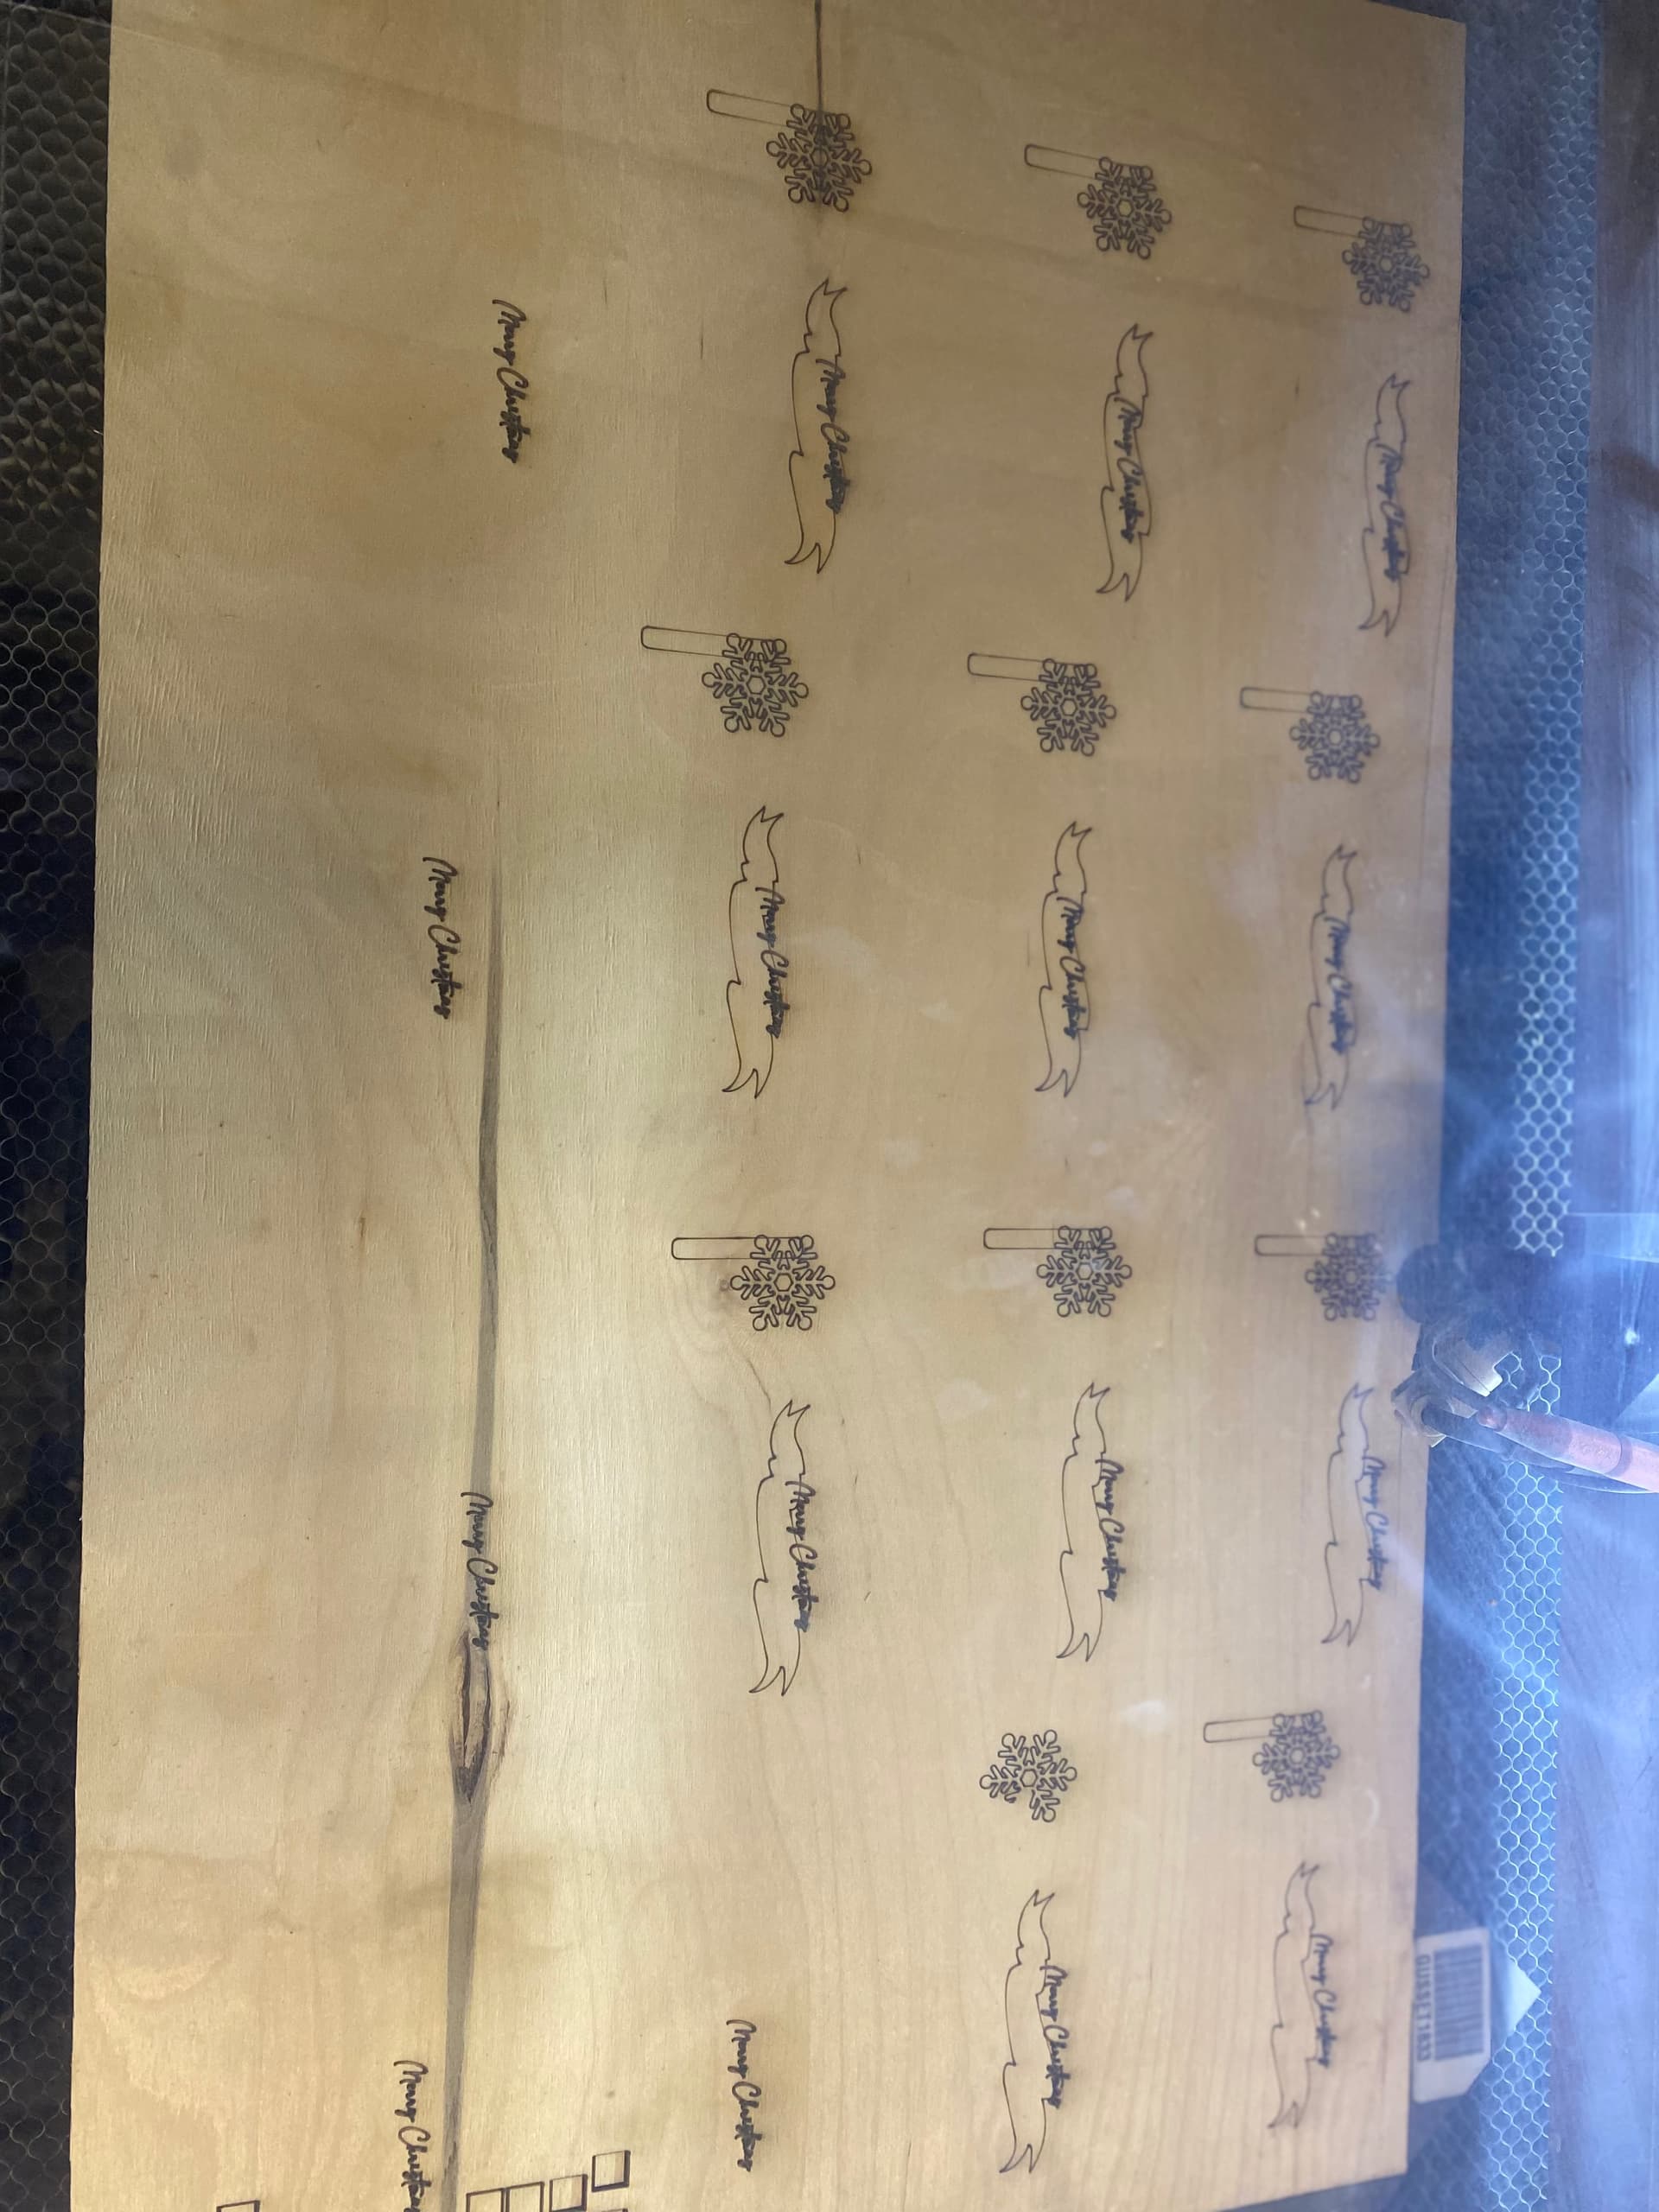
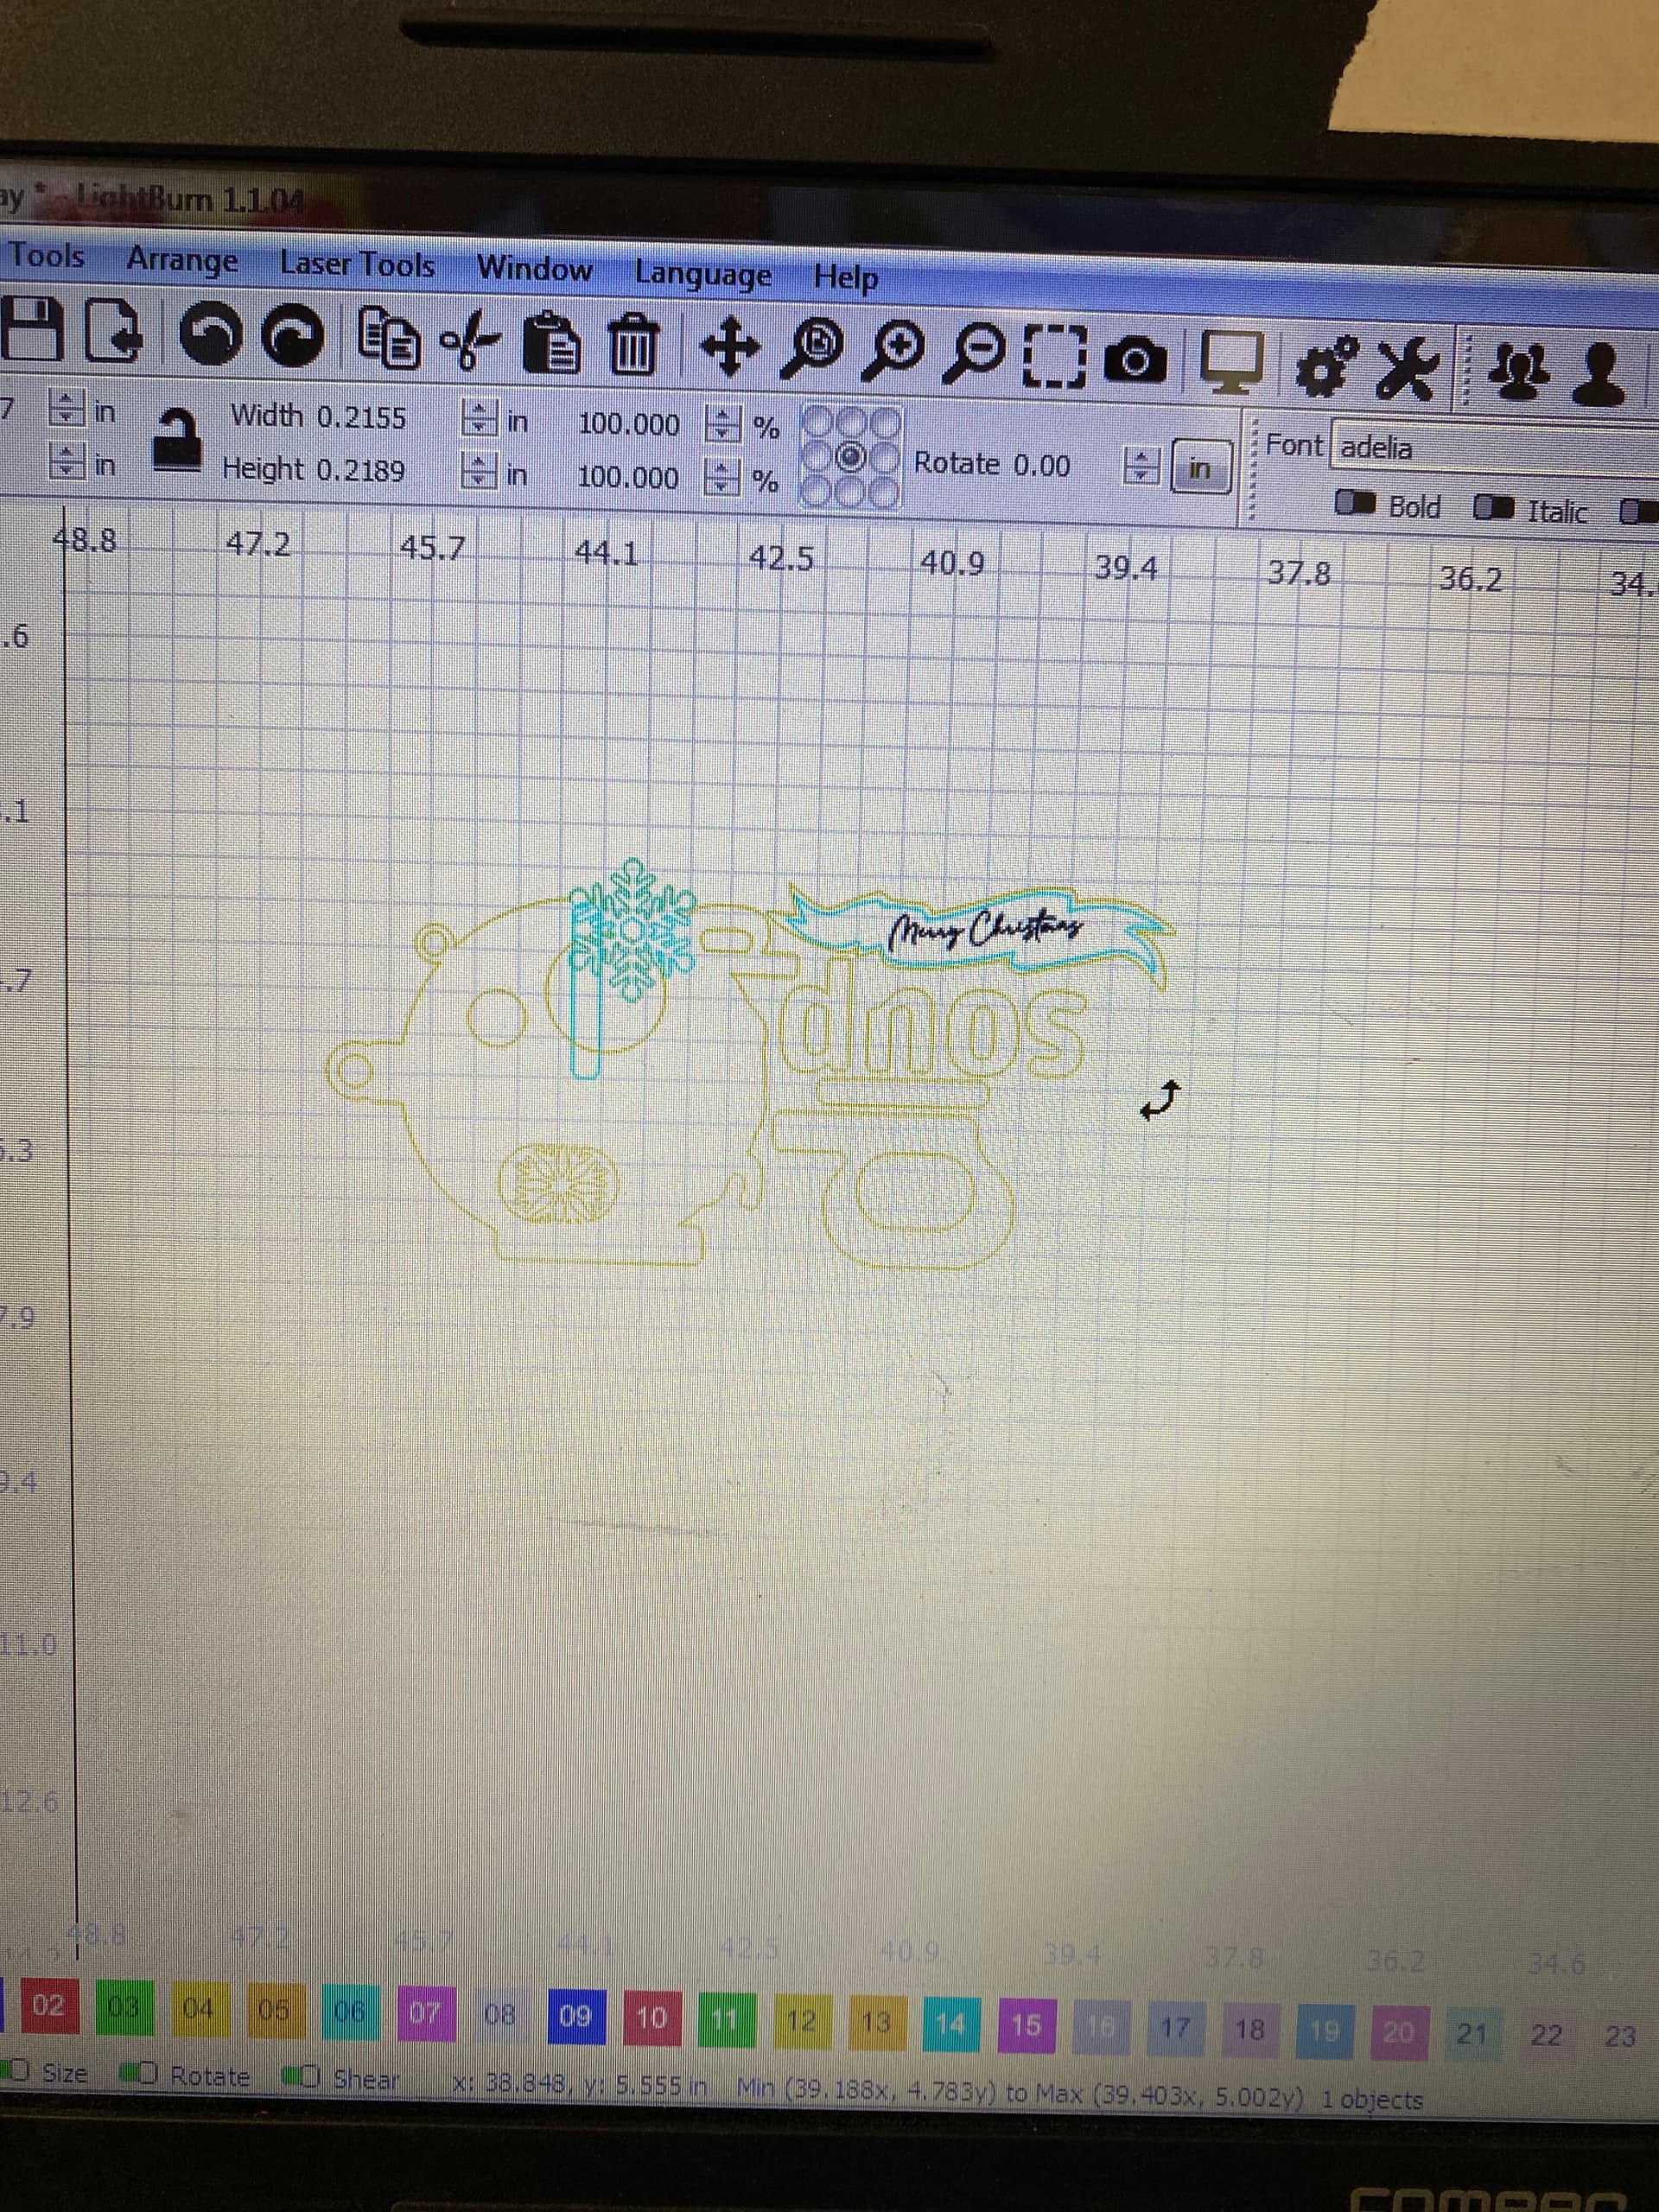
The first image is the shift in Y. The line section (black) is lower than it should be. (This is merely an illustration. I deliberately moved the line to where it winds up on burns.
The bottom photo is how it looks when I send it to the laser.
Hard to say without seeing the burn but it’s possible you’re dealing with this common Ruida setup issue.
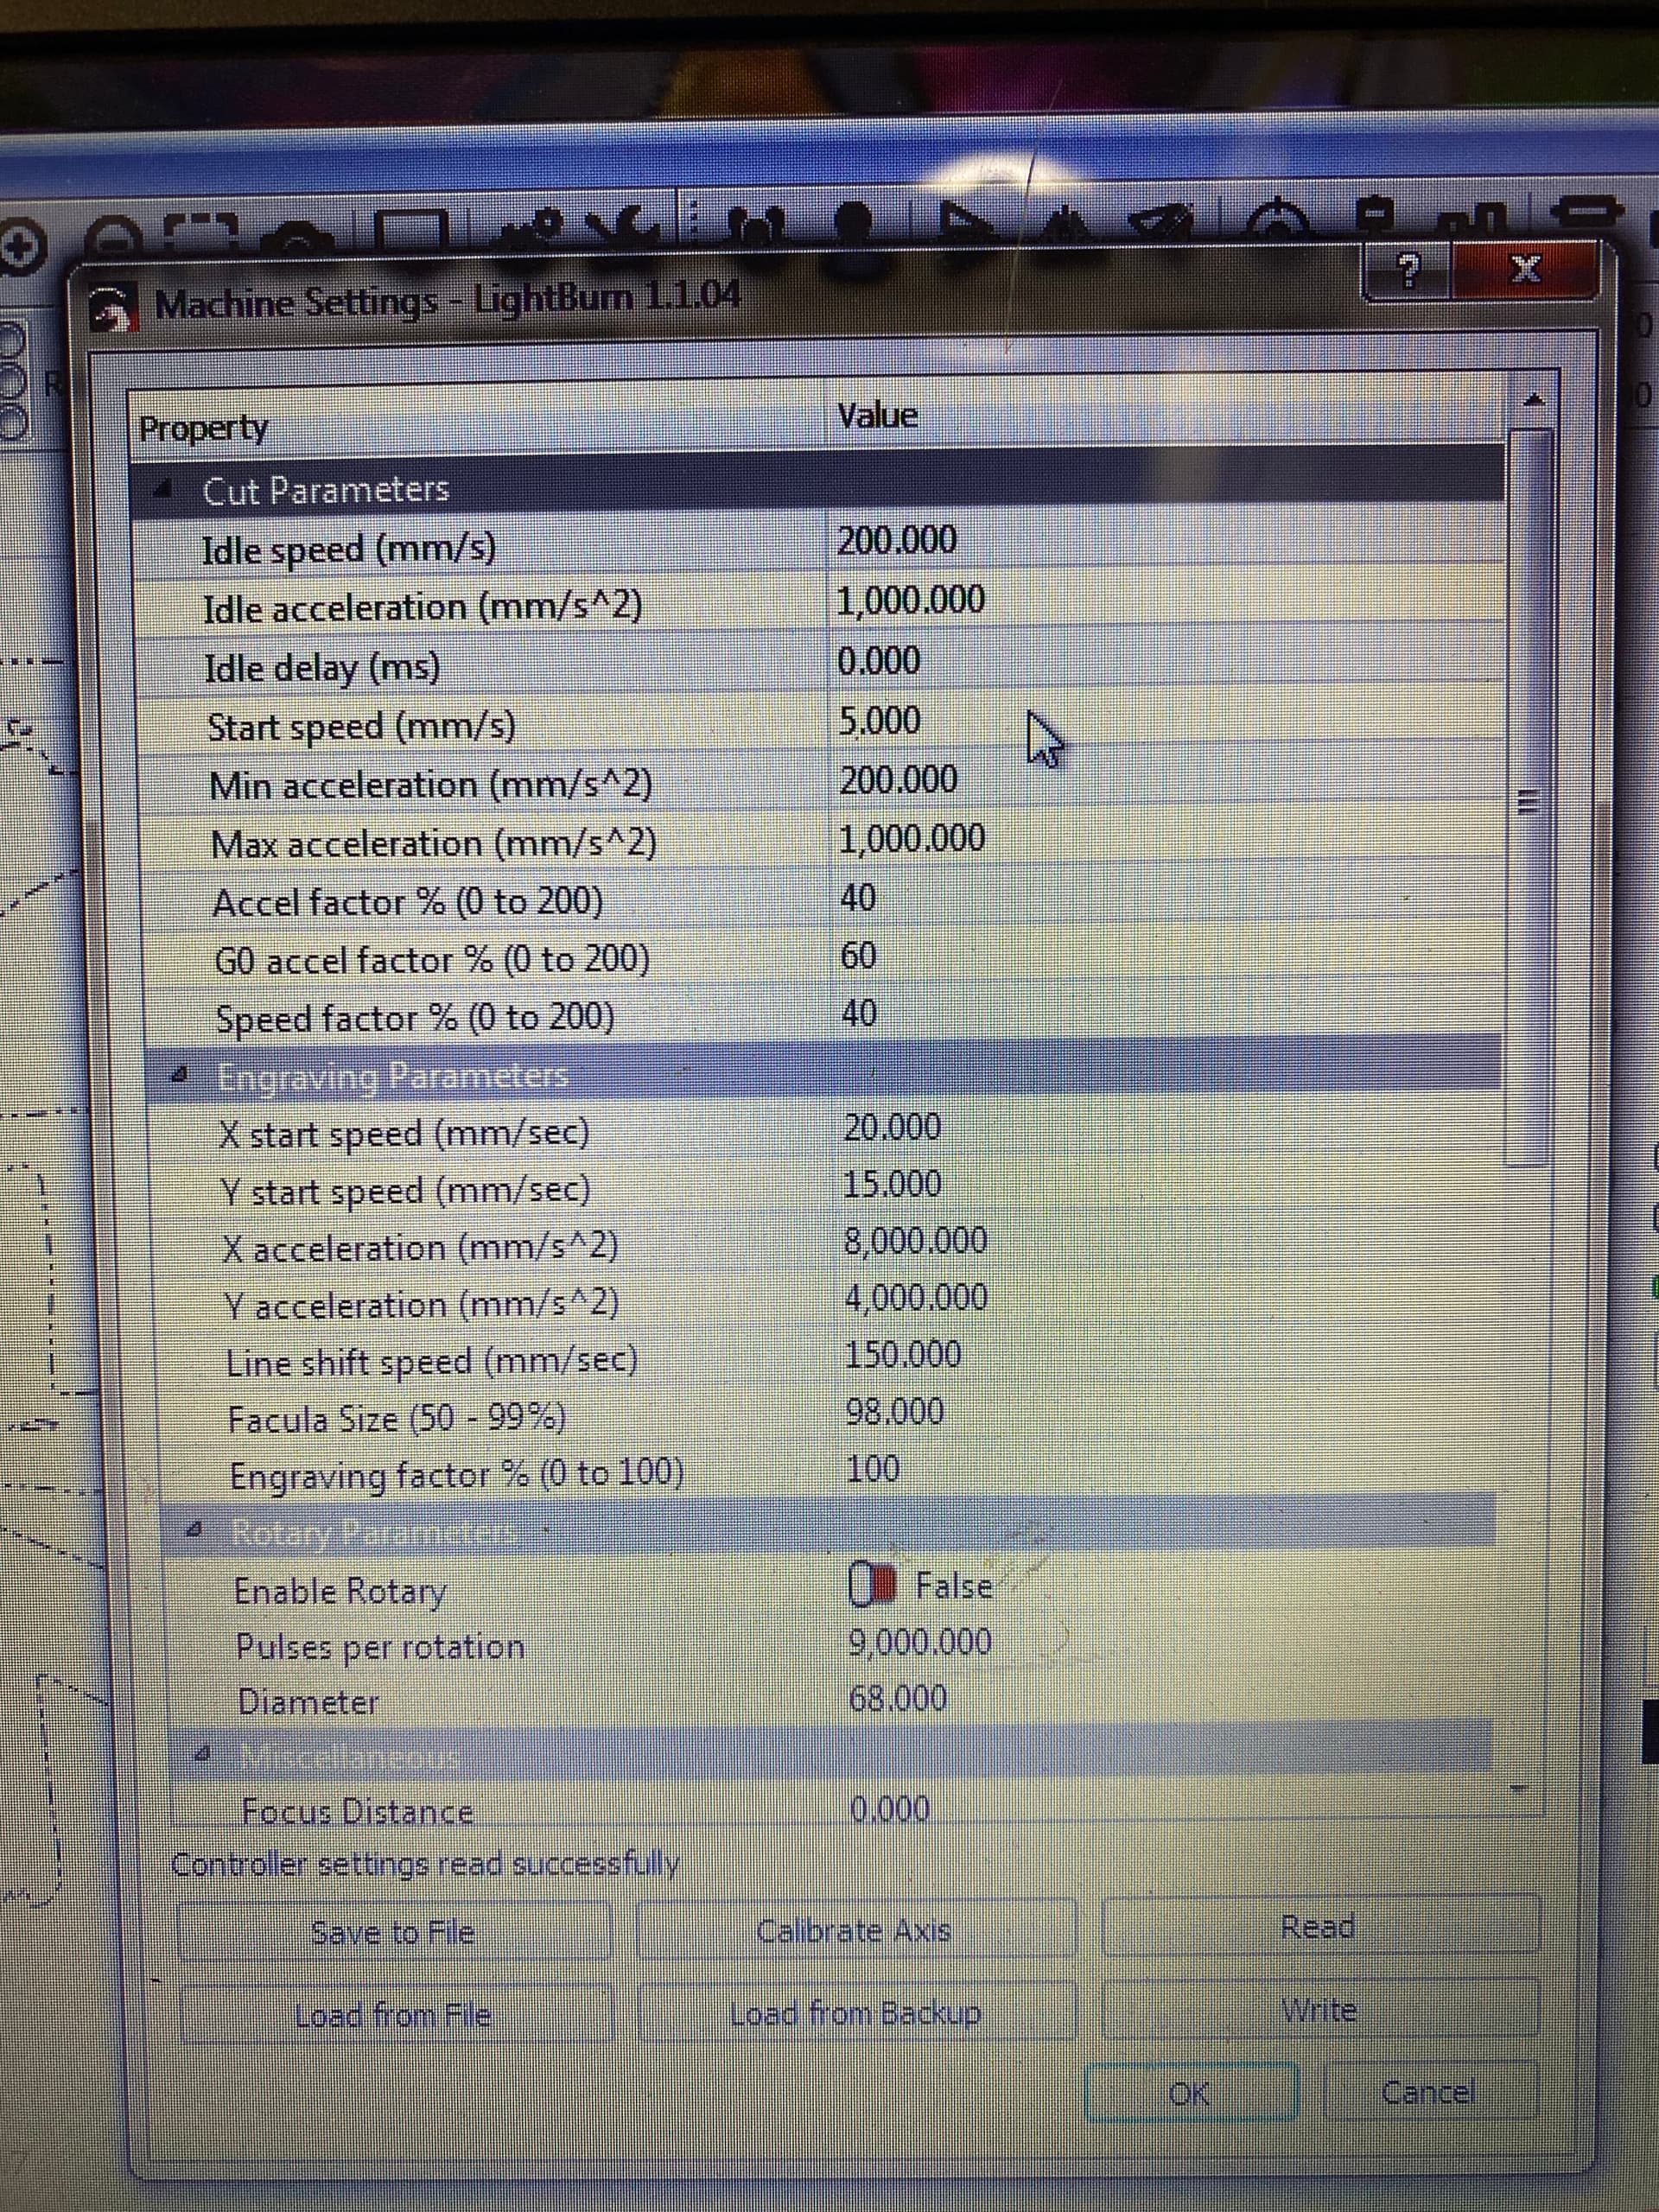
Take a look and see if this applies to you. I suggest you take a backup of your settings before making any changes.
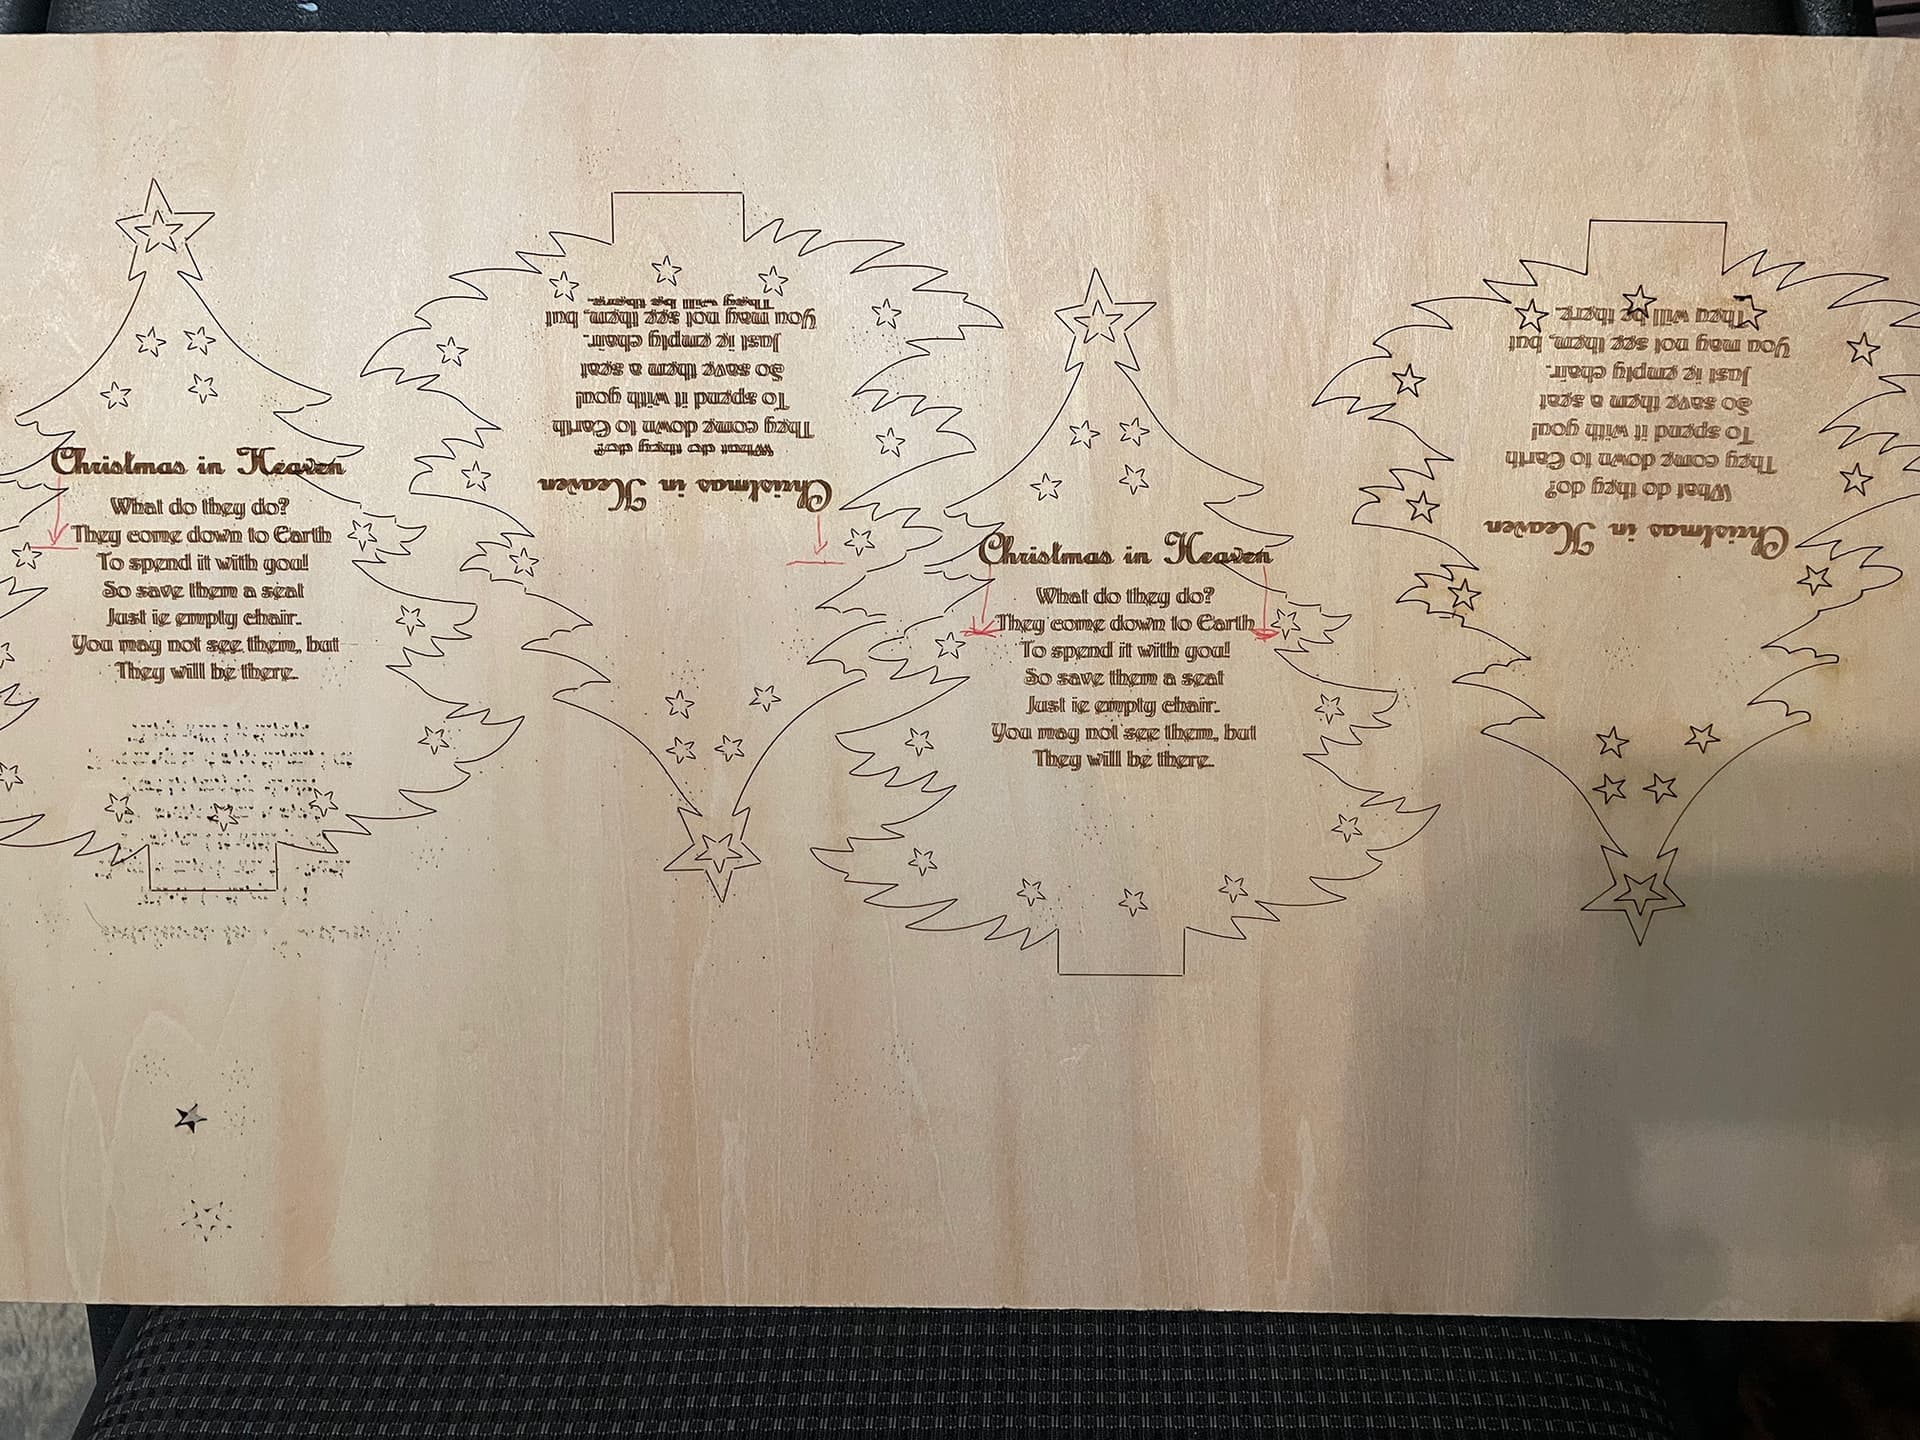
My bad, I thought I put it in the first post. All the lines are about 1/2 inch down from where they should be on the material. You can see from the image above where it should be.
After looking at the photo I think it’s more likely that you’re missing steps somewhere. Notice that the location of the tree outlines don’t match the design in every case.
I don’t think your cut settings are necessarily an issue so I suspect either loose belts or possibly loose pinion. I’d focus on the Y-axis. See if the belt or pinion gear is loose.
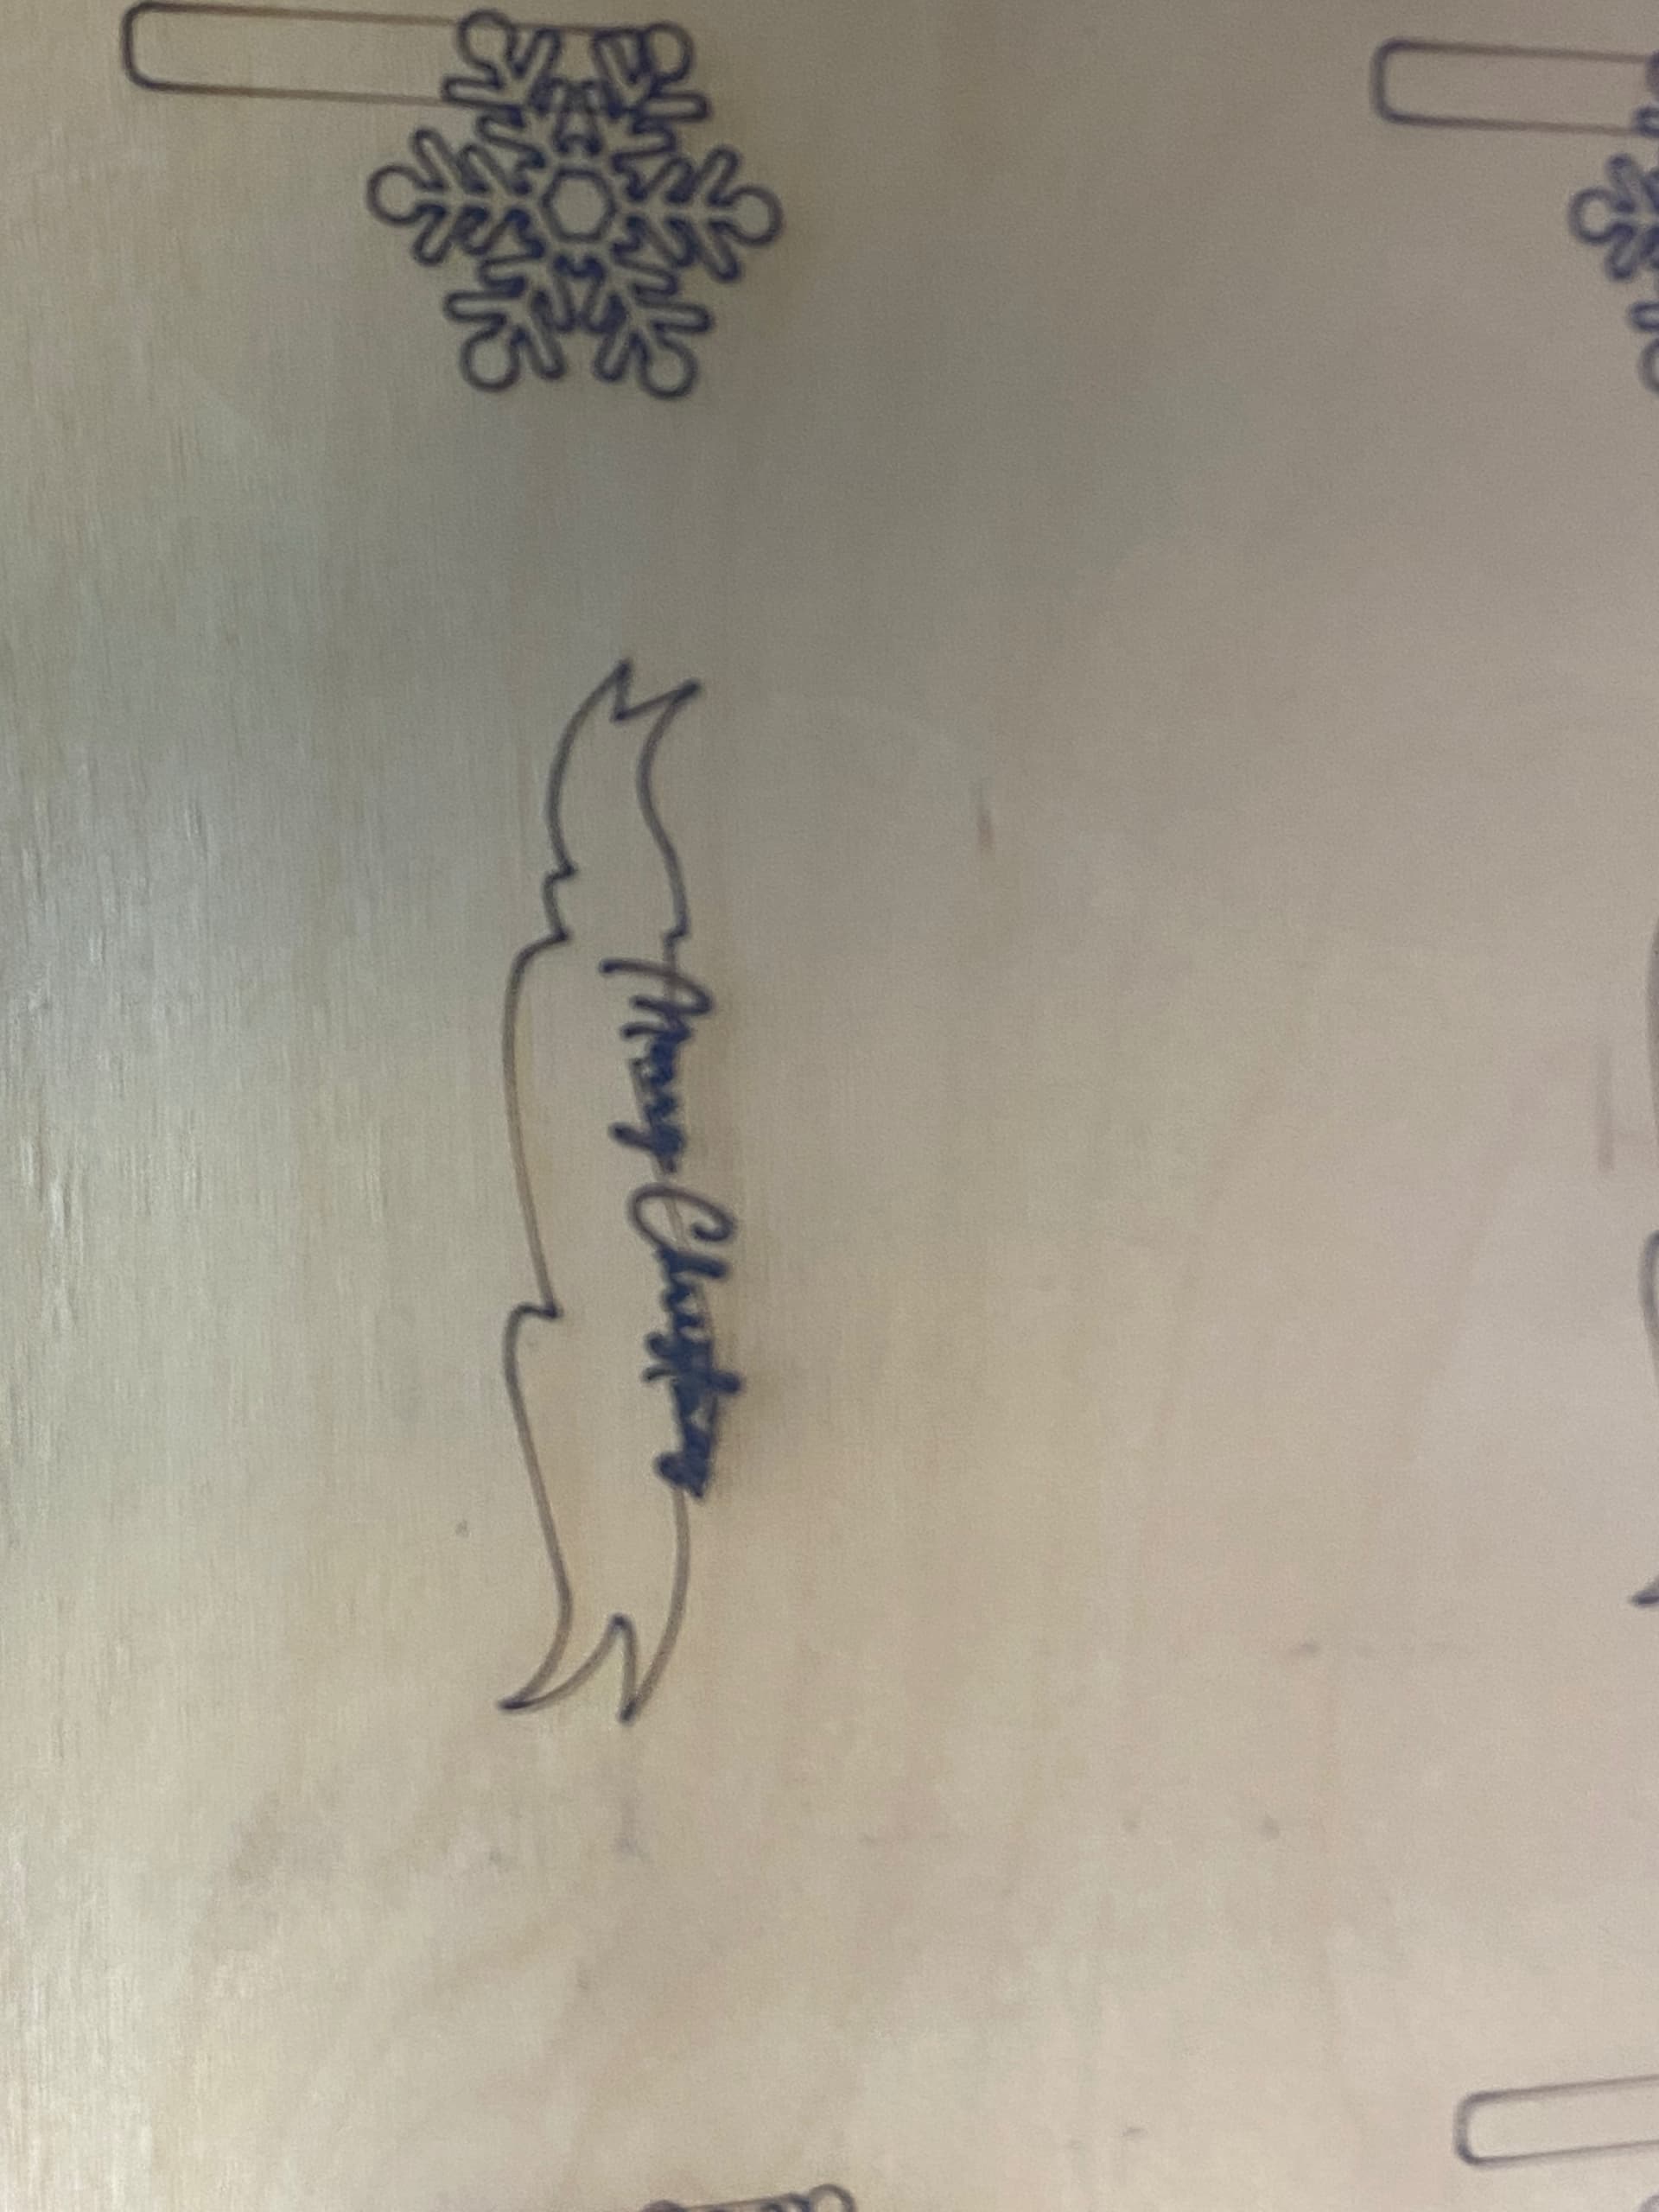
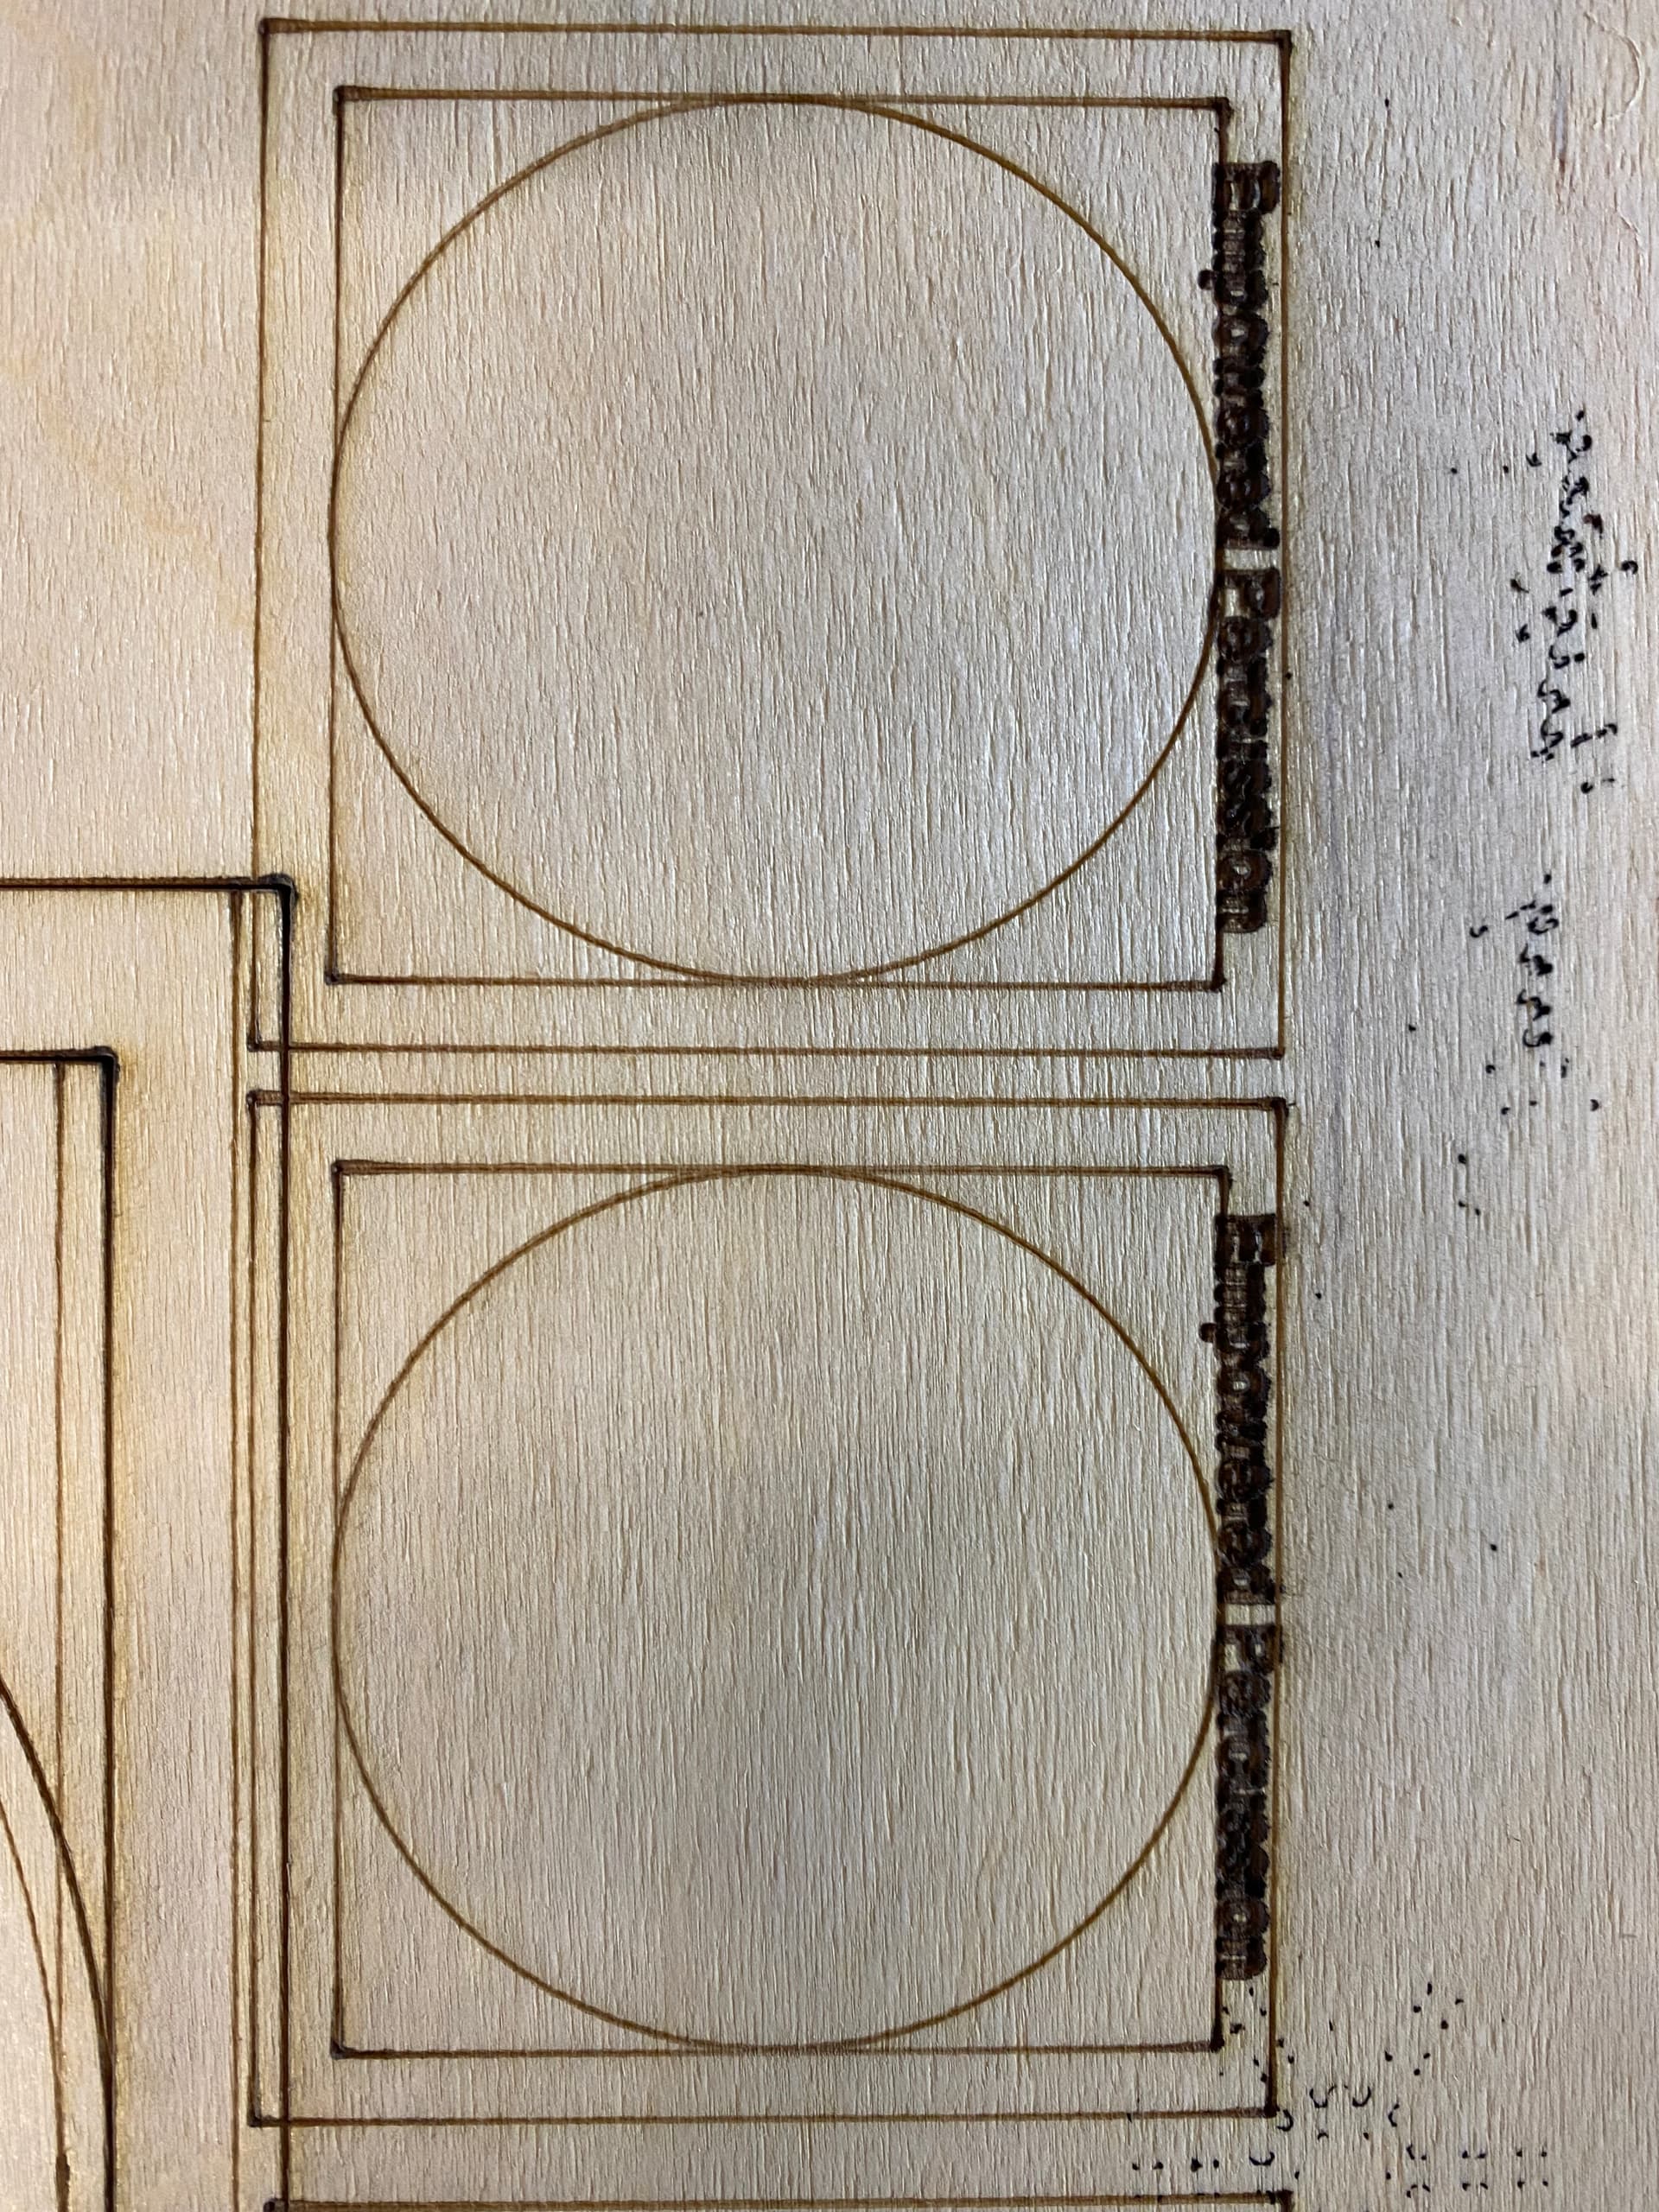
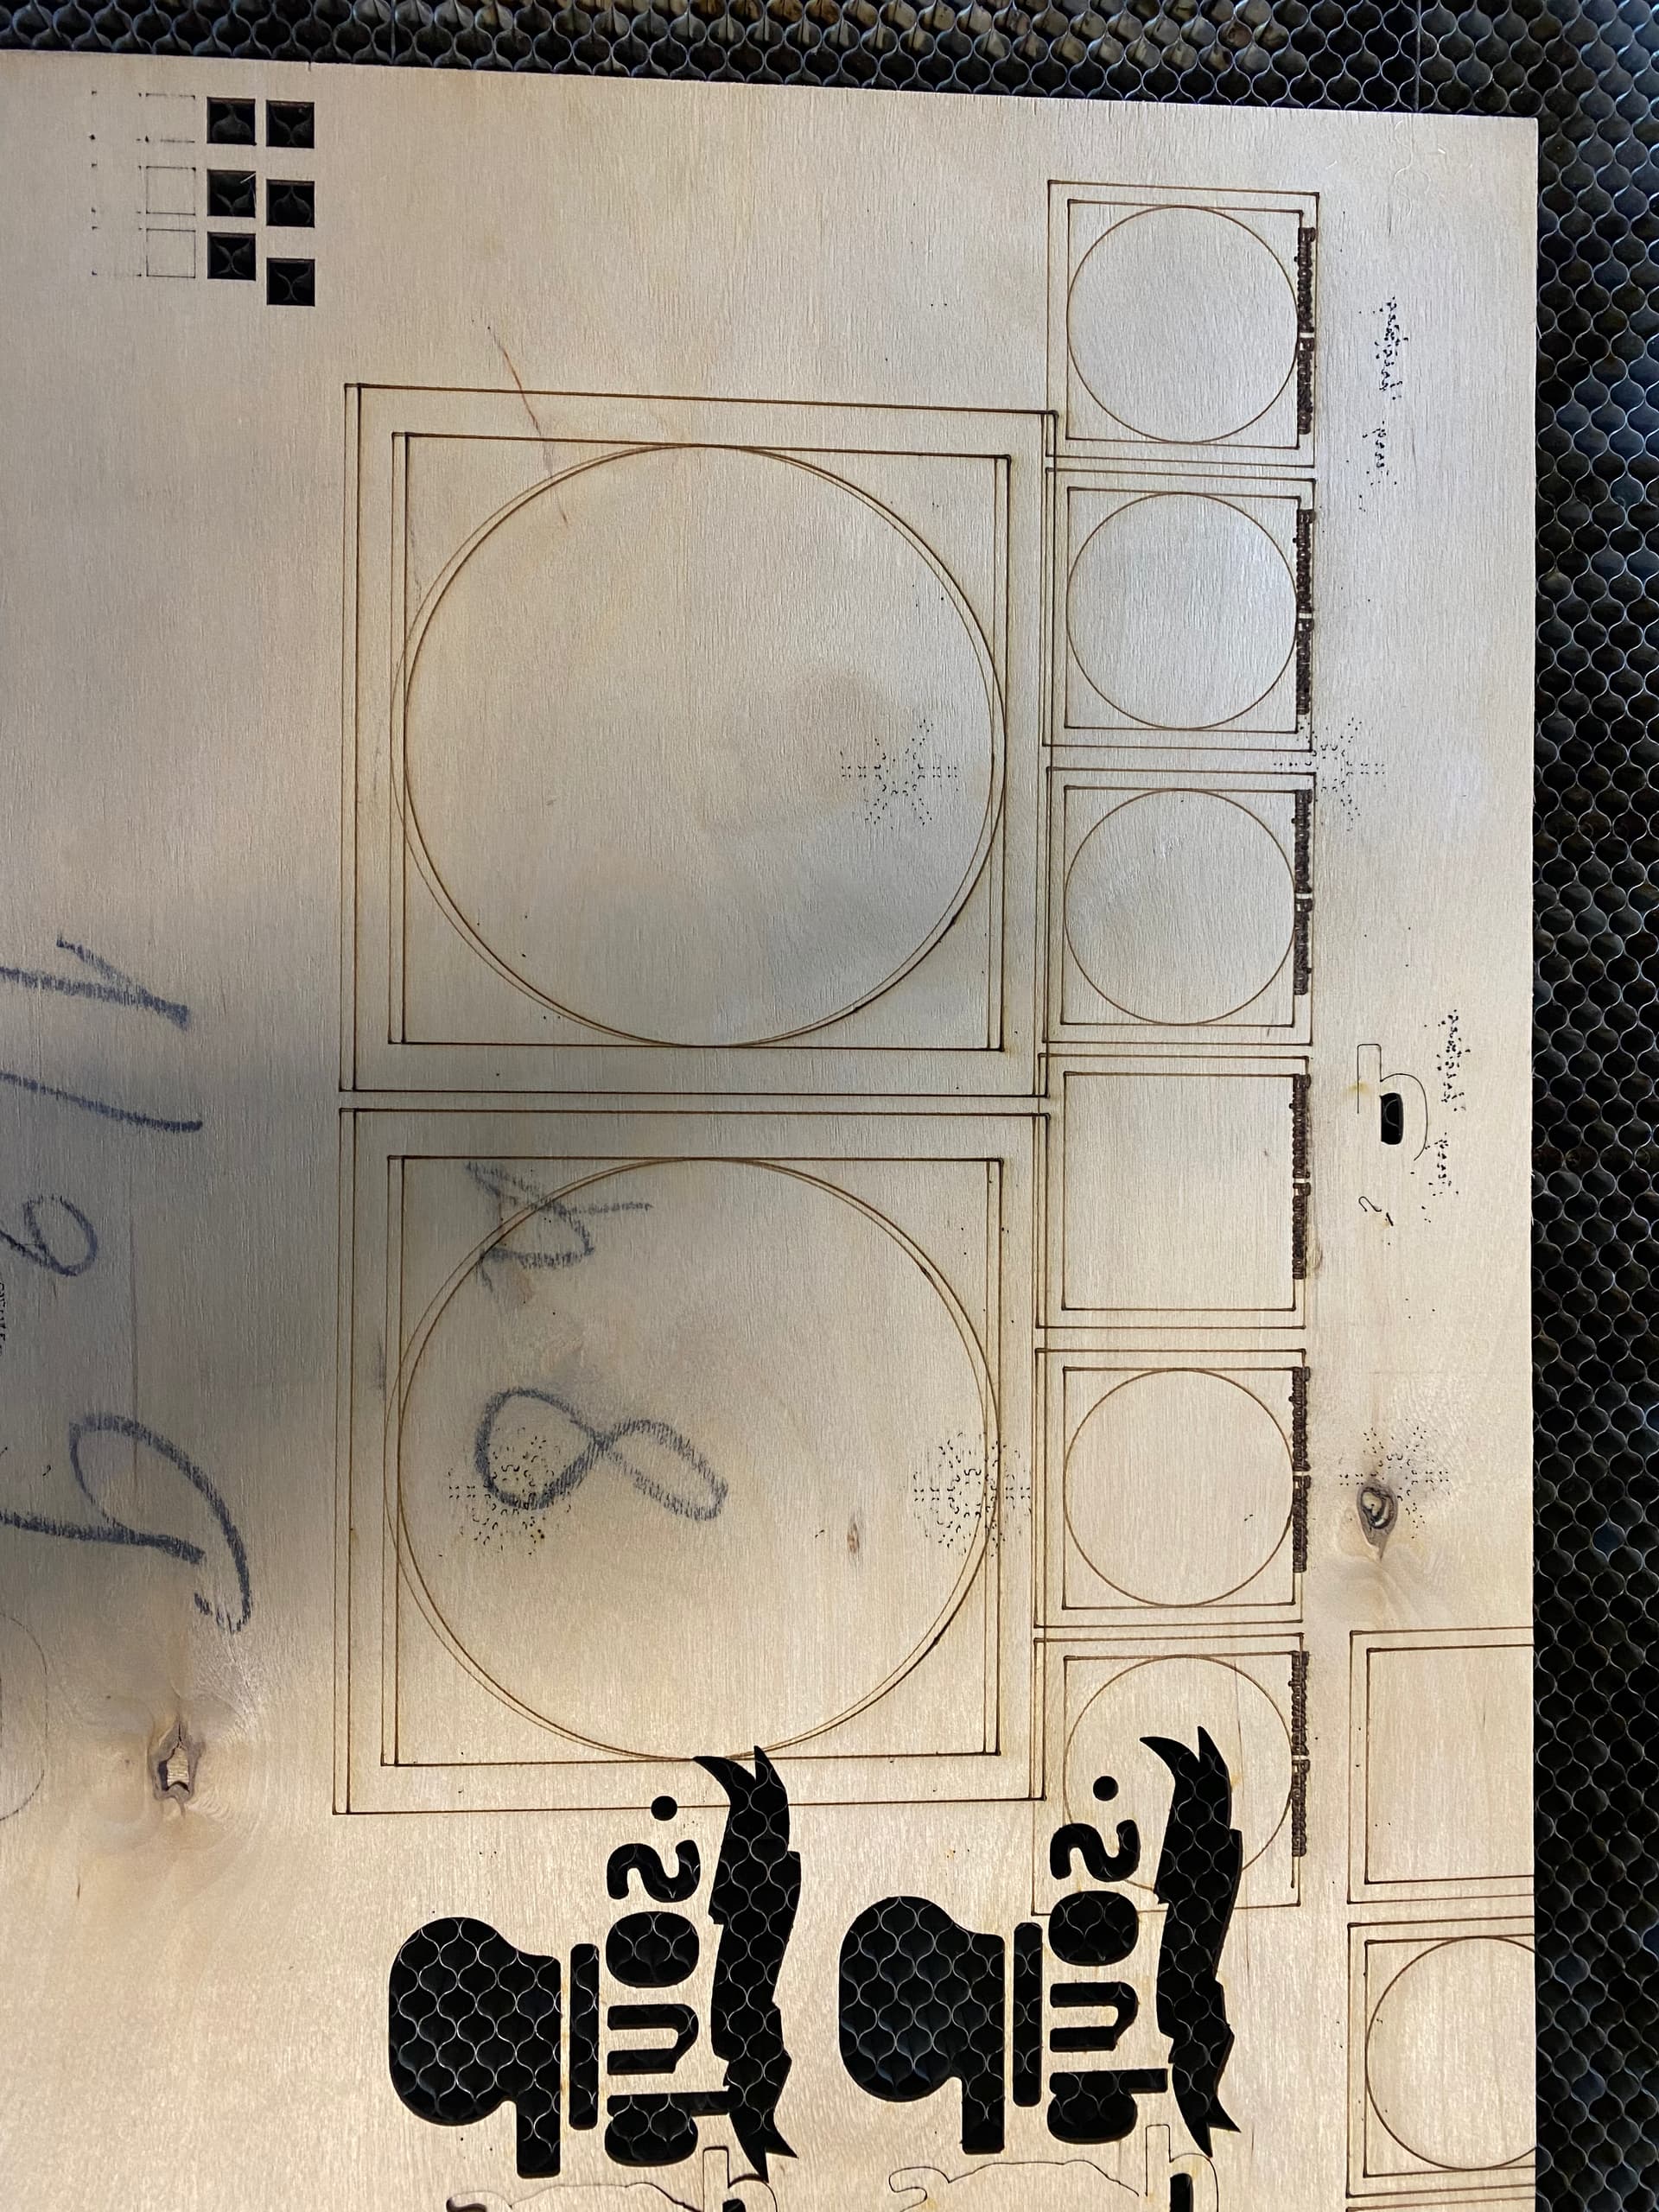
Mine is doing the same… Notice on the merry Christmas picture, the upper left the engravings or centered but the further right they go the more off-center they get. The second issue is that if my machine is homed and I run the program again over the top of the other one, it never lines up perfectly for example in the picture of the boxes. I have 350 ornaments to do in the next week lol Sorta slows my roll.
I did tighten up my Y axis belt, didn’t resolve the issue.
Uploading: 23C50806-2232-4737-B363-12E4560A5F40.jpeg…
Processing: B98DFF48-3201-4A1C-8D90-54DC4282A1C3.jpeg…
Uploading: 38947AC8-45E0-482E-9BD6-5C7269AFFC04.jpeg…
This is a good sign that you’re losing steps somewhere. This will be either in the mechanics or in the stepper motor.
Do you ever hear a buzzing or whining sound during the process? That would be an indication of the stepper motor skipping. If not, then likely mechanical. If your belts are well tensioned then make sure they’re not overtensioned and that you’re not experiencing any binding in the motion. Check pinion gears that they’re securely mounted on the stepper shaft.
By the way, your photos are not uploaded. You need to make sure they finish uploading before completing the reply.
1 Like
I’m new to this so might be misunderstanding the stepper stuff. If it were a loose belt, wouldn’t there be more of a random shift? It seems pretty even across the piece.
It’s possible that it’s losing a fairly consistent number of steps for each rapid move. If the belt or pinion is just on the verge of slipping this could be possible. If the belts were extremely loose then yes, would look a bit more unpredictable.
I tend to think it’s more likely that you’re dealing with a loose pinion gear but not absolutely certain.
You could check for that by engraving a circle. If the start and ends don’t match then a good sign that you’re dealing with backlash and that often comes from a loose pinion gear.
Good insight. The other thing is that if I do a small nesting of an ornament 6x6 in it usually turns out good. Sometimes not so much on the 1/4th hole of the ornaments though. It doesn’t vector cut it perfectly center as the rendering is.
I did cut a circle and several of these small parts and they seemed to turn out well only if it’s one group of nested parts at a time.
What does the image on the panel look like when you do this? Does it look like the actual burn or does it look clean? If the image looks clean and as it does in LightBurn then the issue is most likely a mechanical or stepper related issue… keeping in mind this could also be derived from overly ambitious speed/acceleration settings on the controller. However, if you are using settings tuned from the factory they’re typically fairly conservative from what I’ve seen and should work okay assuming the rest of the mechanical bits are sorted.
1 Like
I hope your were referring to the panel as on the wood? The image is taken apart by letters and the ornament and cut out. If I group these all together it’s roughly 6 x 8”. I can cut them out one group at a time verses a nested bundle of ornaments. Even doing one ornament the hole on the top of the ornament slightly to the right seems to not cut perfectly center. The machine setting is stock. I did tighten up the Y axis, it didn’t help. I will check the pinion and tighten up the x axis on the right side, it seems looser than the left side.
I’m referring to the controller panel that has the display and buttons to control the laser and is mounted to the laser itself.
1 Like
I will be checking that first thing tomorrow morning when I get back to my machine. I should also note That I put a 45° angle along the X channel and a square that I engraved and it looked even.
Thank you sir.
Hi toned down my speed significantly so I will see what happens. By the way, I am problem-solving trying to get my pi burner 3.0 to work without getting frames locked. I have a pretty big machine and I noticed some other people were talking about the same issue with the RIUDA controller. My question is do we have the option to chime in or reply to old post? Seems like they’re all closed and it would be nice to start another conversation regarding a similar issue.
I understand the Y frame/issue, my rotary machine is set up in the center of my machine to the furthest rate justification nearest my home. If I convert my 40 inch bed Y to mm, I’m at about 1046mm. I then need to adjust for half that if my rotary is half way between the bed. So what happens when I hit go from the controller (under user origin settings g over my laser) the travel distance to my machine eats up 450 mm, the rotary will spin as well letting only 50mm to cut a quarter of the job. Logo is only 4 inches.
Any wisdom?
@jkwilborn from my memory has a Pi Burner and may be able to provide some insight.
Did you have any issues setting up the PiBurn?
Does it engrave correctly on the rotary when it does work?
I don’t follow this description of what’s happening… can you clarify…
What is the “Start from” and “Job Origin” settings.
![]()