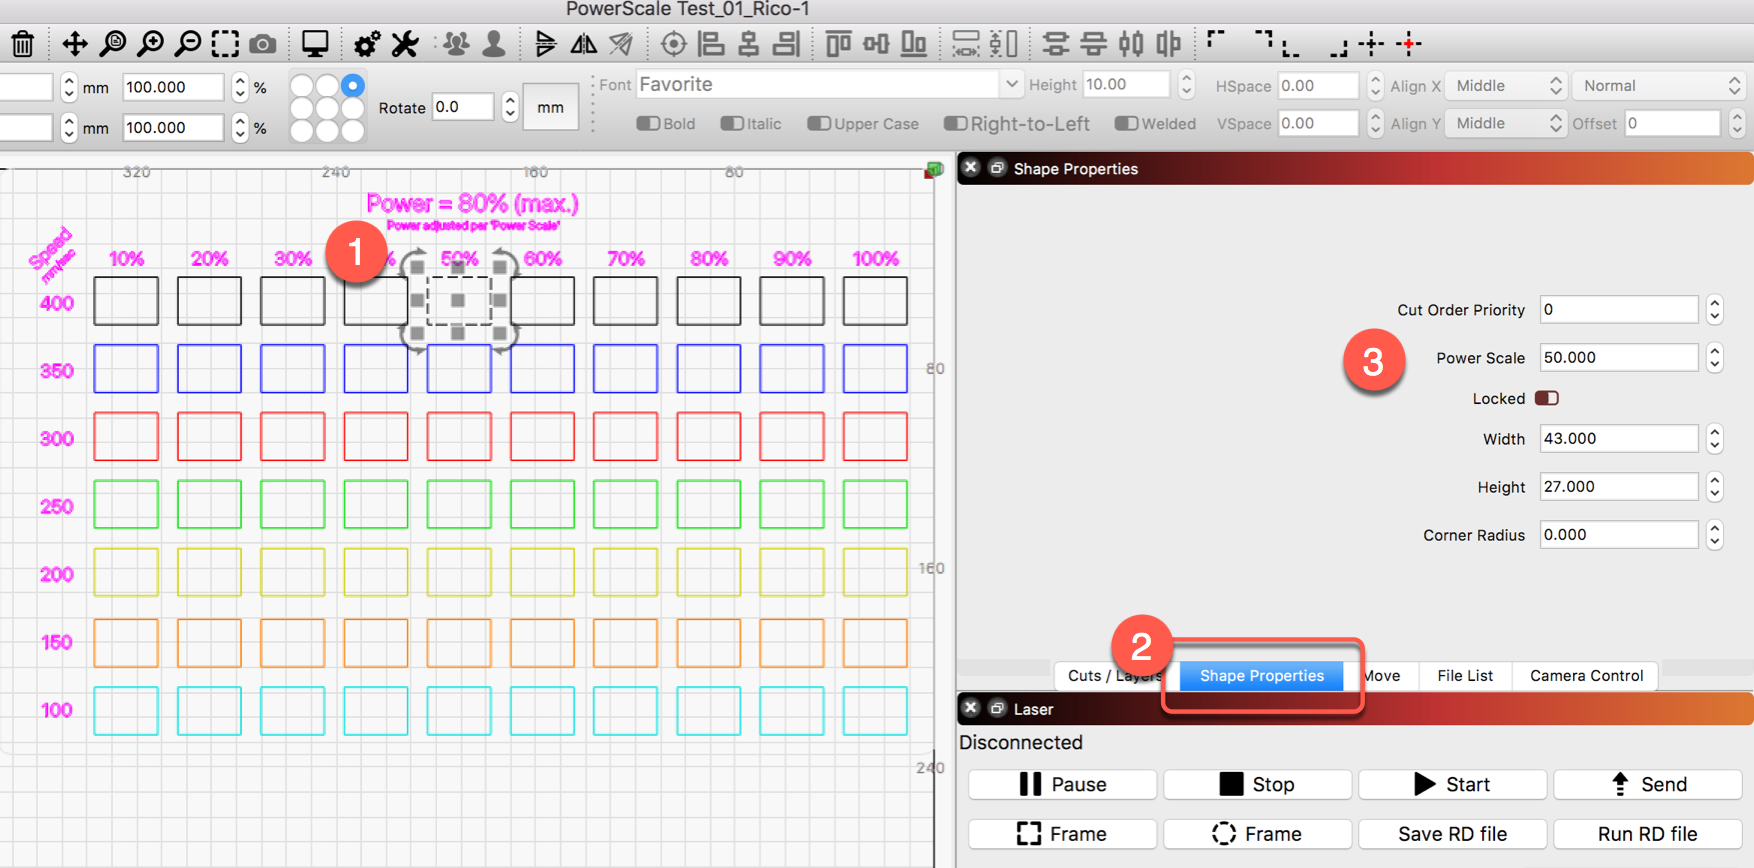
Material Cut/Scan Test Files - Power Scale

guys can you help me ,why did I circle the blue color burned and had holes while the middle one was not

I get an error when I load this file, @Rick, about some text file not being installed on my system??

This may just be a notification telling you that the font I used in this file is not available on your system, but would need to see the message to confirm.

Probably what it is.
So, I’ve a 90W tube.
I’m trying to dial in a setting to get a dark engraving on a veneer. So how do I adjust the power scale to be more fractional than huge?

Thanks!
John

Look at using ‘Overscanning’, which allows travel past the burn, so the laser has some time to turn around and start heading back.

@Rick
Do i have to do that for every individual square or is there a programatic setup?

Hmm. I guess I have some learning to do. I adjusted the speeds, that worked ok because that was at the layer level. Then I went to the black squares and adjusted the power %. Choosing any other color square selects the whole group - I guess I have to ungroup the layers and change the power on each one?
Thanks for making this, @Rick

Figured it out. Delete the other layers, then duplicate the black layer and assign it. Working great now! Thanks!

1 Like

I had the same questions with my desktop k40, which I sold and bought a cabinet 60w. A lot of these Chinese cabinet lasers 60/80/100 have a power/amp digital meter inside the lower cabinet. After a lot of looking I simply ran a test myself on my machine. Got some material and started using the pulse button at 8% which I got a 1 ma reading. 10% 4 ma,15, 20% the same at 5 ma 25/7 na, 30/9 ma, 35/10 ma, 40/12. 45/13. 50/15, 55/16, 60/17, 65/18, 70/19, 75/21, 80/22, 85/23m 90/95/98 were all 24ma. 98 was the maximum I could set with ruida controller. Not sure if this is useful or not, nonetheless, run your own tests and copy your results. Needless to say mirrors aligned and clean mirrors and lens.

Thankyou for this burn test file. I’m sure this will help me out a lot.

1 Like

Much appreciated!

1 Like

Thanks for the share! I would like to run this on several other types of material. I have an 80W OMTech laser and when i ran this it ran fine but the lettering would not run. I ran this on a piece of popular wood. This is only my 3rd attempt to run anything but my 1st on this. Just wondering if I didnt do something correct?

Make sure you have output selected to “on” on top right (cut/layers window). If it is on make sure the power is above the limit where the laser will actually fire. My 60w OMT (wish it was the 80) won’t fire unit the power is set to 11%. I had the same problem as you early on. Not sure how the 80w acts. Do a test, set your power to 10 on a short line/circle/square and fire. If there is no cut/engrave move up 1%, test again and repeat until you see your tube fire. Evidently this is a normal function of the CO2 type lasers. Also, if at the 10% you to get a fire then reduce the power by 1% and test until the the tube doesn’t fire. I would love to run at a lower power, down in the mid single digits if I could. I use the speed to compensate. ie: 11% / 450 speed to get the same result.

1 Like

greatly appreciated! i will work on this sometime this week.

I really hope this is covered elsewhere and I just couldn’t find it.

Can you create a similar grid but with multiple passes on one axis and z step down on the other?

I’ve got a Snapmaker 2.0 A350 with the 1600mW laser. I’ll try to attach an example.

Thanks

  • N

Yes, this can be accomplished, these Z moves would need to be added and are required for both ‘Line’ and ‘Fill’ modes.

and / or

2 Likes

N00b to the forum, and engraving, as well. I’ve been futzing with the templates and finally engraved a set of the tiles onto Maple. All was well, until I got into the slower 900/600 and 100/90/80/70 tiles (the top left of the template). At that point, I was seemingly in the range of “you’ll burn your house down!” power, and that’s not the intention here.

How do I modify these rows (which are grouped together it seems) to remove the ones that are just too slow/too powerful, but not also remove all the other test swatches at the same time?

Thanks in advance, y’all!
–Mike

Ungroup first. Then…,

Thanks, Rick, that was really too easy. I was worried I was going to jimmy up the gradient if I futzed with them individually.

2 Likes

This works nicely on my Ruida controlled generic 60W laser, but my 150W Boss Laser HP3655 with a Trocen/AWC 708C controller doesn’t seem to pay any attention to the Power Scale. Do you have any ideas regarding this problem? Thank you for any help you could give.