I have merged this double post to keep the responses together.
It is possible that this affects some machines more than others. But as I tried to explain/show before, there should be no optical difference between AaO or individual engraving.
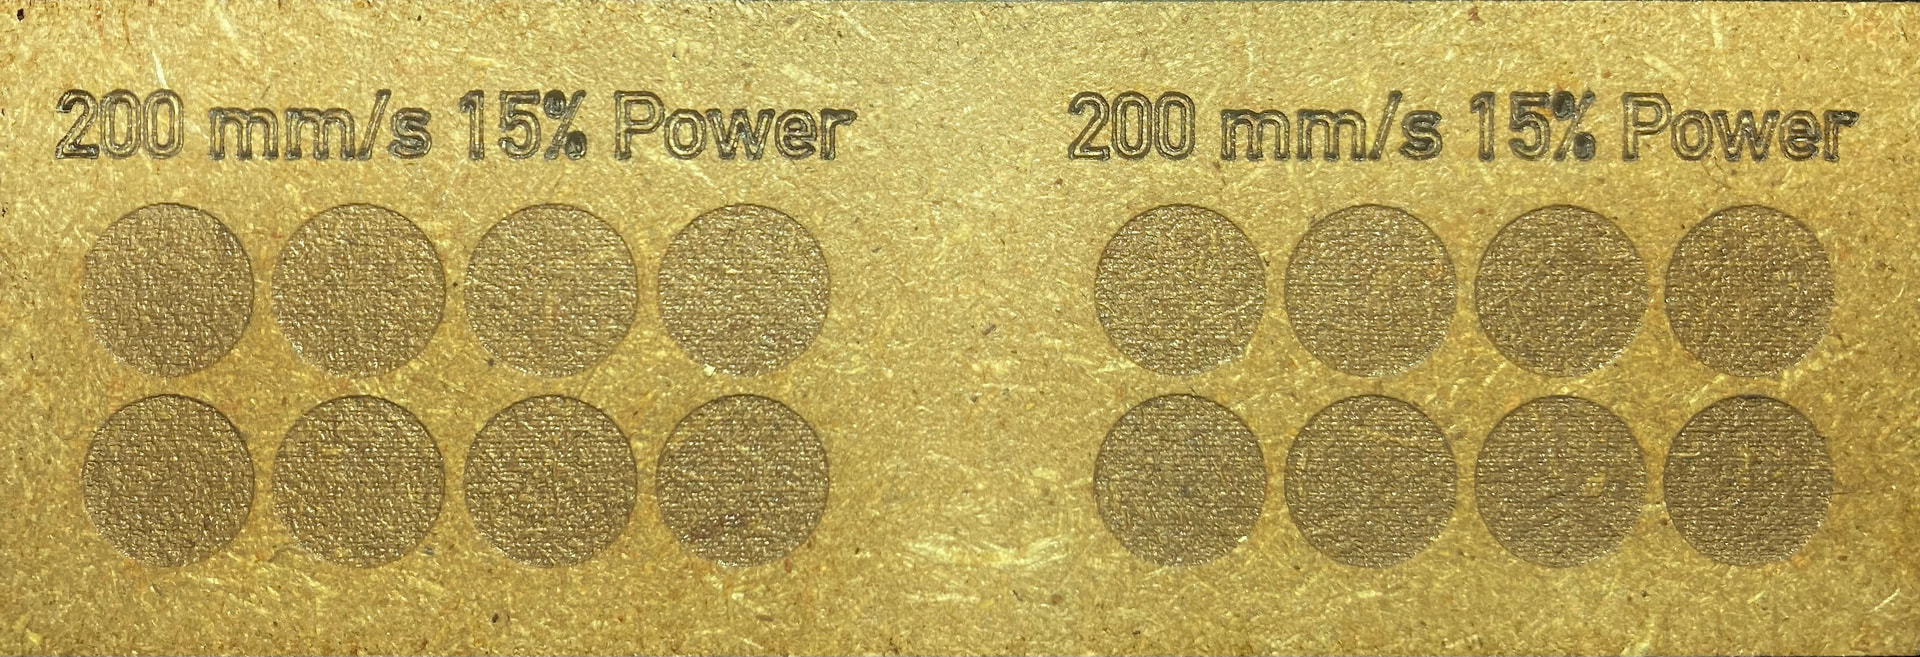
Try looking at this picture and tell me if you can clearly see the difference between the 2 examples?
(ignore the writing, too much power has been used)
That is 472 inches per minute!
Of course there is no difference. The amount of time your laser is in a certain area is a lot less than mine.
Thanks for the test though.
Have you tried measuring the time for a similar project and see where your machine’s “breaking point” is, i.e. overscanning eats up time gains?
As I wrote before, your machine may perform better, but the principle is the same for the machines.
This is not about proving that I am right, it is more of a suggestion to think unconventionally to find and understand optimal and other solutions.
That is funny and humble of you.
You misread what I wrote.
Your machine is much faster then mine.
I can’t even lay a finger on that speed.
It is certainly possible. Do you have a CNC milling machine with a laser head attached?
What is your “max possible - usable” engraving speed?
True but not relevant to the conversation. You set the speed and power that works for your machine. @bernd.dk is correct, each square is filled individually by design. If you prefer to have it scan all squares like an image, that is a preference, not a bug or software failing.
You should have offered this right at the beginning. A Material Test is not a speed contest. It is a tool to help you get in the ballpark for speed and power settings. It is not a tool to optimize max performance of your laser or project.
1 Like
It is very relevant to the conversation and from a programming point of perspective.
I’ll deal with both here
Test this on your laser so you will know.
Put the laser on 1%. Hold it there. Don’t go anywhere. Just hold it.
What you will see is a slow burn spreading outward even though it is one percent the burn, like all fire, will spread outward.
Three things control that. Speed and power and area or space apart otherwise it will give you a false color. Meaning a color that you think you will get during the project.
Doing a small square, one at a time, your not getting the speed you ask for or programming it for period so it is a waste of your time and the lightburn programmers need to be aware of that to fix it. Which, in turn, does not give you the true representation you should be getting during your project because I’m sure your project is not a bunch of small individual squares.
To fix this, lightburn needs to quit treating it globally and print to the screen in layers so users can adjust accordingly.
Don’t act like you know the answer. Just hold it still, burn at 1% and watch what happens.
Then transpose that same idea to a small square. The exact thing happens in a small square. Burns spread! That’s why it is better to do it all at the same time but those radio buttons do not work during a material test. They aren’t even grayed out as further proof of how right I am. It is a mistake on their part.
Oh yeah, one more thing. When you spoke of a bug and said it is a preference.
During a material test, you have no choice in how you want it to burn. You have no choice.
Those radio buttons do not work and they are not grayed out so what you said is irrelevant because you have no choice in how it burns.
Do you get it now?
The only way to give us a choice is doing what I said earlier.
I agree with everything except the first and last paragraphs. Yes, if you hold it in one spot, it will gradually burn outwards. To add to that, it will also burn a cone through the wood (notice I specified the material?).
You set your choices in the Material Test. Each square is a single test. You adjust the size of the square, and the range of both the power scale and the speed scale.
If any, or all, of this is unacceptable to you, you are free to create and use your own version. But I doubt you will see much rewrite of the current Lightburn test.
1 Like
Adjusting the power and speed of each square???
Are you telling me your laser, in the span of less then an inch or whatever, can achieve 400mm per second and defy the laws of physics like a ufo?
You’re not achieving that speed at all. So what good is their material test the way they have programmed.
Do you really believe you’re getting that speed in that square?
No you’re not. Therefore when you do your project you’re probably getting something completely different simply because the type of burn you want requires a specific combination of speed and power that you prefer. Dunno about you but I am. And if I am there are a lot more out there.
Dunno who you’re talking to about closing a thread but I agree with you on that.
And, about the radio buttons not working during a material test. I’m sure they already know. I am just using it as evidence that the material test is not designed right. The more people that know about it the more it will get fixed.
I’ve had lightburn a couple of years ago and just recently bought it again and the same issue was also in that version. So, there has been no change in the material testing. Only radio buttons that do not work which, in the programming world, is a no no.
Pardon me for jumping in.
I don’t know the behind the scenes of how the material test is built and why the radio buttons don’t work in it.
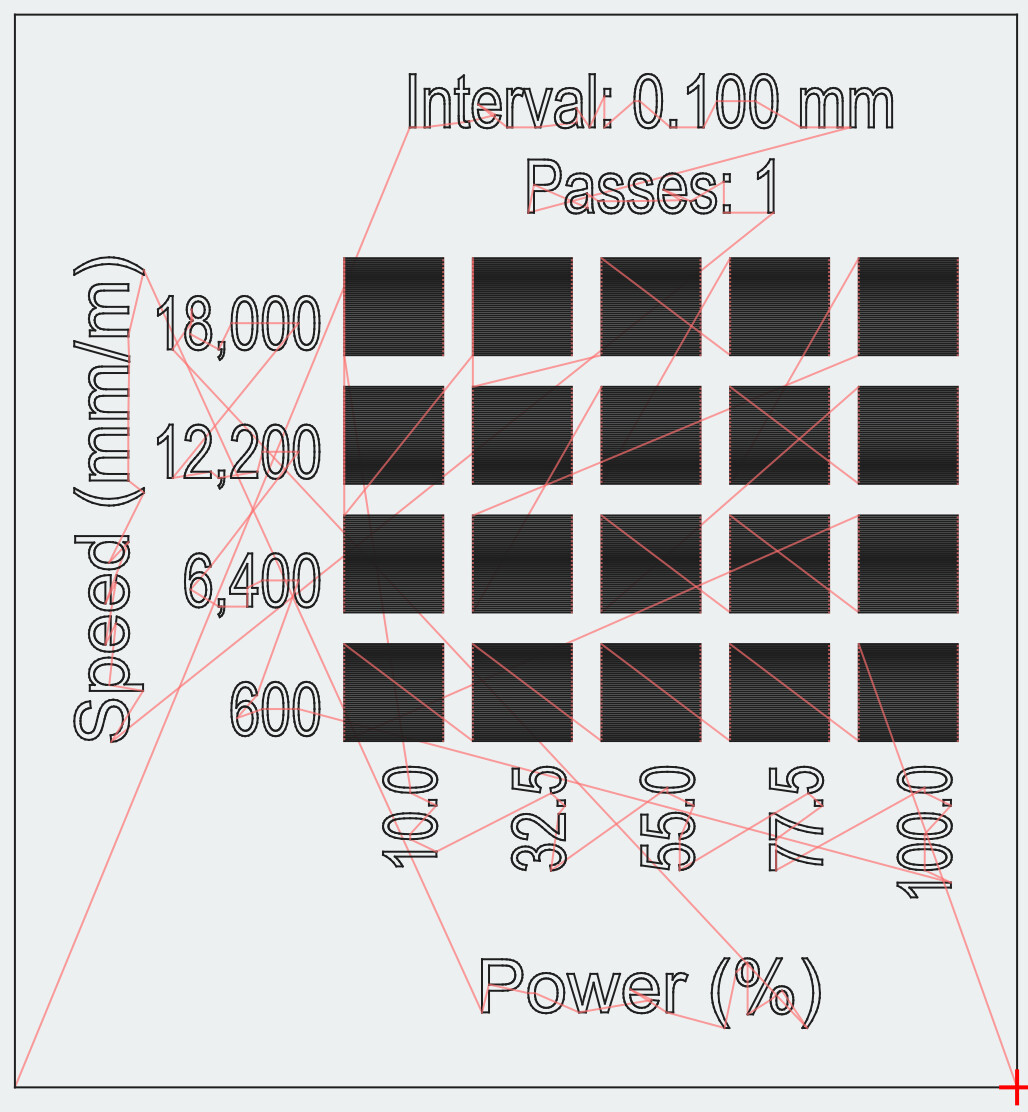
I absolutely agree that the laser cannot get to higher speeds on the material test when using line mode. In fill mode though there is the overscan setting, which you can change to allow the laser to reach speed before firing. Look at the traversal lines in the previews below. This is with no overscan. No traversal lines extending beyond the test square. Impossible ofr the laser to reach speed.
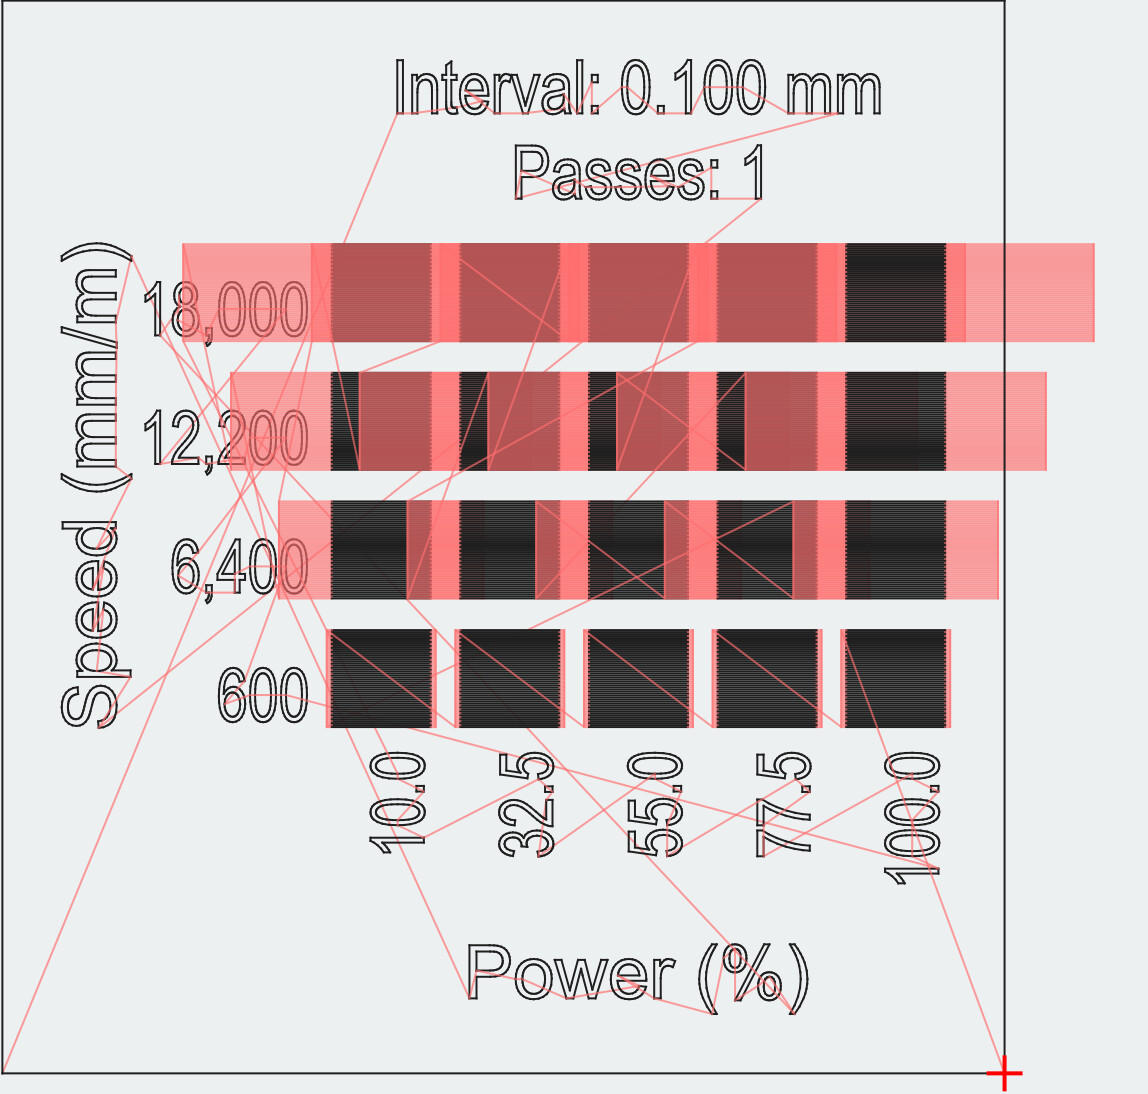
This is with 2.5% overscan. The laser probably will reach speed.
This is 5% overscan. The laser most certainly has enough room to reach speed here.
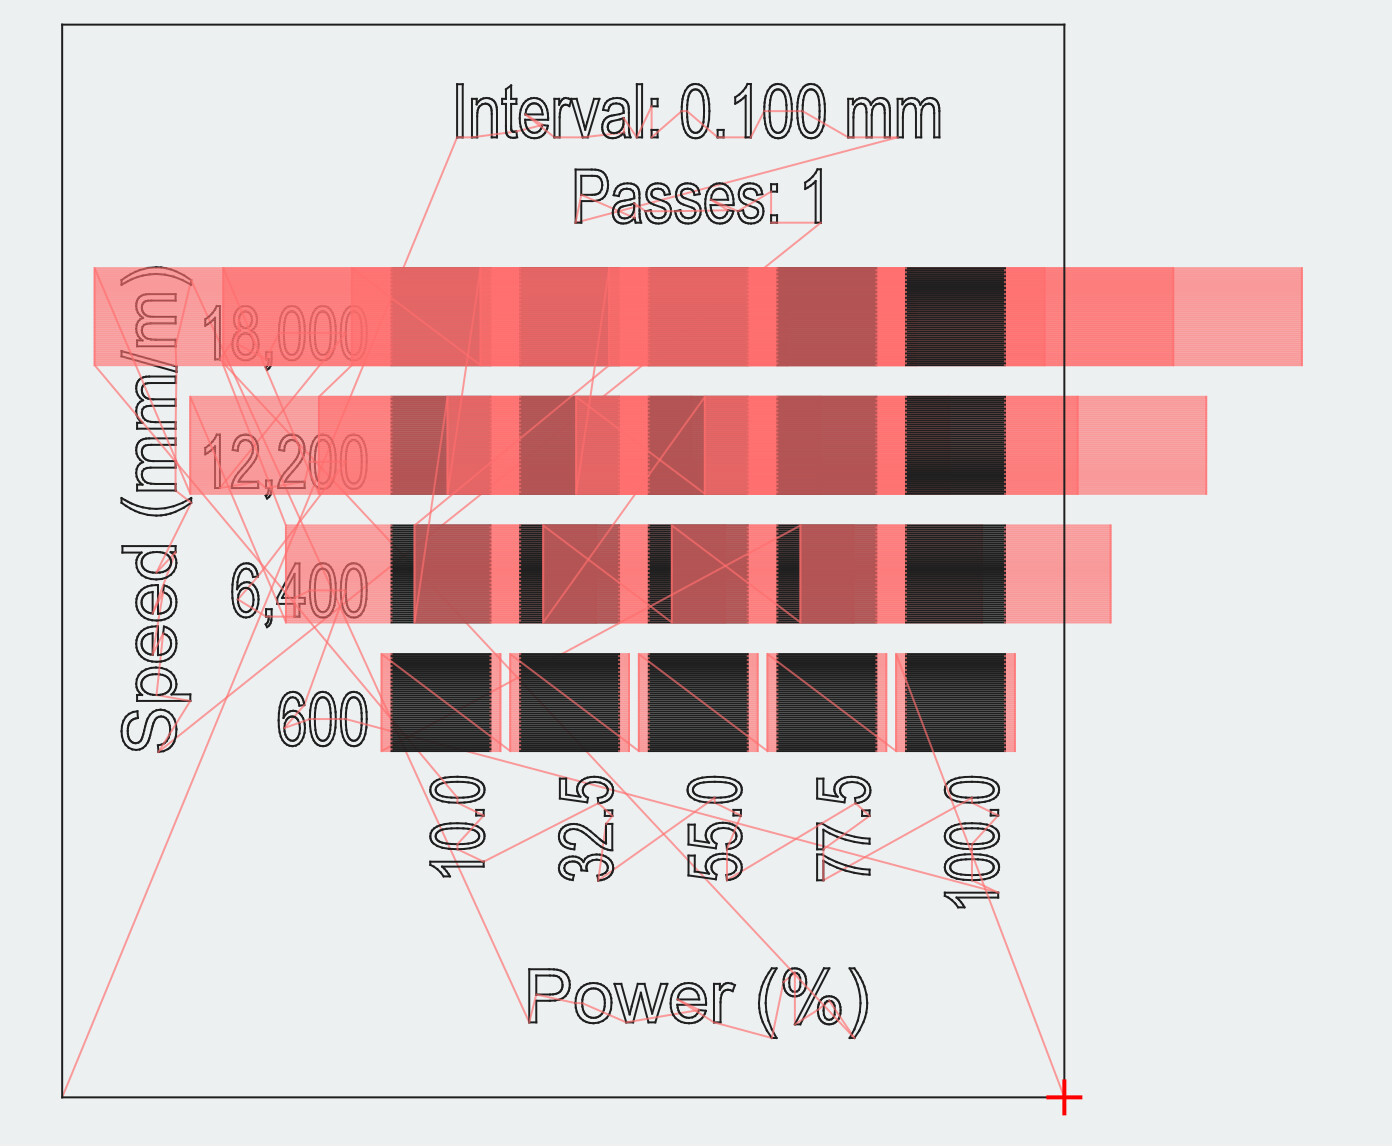
Notice how much farther the laser travels beyond the test square as overscan is increased. This allows the laser to reach speed and you have control over the amount.
1 Like
This is exactly what I, and others, have been saying. I do not understand why you seem to not be reading that in our postings.
If @bernd.dk says this posting has run its course and should be closed, I agree 100% with that opinion.
I thought the Material Test was a more recent addition. Maybe I am wrong…
I think that is because the material test somehow hijacks the material settings window for its own purpose. I guess they didn’t have the function to alter the layer settings window from an “outside” function. The material test wizard is just kind of gcode-generator, so nobody thought about deeper implications for other windows.
I generally understand your point, but in my perspective, the test is still executed right and I also expected it this way. If you do a material test, each square shall tell you exactly what these special settings look like. If you start to change the behavior by running them in one go, you will change the inner squares compared to the outside ones. A square with identical settings will look different if it’s on the edge of the test or in the middle of a line. Because the acceleration and deceleration is different then (the effect we are talking about here).
I also get your point that the laser won’t reach high speeds then. But that’s also absolutely correct/expected. The size of an object plays an important role (as we all know). A user needs to take the physical capabilities of the laser into account. It is obvious that a laser can’t reach 500mm/s within a 1mm square. So, if a user wants to test 500mm/s, he needs to adjust the size of the rectangles to like 50mm or whatever. You can’t test high speeds with minimal squares. Maybe the wizard window should warn the user, “You are using high speeds. It is recommended to increase test size” or something like that. That’s also why many people are asking why they didn’t get the expected results after doing the material test; they do not understand this connection.
The material test will not release the user from making a sensible choice for the test settings.
Bottom line, in my opinion, the test is working absolutely right, as I would expect it to. Though, I agree, if they greyed out the unused options, would make things even more obvious. Maybe documentation should also be more extensive, so that people understand the whole matter in more detail.
2 Likes
A Ruida an other dsp controllers will do this properly as it computes the overscan internally for each block.
You might have to look closely at the preview to determine the lasers path. Doesn’t sound like a mistake Lightburn would make.
![]()