Mirror Protection?

Happy New Year!

I have a 130w Co2 laser that lives in my work shop, where I work mostly with wood, using saws and a CNC Router.
Due to the laser’s size, my shop is the only place I can keep it, so I am CONSTANTLY struggling to keep dust at a minimum.
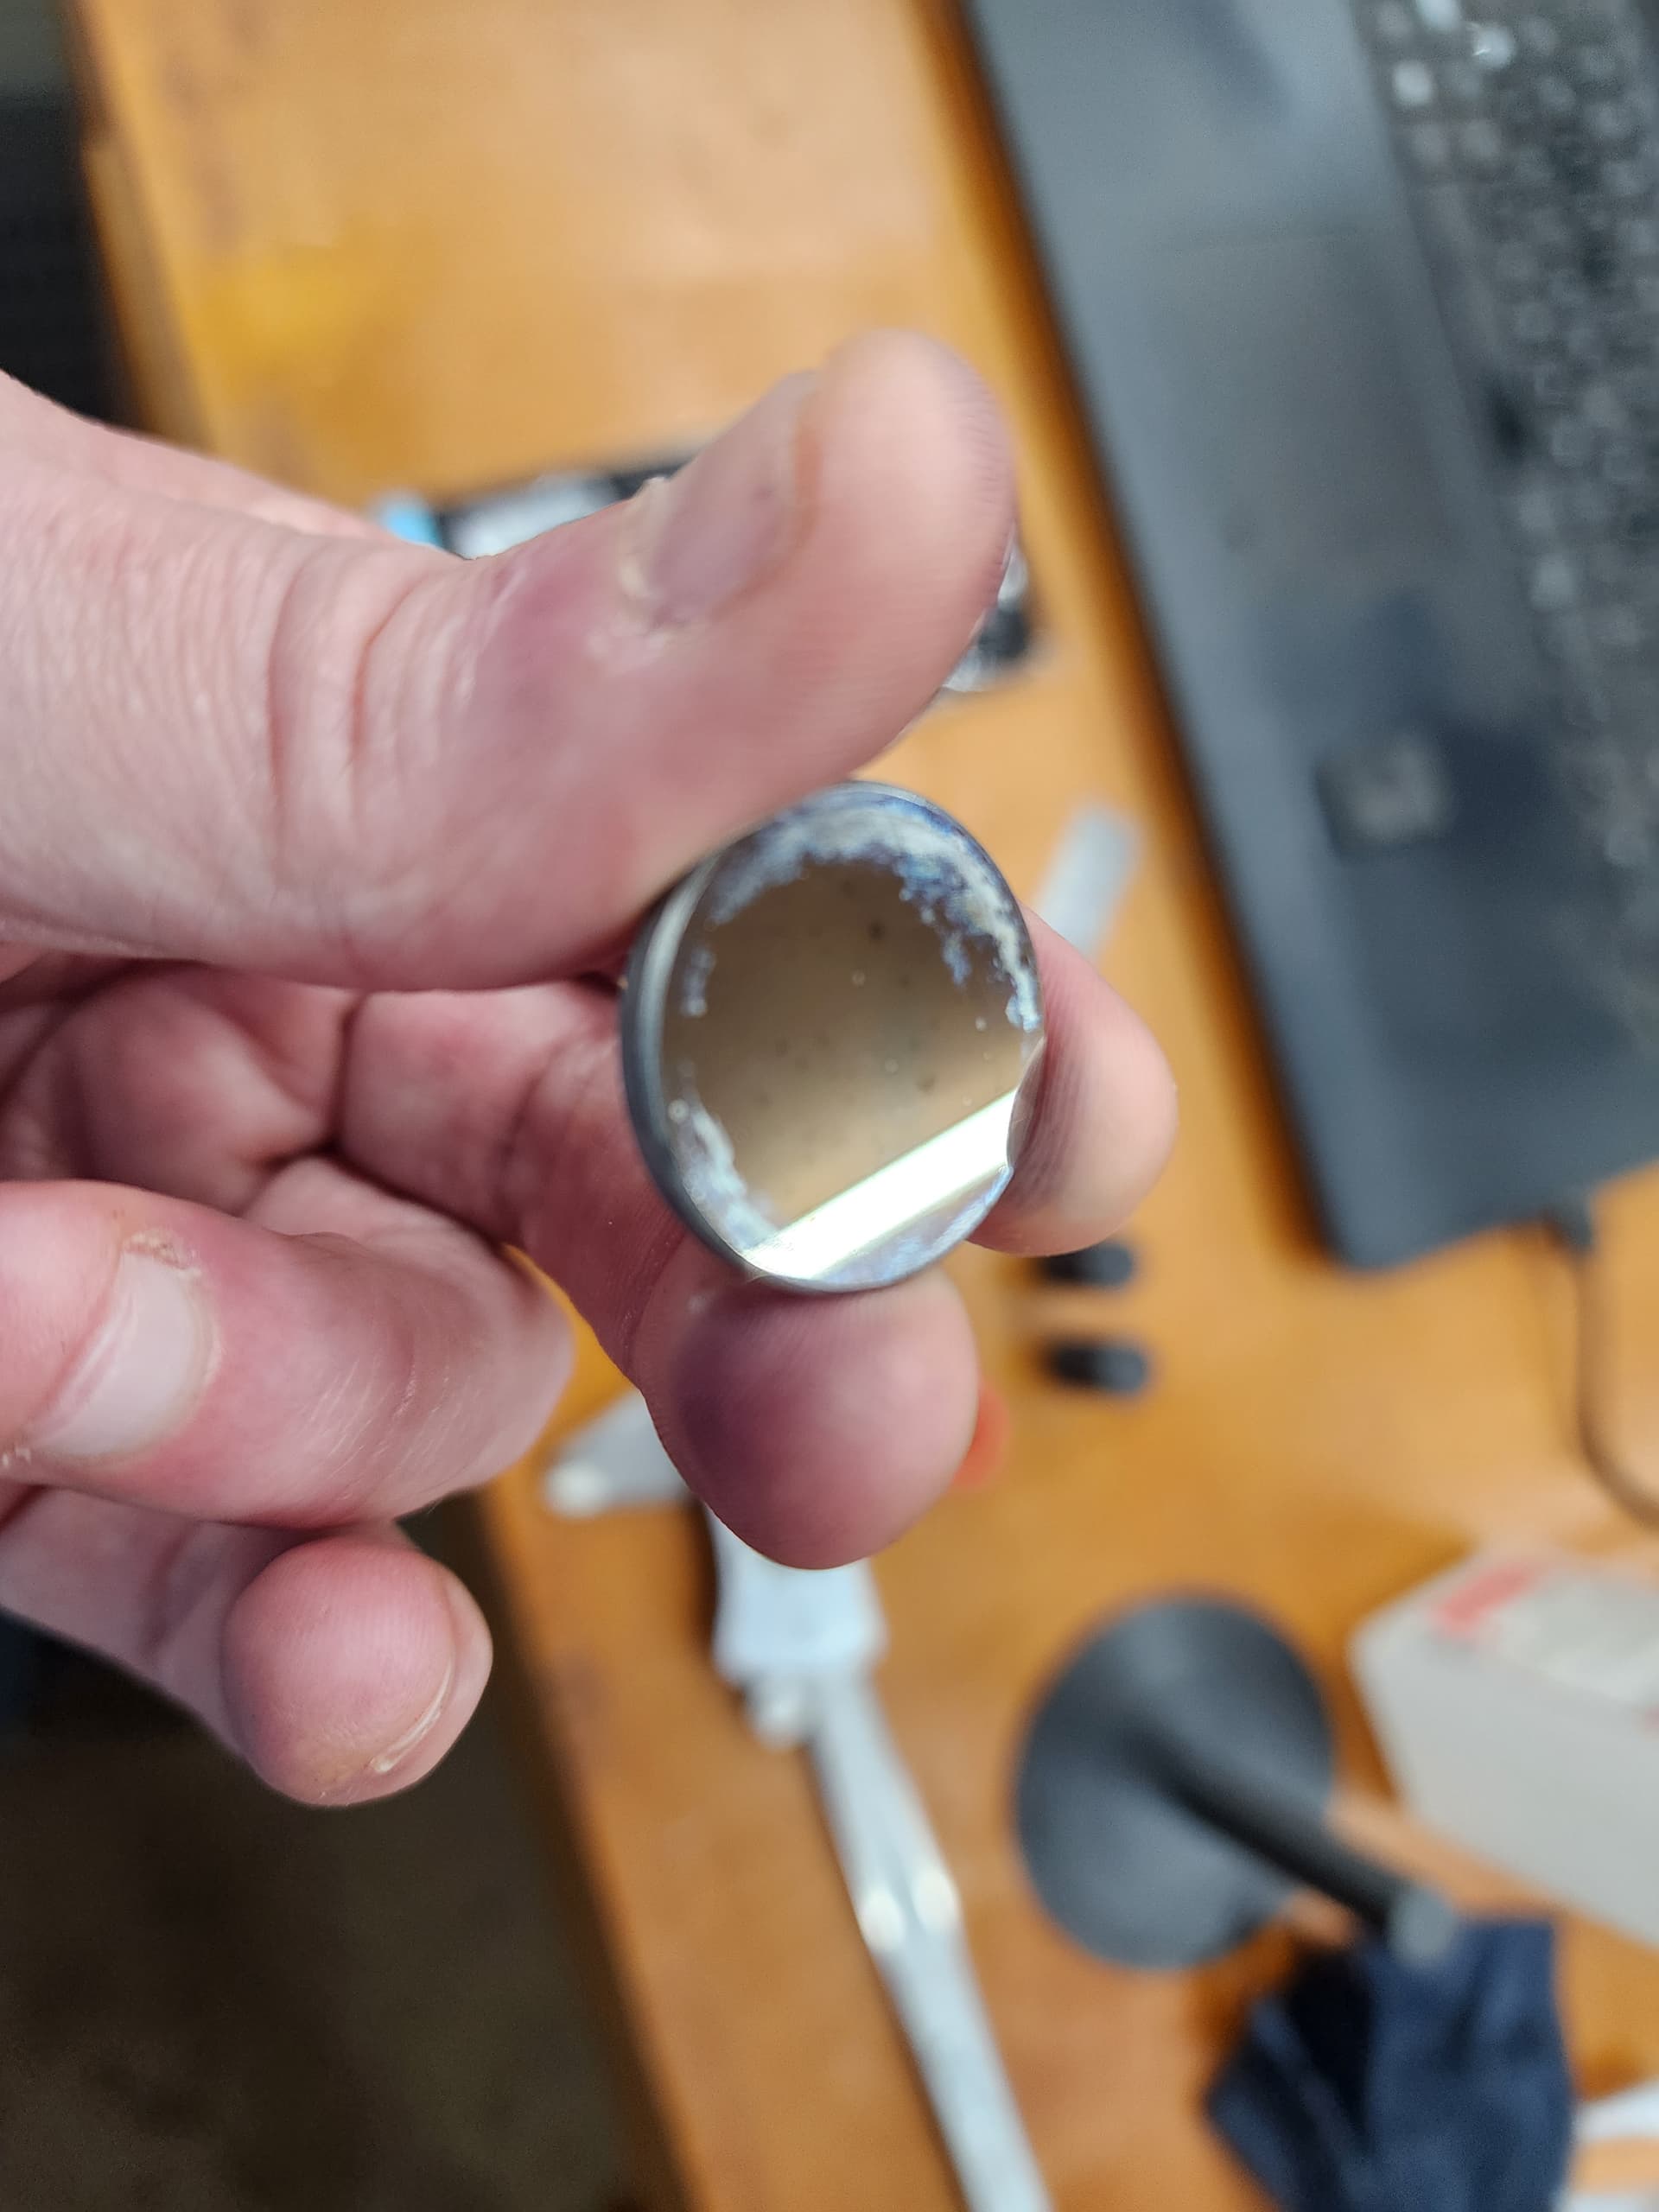
I have upgraded the fume extraction and air assist so smoke residue on the mirrors isn’t a big issue, but as mentioned the dust is.
I keep it covered with a large tarp when I am not using it, but dust still finds it’s way inside the cabinet, most specifically on the mirrors so I am constantly cleaning them. And because of the constant cleaning they have become discolored with the laser losing power so I have new ones on order.

Now, with that…
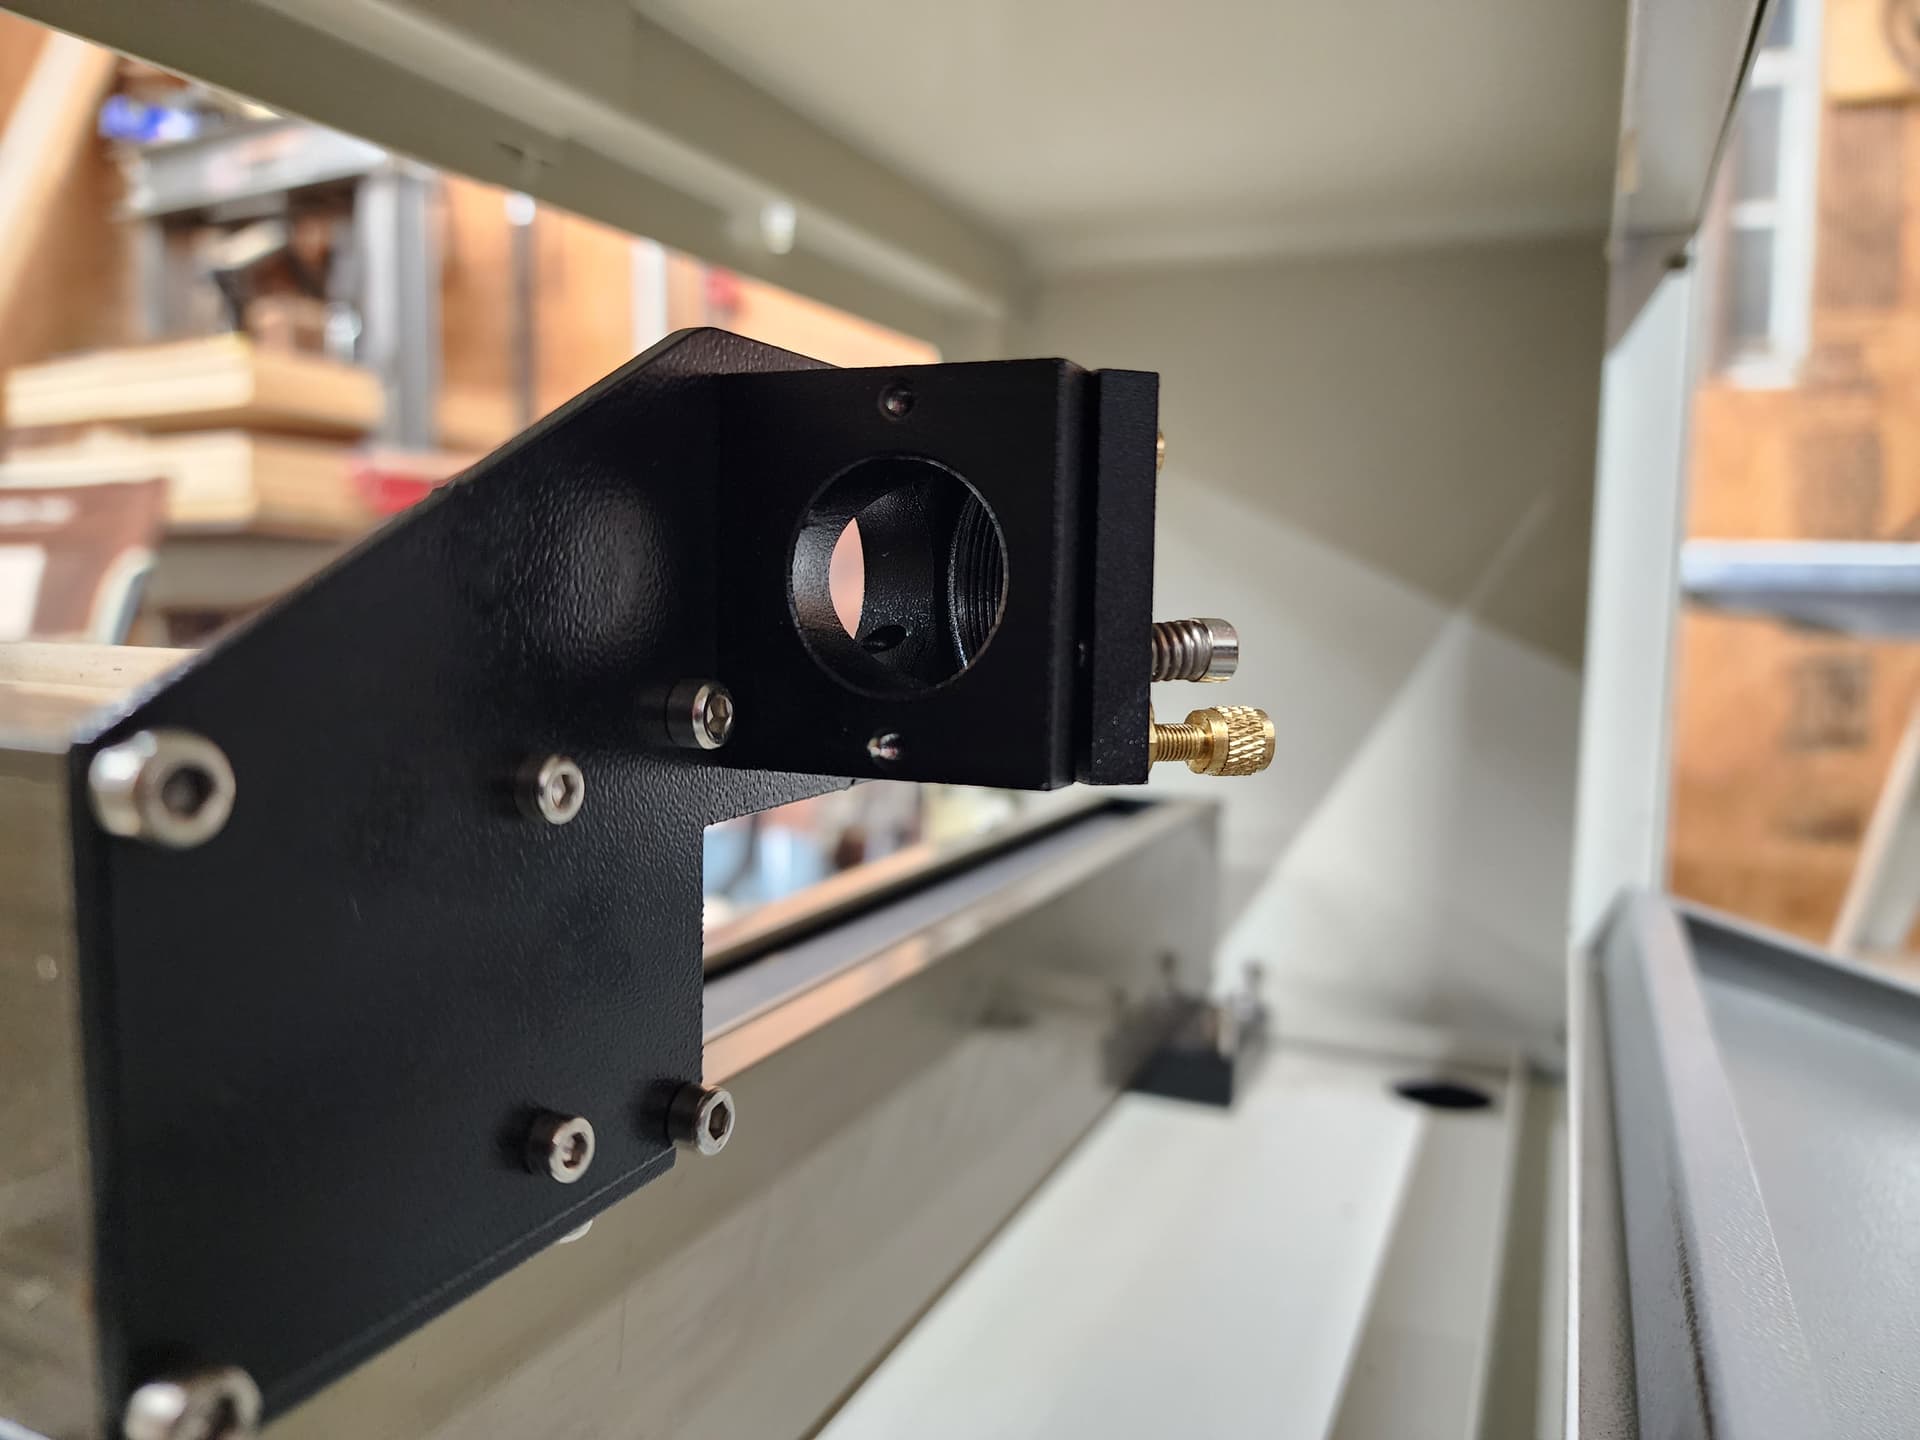
I am pretty handy with a 3D printer and Fusion 360 and I had an idea of printing some covers to fit into the openings of the mirror mounts, which as of right now are about as large as the mirrors are, approximately 25mm in diameter.
The covers would have a large enough hole in the center to allow ample room for the laser beam to pass through to and from the mirror, but would reduce the size of the openings in the mount on each side to help reduce the opportunity for dust to find it’s way onto the mirror. I know this wouldn’t eliminate the dust, I am just trying to reduce it.

My question to you good folks is:
Is this a dumb idea?
Would this cause problems that I am not considering?

Thanks in advance for any feedback.

What works well with mine is it had little bags that sat over the mirrors, closable with a draw string…


Most of the beams just don’t cut off, the power drops as it move outward from the beam. Don’t want to cut off some of your power.

I find it had to fathom that you have to clean them so much it ruins them???

Good luck

:smile_cat:

1 Like

I had considered using the baggies as part of my procedure when covering the cabinet when not in use.
You mentioning has cemented that idea.

I guess discolored was a bad term to use.
Mirrors 1 and 3 still cleaned up well, though not perfectly. There is still a light fog around the edges of mirror 1 despite my efforts to clean it. I even tried acetone after reading that suggestion earlier, but it doesn’t make them new again.

This is a photo of mirror #2, and you can see the foggy areas around the edge, and the dark spots in the center. I am assuming that is from cleaning but I also assume that it could be from dust that I missed or what could have creeped in between cleanings and burned onto the mirror.


1 Like

Probably from how the mirror is held in place. They are usually sandwiched between the frame and a screw plate.

There are odd spots on it in the first photo. Is this the same mirror?

:smile_cat:

Yes. Same mirror.
I held it up next to a white surface so you could see the spots easier.

I’d change the mirror out…

:smile_cat:

In the case of a professional machine in a wood workshop, I think I will use dry air, only a little, directly on the mirrors. (throughout the production time) When the machine is not used, I will cover the mirrors and nozzle with fabric bags. (may require a reminder to remove them before laser start …)

Seeing as you are covering it with a tarp, I would run a line from an air pump to under the tarp to create positive pressure there to keep dust out.

1 Like

Thank you all for the suggestions.
I sincerely appreciate it.
But could someone maybe give some feedback on my question about the 3D printed covers?

1 Like

Opinion: Bad Idea™.

As @jkwilborn pointed out, the beam is not just a crisp 5 mm cylinder bouncing from mirror to mirror, it’s a vaguely defined column with energy tapering off from the center. The aluminum aperture is a good-enough heatsink to absorb & dissipate the scattered energy without damage, but a box of flammable plastic won’t behave the same way.

A recent discussion mentioned the scattering:

1 Like

You could consider using a filtered intake and positive pressure inside the machine to keep dust from making its way in.

Personally, I taped up all the access hatches and other gaps in the panels to prevent ingress, and run door/window weatherstripping to seal up the machine the best I can, along with frequent checking and cleaning of mirrors. I have as many problems with spiders as I do with dust!

2 Likes

Do you have a separate air inlet to give the exhaust something to suck in, or do you supply a lot of compressed air?

Not currently, but I’m planning on doing a cold air intake in the machine so I don’t suck all the nice air conditioned/heated air out of my shop

Colin, you must take into account that you must have at least the same amount of air supplied as you extract, otherwise the extraction will not work correctly.

1 Like

Some Universal Laser Systems machines use purge air on some optics.

Just a small compressed air tube to provide clean air over the mirrors and especially the head, getting air in above the lens.

It’s not really for keeping shop sawdust from setting on the optics. It will keep smoke from contaminating the optics.

It doesn’t necessarily need regular compressed shop air. In fact, that is not my first choice because if the air isn’t totally dry, there’s a risk of condensing water coming out which can damage optics instantly and it’s pretty hard to guarantee the air will always be dry. Also oil, if you have an oiled compressor type. And you need HEPA filters on the air intake so you’re not just piping dust onto the optics

Rather, since we don’t really need much pressure, just a diaphragm compressor like a fish tank aerator is practical. No condensation possible with these. It does need a HEPA filter, but it’s also simpler to run a HEPA filter on just this tiny air compressor rather than your whole shop air compressor where it may clog too quickly trying to filter the larger volume of air you’d be using for other stuff.

Also, I try to avoid big shop air compressors that are noisy and the compressors don’t have such a long life under frequent restarts for delivering constant air over a long time.

It IS very helpful to have a sort of enclosed area around the optic so the area around the optic is filled with an outflow of purge air.

3D printed parts are “controversial” here. I did 3D print a #2 mirror mount out of high temp, high rigidity PET-CF (not PETG-CF). It took more than a week after printing to stabilize its internal stresses, I should have annealed it. It required large adjustments frequently in that time as the mirror alignment creeped around.

The mirror scattering of laser energy was not an issue. It’s too low a density in general. I’d be more concerned about when you’re working on metals for engraving or doing aluminum foil tape marquetry that there’s reflected laser going back down the optics path in the reverse direction. Hasn’t actually proven itself to be a problem. If it did, then actually just putting aluminum foil tape on the at-risk faces of 3D printed material. Very good protection, except in some cases I’d worry about the reflection off the tape also becoming an eye hazard in some cases like when I need to do alignment work with the door open and interlocks defeated. Black anodized surfaces don’t reflect, foil tape very much does. That would really only concern me if I were to 3D print a head, where the beam goes into it from the side.

I haven’t 3D printed a head like that, although it could have some intriguing benefits.

2 Likes

Hola, como te a sugerido Wykend, ya que eres bueno con fusión 360, cuando crees las cubiertas para los espejos, aria de manera que se pudiera insertar un tubo de aire, tal decía para darle un flujo de aire seco positivo constante, astasia bien ver el resultado, hasta podría sacarle benefició si funcionase la idea, yo me lo plantearía

Thank you all for the feedback.

@Dannym
My idea is a bit more simple than a full enclosure.
Think of a 2mm thick washer that would press fit into the inlet/outlet openings in the mirror mount.
Here is a photo of how my mounts are designed:

I would 3D print a ‘plug’ with a hole in the center that would press into the opening and reduce the diameter from 25mm, to say 10mm or even smaller if I thought I could get away with it.
So if I am understanding your comment correctly, the metal anodized housing would remain the same, just the size of the openings would be reduced to help keep out the dust. So no worry about the structural integrity or warping of the 3D printed part.
Your thoughts?

@Macguiver
I will give my reply in English and Spanish. I am using Google translate so I hope it is accurate.
Yours is a good idea, but a bit more than I was hoping to get into.
Having to plumb the machine with air hose leading to each mirror mount is a bigger job than I wanted this to be. :slight_smile:

Daré mi respuesta en inglés y español. Estoy usando el traductor de Google, así que espero que sea preciso.
La tuya es una buena idea, pero un poco más de lo que esperaba abordar.
Tener que conectar la máquina con una manguera de aire que conduzca a cada soporte de espejo es un trabajo más grande de lo que quería. :slight_smile:

There is some protection, but maybe not that much room without risk of the beam hitting it

Most of the beam energy is usually within about 6mm dia. But it will never be perfectly on center.

Now, the mirror is at 45 deg, and about 1mm of the rim is covered by the mount. So, the beam has to be within sin(45 deg)*24mm= 17mm anyways. My “Pro” head has a hole like that, it’s about that big.

But there is some fringe energy outside that.

There is some additional protection in making the hole longer, a short tube.

But this really needs a port of clean purge air to work. If the interior of the enclosure is smoky air, it will take longer for smoky air to reach the mirror, but it does get in there, and then takes that much longer to leave. The air is contaminated either way

1 Like

Can’t help much with the dust settling in your mirrors. Some of the ideas already mentioned seem good to me. Just DON’t clean your new mirrors with acetone. The best thing for these front surface mirrors is alcohol. With Everclear , yeah, that strong as heck liquor, found on the bottom shelf of most liquor stores. Here, it was $28 a bottle.
Old manuals from Epilog used to mention it. I worked in an optics group at IBM and grain alcohol or this stuff was used.
Lightly swab it in with a Q-tip and gently wipe it off with a tissue.
Happy New year to all.

1 Like

Yeah I use rubbing alcohol, I think it’s 91%, and I still get a thin white residue on the optics. The balance is supposed to be just water, but it must be a very small % of something that is soluble in isopropyl but won’t evaporate.

I usually fix that be just breathing on the optic to fog it and quickly follow very lightly with a new q-tip. I know the reside isn’t stuff already on the optics that it couldn’t clean off- if I do the fogging thing and have it totally flawless and touch it with a fresh q-tip with fresh iso, it comes back.

I’ve been meaning to try the Everclear. I have a bottle at home that I got just for cleaning in general. Can’t imagine actually drinking that stuff.