Thanks Patrick,
As away if you have any questions, glad to help.
Thanks Ashley!
One thing I still need to try is hot sand shading once I can create real artistic designs.
Wonderful and one of the reasons i bought the laser. Tons of veneer. thanks!!
Your work is phenomenal. I am just starting a cherry jewelry box for my granddaughter. All of the pieces are cut out but I wanted to do some sort of inlay or laser art for the lid. I don’t think I can do anything near as complex as what you did but I am interested about the process. Do you create the design and then cut out the pieces of different color wood with the laser? It looks like you don’t have a back plate behind the inlay so the image is seen from both the top and bottom of the lid? I was considering cutting out the top of my lid, which is 1/2 inch thick, but wasn’t sure I wanted the image to be on the underside since it may be just her initials and some graphic imag which wouldn’t look good from the underside.
Hi James, thanks!
I created the design shapes and then lay out and laser cut all the shapes that share a common wood type grouped together.
I use veneers of standard thickness (1/40") which cut easily with most any power of laser.
The panel is based on a square of 1/4" plywood, I applied the inlay veneer (the “pattern”) to one side and a full piece of veneer to the other side with “cold press” veneer glue and vacuum bag (clamps and caul boards can substitute for the vacuum bag if the panel is small enough)
The inlay side includes a piece of the same veneer used on the lid underside with the patterns overall outline cut out to form a single layer of veneer.
For the layout, I edge-tape a square of shelf liner to a flat surface, sticky side up. I then place all the parts making up the pattern (with tweezers usually). The shelf liner keeps it all in place, but still allows for pieces to be lifted and repositioned. This method should have the final “show” surface stuck to the shelf liner. You are therefore working on a flipped image and need to verify that any words, etc. are going to read properly when finished.
When the pattern is all laid, I use a small ink roller to roll/press/flatten all the pieces tightly onto the liner. Glue is rolled out on one side of the plywood and the inside veneer is placed, then I roll out glue on the other plywood side and place the complete pattern/liner assembly with the pattern side against the plywood.
This veneer/plywood/pattern/liner sandwich is then placed between two flat cauls and pressed for several hours until the glue sets up.
I’ll wait a day, then peel off the liner to expose the pattern, After that, typically I’ll sand it smooth and then cut to size.
I understood those words…
Kinda sad film photography and processing has been dying out, but it’s still a a niche art and burning/dodging etc. is a real skill, part magic.
Mr. “B” - That is a really beautiful piece of art work ! The way you used walnut burl for top lid back ground,
WOW, that was good. Now I want you clear your mind and tell me what you see. From birth your brain is programed to see faces of all sorts. I look at you art work and I see 3 dogs and also Santa is hiding in the bottom of the image !! Clear your mind and take a close look.
Randy
That’s gorgeous!
I have to say, I admire your courage. Taking a laser to that beautiful piece of burl would have done me in. How do you even test on a piece like that?
Randy ![]()
Yes, I’m plagued with that “ability” as well and sometimes have swapped out pieces due to some creature lurking in the background.
My wie sees things all the time in our tile floor which is a rather busy variety of travertine. Plenty of faces and animals. Kind of a Rorschach psych test!
Thanks Mark! ![]()
I’ll usually test something completely new on paper or thin cardboard, but the burl is just veneer and actually not that expensive. If it was solid, it would be rather unstable (and expensive!)
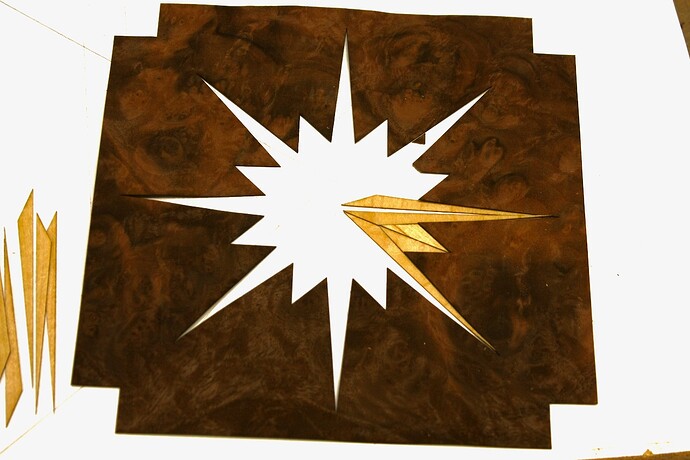
The only problems are the pointy parts of the cutout. The burl veneer is fragile and these narrow sections are prone to breaking,
Here is a photo of the burl just after cutting out the central shape and preparing to assemble the shapes. It is resting on a white counter so the contrast makes it hard to look at. You can see a small broken-off piece at the 2 o’clock position. Fortunately it is easy enough to position it back when assembling the pattern.
