When I home my laser, it ends up at X=3 and Y=3. I also have it set to the default end position of X=0 and Y=0. If I home and then set up a cut using my camera, the result is slightly offset. If I then leave it at 0/0 and cut again, it the result lines up much better to the overlay.
My question is this. Is there a way to get the result of homing to be 0/0 consistently? I have Lightburn set to Absolute Coords, and my guess is that there some “bounce”(?) when homing that’s caused by the limit switches…but I’m not completely sure that’s why it ends up at 3/3. If I could get it to be absolute 0/0 for both operations, i.e., home and return, it seems like my results would be better.
Update: I set $1=255, which didn’t change the behavior. I then tried $27=0 (it defaulted to 3 which is, I guess, where the 3mm bounce or “pull-off” was coming from). After that, when I home, the head just stays jammed up against the limit switch and requires a laser reboot in order to be able to connect again. So, I had to take it back to default.
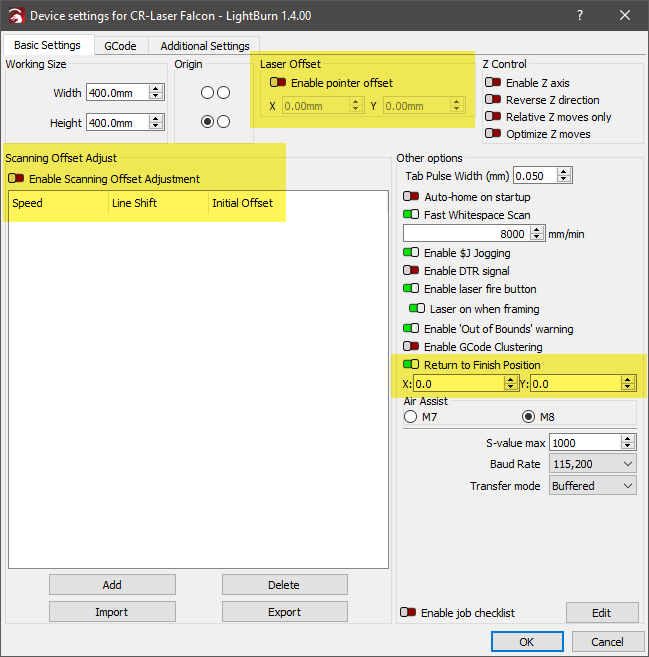
Would one of the settings in the attached screenshot help with this issue?
I’am new on this but i think when you hit the limit switches that´s the safety for the machine to stop and the X0/Y0. I think you shouldn’t home on 0/0 position but on 2/2 or 3/3 position. You can set that on the machine settings. As i don´t have my machine here I can´t help you much more, but I remember that´s a parameter about “homing” or “limit switches debounce”?..
Ok, I reversed my logic, which was probably backwards to begin with, and set the “Return to Finish Position” to X:3.0 and Y=3.0, so that it would be consistent with the final Home position (at default pull-off).
Then I ran a cut and adjusted the X Shift and Y Shift on the Camera Control panel to account for the deviation, and cut again after homing. It appears to be much better now; but I’d be open to a better way to do this if someone would like to chime in.
I have to say, it’s really cool having the camera aligned with the laser so I can just throw something pretty much anywhere on the bed, add stuff onto the Overlay, and have it come out accurate to within about 1mm or so.
Yes, I had read that, but I didn’t initially put two and two together about the relationship of that to the Home position and the Shift in Camera Control. After performing the steps above though, it’s working great!
This is intriguing. How is this determined? A picture or a screen capture would be great.
With your Creality Falcon connected to LightBurn and just after the homing sequence please request a few reports by entering the following into the Console window in LightBurn:
$i
$#
?
Pressing enter after each one.
Please select these in the Console window, then copy and paste the reports into a reply here.
I would be quite surprised to see the laser not at 0/0 in these reports after homing. 0/0 should be set 3mm from each rail of the machine. The rails aren’t the Zero. The controller should see the rails as -3/-3.
The ‘bounce’ is the switch pull-off distance. Setting that distance allows the engraver to return the switch to the rest state after it’s triggered.
This is the step that tells the controller (or most controllers) where zero is. After the switch returns to its original rest-state it’s ready to be switched again if/when the engraver goes out of bounds.
Selecting a zero pull-off distance means the switch stays active. It is in the collision state. Homing is incomplete. The pull-off distance and the seemingly lost work area are essential to the function of the switch…
The paradox comes when we try to move the switch so it triggers 3mm beyond the collision point at the face of the rail (to where it can’t be activated). Now the engraver can pullback to the face of the rail and it’s far enough to release the switch. The switch is considered reset at the 3mm pull-off and the engraver now homes to zero at the face of the rail. Except, it’s complete nonsense because the switch can’t ever be triggered. It’s simply out of reach.
Both actions of the switch must be well within the range of motion and occupy enough distance to offer reliable and repeatable service.
If you really need a much smaller pull-off, a more sensitive switch may offer possibilities. The increased sensitivity makes it easier for the switch to trigger accidentally and the reduced travel may not allow the controller ample distance to decelerate. The 3mm pull-off is well tested with the typical micro-switches used with most laser engravers.
Advanced controllers with torque sensing motors will deflect the frame (a very small amount) then pull-off enough to release the tension and make the frame spring back. This could offer a very small pull-off setting at considerable expense.
Thanks for the great feedback and details! I’m still somewhat new to this, so I tried to articulate the issue as best I could. It also wouldn’t be too surprising to learn that Creality takes some creative liberty with established standards. But the Falcon 10W is a great laser (imo). Here is the screenshot after homing:
…and here is the command output:
Waiting for connection…
e[0;32mI (830446) serial: Line state changed! dtr:0, rst:0e[0m
e[0;32mI (857940) serial: Line state changed! dtr:0, rst:0e[0m
e[0;32mI (859195) serial: Line state changed! dtr:0, rst:1e[0m
Does this mean that Machine Zero is actually X=0 and Y=0?
By the way, I did a camera realignment after having set the adjusted values above, and I was able to set the Camera Control shift values to more reasonable values, while still having the Overlay aligned to ~1mm of my cut result.
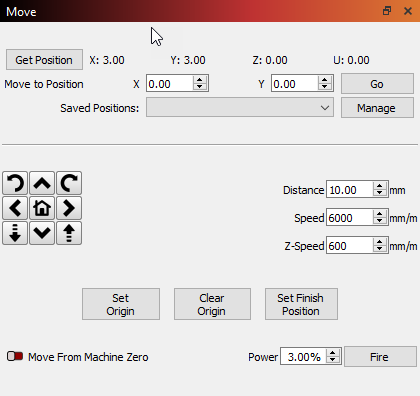
If you were to press the Get Position button in the Move window, in this freshly homed state, with zeros in all the position counters, I believe the X axis and Y axis positions would be set to zero.
Is the Return to Finish Position set to X: 0.0 and Y: 0.0 in the Device settings window?
I’m not certain how the X=3.0, Y=3.0 came to be there.
A screen capture of the workspace should show two origin markers.
Capturing the Laser window and Move window should get us the rest of the information.
If I set the position counters or the Finish Position to 0.0, the laser head depresses the limit switches, but doesn’t release them. After homing, the Falcon 10W has always shown 3.3, which is why I changed the Finish Position to match. The position markers don’t appear to change position during these operations.
I really appreciate your help! At this point it’s working great, and I’m able to use the camera to position graphics on the overlay picture with very little offset in the resulting cut.
Update: I was seeing the camera overlay to cut result offset issue again, so I reset Finish Position back to default (0.0) and it seems to have resolved it.
If I understand correctly (finally), the 0.0 finish position is the accurate start point whereas, after homing, 0.0 is recorded accurately in the system, but the debounce setting moves the laser head to 3.3 to release the limit switches.
Big thanks to JohnJohn and the others who helped me!