Sorry but I’ve looked and not found an answer to this; I have designed a project that has numerous layers for cut and engrave. They are laid out in lightburn as the final product would appear but it is comprised of a number of parts that get cut out, layered and bonded. I use my red spot laser pointer to find say, the top left corner of the first part to be cut out and locate that on my sheet of material. The next part to be cut out (next layer) does not have the origin placed on screen at an identifyable location on that next layer so how do I locate it on the material sheet? At the moment I keep dragging the graphic on the layer I want to cut around on screen until the origin (green square) is located on the graphic to be cut. That way I know where to put the red spot marker on the sheet for economical sheet usage. I suspect I made a hash of explaining this but hopefully someone will understand!
Pictures or screen shots illustrating what you’re describing would likely go a long way.
If you want to cut out single items, or small groups of items, and give them their own origins, click the ‘Cut Selected Graphics’ and ‘Use Selection Origin’ buttons on the Laser window. With those enabled, LightBurn will only run the selected shapes, and the job origin will be computed from just the selection.
Hi. I aplogise for not including a screenshot. However, you’ve answered my question and I just tried it so thanks for that! To be honest, I’d read elswhere about ‘cut selected graphics’ but having searched all the menus and scoured the screen I just couldn’t find it! I tend to overlook the little ‘switch’ type selectors but I’ll try to be more thorough in future. Thanks again.
I don’t get what the Use Selection Origin does.
BTW, what is the User Origin in the Start From box?
User Origin works almost exactly the same as Current Position, except that the starting location is “programmable”. Some lasers have an “Origin” button on them (like Ruida controllers). GCode based systems use the “Set Origin” button in LightBurn to do the same thing. You jog your laser to the position you want your job to start from, hit the “Set Origin” button, and then you’re free to move the laser around again. If you specify “User Origin” as the “Start From” value, the laser will move back to that programmed location and start the cut from there. Documentation/CoordinatesOrigin.md at master · LightBurnSoftware/Documentation · GitHub
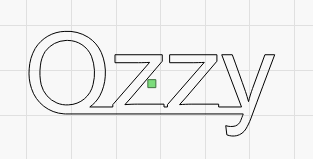
Let’s say I’m cutting this file out, but I hit a glue spot, so the middle of the O doesn’t cut all the way through:

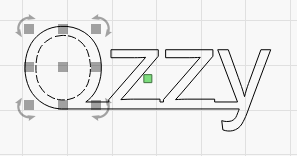
With ‘Cut Selected Graphics’, I can select the middle of the O like so, and just re-run the job. Notice the the green square (my job origin) hasn’t moved, so even though I’m only cutting the middle circle, it’s going to land in exactly the same place:

That is normally the desired behavior: if I’m re-cutting a shape, I want it to go where it normally would, relative to the rest of the job.
Now, change the job - let’s say I have a file filled with different shapes that I use all the time, and I want to cut out just one of them, and center it on my material:

As shown above, the two names exist in the file, but I only want to cut the one on the right. The job origin is centered in the entire job, so I can’t easily center this in my material.
Here’s what happens if I click ‘Use Selection Origin’:

The job origin moves to the appropriate spot, as if the only things in my file were the selected items, so now that cut of just the selected items will have the job origin I want for this case.
Thank you. I’ll check out the Docs too.
Thank you too Oz. I’ll play with it more. 
This topic was automatically closed 30 days after the last reply. New replies are no longer allowed.