I am pretty happy with how well this laser is working now, BUT I do have a question about residue on a CO2. I know this is much more powerful than my 20W diode but I am wondering about the sticky tar like residue as well as soot like residue left from the CO2. It is quite a bit more than I am used to. I know I am using a weak (70L/m) air assist pump. Is this part of/the reason for all the residue? Or could this just be the type of wood I am cutting/engraving? Or is this just how it is with a CO2?
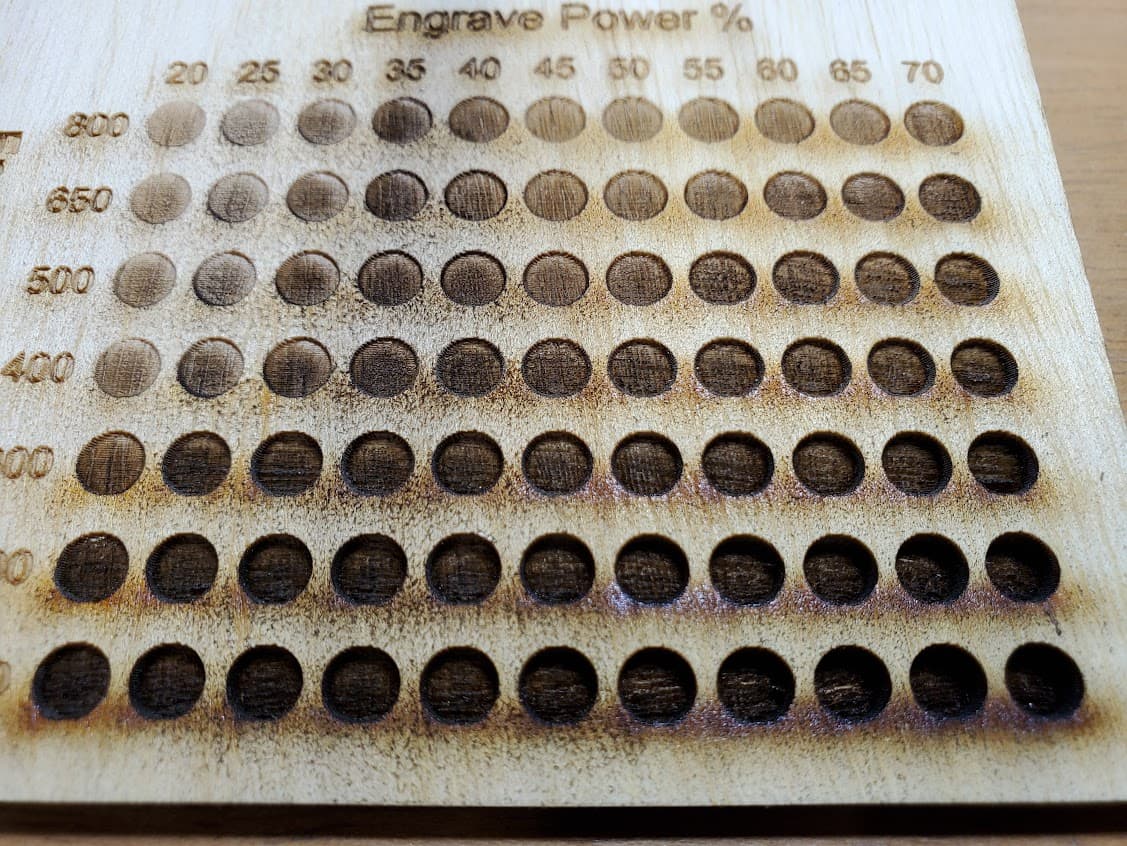
In this pic you can see the bottom few rows of my test card has quite a bit of tar like residue on the bottom half of the circles. I tried to remove it with some 99% iso alcohol but it pretty much left the tar residue behind. I could sand it but it takes some effort. Even at higher speeds I did not expect as much soot like residue left behind. Just wondering what I can do to minimize this?
Yes. But possibly not in the way that you’re thinking. For engraving, you really only want minimal nozzle air flow. Just enough to prevent lens contamination. By using high pressure you’re forcing the smoke and debris back down onto the surface of the material.
Try reducing air flow from the nozzle. Then find ways to promote air flow across the surface of the material so that it gets evacuated as quickly as possible.
Also keep in mind that different materials are more prone to this than others. You may want to experiment with different materials to see how results differ.
That makes sense. Since I really only cut with my lasers and have not done much engraving, other than text, I guess I did not pay much attention to the air assist differences.
I guess I need to look for a inline valve that will let me restrict the air assist as well as some way to blow air over the top of the material. What do most people buy/use?
That’s what I love about this forum, there’s no end to the ideas from the members here. I was doing a wholesale replacement of the 4010 fans (with silent ones) on all my 3D printers, so I had a few extra laying around. I made a fan bank that sits behind the passthrough door (when needed) and blows air across the bed.
As far as lessening the amount of schmutz I get when engraving, the greatest improvement I saw came from switching to the Compound Lens Kit that Cloudray sells (it was developed by Russ Sadler). I get very consistent coloring across both light and dark toned wood (I mostly engrave Acacia), and the crud on the surface of the Acacia is almost non-existent. I don’t know if it would fit on your machine, but if it does, it’s money well spent (at least for me). I have the 24mm OD “C” series lens tubes.
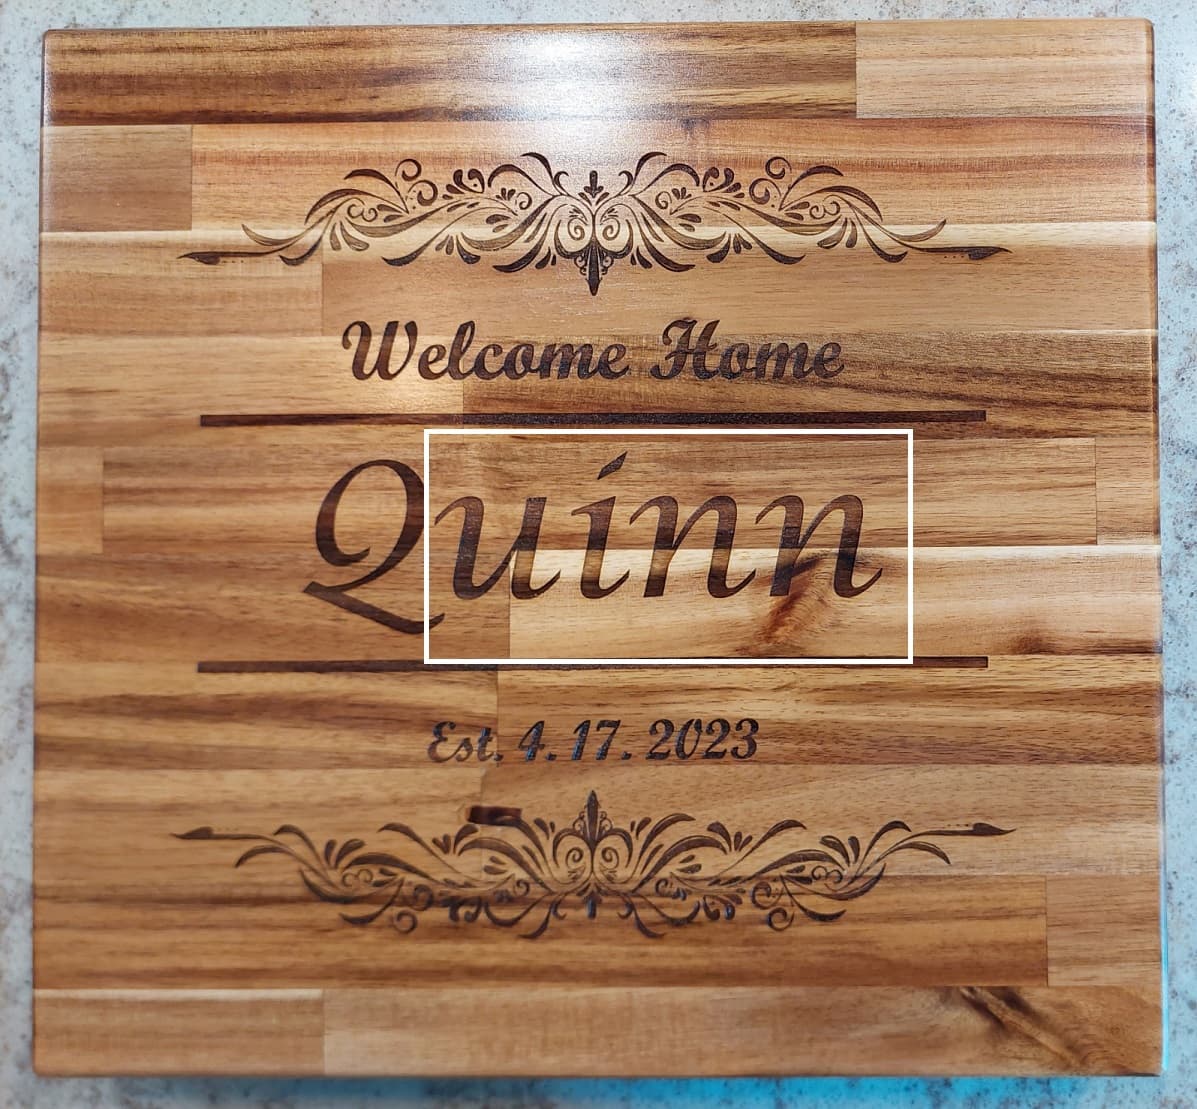
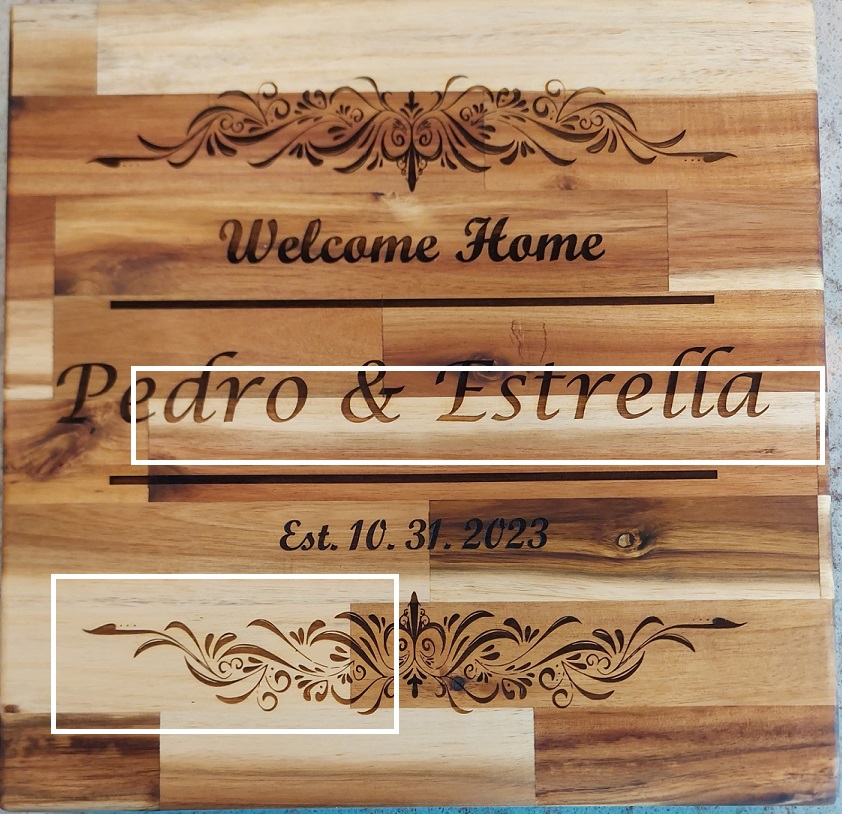
You sure can. As with anything, results are in the eye of the beholder. When I first started doing these Acacia cutting boards (first with a diode laser, then a CO2) the bane of my existence was crud on the board that required cleaning, and inconsistent color in the engraved areas. This was especially evident when I switched to a CO2 laser. I had to use tinted butcherblock oil and “paint” in the light areas (I didn’t take any before & after pictures as I had to get the boards to customers). You can see it in this example:
Once I switched over to the “C” series lens tube and the compound lens I don’t need to mess with the BB oil so much. This board is right off the laser, I didn’t need to do anything to it.
I did this about an hour ago. The top line is with the OEM lens that came with my 60-watt OMTECH, the bottom one is the compound lens. It’s not as pronounced here; it really just depends on the board (as you well know).
This is exactly what I ran up against. Additionally I was getting texture differences between light and dark areas of the wood.
Looks like the strategy is to get crisp dark areas. The wood I’m working with is several shades darker but still has the large variation between light and dark like you’re showing. I initially tried to see if I could get a light engraving to show up against the darker finished areas. I ended up going for a dark engraving strategy by first doing a light pass at proper focus to get a crisp outline, then doing multiple defocused passes to darken it up.
Seems you’re able to get even better results straight away.
I like this idea. I may have to borrow this idea. Thanks
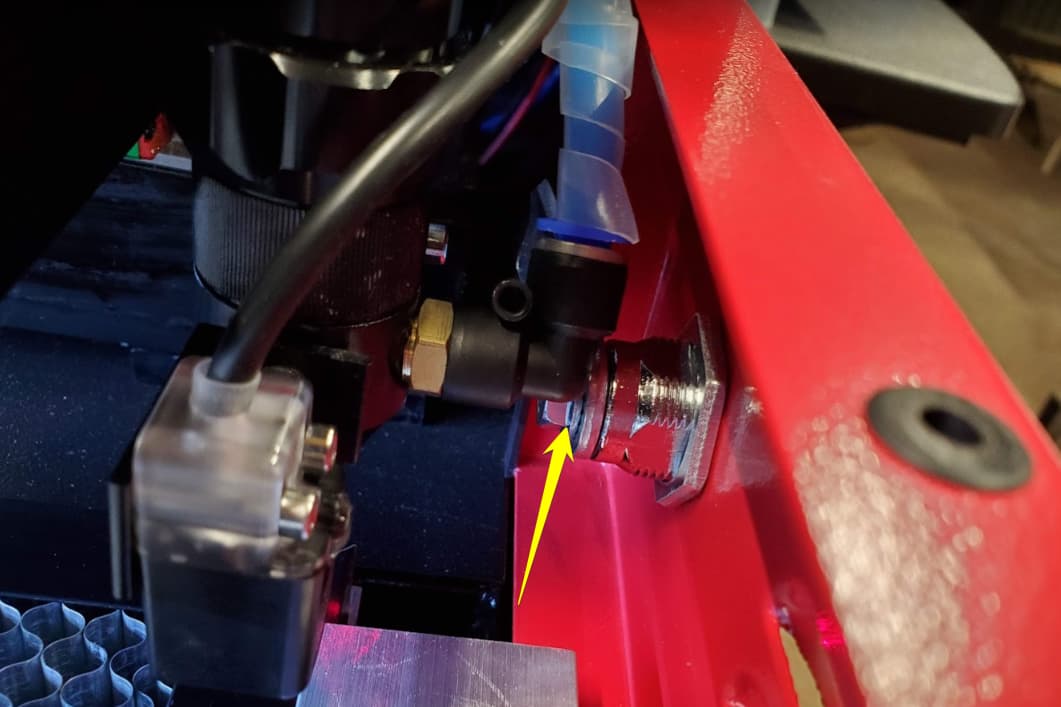
This too is great. Not sure I can make something like this fit behind my passthrough door. Unfortunately my machine has a design flaw that apparently nobody noticed/addressed. My laser runs right up to the door. In fact the air assist elbow is just mm’s away from touching the inside of the passthrough door. I had to remove both door latches because the air assist elbow actually slammed into them a couple times before I realized what was happening. In this pic you can see how it hits the latch. And the laser head is not even all the way forward. When all the way forward the elbow is just past where the threads start.
I now have plugs in the holes and strong magnets that hole the door closed. I thought about moving the Y axis limit switch back but I don’t care to mess with it at this time. I sent this info to the company I purchased it from and never heard back. It is definitely a design flaw that should get addressed. How nobody noticed this boggles my mind.
Anyway, great idea. I may figure out something similar down the road.
I will also look into Russ’ Compound Lens Kit. Thanks
Try rotating the position of the air assist entry by loosening the tube collar and physically rotating the lens tube such that the air assist attaches closer to the gantry. This may get you the clearance that you need.
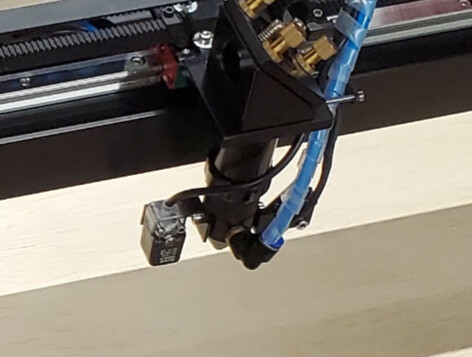
That was my first thought but my nozzle has three things attached (on 3 sides) to it. You can see in this image there is a proximity switch on one side and the red dot laser on the other side with the air assist in the middle. There really is no other good position to rotate it. I have thought about trying to rotate it 180 deg and have the air assist come in from under the gantry but I decided to just remove the latches. It works fine this way. Maybe one day I will think more about it.
Is this for auto-focus? I forgot that I had pulled mine off. It was a pen style model. It came defective from the factory and realized I wasn’t likely to use it anyway.
It looks like it may be rigidly mounted to a fixed position on the nozzle. Is that right? Mine was on a ring that could allow it to rotate on the tube.
I see what you mean about rotating it 180 degrees. I’m now asking myself how something this basic was missed at the factory. That means nobody ran through the laser head at full extremes of travel. Nice.
Maybe look to see if you could have the laser home farther back. That may get you enough clearance.
I agree. The first time it hit the latch straight on at full speed. It was a loud clunk. By the time I got to it I could not figure out what happened. It was later that I had a job running right at the front of the Y axis and it was moving toward the right front corner when it hit the latch and spun the nozzle/tube around in the head. I was watching it when it happened and that is when I realized where the loud clunk came from before. I never even thought that that could be an issue. I mean this is not the first laser they have sold in this size/configuration. They have sold this unit for years. When I tried to tell the company I bought it from, I never heard anything back.
Yes I could try this. I will need to drill new holes but I think I may be able to get it back far enough. Something I plan to do at a later date.
When this happened to me it shifted the vertical alignment of the lens tube. If you haven’t already you may want to check that you’re still good there.
When I originally checked this it seemed OK, but I have been noticing the edges are not looking square. I did some further testing and it does seem that the lens tube must be shifted some. Based on my cut edges the bottom of the tube appears to be pushed slightly back and to the left, which is exactly what I would expect based on the two times it hit the door latches (once straight on moving to the front of the machine and once while moving across the front of the machine to the right).
I am thinking that it may have appeared fine when I checked it back then because the laser head mounts (to the linear guide) were completely loose up until just recently. So I am thinking that when I tightened them it shifted the tube further out of square than it was.
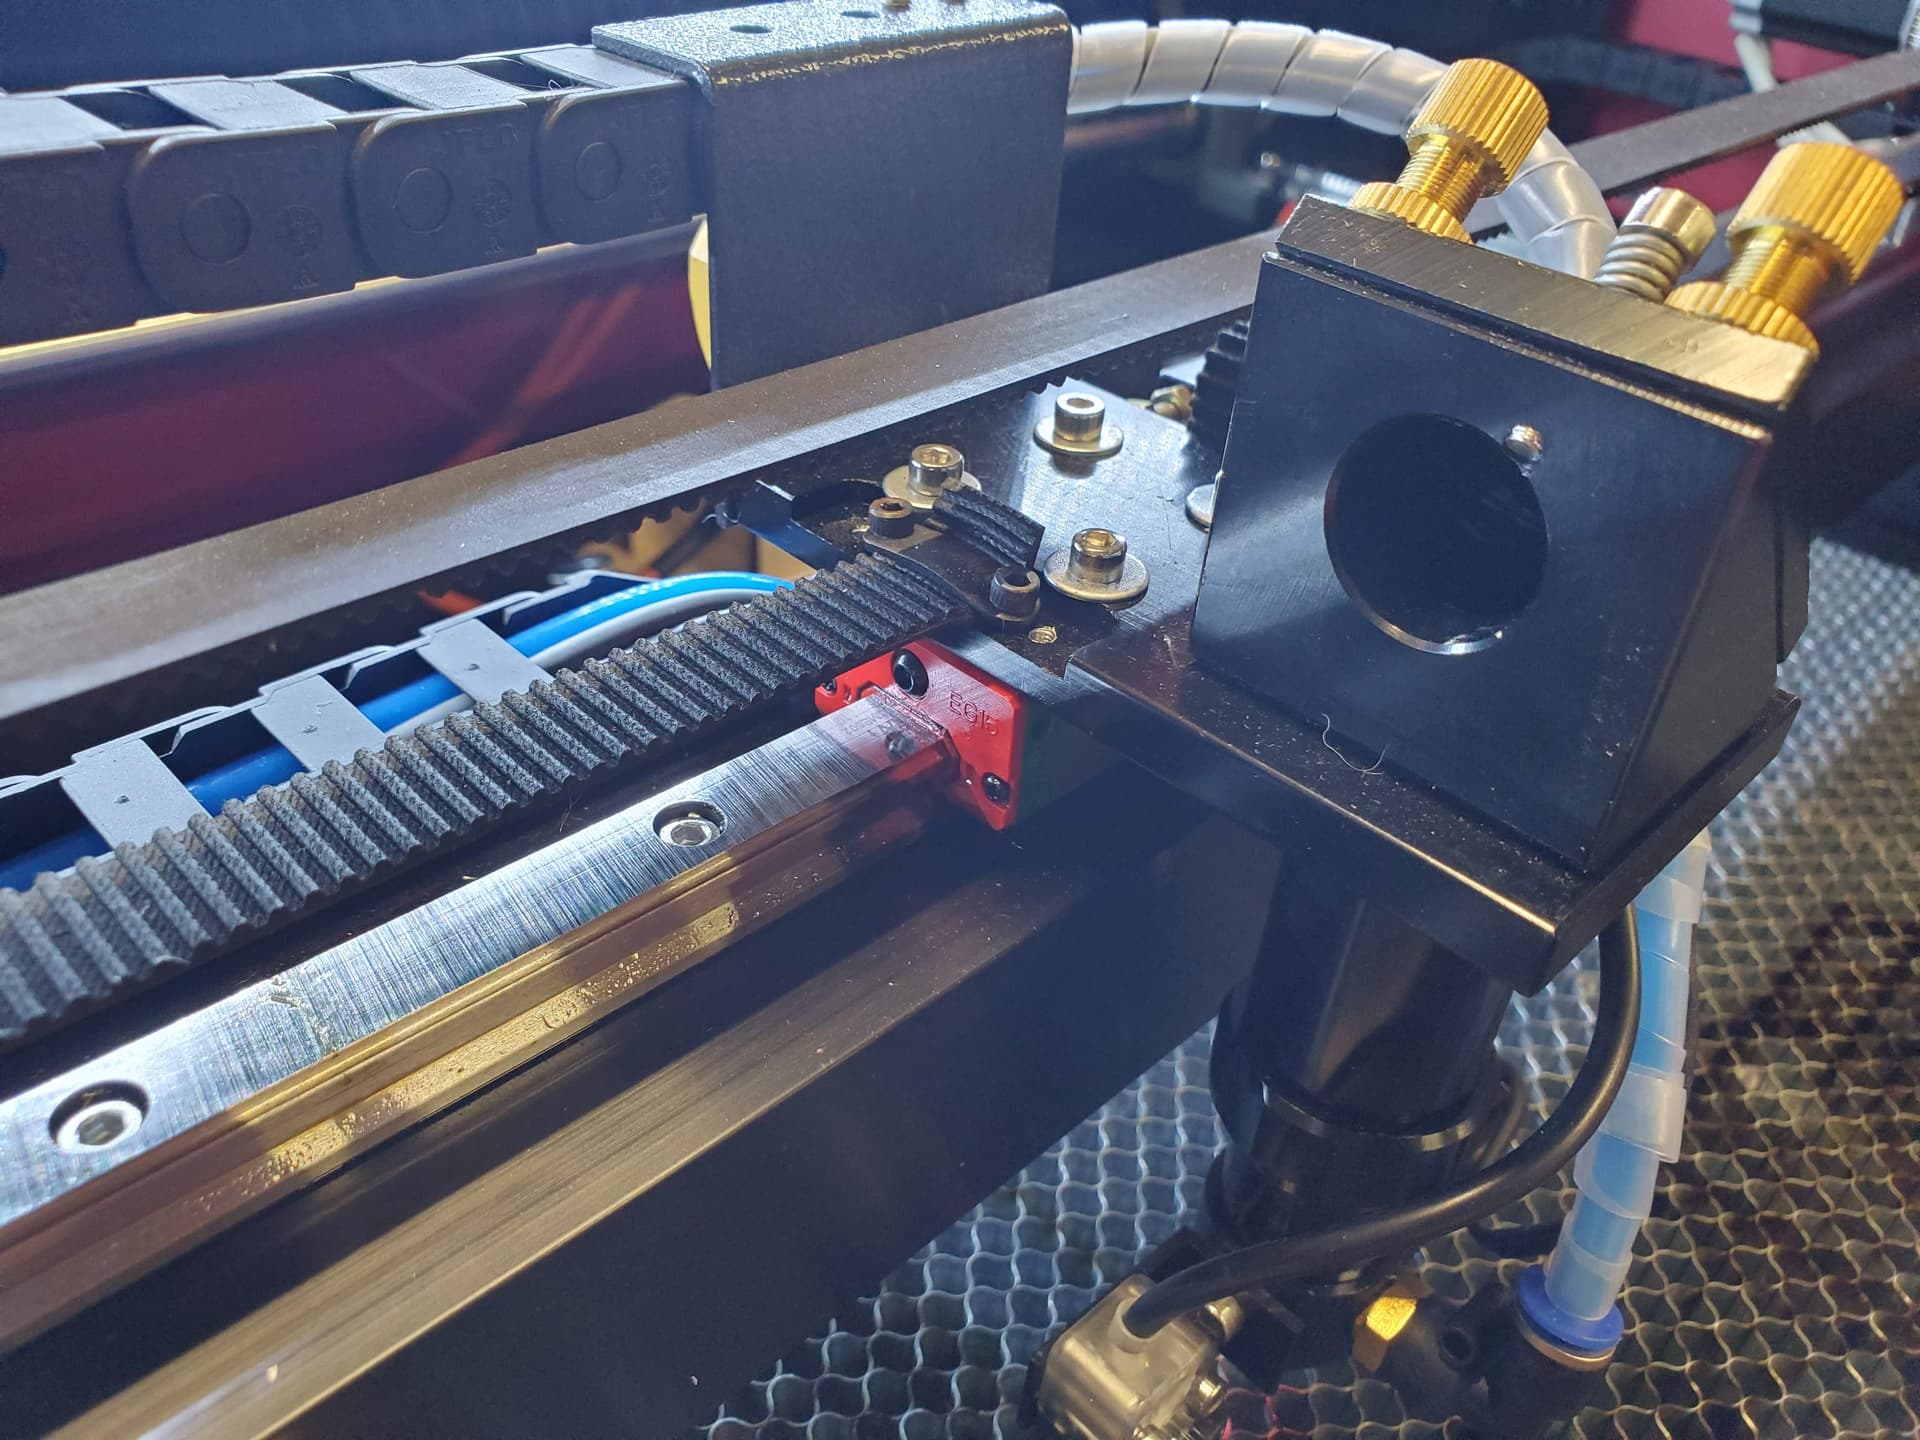
So what can I do to correct this? Do I shim the mounting plate? Or do I need to replace the laser head? The style of head that I have I do not see any way of adjusting it other than shimming it. Here is a pic of my head.
My laser head mounts vertically so I was able to adjust that way. I’m curious where the source of your error is. Something would have either been pushed out of position or gotten bent.
Ideally you’d be able to identify what actually was damaged so you could directly repair the issue. If you cannot, a shim under the mounting plate doesn’t seem an unreasonable approach.