Watching a 3 year old EZ Cad video on photo engraving, is there a LB fiber laser equivalent for this? Seems like similar to depthmap.
Perhaps:
Thats not quite it. This runs every thing in the layer below a threshold, bumps it up one threshold, runs everything again. 256 times, at least how I understand. Same power each pass.
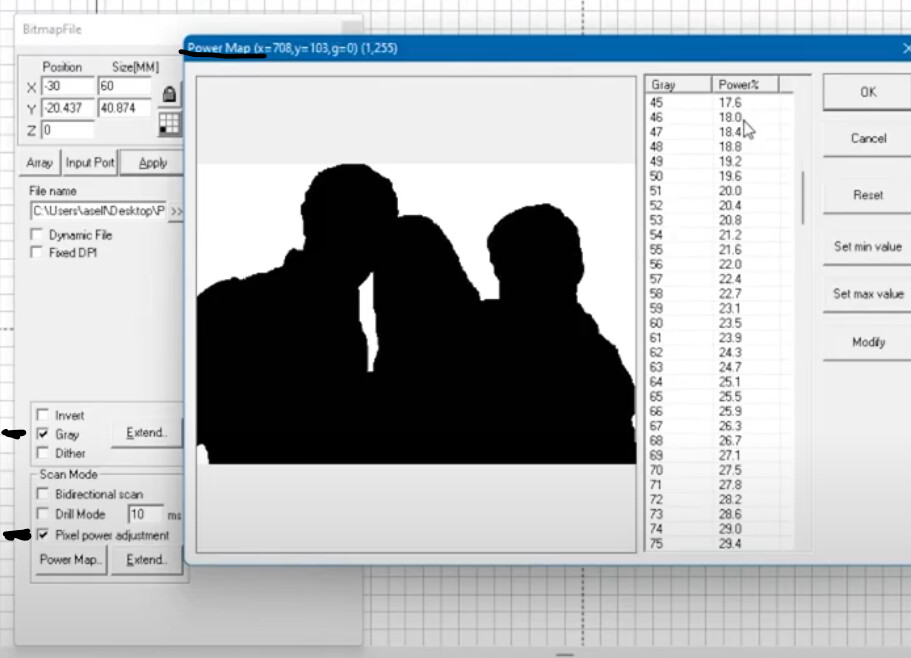
The power map hits each dot once with varying power depending on the greyscale level.
Or am I missing som?
Perhaps I misunderstood; your profile indicates you have a JCZ, you referred to an EZCad video, and asked about “depthmap”. AFAICT, that’s how a depth map works on galvo lasers: hitting one depth slice at a time with constant power.
These rather long discussion covers grayscale on galvos in enough detail to explain why it might not be the right choice:
@jkwilborn knows more about this …
Correct on the galvo laser. I referred to a Power Map, questioned if it was the same or similar to depth map.
I followed that thread, have to go back through it again. And go through the 3D slice again also, maybe I missed something. Thanks.
I think EZCad2 refers directly to a power change.
I’m a thinking, this is how a grayscale works?
I have Linux based systems, EZCad2 only runs natively on windows, so I’m sol with most of the Chinese software.
The links @ednisley posted reflect why the creators decided to do it one way for fiber and another for a diode.
From the EZCad2 users manual (from OMG laser).

If you can follow them.. maybe I need to lick a ![]() –
– ![]()
![]()
^This!^
Makes a nice photo on silver.
I worked this out. Prob was the metal was getting too hot. At high temps, where the metal starts getting plastic, the galvo cutting process will fail.
The metal will absorb the energy, but doesn’t create the tiny explosion that throws off a metal particle as a spark. It will just get hotter.
It will not cut or engrave very effectively in this state. The cut’s brilliance will fade even though it’s in focus, giving the appearance that perhaps the laser is losing its power output. But that’s not the case.
It is MUCH more prominent of an issue with stainless. The metal stock thickness and its overall size matter a lot. A cooling fan is of some help. I think I’m going to try a mister like you use for CNC cooling.
I have a JPT M7 300W, I don’t know anyone else running one this big. This surely made the effect more noticeable for me. The 60W or 100W that everyone else has would have a hard time overheating.
A stainless coin blank can overheat really fast if you use the cutoff freq, but it depends on how much of the layer has to be rastered. It’ll warp, too.
I think the best way to limit it is not to reduce power, but slow down the scan rate, pick a freq that makes 1-2 pulses for the focal spot size, and the pick the longest q-pulse that you have that stays below the cutoff window
1 Like
Peltier cooling is terribly inefficient, so those gadgets can’t handle the amount of power deposited by a laser.
The Coefficient of Performance is well under 0.5 and typically around 0.1 without rigorous engineering, A Peltier cooler would also have trouble with the large temperature difference between a lasered object and room temperature.
Using the heatsink required by the Peltier module, without the module, would produce more effective cooling with much less power. ![]()
if you say so and are so sure of it
.
I provided the links to make my statements easier to verify, at least to first order. Slightly more effort will get you more data; feel free to ignore anything I wrote.
ednisley is totally correct. Peltiers are neat in that they can reach cold temps when well isolated so no heat is leaking in. They have very limited ability to actually pump watts out and it doesn’t take much to overwhelm its pumping capacity and it will actually end up hotter than just putting the heatsink (or water cooling block) on it.
Cooling a stainless engraving, I mean, I could think of a number of ways to do it. But one prime problem is if the beam runs past the edge of the stock, it’s going to cut into any back-side heatsink solution.
I think the best solution might be to employ a mister. I can see plumbing and pumps would be problematic, but it could be much simpler- just a pump-up garden sprayer. I’ve used this trick before, it works pretty well. If you only fill it like halfway, it has plenty of headroom to compress air and the pressure would only drop by half if you used up all the water in it. I’d guess like 45 min should use less than 100ml.
It may cause problems with particle removal. I only picture wetting the surface, not a flood coolant that will wash metal dust off. If the surface is wetted, the metal dust could stick and form a mud. But I think what’s actually going to happen is the raster line is going to sweep the dust off even more effectively because the line will create a steam bubble that will blast all the cruddy water off like a mm ahead of the raster line and take all that metal dust with it.
Normally I use a CPAP blower that can produce a pretty strong airflow- in fact, I’ve been limiting the blower’s flow way down because it would easily blow the coin right off the bench at much less than full power. Maybe I should make a coin holder and turn up that blower to 11 first and see what happens.
Water misting would likely change the cutting properties and the finish- but, honestly, my bet would be that it improves it a lot. Esp on my 300W, I can’t make use of anywhere near its full output right now.
This topic was automatically closed 30 days after the last reply. New replies are no longer allowed.