I’ve spent alot of time trying to use the Print and Cut alignment feature for 2-sided cutting. My freshly-squared, 5watt laser can’t quite cut through 5ply 1/4" plywood but cutting from top and bottom should work fine if I could just get the alignment right. If I use the print and cut wizard and the ‘align - no scaling’ on two marks burned thru from the top, the first mark I selected gets a new mark overlain exactly, but the second mark overlay shows an offset and the object won’t come out cleanly. If I use the ‘align to target’ (presumably with scaling), each alignment mark gets a new mark overlain exactly, but the object alignment error is much worse, 2.5mm on my last attempt. It seems to be worse if my alignment marks are not on the axis of flipping (from the top to the bottom side). And I try to have my alignment marks as wide as possible on the board I’m using, so far from 300-600mm.
I’ll eventually standardize on my material size and make a jig indexed to the machine so I won’t need to do per-piece alignment, but it still would be handy for all those test cuts on scrap pieces.
Otherwise great software. Thanks!
I’m not following what you’re describing here. Can you take a screenshot?
Are you certain that the holes you are burning are going down straight through the material?
Can you share the designs that you are using to attempt both sides of the burn?
As I say, freshly-squared laser. That certainly helped, but not completely.
The design doesn’t matter, I’ve done many. Sometimes just a 10mm test square with two reference X marks as far from the design as my material allows. On 1/4" pine the Xs burn thru OK and I align off of that. On the ply it almost burns thru at 2 passes so I just finish it at the cross with a 0.025" drill bit, any offset should be tiny. Have you done this successfully?
I’ve done print and cut dozens of times without issue.
I want to review the designs for proper setup.
The problem is likely going to be a design issue or a workflow issue.
It’s still not clear to me what you’re describing here and may account for the whole issue. Can you please explain this?
Yes, but are you cutting from both sides when you do your print and cuts? It’s likely not noticeable if you’re not.
My test board is so full of failed cuts it would just add more confusion. I’ll do a simple square again tomorrow and show you the results.
Thanks
No. But print and cut does not depend on this.
Can you please explain the question I had in the previous post?
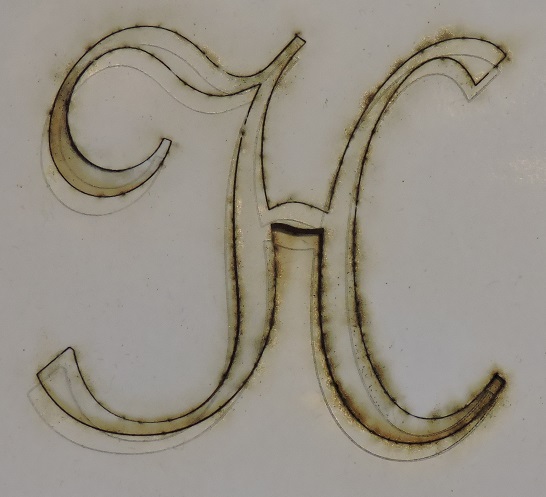
So, here’s a test on paper that should make things clearer. I chose some backing paper for vinyl of the right size and wow that’s tough to cut! But it’ll eliminate any question of laser alignment with thicker material. Before this test I burned spots as far apart on my spoiler board as I can and was only 1/2mm larger in both the x and y directions (for 800 and 700mm of travel respectively) than what I asked for.
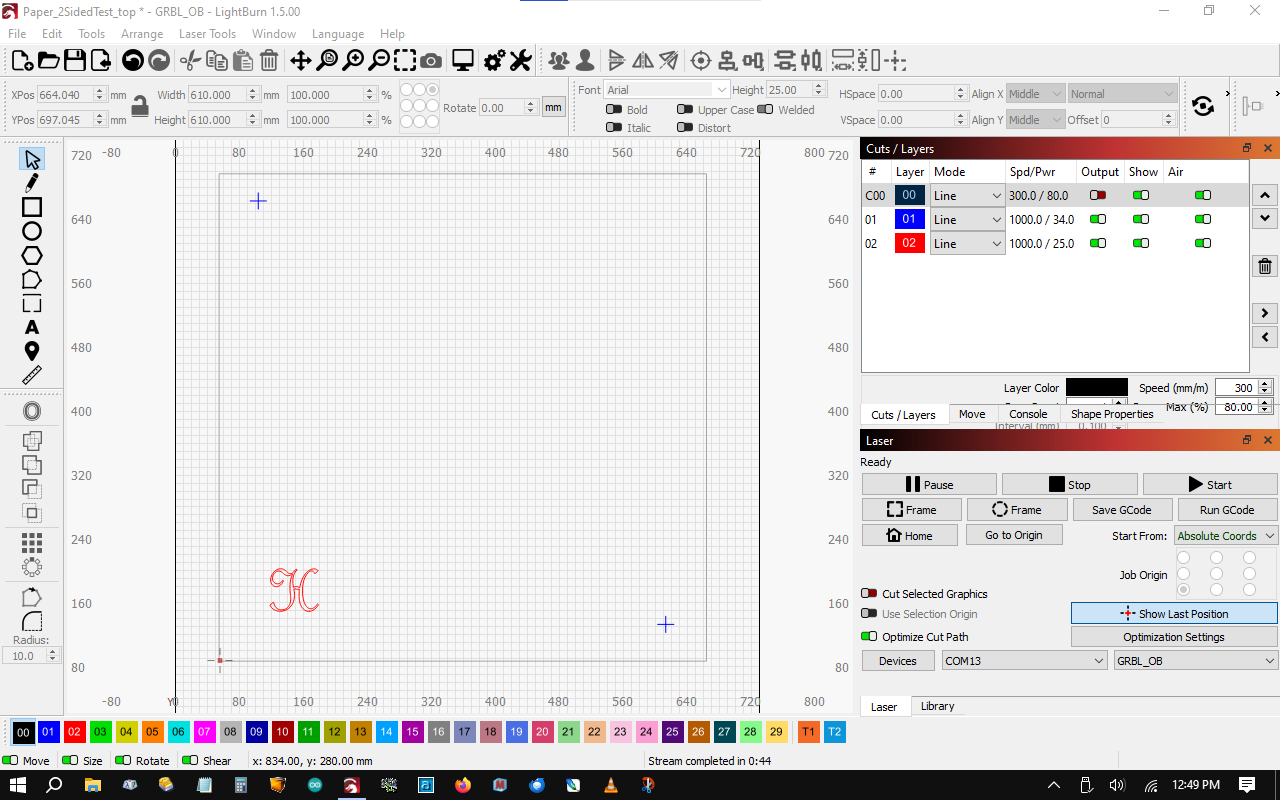
Using just Lightburn, on one layer I put the letter ‘H’ in one corner of my sheet, and on another layer I put a ‘+’ in each adjacent corner for alignment. I set the speed and power to just mark the letter and cut through the alignment marks and saved it as ‘top’.
Then I saved it again as ‘bot’, and clicked arrange >> flip vertically. Then I selected each alignment mark and did a 2-point rotation to make them Xs so you can better see how they overlap with the '+'s. Then I set the power to this time cut the letter H, and just mark the alignment Xs. Then saved ‘bot’ again.
I ran ‘top’, flipped the sheet over, opened ‘bot’, print and cut alignment to the burned-thru marks, and ran it.
I’ve included screenshots of each. Please note my mouse had slipped down while taking the screenshot and it appears that both ‘align to target’ and the ‘align to target, no scaling’ options are both selected, but it’s just ‘align to target, no scaling’.
As you can see the first target that I aligned to is right on, but the second target is off by 3mm.
The topside marking of the letter H is not as clear as I’d like, but you can see there’s a significant offset with the cut H.
In a previous test after the first failed no-scaling cut, I kept the registration marks selected for print and cut and just changed the option to the scaling ‘align to target’. Now both registration marks aligned perfectly but the design offset was much worse.
I purposely made the design and alignment marks as far apart as my machine allowed to illustrate this. With alignment marks and design all lined up on the axis of flipping it’s much better, but still enough to make it difficult or impossible to push the object from the material.
I know this is likely an unintended use for ‘print and cut’, but it’d definitely be of benefit if it could be included in future versions.
Thanks very much,
I’ll post the pics separately…

Here’s the result pictures.
Thanks


Can you upload the two .lbrn files?
This topic was automatically closed 30 days after the last reply. New replies are no longer allowed.