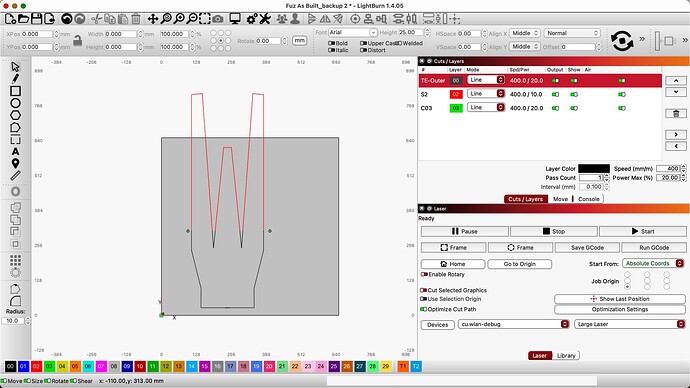
I have used this feature a few times with no problems however meeting a problem that I am unable to esolve and it may be an error by my doing.
On a simple sketch I follow the proceedure by cutting shape and then setting reference points. I burn the first half ok. I then set the rreference points and all looks good with the refence points red and blue.
I now attempt to burn shape and a warning states “Cut may be out of bounds—” Using Preview I can see the shape is well off the cutting area.
Hopefully this is clear enough and some advice acan be provided.
This is on a DIY machine using Arduino and I have done before
This is saying that the resulting motions required for the print based on the print and cut alignment exceed the bounds of your laser as LightBurn understands it.
So either you’re attempting to burn more than you actually want or you’re too close to the edge of the machine the way you’ve positioned your material.
If none of those make sense can you upload the .lbrn files for review?
Thanks for your reply, I am trying to burn on a sheet of A4 paper that is on my 600 X 600 cutting area and not near te edge
This is likely a configuration issue then. Can you confirm that your machine homes properly? And if so, to what corner does it home?
Can you provide the following:
- full screenshot of LightBurn with the design loaded
- Run these commands in Console and return the full output:
$H
$$
$#
?
If your machine isn’t equipped to home, then exclude the first command. However, manually home the machine before running the other commands.
Please bear with me at 78 I am not the sharpest tool in the box and am struggling to find the hash on my macbook
I’ll assume you’re on a British keyboard.
You could either copy/paste from the forum or use Alt+3 key. If you have an older Mac Alt might be labeled as “Option”.
FM-Fuz - Compleye -CUT.lbrn2 (12.4 KB)
Idle|MPos:0.000,0.000,0.000|FS:0,0|Ov:100,100,100>
I am unable to get the command line to take $# mainly #
Try copy/pasting from the forum into Console.
I’m a little confused. If you are trying to burn onto an A4 sheet of paper on a 600x600 laser, why does your design need to be larger than the area of your laser?
When you are trying to start the job with the portion of the design currently overhanging the workspace, is that how you have it? I haven’t confirmed but it’s likely that you need the shape entirely within the bounds of the workspace.
Also, it looks like your workspace is closer to 640x640mm. What’s going on there?
Will look at forum copy/paste
A4 was just a tester to simultae Paste and cut which is well within bounds of workspace. I attempted to replicate a previous project but it now goes out of bounds
My useable workspace is about 560 x 600
Step 1: change the addressable area of your laser in Edit->Device Settings to match this.
If the reported position that you posted earlier was indeed right after homing then you’re likely good from a configuration perspective.
Have changed workspace to actual No homing switches fitted,
Loaded a previous file that I had burned and set up reference points. All appears ok until I set align when the out of bounds appears. On preview the project is shown well off the workspace.
Will leave overnight.
If you do not have homing switches you must manually home your machine for this to work.
With the machine off, move the laser head to front-left of machine. Then turn on machine. Check position of laser with “Get position” in Move window or by issuing ? command in Console. It must be 0,0 or more work needs to be done.
Once established, never more the laser head by hand. Use jogging controls exclusively.
Print and Cut relies on Absolute Coords and so must have appropriate coordinates for the machine for this to work.
Well I eventually got there with much head scratching.
I found G10 L2 P1 X 500 Y 550 and $10=0 appears to have resolved. Many thanks
Have to work out the Solved tick mark
Are you certain about this? That would be fairly unusual. Does that machine your machine position after manually homing was positive 500,550?
I was just about to post as although I can get working it is incorrect. Shows position on power up is-500 & -550
Not sure how to resolve???
This is likely because of the change that you made.
You can reverse it by running:
G10 L2 P1 X0Y0
$10=1
Then shut the machine down, move the laser head to front-left, then power on.
Then run this in Console. Please return all output.
$I
$#
?
$I
[VER:1.1h.20190830:]
[OPT:V,15,128]
Target buffer size found
ok
$≠
<Idle|MPos:0.000,0.000,0.000|FS:0,0|WCO:0.000,0.000,-10.002>
[HLP:$$ $# $G $I $N $x=val $Nx=line $J=line $SLP $C $X $H ~ ! ? ctrl-x]
ok
?
<Idle|MPos:0.000,0.000,0.000|FS:0,0|Ov:100,100,100>
ok
Something not quite right with the hash mark but I think what’s there is adequate.
Based on what I’m seeing this looks okay. As long as you manually home the machine and use jogging controls you should be able to use absolute coords without issue.
Can you test now?
