Print & Cut alignments issues

Hi everyone!

I’m definitely not the first to ask about this, but I’ve read all the forums I could find about this along with videos. I’m pretty sure I’m confident about how Print and cut should work but there’s something very strange that’s happening that prevents me from engraving the two sides of a basswood sheet.

The issue

Every time I setup Print and cut, my engravings on the other side of the sheet are always offset by some millimeters, even if I take a lot of time ensuring my laser points directly at the middle of my markers (Im using crosses in two corner). Once I complete the print and cut setup, if I run the Frame to see where it’ll land, I already see that the framing is offset.

I’ve tried using align with and without scaling. I also tried on the latest version as well as an older version - Same outcome.

So, my flow is :

1- I put my sheet on the honeycomb
2- I home my machine
3- I put my design in Lightburn
4- Trace a square around it
5- Put markers (+ signs) on each top corners
6- I engrave the first side
7- I select my design and flip it to mirror it (Yes i flip it the same direction as my woodbass sheet)
7- Then, I flip my woodbass sheet and start the Print and cut setup
8- I then jog my laser above mark one as precisely as humanly possible
9- same for maker #2
10- I select Align (no upscale) I tried both methods - same results.
11- I select the square around my design and my design itself (Note that I’m not selecting the crosses to ensure the framing is not taking into account the + in the corners)
10- i run the framing and, I would assume the framing would run along the bottom part of the + signs that are sitting on top of the square corners, but already, that’s offset.

It’s like something applies an offset in the Print and cut and I can’t for the life of me get two engravings on the same spot on both sides.

If I engrave a marking on the wood, home in every time and then fire the engraving, the engraving will be exactly at the same spot every time. So it’s not a precision issue. I’ve tightened the belts, although this wasn’t not an issue. It really seems to be with the Print and cut process.

Here’s my process with a much simpler test:

so here i made a very simple test file
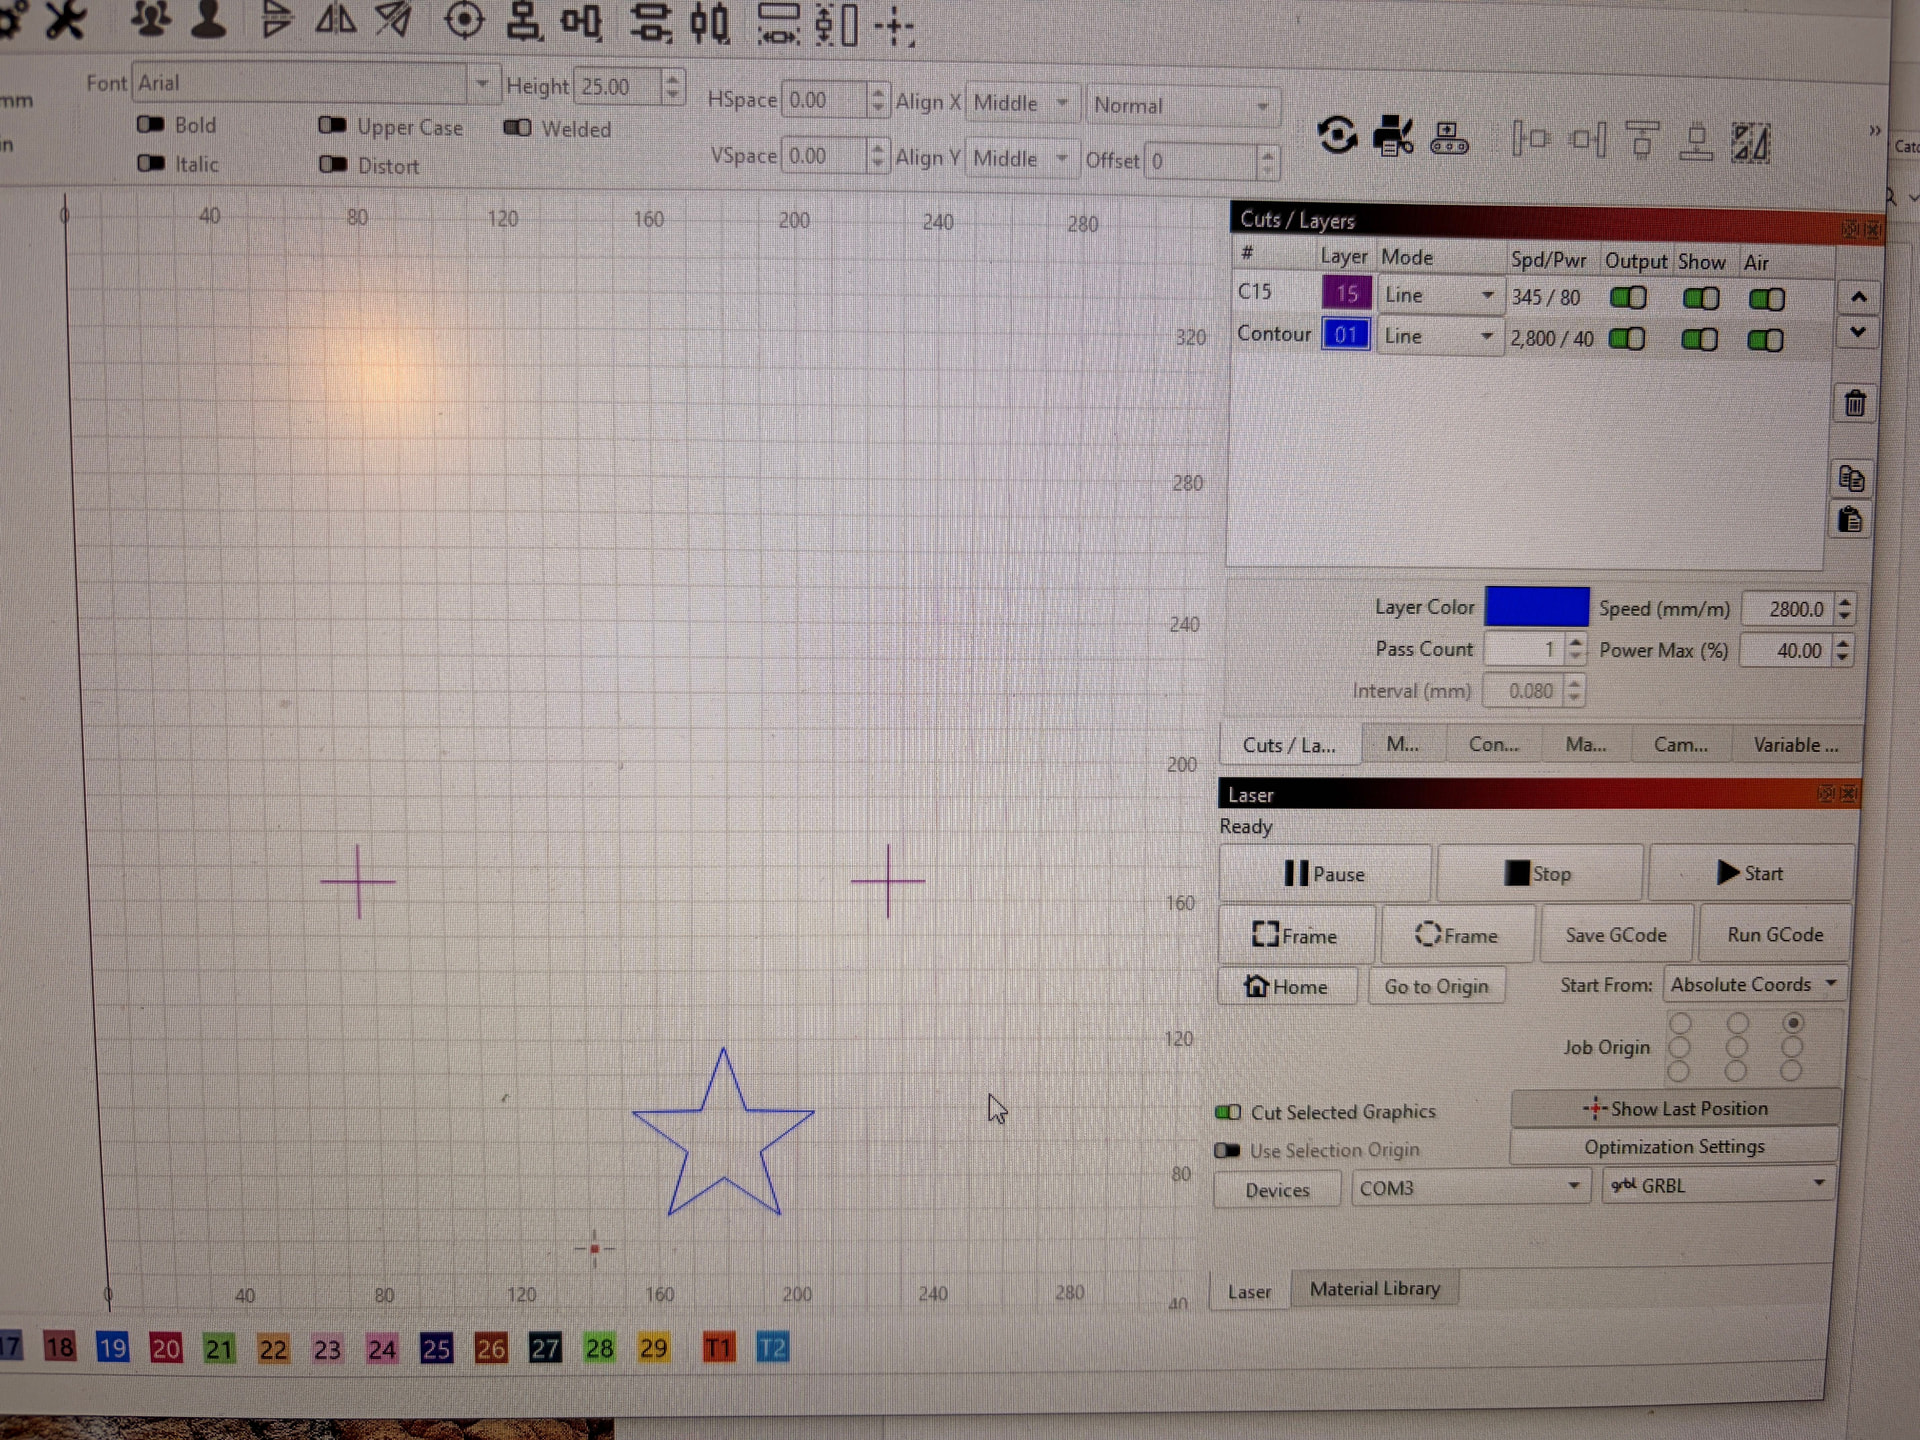

Engraved it on first side
Now, I flip everything in lightburn mirrored
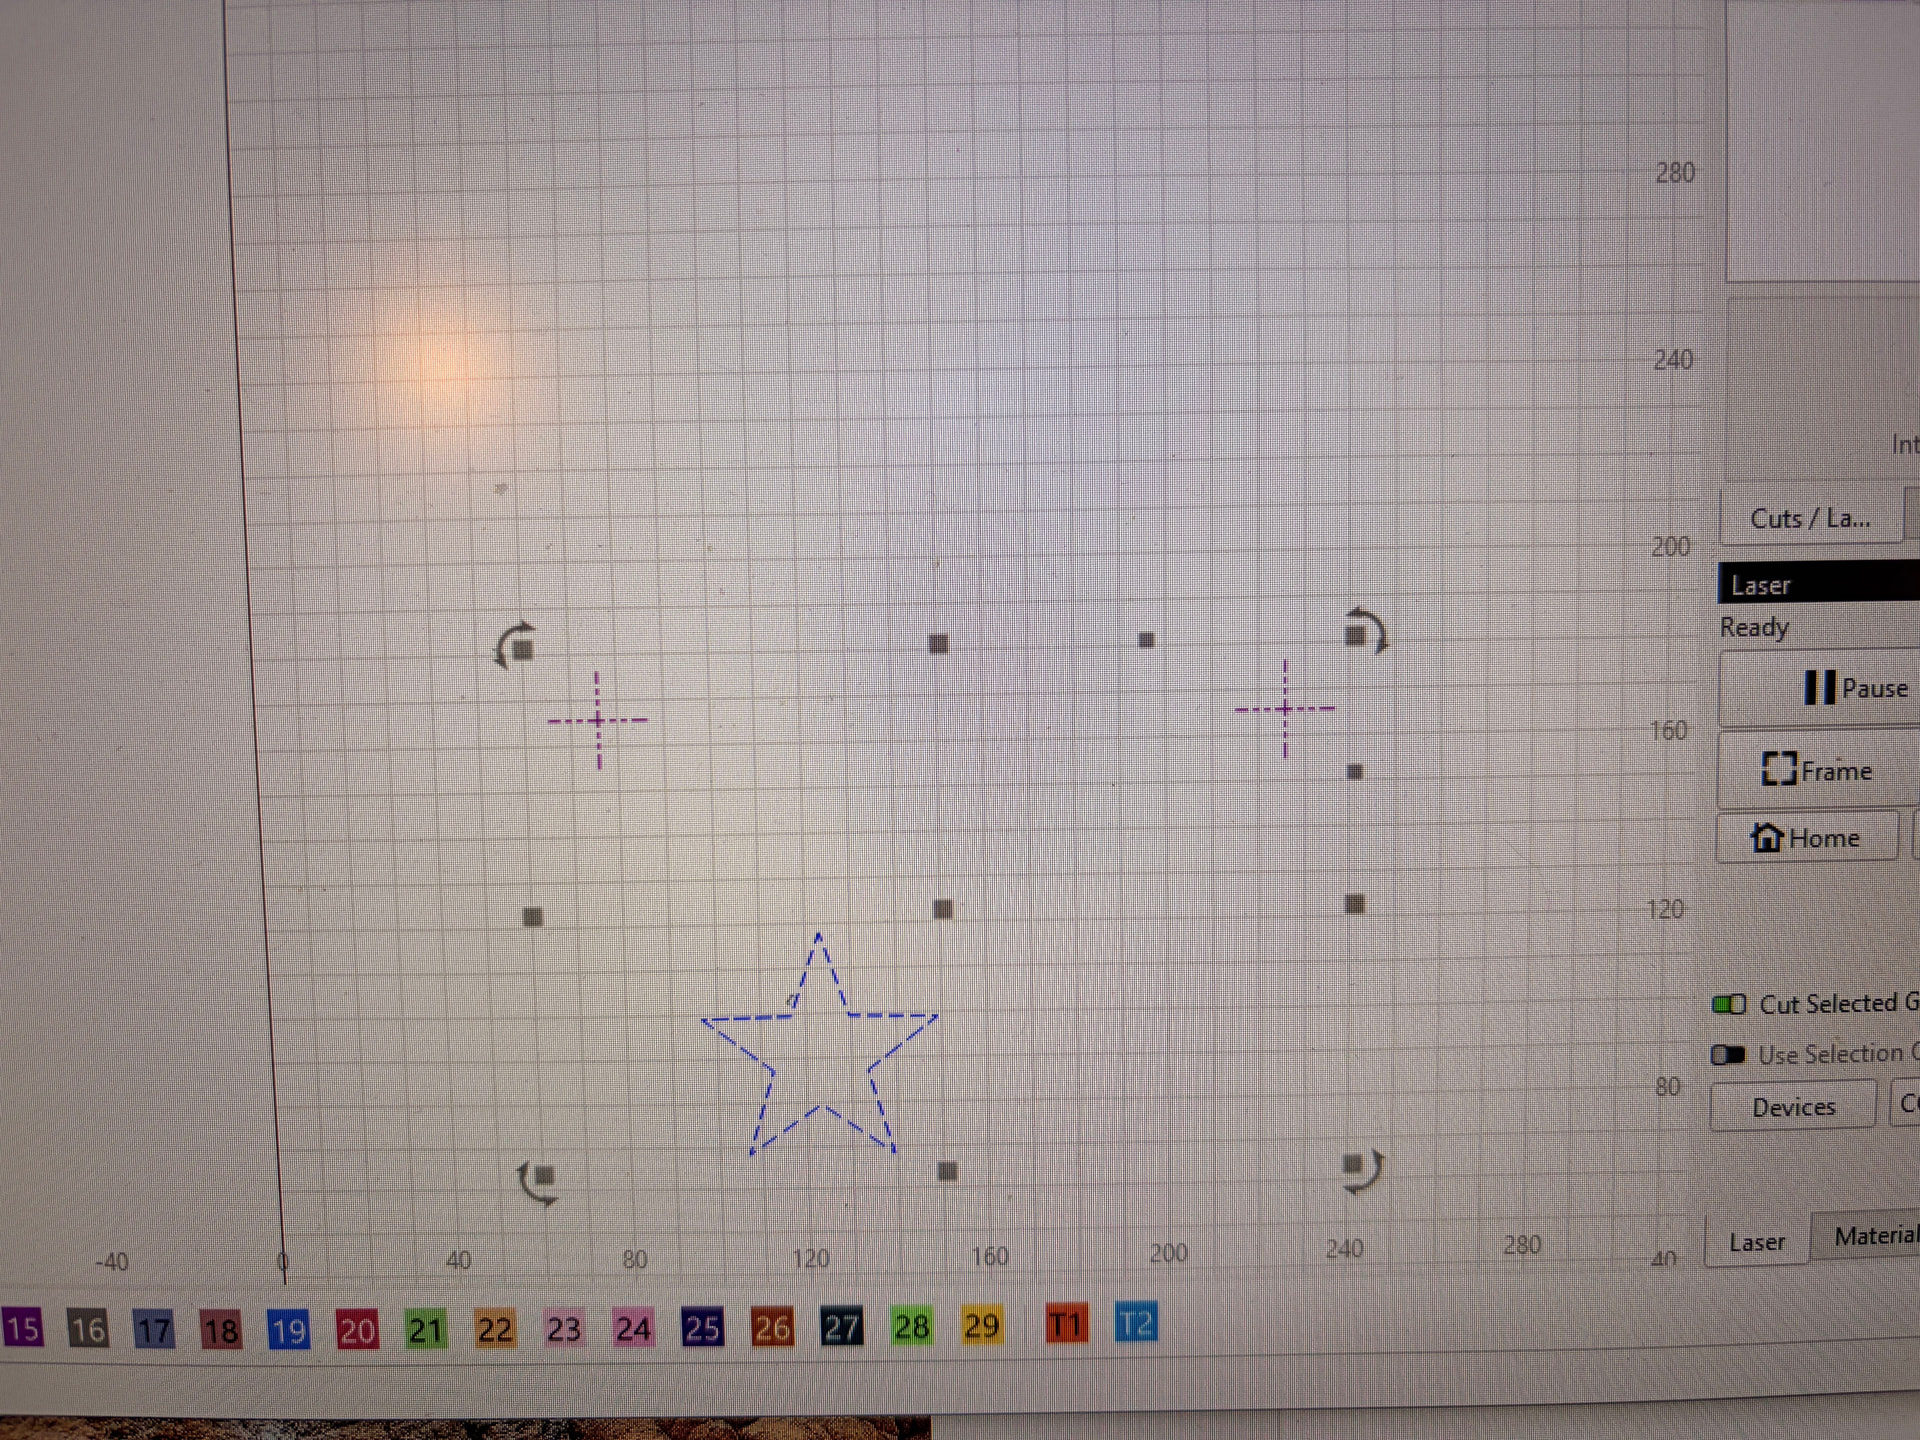
Flip my wood sheet
Set the Trackers with the Print and cut wizard
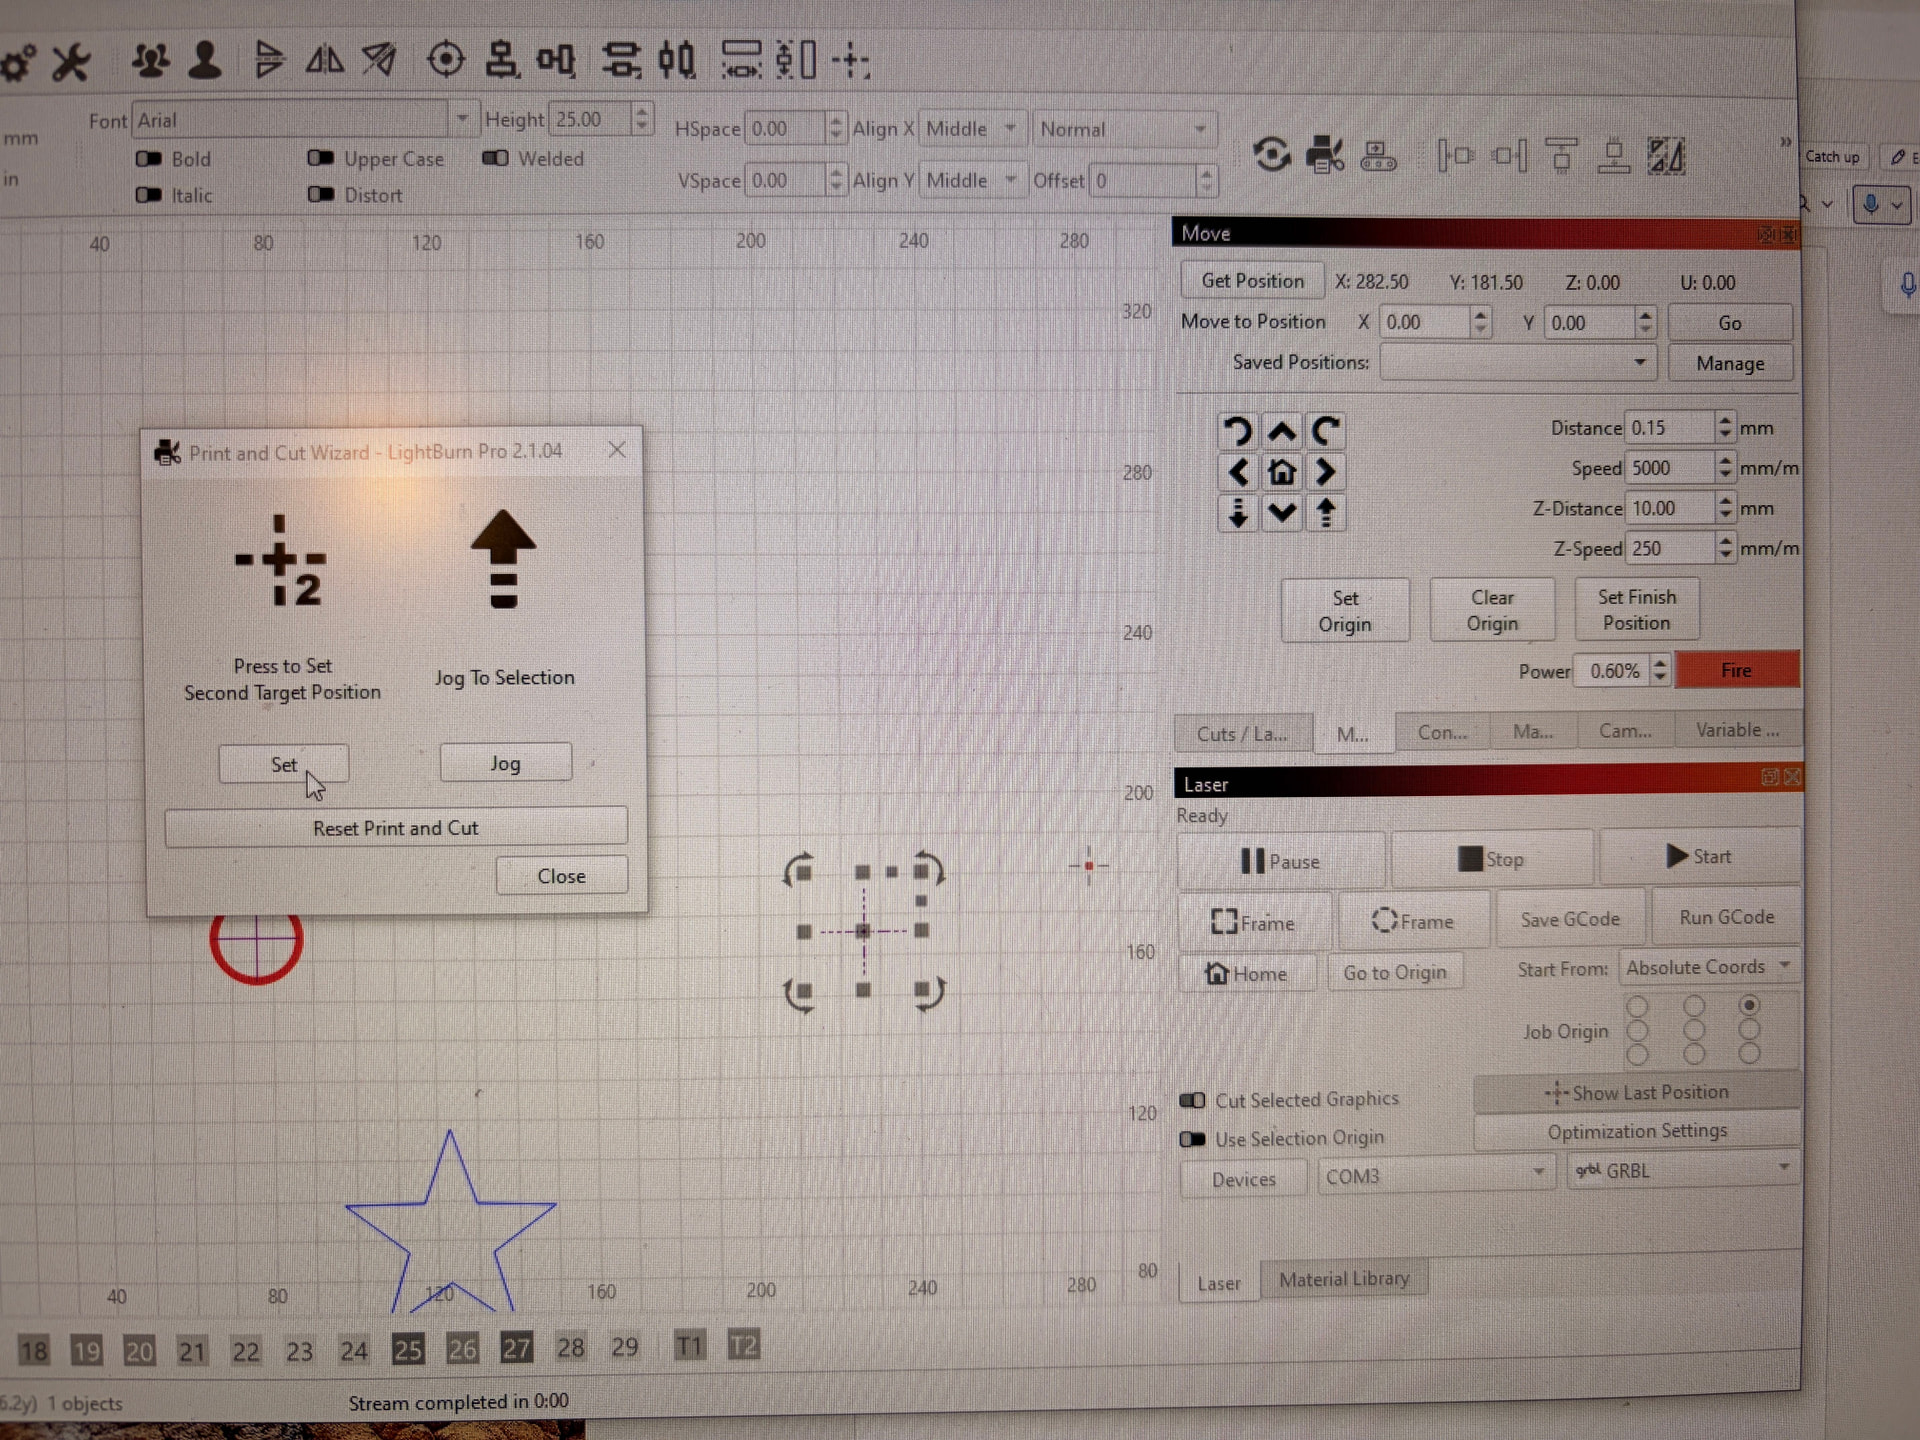
both align options are giving me an offset
Everything looks good so far
And there’s the offset. It’s like that every single time
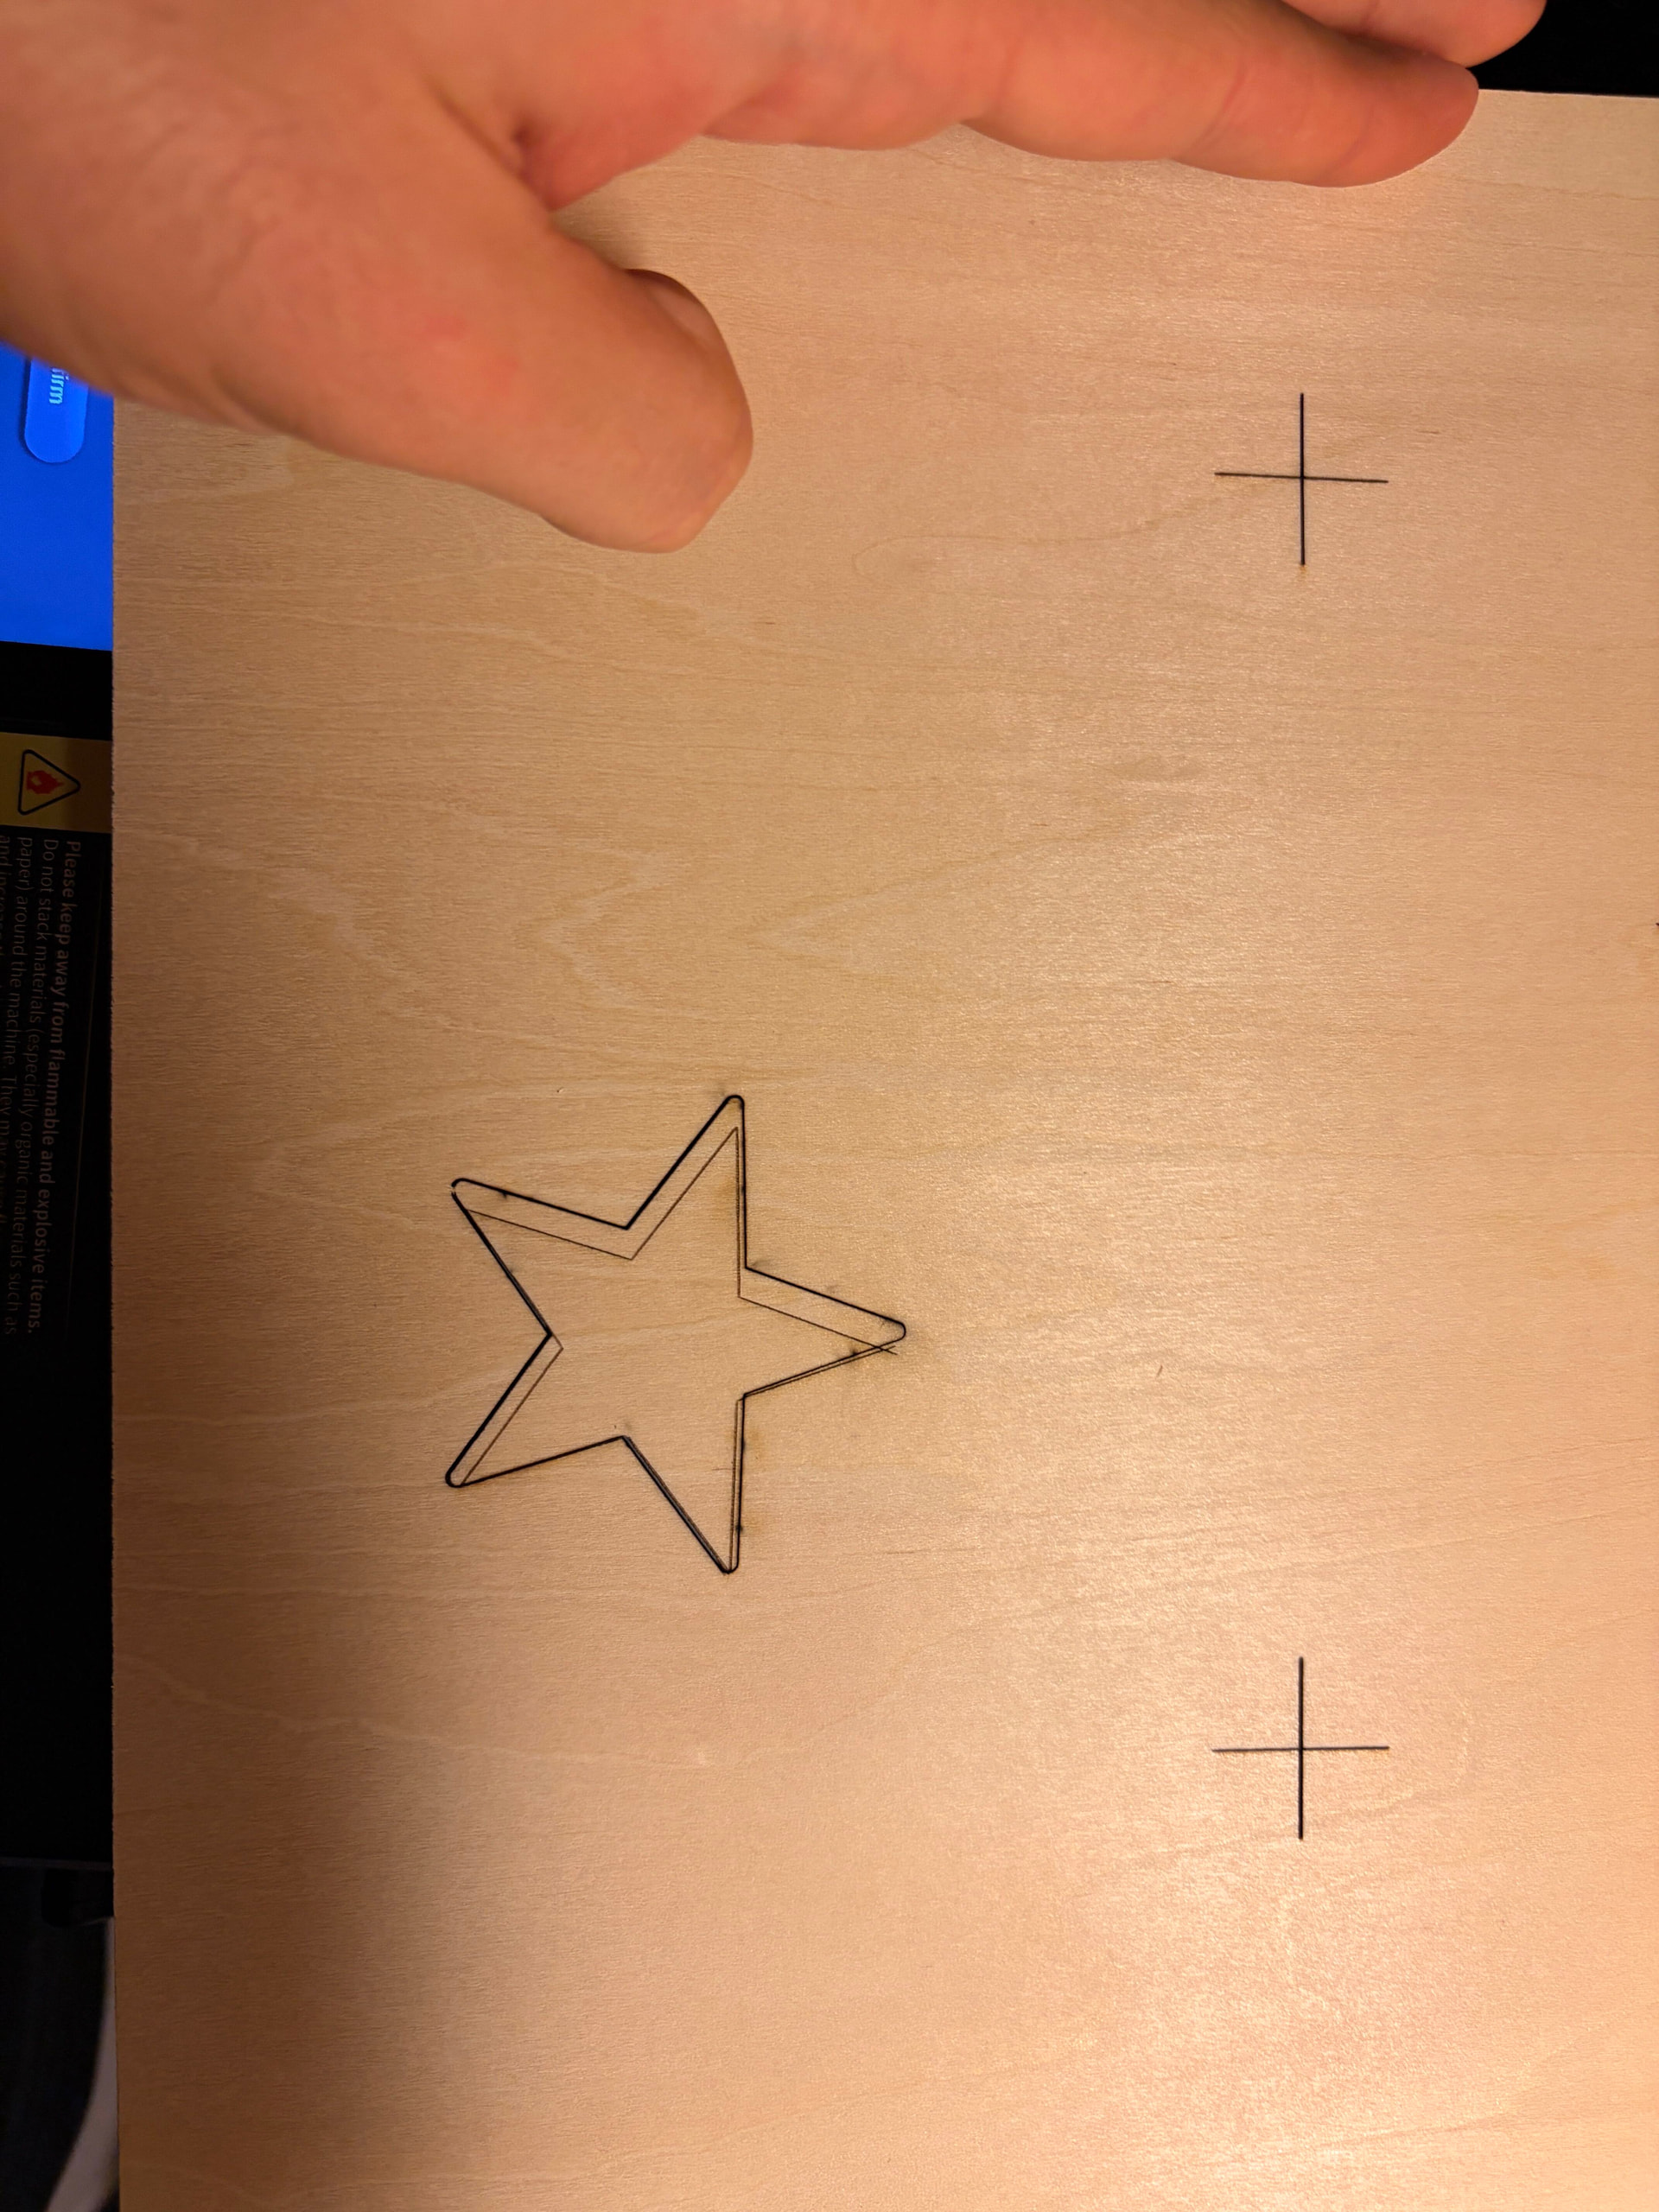
Sorry I wish I could put more screenshots, but there’s a rule that prevents new users from uploading more than 4 images.

Could anybody assist? This is driving me absolutely crazy !

Im using the Pehcda 20W if that changes anything.

Thanks in advance

This is a real challenge. Imagine the backside viewed from the front, including the registration marks for PnC. Now if you flip it over, have the registration marks moved? They will if their position is not perfectly symmetrical in relation to BOTH edges on the right and left, top and bottom. And to make it even worse, the figure must be symmetrical to those registration marks.

Try this: Design your front with the registration marks. Make that one Layer. Use the Mirror Selection Horizontally icon to flip it back and forth. Do the same for the Vertical. Once you get those items not shifting around, you can flip the wood over and everything will line up.

If you have something in your design that is not symmetrical, you need to create a second Layer and flip it (both X and/or Y) to burn the back side.

That said, PnC should allow correct alignment if your design is set up properly. But you have to select the registration marks in the correct order when you flip the wood over. I hope what I said here helps you sort out what is happening in your situation.

Project #2 will go much faster. Trust me. :grin:

Hey there ! Thanks for answering !

I’ll take a look at your method - although I would’ve thought that print and cut would’ve made my life easier haha

It’s not the “a couple of milimeters off cause I have bad aim” that bothers me. It’s the “systemically applied offset of about 5mm” that’s annoying. It’s like there’s some math I’m not mathing in the process. :joy::sob:

What I described is without PnC. I wrote it to illustrate what is happening when you flip the board over. It may help illustrate what is happening when PnC does not cooperate. :rofl:

Let us know how it goes.

After reading what has already been said, I, who have also had several problems with the PnC tool and last time had considerable success, would add the following:

Instead, place a target in the upper right corner and another in the lower left corner to draw an imaginary diagonal line.
Position the object so that it is covered/intercepted by this imaginary line.
This way, alignment and any corrections are made, in my view, on both axes where the object seats.

You should pay attention to what you have selected when you have “Cut Selected Graphics” selected. I’ve had problems because of hidden layers, but I don’t think that’s the case here.

Hi! @MikeyH & @Kuth,

Funny thing happened last night while I was going down the rabbit whole and trying your methods.

I homed my machine and heard a weird noise. Didn’t really thought it was the machine. Then I started to cut the Markers. I then decided to mark them again. They where off already and not sitting on top of each other.

I decided to start again. Home the machine (no noise this time) cut the markers 2 times. They were sitting on top of each other perfectly.

That was the moment I decided to take the whole freaking machine apart :joy:

I paid attention to the x axis shaft and its motor. Everything was normal UNTIL i moved the motor manualy and saw the shaft turn… I noticed 2 big holes in the plastic bit that holds the shaft on the motor… It was missing two screws to hold the metal rod on the motor…

What I think was happening is that since it was missing two screws, the homing on the X axis was SOMETIMES off. I also thought about how I was cutting cards shaped…shapes(?) days ago and when i was flipping them over to put them back in their cut whole they wouldn’t fit just by a milimeter. as if they were like skewed diagonally and would only fit on one side…

Then everything made sense.

I installed the two screws and now running some tests

Will let y’all know how it goes. Again, thank you for your help! If that solves the issue, I will most definately use your tips and tricks in the future.

Hey everyone!

Everything seems much better now. I did see a bit of misalignment, but I believe this is a user problem - It has nothing to do with the crazy offset I was seeing! I’ll run some more tests, but its looking better than before!

No one can guess, but if you had known, you would have started here and then addressed the PnC issue.
Someone would immediately point out framing problems or mechanical problems.
But,… if you or any of us here guessed, the forum would hardly be necessary. :smiley:

That was actually the best decision.

What I would do were still three things. Confirm that the dimensions are true and the frame is square and level.
To do this, I would draw a square that covered most of the useful area and have it cut or engraved (depending on the material used) and then analyze the result. If the measurements of the drawing and the work coincide, if they are square and if there are no blurred areas. (which indicates a change in the focal point due to probable unevenness).

Coming from the 3D printing world - we’re never safe from those weird issues :joy: :sob:

Again, everybody, thanks for your answers :smiley:

I don’t work with 3D printers, but my brother does. Sometimes he’s describing a problem to me, the cause, and how he solved it, and I just nod “yes” because I already feel lost halfway through. :laughing:

Regarding this topic, you’re welcome.
For my part, and I’m convinced for the others as well, it’s a pleasure to be able to help.