I was wondering, when I have open windows like Laser, Move, Console etc. I have them all sized how I want and where I want but when I close LB and reopen, the windows are in the correct place but have resized themselves to their default settings. Any way to have lightburn remember the sizing I did?
Thank you for posting this and apologies for not responding sooner. I just tried to reproduce what you are experiencing using the Mac version 1.1.04 (most current release as of writing this) and am unable to.
What version of LightBurn are you using? Show us some screenshots of your layout and how things are not returned as you’d expect when restarting. We can go from there. ![]()
Latest version of lightburn 1.1.04 windows pc
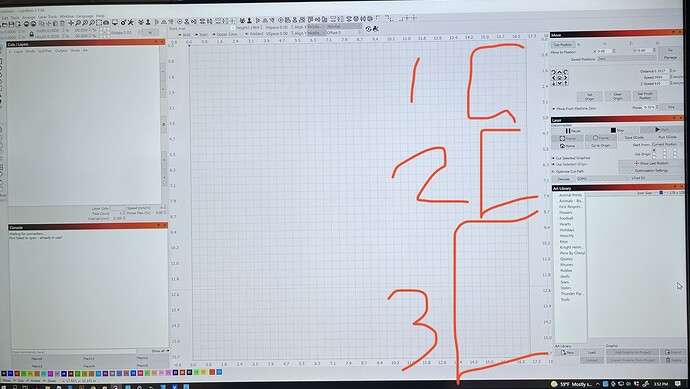
Pic with brackets is what I adjust the windows to be…
1- move window is resized a bit smaller than original
2- laser widow resized smaller
3- art library window enlarged to make room to see more of my library
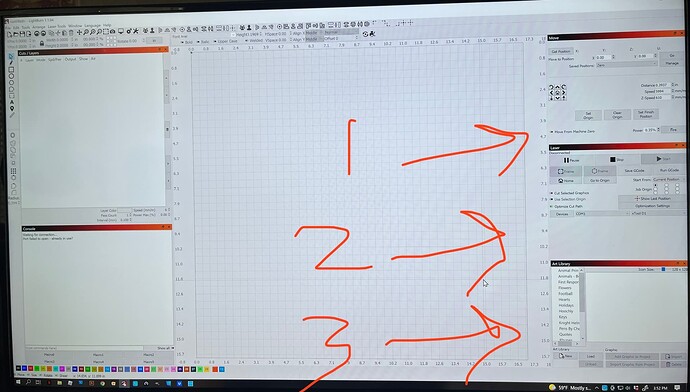
Pic with arrows is how it reverts to every time I close lightburn and re open it.
1- move window reverted back original size
2- laser window reverted and has the unnecessary gray area at bottom
3- art library reverted to original size
It is annoying that lightburn doesn’t remember the sizes. It also is necessary to mention that the cuts/layers window and the console window I have positioned on left of art board, DO remember their sizes
Currently, this is due to the framework we use - things “rebalance” again upon restart. In chatting with Oz, he said he can look to see if there’s a way to have it save and restore the ratios of windows on the same panes. ![]()
Awesome thanks!
Rick, I just encountered something else I would like guidance on if possible. I now have the Xtool RA2 Pro (chuck and roller) rotary attachment. It connects to the main board and uses the z axis option available in Lightburn. The xtool d1 does not have limit switches so I use the laser by manually moving it where I want it to burn and then go from there so i have lightburn set to current position and center origin. on a flat piece and no rotary, i move the laser where i want it to burn, and when framing it frames around fine. the green dot is always in the center of my art work and thus the laser pin points the center of what i want burned onto the medium being burned on to. with the rotary however, i enable, and then when i move my artwork around on the art board i see that the green dot moved away from the art work. this makes the rotary not keep the image where i want it, it moves to the distance the art work is from the green dot. I believe this movement may be due to the z axis, and how it normally works but is there a way to disable that or create a new axis for this rotary that will keep the green dot dead center of my artwork? I did find that if I move my artwork toward the green dot I can kind of get the art and green dot centered to each other, but some of my work really needs precision and the smallest difference in position can be bad. I will upload a video showing whats happening. And also on a side note. the rotation is defaulted to 360mm but shouldnt it change to whatever the circumference is on the item to be burned? I enter the circumference or diameter but the 360 rotation stays on 360mm. am I right in assuming the 360 deg rotation should be the circumference of any object to be engraved on?
Thanks for everything
PS I tried to upload video but it wont allow mov
I did notice I can center my artwork to be lasered on the artboard to the green dot by setting my y position of the artwork to 7.9920
this puts the “z” axis at i guess a zero as the green dot is dead center of my artwork?
I can use this as a work around but it would be a great feature (if its not already there) to center any given artwork to the cross hair center of the art board in lightburn ![]()
edit: ok I found the move to page center… a keyboard shortcut to do this would rock ![]()

While working in the workspace, with object(s) selected, hit P key to center these selected shapes to the page.
omg thats awesome
however i just found something out
if i open the set up laser window, and enable… thats when the green dot moves away from the artwork if its not dead center of the y at center of the page… BUT i also enabled the slider to enable the rotary from the settings window… if i turn on the rotary using the slider on the main window… the green dot stays centered on my artwork no matter where I move it… ??? but at the same time, i have mirror output to rotary on the set up rotary window… it works correctly from there. if i enable the rotary from the slider control i added to the main window, the green dot stays centered, but the image is not sent mirrored… its like the slider control is not tied completely to the set up rotary window. the slider works to keep the green dot centered regardless of where I move the artwork on the page. but the rotary set up window does the mirror the output to rotary correctly… did I find a bug maybe? :
also, the 360 rotation… should it be set to the circumference of the object im engraving on? if so, why doesnt the software handle that calculation when i enter the diameter or circumference of the object?
This is worth review, Coordinates and Job Origin - LightBurn Software Documentation
And this as well, Rotary Setup - LightBurn Software Documentation
i got the mm rotation figured out, with the xtool RA2 Pro rotary its 128mm
as long as i enter the correct circumference of the object im good so we are good there.
as far as the current position, I am familiar with that documentation and refered to that before asking the question. What is not discussed in that documentation, is that the origin indicator… the green dot… moves away from the art to be engraved if I click on the art in lightburn and drag it around the artboard. Thus, when using the RA2, if I accidentally moved the artwork and the origin dot has moved away from center, the art gets engraved in a different spot. Without showing a video, Its hard to explain…
you can see what I mean about the dot moving by just placing anything on the art board of lightburn, setting current position and origin at center (like the coasters example in the documentation) Then enable the rotary from the rotary set up window, and find the green dot, if you drag your art up or down, the green dot moves the opposite direction. This indicates the laser starting point per the documentation I believe. This does not happen when you enable the show rotary enable button under settings. that button, when pressed instead of the enable in the rotary setup window, will keep the green dot in the middle of the art regardless where you drag the art on the art board in lightburn. however will not mirror the output to the rotary (which is what this RA2 Pro rotary needs or the image is flipped) like the rotary setup window does… anyway I have a work around but it seems like these two ways to enable the rotary contradict each other
I wish I could submit a video lol it would be easier to show
This topic was automatically closed 30 days after the last reply. New replies are no longer allowed.

