Has anyone had success with this camera. I purchased one and was impressed buy its construction. It fits well on my XTool D1 Pro. However, I am not impressed buy the image quality or its accuracy. I am new at this so I am not sure what to expect. However, I can not get it to calibrate via Ligthburn’s custom calibration. If I chose the recommended preset my image does not accurately reflect the burn location. If I adjust the X and Y to align the image with the burn for one corner it will be off in a different offset on each of the other four corners of the work area. I have no confidence where it will burn its within 1/8-1/2 inch but that is not good. And if you zoom in at all the image pixelates quickly and becomes useless.
Is this standard for a camera?
Did I just get a bad camera?
Has anyone else had experience with this?
If it was accurate it would be a game changer!
BTW - I purchased mine from Amazon and Comgrow will not support it because i did not buy it direct from them. In my defense I thought it was their store front on Amazon, but regardless, I do not have much respect for a company that does not support their product.
Did you run “Calibrate Camera Alignment”? If not, you’ll need to.
Prior to that, what’s preventing you from running “Calibrate Camera Lens”? I wouldn’t normally expect a non-LightBurn camera to have a preset that ships with LightBurn. What was the recommended preset?
Yes I ran “Calibrate Camera Alignment”.
However, this might be my issue. When I ran it I reduced my area to match my material at the time which was about an 11 inch square but my targets burned about an 8 inch square.
Does this need to be a bigger area?
Secondly, when I was unhappy with the results I tried again but I did not burn again I just reused the previous image.
Is that OK?
Thirdly, the calibrate camera lens recommendation was “8MP-N-75” and I have the camera positioned at 22 inches above the work area. When I tried to calibrate the lens via the custom method, I printed the dot pattern, but I was unable to achieve the .3 or less. The best I could get at any position was .36-.5
Was the burn moved at all? Even the tiniest bit? If so then no, you cannot reuse the burn.
I’d suggest you scale the burn to as large as you can reasonably manage. It should help alleviate any effect of measuring error.
Does that match your camera? If not then this likely won’t work. Is your image looking distorted? Or does everything look square and fairly orthographic?
Oh okay. So it was calibrating but not getting good enough scores. That’s much more about conditions and practice. Did you paste the calibration pattern to a known flat surface like MDF or poster board? Any curvature or surface imperfection will affect the quality of the calibration. Other than that it seems lighting and placement are the most other critical factors in good lens calibration.
If you’re not getting distortion with the preset it may be good enough. It’s possible that Comgrow is using the same camera module as LightBurn. I’m not sure. Even if compatible custom calibration is likely to give you better results since there will be manufacturing variability.
Make sure to focus the laser before lens calibration and alignment at the expected focus distance.
I have the COMGROW camera kit that I use with their Z1 laser. While the mount is excellent, I was never able to get the camera to work with the old iMac I dedicated to the Z1 laser engraver. So I added a $25 webcam from Walmart (3M taped it to the mount) and it worked fine. Be SURE that the dot pattern is very flat when calibrating the lens. In my case, I printed it on paper and that was not good enough; I had to tape the pattern onto a piece of ceramic tile to get it to lay flat. Then my calibration scores were very low. You also need to set material heights appropriately when calibrating. And after calibrating the camera alignment, do one or more simple crosshair engravings at some random location(s) in the software and then update the overlay preview in the camera window. If the burned images and the overlay don’t line up, use the x shift and y shift selectors to make them align. Save the settings. Then you should have pretty accurate burns until something (like material height) changes in your setup. For me, I found it necessary to recalibrate the camera often so I’m going to add a red dot pointer (Z1 doesn’t have one) and try just use registration marks to align most burns. Good luck.
Not sure why that would be necessary. Was your camera positioned in a way that it would always be in the exact same location/orientation with reference to the laser frame?
First I should say that I only bought this Z1 (10W), my first laser, a couple months back so I’m still fairly early in the learning curve. The main reason I want the red pointer is that I wear glasses and haven’t got corrected laser glasses. For alignment I see best just removing the corrective glasses and the laser glasses. I also have to remove the shield around the laser head to align with the blue laser. I have the LightBurn fire button level set way down to 0.25% for visual alignment and I still still don’t feel safe viewing it without eye protection - and I can’t see it with the laser glasses I have even if I were to put them on. For alignment viewing without any protection, I guess I would feel safer viewing the red beam. Does anyone know if the low level blue laser dot is harmful when viewed without protection? Has anyone been doing this for years and still has eagle vision? I’m listening if anyone has experience.
I’ve seen some contrary opinions but the safe assumption is that yes, even at low power there is potential harm. Although I’m sure there are ways to mitigate that with proper precautions.
I haven’t looked for any long term studies on effects to eyesight for long term low level laser light exposure but I would not be at all surprised if there was a strong correlation to diminished eyesight. Even without direct exposure if you even occasionally watch the intense light from burning that can be harmful to the eyes. I guess I should stop staring at the sun.
Having said that, I wasn’t trying to discourage you from attempting a red light. I think your approach is well reasoned. Just need to be aware of some of the drawbacks.
On my Comgrow camera, I got the lens correction to complete on Windows 10 and it was a fight to get the first image under 0.3. I probably pushed ‘retry’ 20 times without moving the card - I received a wild range of results so I felt that ‘retry’ might go - and it did. Once the first image passed, the other images were easier to acquire. I haven’t run the correction on the ‘Engrave area’ because of an exhaust concern.
Tomorrow the weather will be approachable so I can take it outside.
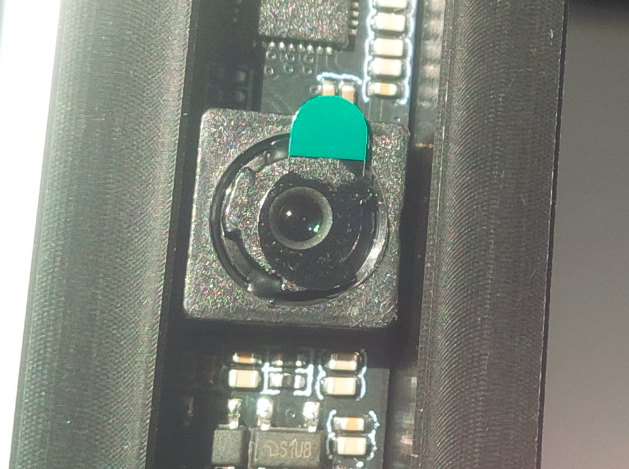
I did notice a little green pull-tab next to the camera lens on the Comgrow camera. I believe that it’s a lens cover made made out of a removable protective film. If the protective cover is still there, removing it may improve your camera calibration experience. I intend to test the camera with and without the protective cover to identify and collect a list of related symptoms to help others get going. There’s a research opportunity and I don’t want to let it get away.
OK so, no joy. I tried all of your suggestions and have a light directly over the work area and the image is still poor and inconsistent, useless. I just can not believe this is an 8MP camera. If I were not told it was 8MP I would assume it to be 1MP or 2MP.
Are there any examples of images people get with an 8MP camera. The lightburn documentation images look better than my images. If I zoom in to mark the center of the alignment targets it pixelates so badly that I might as well guess at the center.
Do you think the lightburn 5MP camera would do better. It really is not of any worth to me if It is not accurate. I want to use it to place my etches and this camera will not do that. I might be able to accurately place an etch in one corner of my work space after calibrating and aligning. But no way in hell will it work for the whole area. And the calibration with the “dots” ranges from on image a .28 to the rest at .40 and above.
If I had to guess the Comgrow mount should would work with the Lightburn camera ( which btw looks like it has a better lens even though it is only 5MP ).
Can you attach some samples of what you’re seeing?
If you go to Settings->Camera Capture System, what option is selected there. During calibration, do you recall what the listed resolution was?
Here’s an example from my 8MP 120 degree camera. My bed is 700x500 for reference. In the background is a sheet of clear acrylic on honeycomb. I’ve place some embroidered lettering for contrast and to give a sense of scale and available resolution. Note that focus on the material may be slightly off since the lettering is physically higher than the material in this case.
One thing to consider for the target alignment is that it’s very easy to washout the image when trying to do the alignment. It’s very easy to trick the auto exposure into blowing out the image. Consider turning off any built-in lighting during that process. Carefully introduce external light until you get a well exposed picture.
I was informed that the comgrow camera was a fixed focal point with no zoom and that is why they did not work well with some configurations.
I ended up buying another camera board with a zoom feature that was the same size and replaced the original camera.
I will be honest and say that I am not sure I noticed a huge improvement.
I have found that it is pretty accurate but I can not rely on it at all.
I mostly use it now for ballpark placement and because I like to see the image but I can not ( I repeat - can not ) use it to accurately place anything
on the work area to burn.
If I spend the time practicing on one small area I can adjust the settings to make it accurate for one spot and one time only.
I feel like I need to redo it often to have any confidence though.
It’s a shame but I do not have anything to compare it to so I am somewhat resistant to blame the comgrow setup.
I think it might just be that the lightburn software does not have the most robust calibration or accuracy with the camera feed.
To be honest I think the image quality and placement of the camera are pretty good and so I am at a loss why it isn’t perfect.
It would/does benefit greatly by additional lighting attachments ( I have attempted to attach my own ).
Good luck and let us know if you find the magic answer to make it work.