Hey All. I have 3 brand new 80W OMTech AF2028, one of them i got about 2 weeks ago and have run 300+ cups on them perfectly without a single issue, was running them Thursday night fine and came back Friday morning and now its all messed up.
All of them engrave perfectly fine when on the flat surface settings, its when i try to use my rotary that nothing is working properly.
I am having the issue with both my piburn and my rotoboss so i dont believe its a piburn issue. I am using the same exact settings ive used since i got them and have done 300+ tumblers on them perfectly with 0 issue up to this point.
I have completely reset computer, reset settings for machine, downloaded older version of lightburn and all and I cannot figure out what is causing my issue and I have so much work to get done in the next 3 days.
Mirrors are all tight, and aligned, beams comes out of cone centered, laser head in each machine is tight and doesn’t move, have tried multiple files that all worked in the past 2 days with same issue, not sure what else it could be that would cause all 3 machines to have this same exact issue?
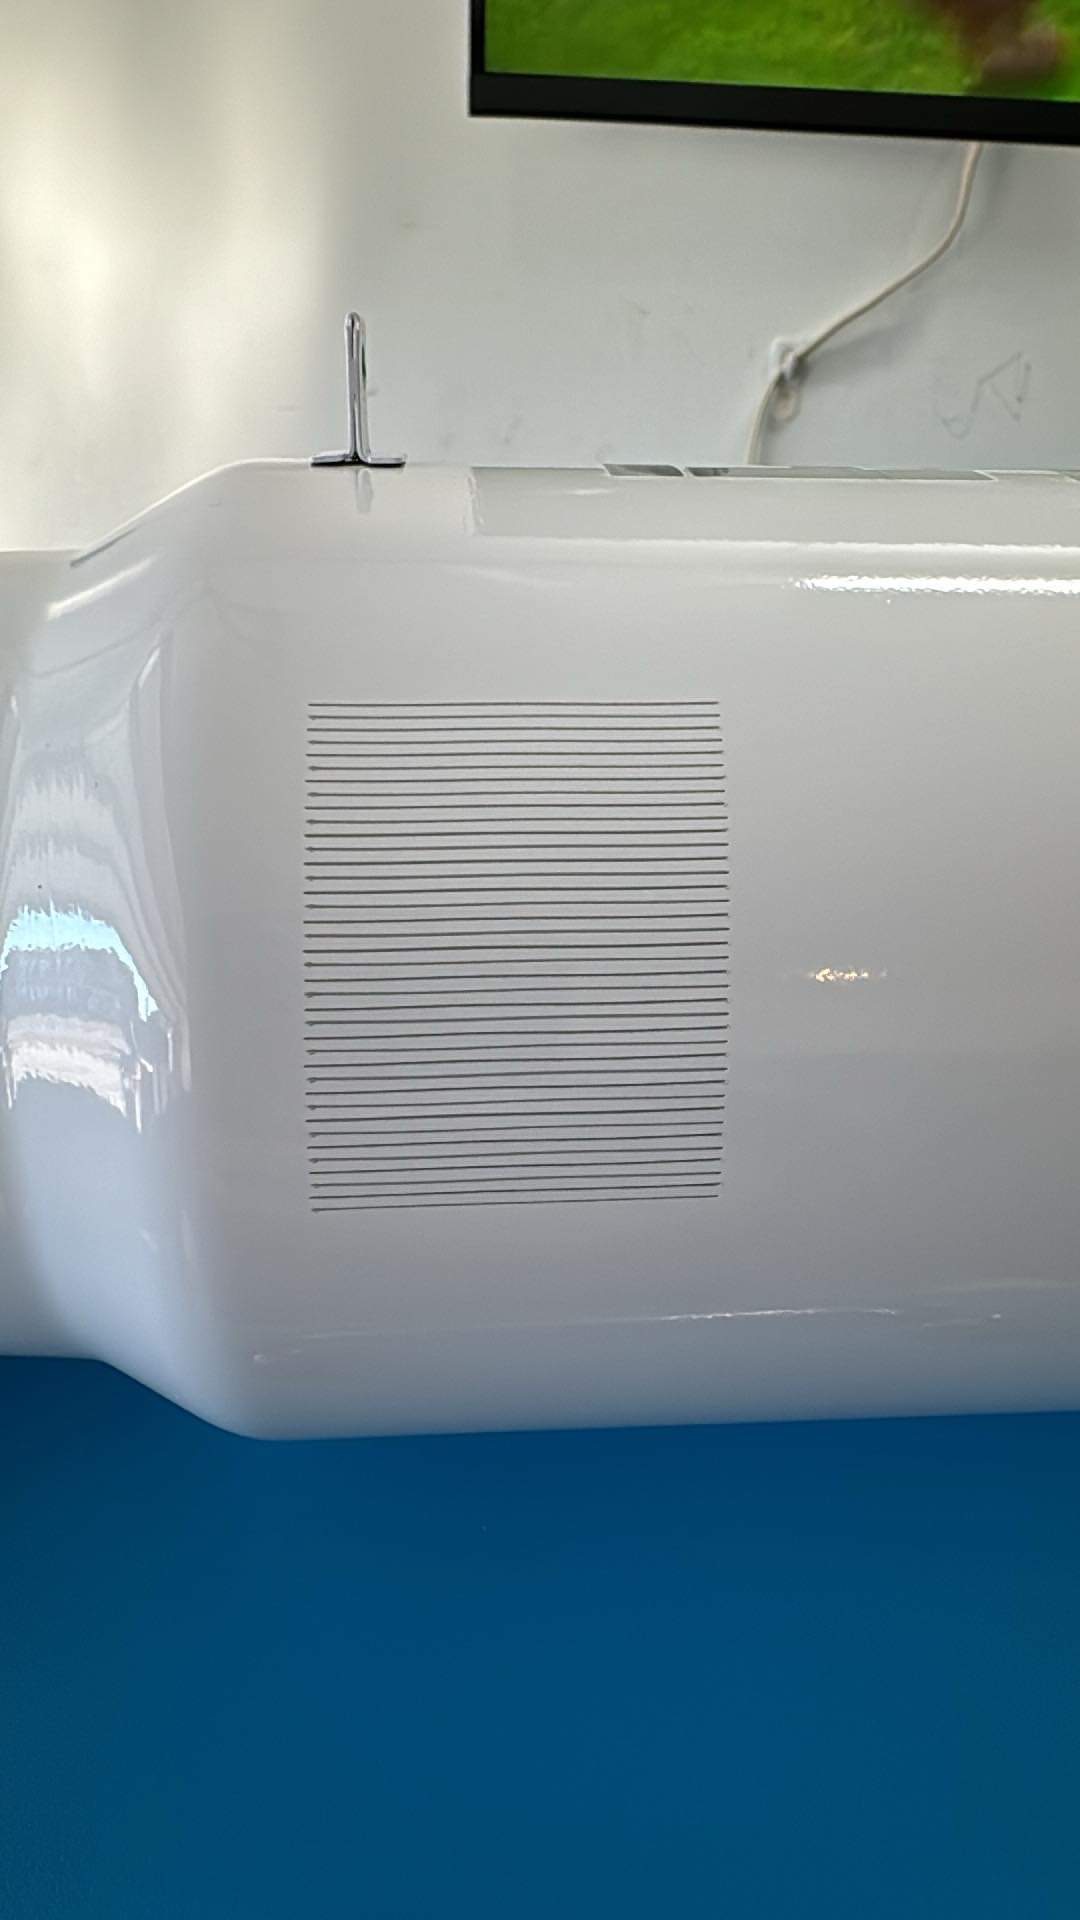
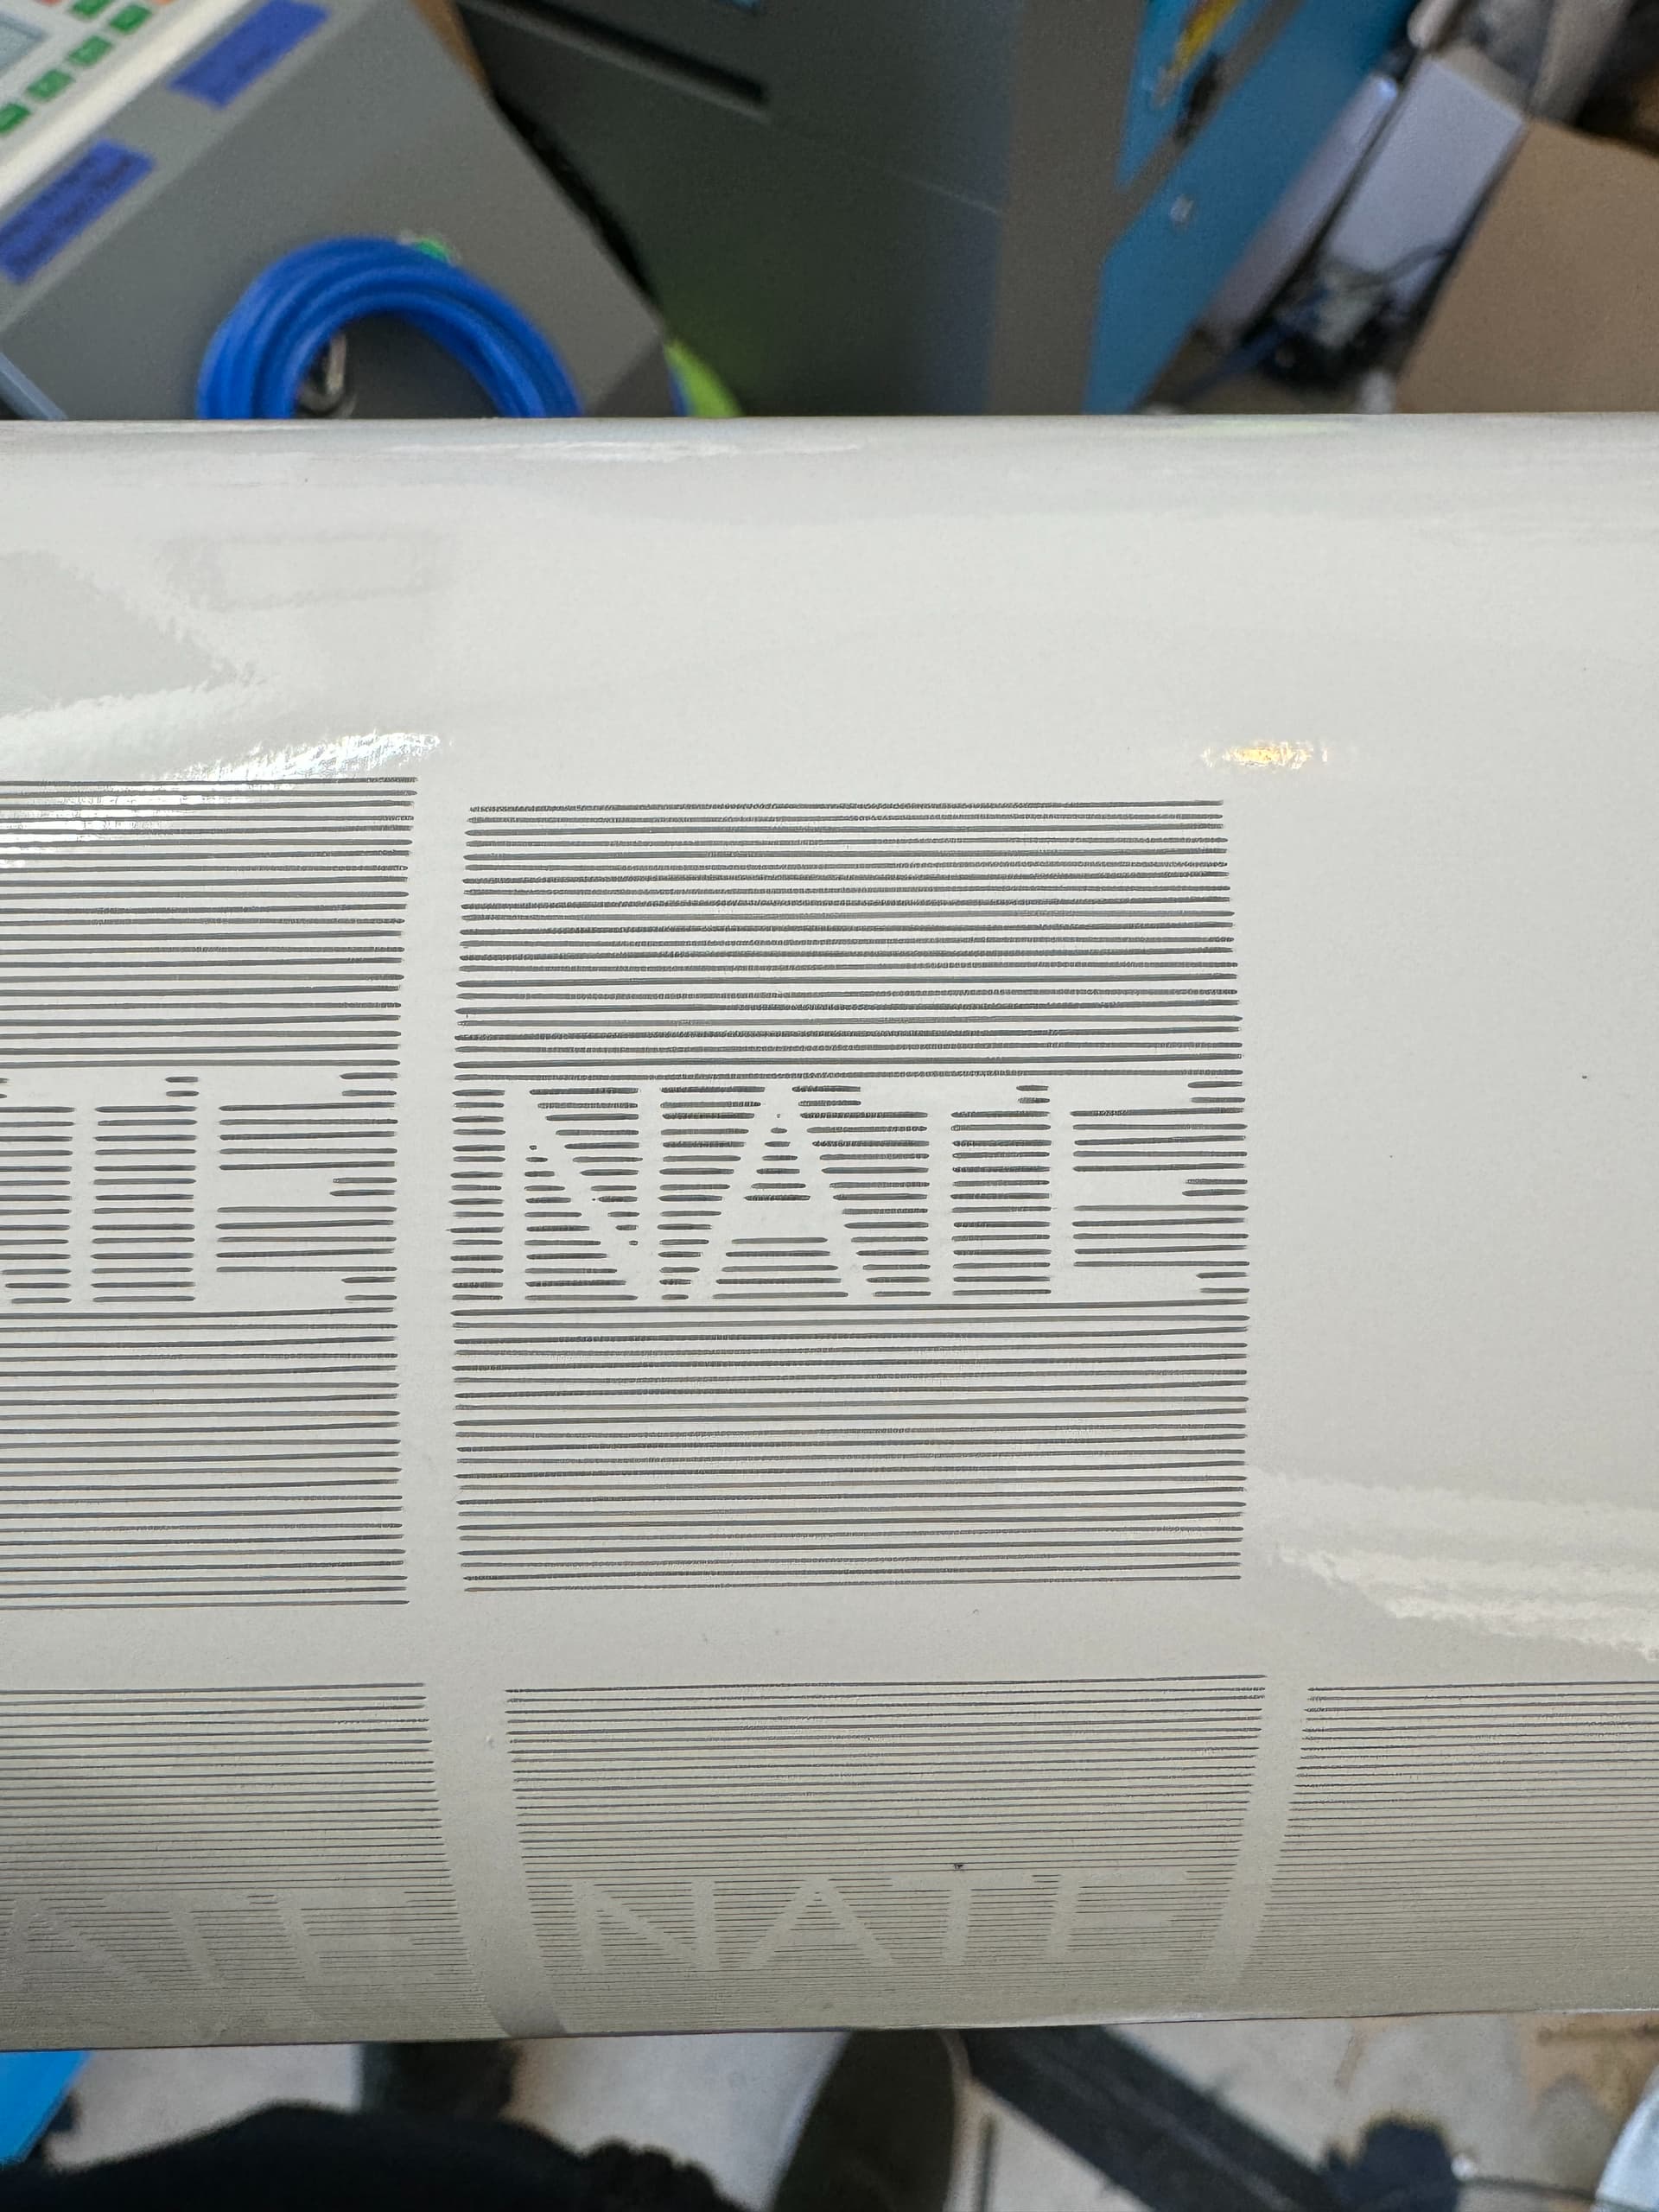
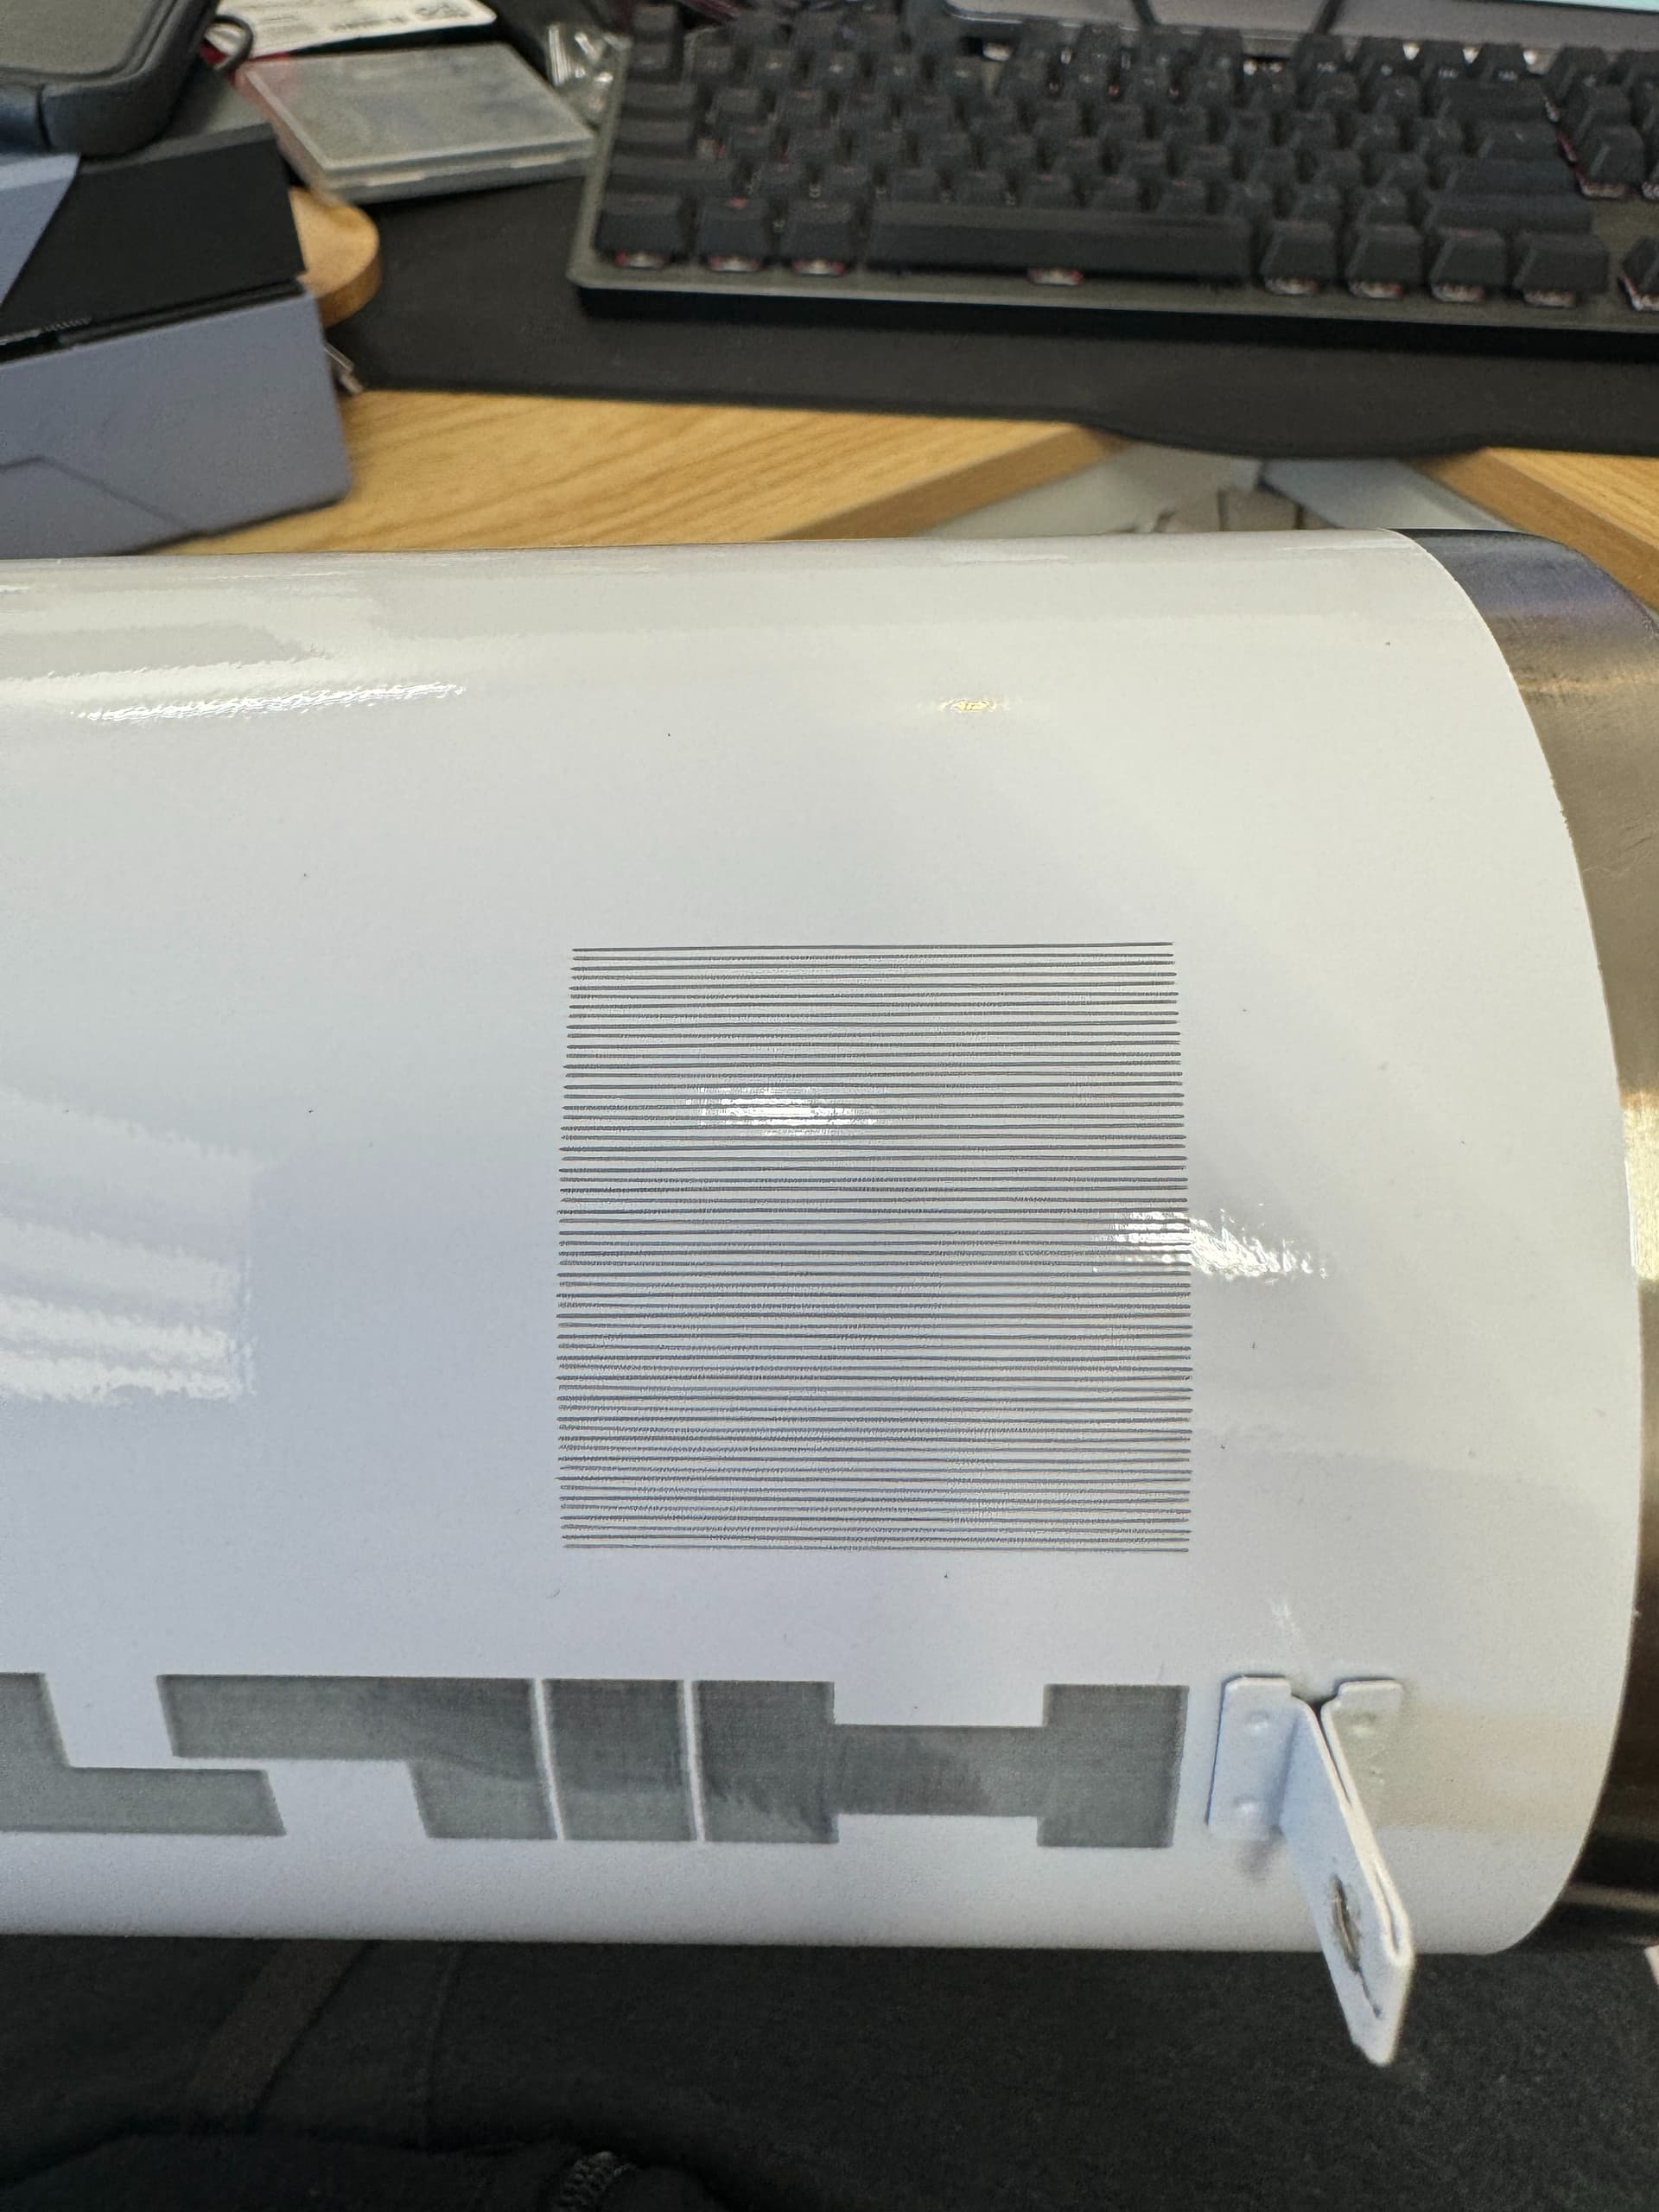
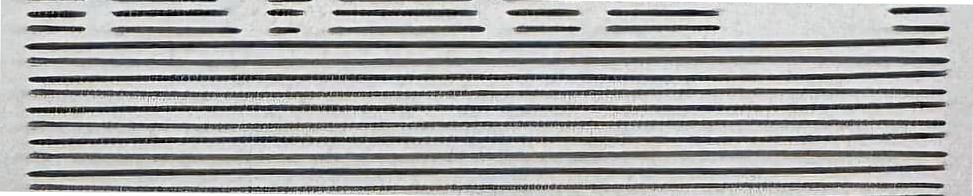
The photos are of my machine at 0.8 line interval just to show the wavy lines and everything
The layer settings in a LightBurn file operate within the limits of the machine configuration settings stored in the controller.
Depending on what you did when you “reset settings for machine”, you may have replaced the machine configuration settings with the Ruida factory-default setup, which differs from the OMTech-specific configuration and is generally wrong for any particular machine.
If so, you must install the original OMTech settings for the machines, which should be available from OMTech after the usual tech support go-round. You may be able to restore them from an automatic LightBurn backup:
Hit the Load from Backup button and see what’s been saved.
Installing an “older version” of LightBurn doesn’t do much, other than potentially change a variety of settings. From your description, the latest version had been working when something changed, so the version was not the problem and changing it did not improve the situation. You should reinstall the latest version so we’re not dealing with anything else.
With all that done, the machines should be back to their proper configuration and LightBurn should be set up properly, so we can begin figuring out what’s going on.
Showing us what that means would be helpful. The photos don’t look particularly bad, so it’s not clear what’s going on.
My guess would be a mechanical issue, as rotaries are notoriously fussy about speeds & suchlike.
So I did exactly what you had said prior to this with the settings. I have loaded from backup and still having the exact same issue.
When I engrave anything with the rotary it’s all jagged edges, and looks absolutely terrible.
If I set my line interval to something like 0.8 then it will do lines, but they’re very wavy and they don’t line up or anything. But when I do do anything on the flat surface, my skin offset and everything is completely perfect. My engraving come out perfect and I have absolutely zero issues.
On all three machines, but only with the rotary. I have tried my Pyburn, four roller and a brand new out of the box Roto boss as well with all of the same issue.
I have also played with all of the acceleration and speed and all of that in the Settings on a two hour phone call with OMT as well with absolutely zero fixing of the problem.
Alas, there is no Make wavy lines setting to turn off.
Converting what should be a straight line into a wave requires motion that is not under program control, which means either the rotary or the platform must move during each scan line. I assume you have both the platform and the rotary firmly secured, but now’s the time to make absolutely sure of that.
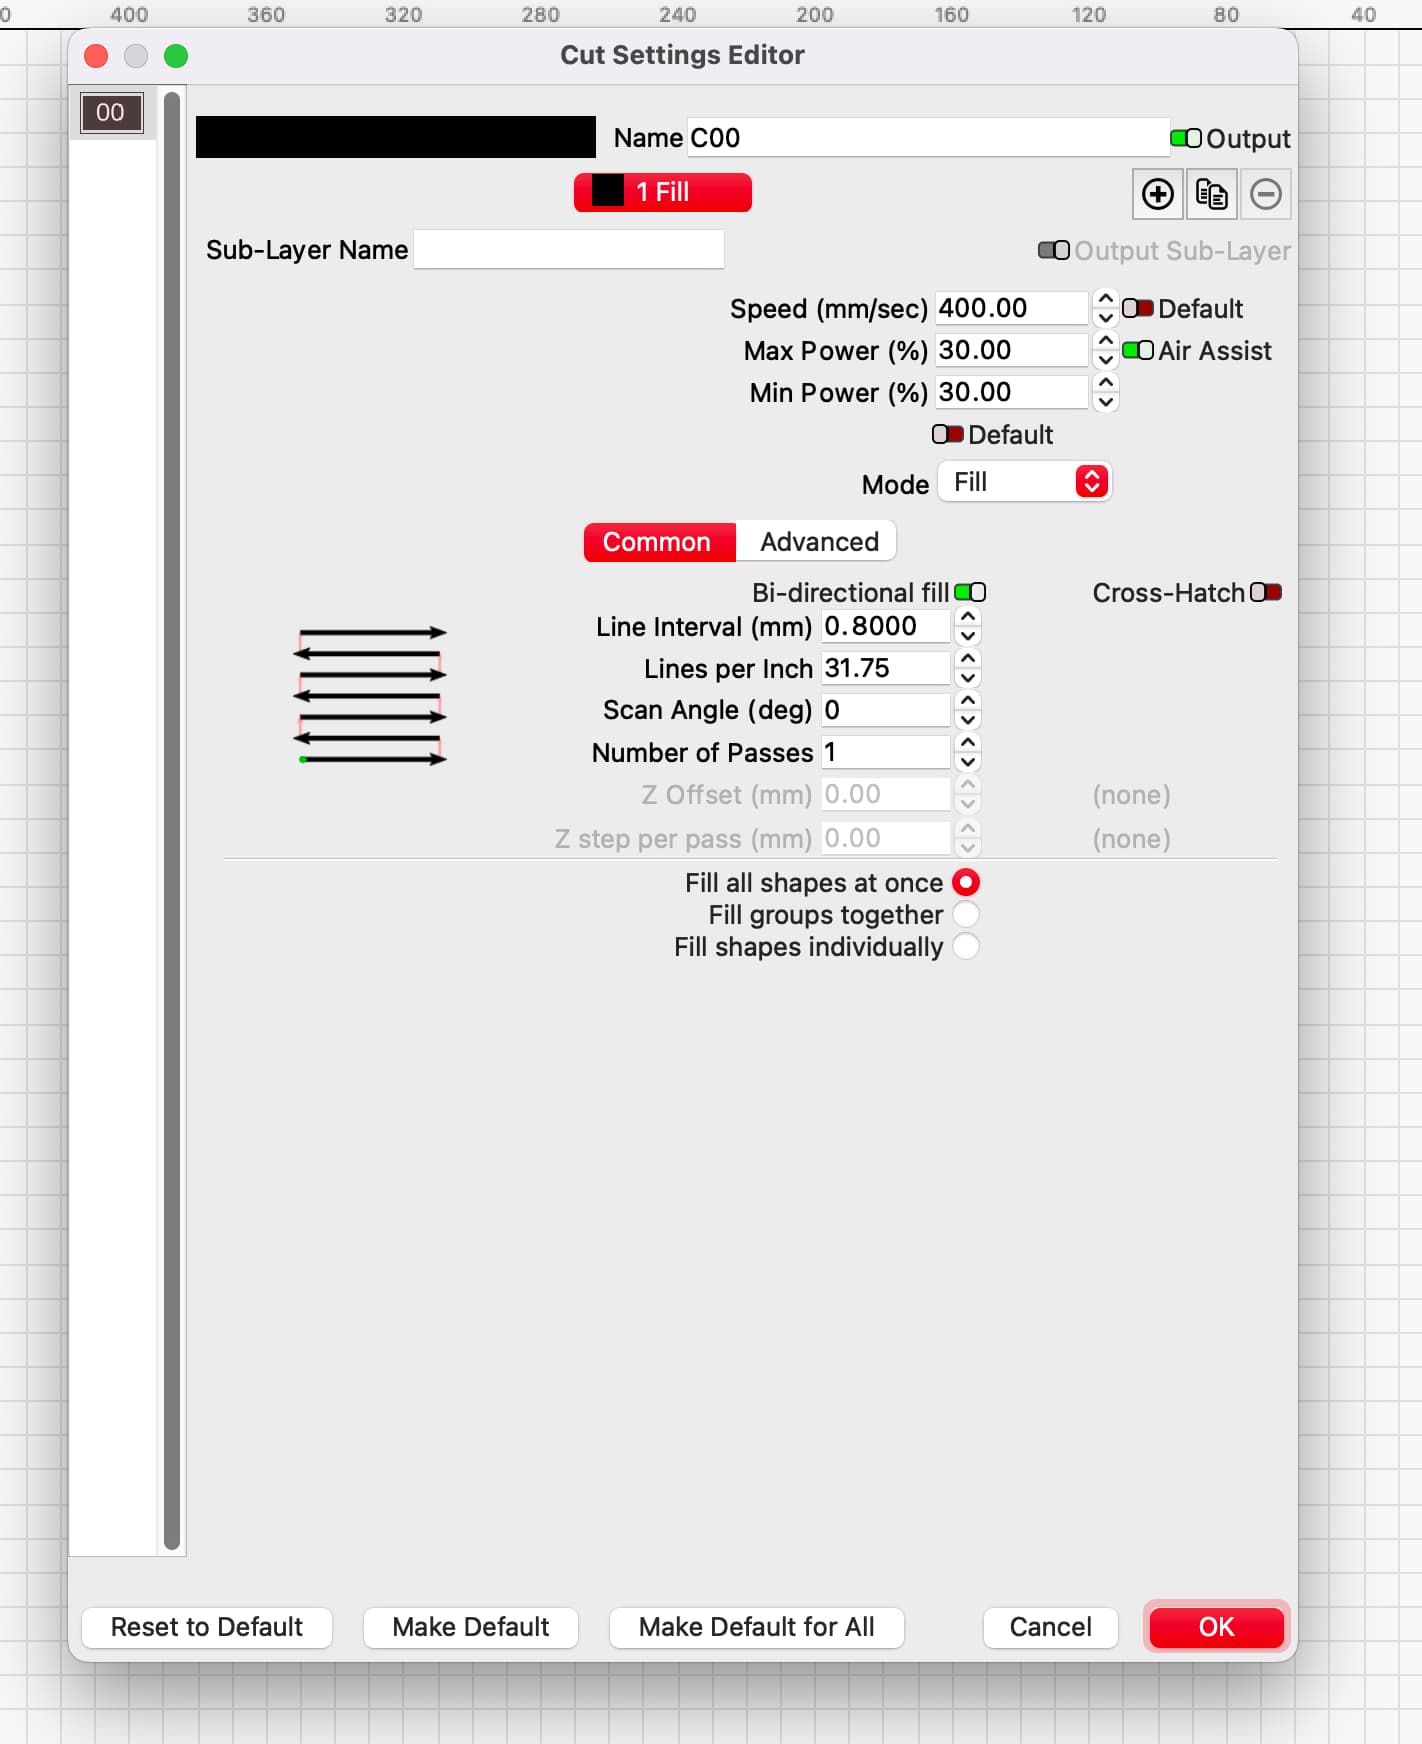
Those look like chonky mugs, so I guesstimate the lines are 50 mm long = maybe 100 to 150 ms at 400 mm/s.
Because the Ruida controller calculates the overscan based on the axis speeds & accelerations, it expects the rotary will be stable after moving to the next scan line, which is obviously not the case.
Those angled ends suggest the rotary has not stopped moving before the laser begins the scan line. Some of the lines have slight bends at both ends, which suggests the rotary has a small amount of backlash allowing the mug to move just a little during each scan line rotation; the controller is not preemptively shifting the mug position during the scan.
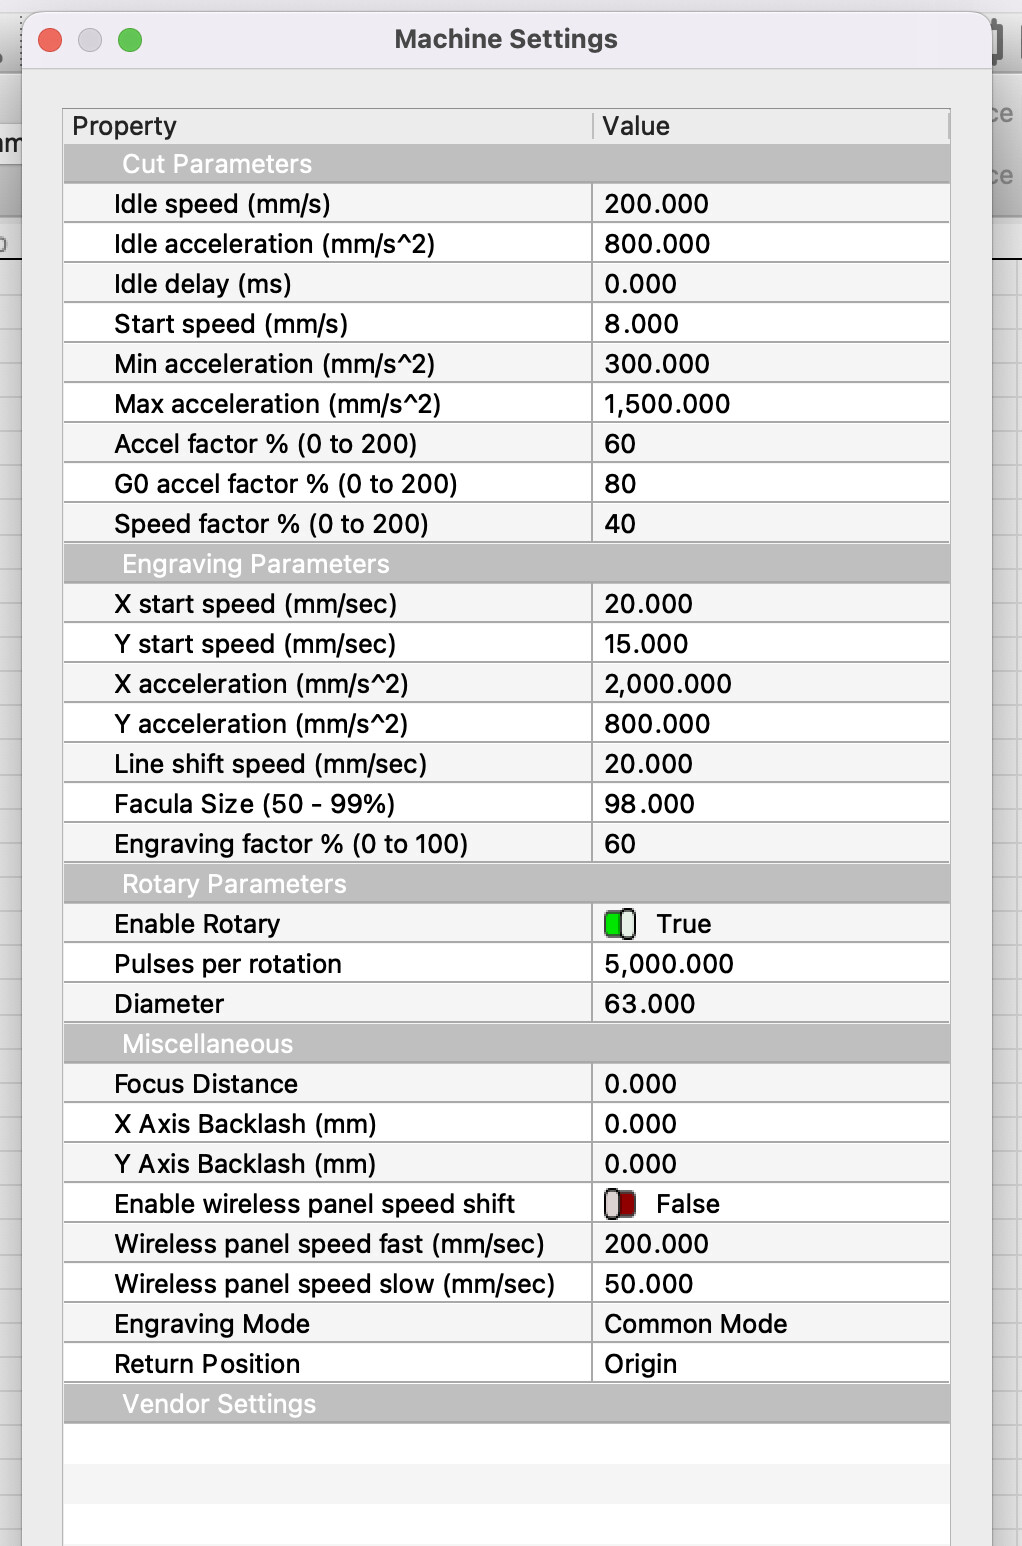
The one setting that can reduce that motion is the Y axis = rotary acceleration. It is never clear which Ruida acceleration settings apply to linear vs. rotary motion, so this is guesswork.
After backing up the current settings, apply these separately to see which one does anything:
In Engraving Parameters: reduce Y Acceleration from 800 mm/s² to 8 mm/s². Yes, a factor of 100.
In Y Axis (which isn’t shown in your screenshots), reduce whatever the acceleration is now by a factor of 100.
If neither of those have any effect, then:
In Engraving Parameters: reduce Line shift speed from 20 mm/s to 2 mm/s.
In Y Axis, reduce whatever the speed is now to 2 mm/s.
At that point, the rotary should turn with stately grace and the lines should be straighter, whereupon you can carefully crank the values upward until bad things happen to scrap mugs.
So this helped my issue with the wavy line slowing down the speeds and stuff and playing with it!
Only issue I’m having is at 0.080 line interval that I have used on hundreds of tumblers, will no longer give me nice clean results. I have set up my scan offsets nicely and all but everything is coming out jagged.
I can’t really afford to run at something like 0.05-0.06 line interval as that adds so much time and I’m doing mostly full tumbler wraps.
Everything is deeply intertwingled, so changing speeds & accelerations will also affect how the beam interacts with the paint.
Start from scratch with a Material Test with speed & power ranges maybe ±50% from whatever you’ve been using to see if the sweet spot has moved slightly away from what you expect, then vary the line interval similarly to find out what works best with the new settings.
AFAICT, everything varies by just enough to invalidate any assumption that “nothing has changed”.