I have an Atomstack A5 pro using the Atomstack roller rotary tool. I have never been able to get my tumblers engraved correctly. The image is distorted no matter how I configure the roller.
I have ruined several tumblers attempting to get this right
I am beginning to wonder if the chuck rotary tool is better
Please share pictures. ![]()
Distortion can be challenging to Describe.
The Chuck type rotary is tooth-belt driven so it is less prone to slipping. They do not allow a tumbler to slip but they can still be heavy enough to need adjustments to acceleration.
Generally, tumblers slip on a roller rotary tool because accelerations for the tooth-belt driven engraver are much too high when applied to a roller rotary.
Recently I’ve been suggesting that folks cut the accelerations ($120, $121, $122) in half, and if the symptoms improve but don’t vanish cut them in half again.
I have a chuck style rotary. The up side is exactly what @JohnJohn mentions. However the down sides are at least 4, all of which can be overcome with some creative “tooling” or settings.
- the jaws are typically limited in terms of a maximum gripping diameter, inner or outer. I fixed this by making an inside ring for the larger tumblers, 100mm dia. or more. The inside (the tumbler mouth) ring has an inner diameter that the chuck jaws can expand into. I made the ring out of 5mm plywood, 2 copies, and glued them together to get a 10mm thick ring jig.
L- Yeti mug chuck ring jig.lbrn2 (53.3 KB) - the chuck axial center line is a fixed distance from the top of your laser bed. This can be a problem for larger diameter cylinders as well, and/or cylinders with a handle. (although I’d like to see a handle on a roller rotary
 ) The fix here is to either use a modified bed which has a cleared “well” area (the absence of a bed) below and in the axial direction in front of the chuck jaw, for a distance equal to or larger than your largest cylinder, or simply put some blocks under your chuck assembly raising it above the bed, but of course you may also need to similarly block/crib the legs of your Y rails.
 - the longer the cylinder in the chuck jaws, the more likely you’ll need to have a roller support or live spindle/axle support the far end of the cylinder opposite the chuck jaws.
- the larger the diameter of the cylinder, the less granularity you will have on angular intervals while Filling/Scanning/Rastering at 0 degrees (inline with the chuck axis). Basically, the issue is that although the rotary motor steps/degree don’t change, the mm/step of cylinder surface does; the larger the cylinder, the greater the mm/step. The fix here is to make a bigger laser dot by de-focusing and crank up the power to account for the laser hitting a larger surface area. Trial and error to tune it.
All in all, I like the chuck. Little to no limits.
I have both roller and chuck style rotary axis.
The roller style gathers dust on a shelf.
Chuck style used all the time.
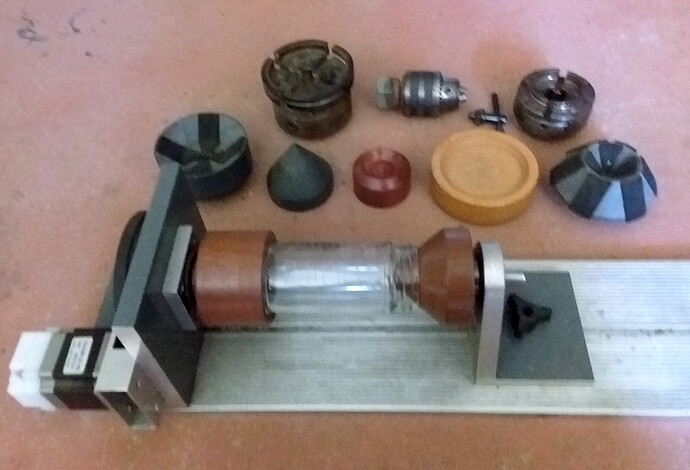
One thing to note is that I hardly ever use a chuck. Mostly cones or other style adaptors.
Fortunately I have the facilities to easily make adaptors as required.
Do you have a picture of the cone in action ? Sounds interesting.
Here is a pic that I posted a while ago in response to a similar request.