Rotary Attachment Printing Narrow

Hi everyone,

Sorry but here’s another rotary issue :expressionless: Laser specs below. I initially had issues with my rotary printing what should be a square to a rectangle and that concept applied to any other prints I sent to it for cylinder object on a chuck or hot dog rotary. I updated my firmware to .30 December 4th 2021 and everything was working great!
Got injured at the start of the year and have finally gotten around to getting back on the laser. Now it’s right back to the same issue I had initially. I tried rolling back firmware versions and Lightburn versions and combinations of them but still nothing.

I’m having the same issue again after having it resolved. Any thoughts or insight? I had hoped it was something in my PC and tried on my MacBook but I still have the same issue which leads me to believe it’s Ruida/laser related.

Specs
-1060 Co2 Laser 100W
-Ruida 6445G (EC) .30
-Windows 10 21H2 and MacBook Pro (Intel) w/Monterey
-Light burn 1.1.01

Thank you!

That shouldn’t be an issue if the rotary is configured properly.

Do you know steps/rotation ? Gear ratio?

These lasers are pretty generic, so some details would help.

What kind of rotary, it’s nice to have a link, so we can look at it. Wheel or Chuck… Sound like you have a couple…

Lets work with only one until it’s right.

I have a PiBurn wheeled rotary on a 50 watt China blue, 6442G. The rotary plugs into the Y axes.

:smile_cat:

@jkwilborn

One rotary is from Mansfiled Customs. https://www.mansfieldcustoms.com/product-page/co2-laser-rotary-attachment

The other is just a run of the mill chinese chuck rotary. Mansfield Customs has the steps noted at 4100 steps/rev. When I changed the steps in Lightburn’s rotary setup it seemed to not change anything. I found that when I turned the rotary off in Lightburn and changed my Y axis step length(um) to I want to say right around 10,000 it would work but I had to do all sorts of weird and crazy things to get the print just right. I would have to hook the rotary back up to confirm that 10,000 number.
The wheel rotary from Mansfield is the one I’d like to get working first. I am also plugging into the Y axis on my Ruida 6445G(EC).
I had both rotaries working great in December but when I started moving around again this year it’s back to having issues.

I have the same rotary. I use 5100-5300 steps. That’s the only way I can get anything to look good. The diameter settings seem to do nothing. I also use a stainless steel cup with painters tape to practice. I set the laser power to roughly 10 and it just etches the tape.

You need to check what your motor driver is set to and then apply the ratio and driving wheel diameter.

The motors themselves have to ‘work’ with the motor driver hardware.

With a ‘wheel’ rotary, it has no need to know circumference or diameter. Only a ‘chuck’ type requires the diameter to compute the ‘surface speed’.

With a wheel type rotary, once set, it should never need to be changed as none of the computations change.

I would save the machine configuration, and then one each for the other rotaries. You can just ‘load’ them as needed.

Here is my google drive copy of the PiBurn setup, which should be very similar to what you need. May be a good reference.

Page 11 is the setup…

Good luck

:smile_cat:

Sounds good. I’m currently set at 6400 steps/r on my driver for non-rotary-regular X/Y engraving. I should leave it the set that way or I need to change my driver dip switches to match as close as I can to the rotary device? I have tried setting my rotary settings in lightburn to 6400 in the past and it didn’t do anything for me.
I’ll be sure to check out that pdf after I get out of work for the day.

Hopefully the motor on the rotary are same way compatible with the driver.

We’ll assume they are for the moment.

For example my one rotation requires 2000 steps. The ration of the motor to the driving wheel is 2.5:1

2000 x 2.5 = 5000 steps, that what I set for steps/rotation.


The software needs to know the diameter of the ‘wheel’ which does not change.

This is why nothing changes with a wheeled rotary one the setup is correct.


You would take the 6400 steps x the ‘ratio’… All that’s left is the wheel diameter…

Make sense?

Good luck

:smile_cat:

Alright so…

In everything I have done tonight trying to figure it out, the only thing that I have seen any improvement in is this…

The actual roller diameter is 42mm including the rubber ring around it.
I have my Steps per Rotation looking to be spot on at 2745.00 set in the rotary settings.
I changed my actual roller diameter from the 42mm down to 17.100mm and I am getting what looks to be a perfect square now. No more narrow or squished prints.

What am I missing? lol

Sounds like the gear ratio is not right


These machines work because we know the math to make them perform correctly. If you did the math correctly it should be very close. I had to nudge my wheel diameter from 63 to 64, but that was it.

This is what concerns me. The math works, something else is a problem… :frowning:

The wheel diameter ‘change’ tells me the computations for steps/rotation is most likely the culprit, at this point.

You fix was to use something other than the actual wheel diameter to make up for incorrect steps/rotation.


Normally the ratio is greater than one and looking at your machine the pulley is small from the motor to a larger drive wheel. Indicating that steps/rotation should be greater that that read off the driver board.

What is the ratio and where did you get it?

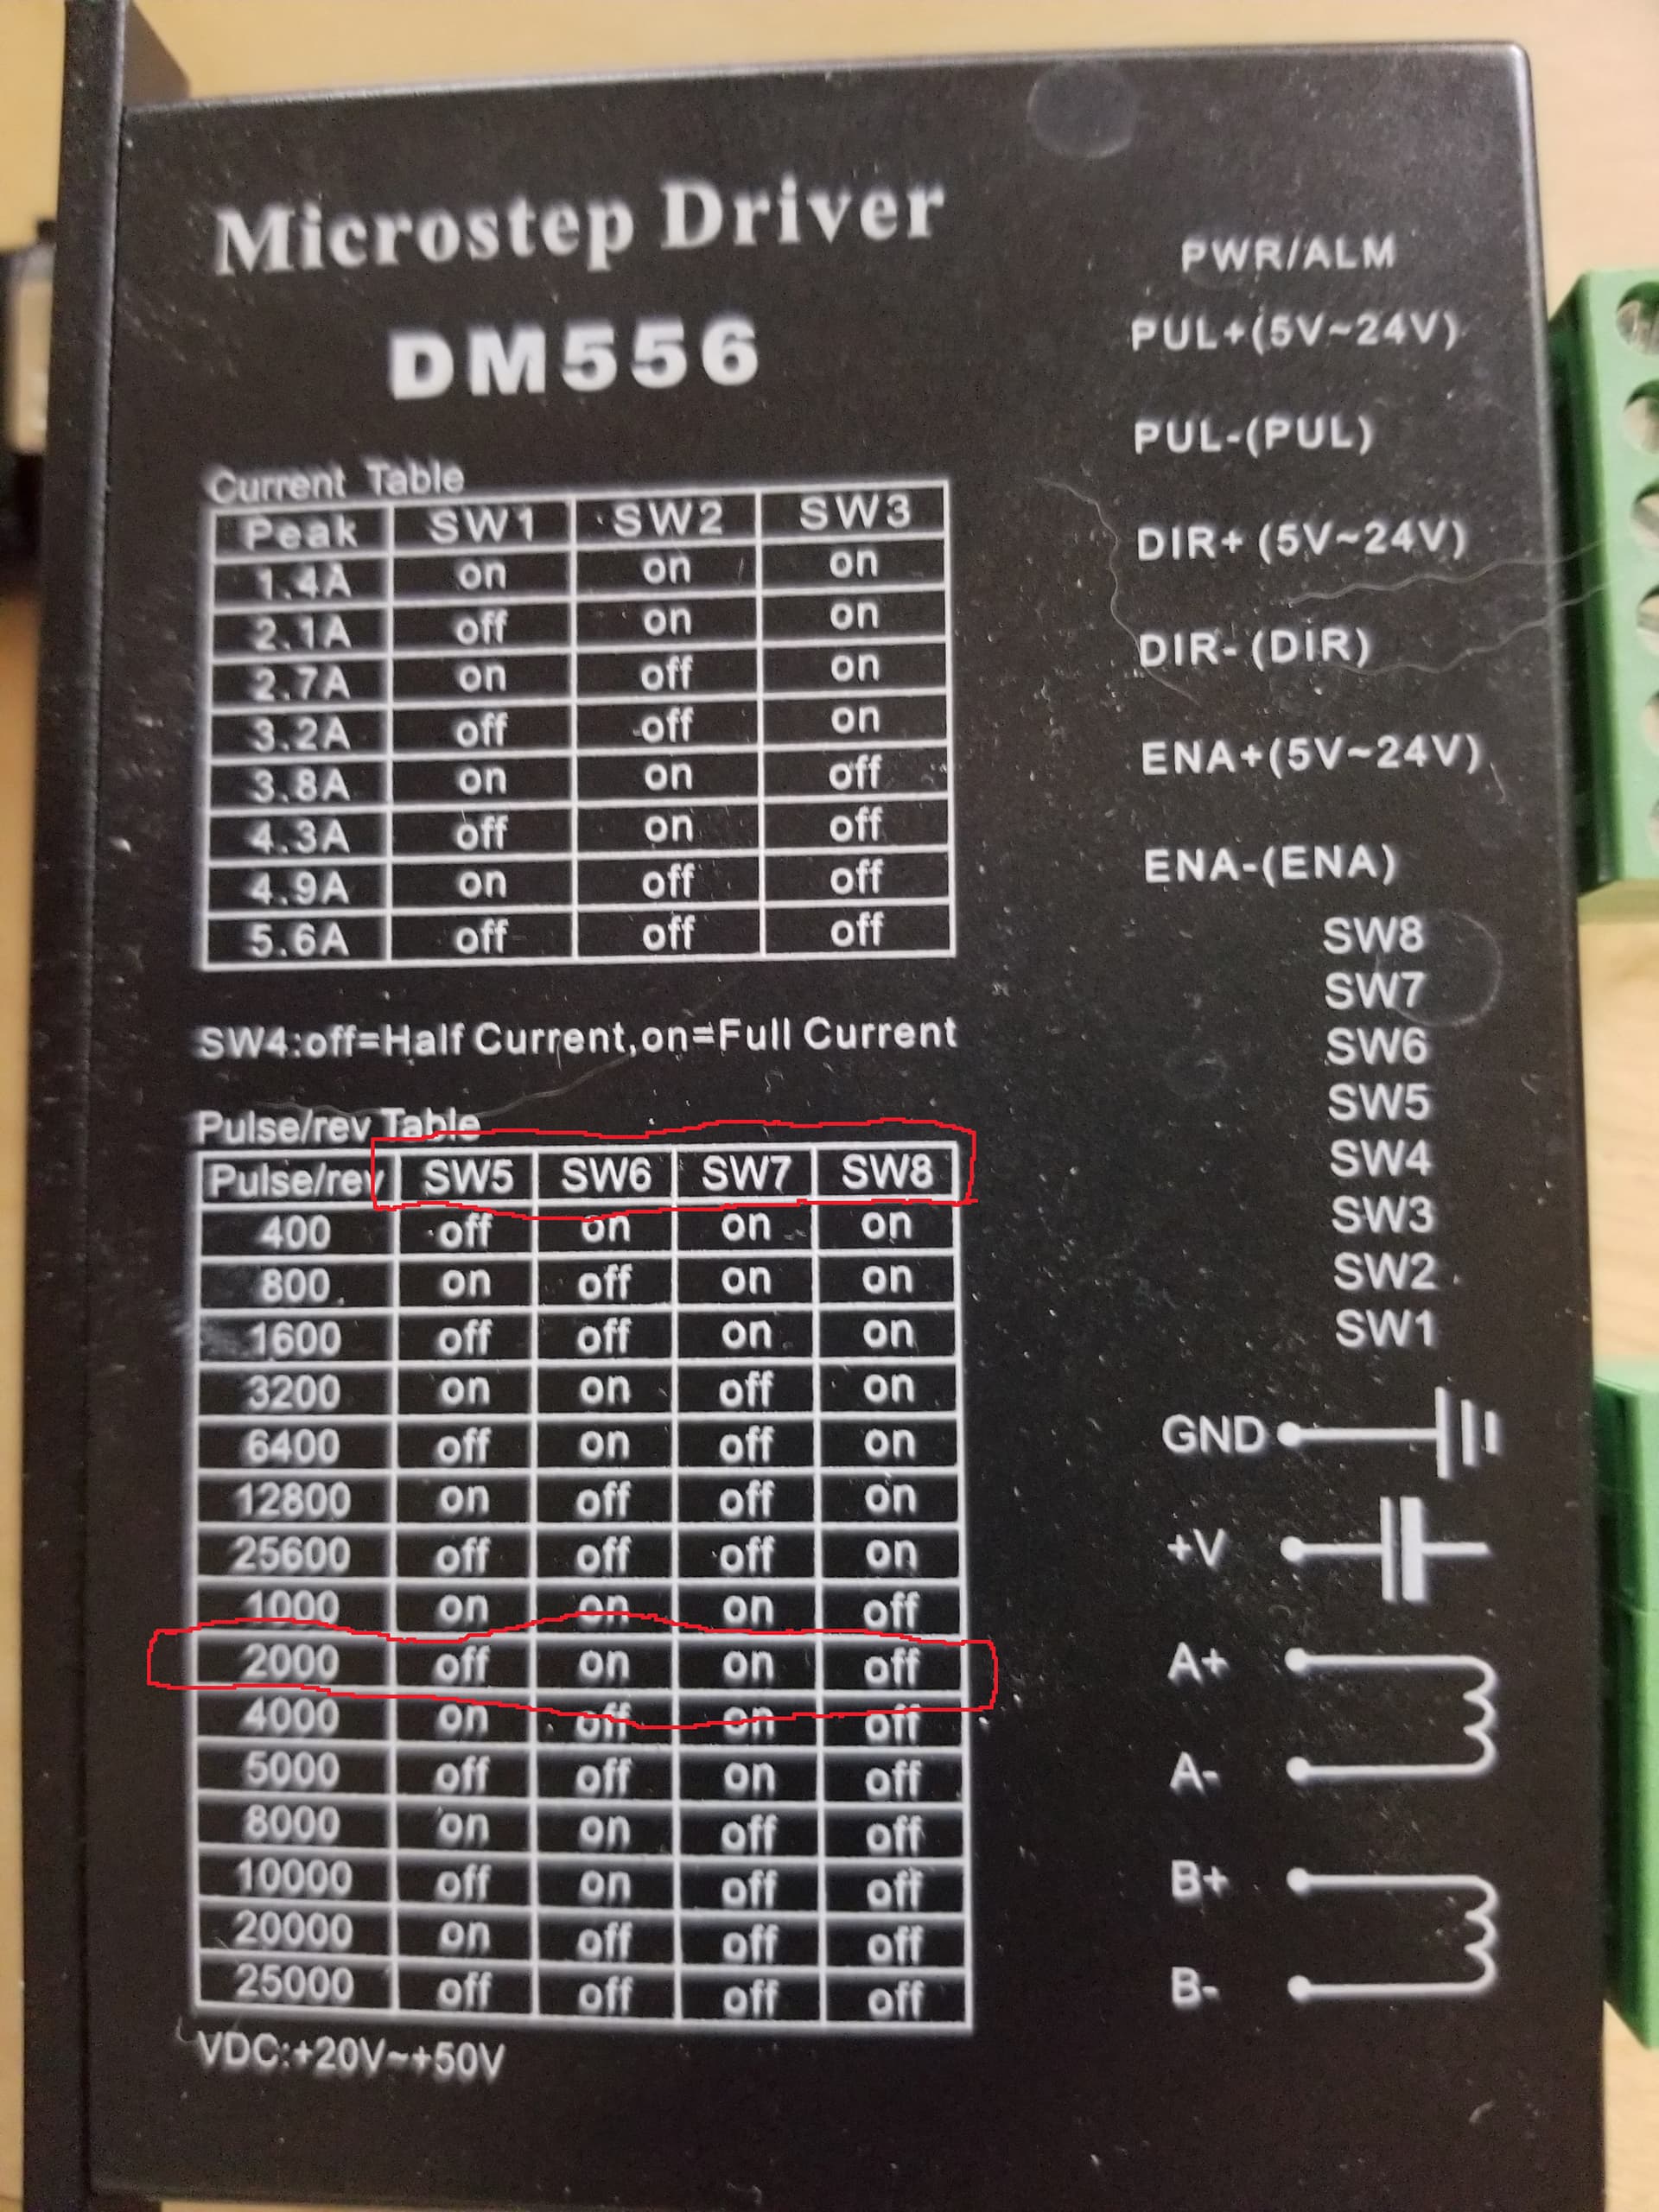
An example, my steps/rotation of the driver is 2000 steps/rotation of the dive motor with my ratio of 2.5, that results 5000 steps/rotation or a larger steps/rotation than the driver board settings.

In your setup, it’s going from 6400 motor driver to 2745 in the steps/rotation…?

If I had 6400 steps/rotation x 2.5 (gear ration) = 16000 steps/rotation.


A couple months past, someone had an issue and the rotary advised it needed a different type of driver for the rotary. They lucked out, it seems the original Y motors worked well with the new hardware. He had to replace the motor driver board.

You might ask… but we need to eliminate that issue by assuring the configuration is correct.

Did you get any kind of manual? I couldn’t find any documentation on the link you posted only how to buy the rotary…

You had this working before, what were the steps/rotation then and why did you change it?

Have you requested information about which type of driver that the motor for the rotary requires?
Might want to ask them, via email might take a couple of days. I’d advise them of the hardware driver you have currently. Hopefully this isn’t an issue, but we can’t fix this with software.

:smile_cat:

This topic was automatically closed 30 days after the last reply. New replies are no longer allowed.