Hi,
My machines is Nova 35. I try to set up rotary in Lightburn.
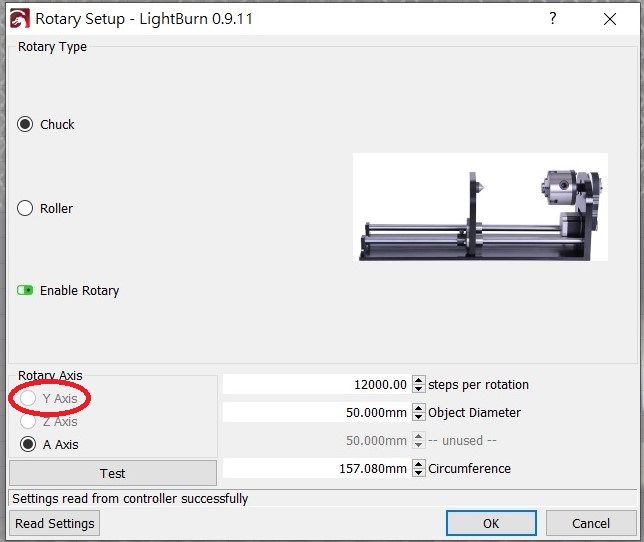
When I connect my Rotary Chuck (7 pin connector), I could not choose “Y Axis” in Rotary Axis section, the picture as below:
I read Lightburn Rotary Attachment Setup instruction (https://github.com/LightBurnSoftware/Documentation/blob/master/RotarySetup.md).
It mentioned that “If using a Ruida controller, disconnect the Y axis stepper connection and connect the rotary attachment to the Y axis.” But I do not know how to do it.
Anyone please tell me how to fix this problem, thank you.
If you are unsure how to disconnect the Y axis stepper connection, that may be part of the problem, but the system doesn’t really know that it’s a gantry stepper or a rotary stepper and should not restrict you in the manner shown.
To perform the wiring swap, power off the laser cutter. Don’t change stepper connections with power to the controllers. Look in your wiring bay for a connector that is hanging free or stuffed in a corner or raceway. It is the cable that runs to the bulkhead to connect to your rotary.
Find your y-axis stepper controller. It might have a marking that indicates it’s the y-axis, it might not. Match the connector hanging loose to the one on the controller, gently pull the existing one out and insert the previously-loose connector in its place.
When you power up the laser, the gantry should not move, but the rotary stepper should spin. It will be seeking the limit sensor. You can expedite the process by bringing a metal object near the y-axis sensor a couple of times, or you can wait until the seek times out.
I don’t think this aspect is related to the lack of selecting the Y axis in the software, but I could be wrong. I’ve been wrong before.
Thanks for your advice.
I follow your advice and check it but it is still not working.
Does the chuck spin when the laser is powered up and have you confirmed that the correct cable routes from the stepper controller to the rotary?
The Thunder Nova, with 7 pin connector, uses the U (A) axis for the rotary. You can’t change it because the software knows this.
Thank you, fred ungewitter. The rotary chuck is spinning (still choose A Axis only in Lightburn Rotary Setup) and it uses U axis in the machine control panel. Didn’t figure out why but its working.
But now there is a new issue. When I sent a file to the machine (Start From: current position; Job Origin: Center), it didn’t engrave on the right position.
I think I need a “step by step” teaching materials about rotary engraving 
Thanks for the information, OZ.