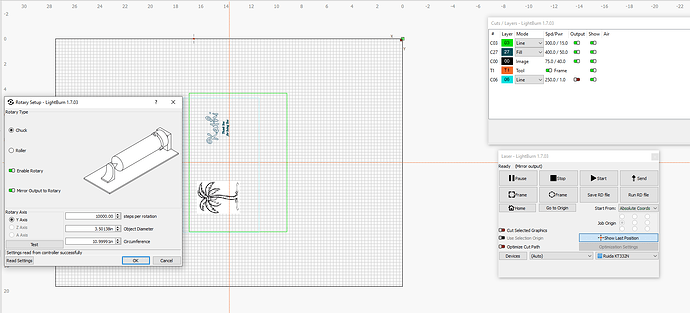
Hello, I am new to Omtech and Lightburn. I am trying to engrave a mug that has a handle. I have read through a lot of information, change several settings and all to no avail. On my old GCC system with Corel Draw I could set the handle just past center and have the engraving window just past the handle and stop just before it on the other side. It appears that Lightburn cannot so this but can be set to start with handle down and engrave left the right of center. The questions are now many. 1) supposedly I should have a centerline on the Lightburn screen, I do not (rotary is set). 2) Job origin is center left and start from user origin. This gets a 'XY Frame Oversize error. 3) I am quite at a loss at this point. I have tried other settings but everything I try seems to have the cup spinning around and starting where it wants, ok for a full cylinder, not so much with a handle. Any suggestions would be appreciated.
I think I can help you. Please post a screenshot of your entire Lightburn screen with your project loaded, the Cuts/Layers Panel and Laser Panel visible. Also post a photo of the rotary setup in your machine.
Her is the screen shot. I think tks
![]()
No its not… Will try again.
Got it this time. The orange line are markers I moved there.
First thing I want you to do is switch from absolute coords to user origin in the laser panel. Then set your job origin to either the top left or bottom left point. I don’t know which direction your rotary turns. I have mine set up with the top of the mug to the right, so you will need to test and see which one works. Use a cup without a handle for testing until you get it figured out.
Making that change will cause one of those corners of your green frame to be your origin point. (The green box that’s currently in the top right will move to one of the corners. That indicates your job origin). Make sure that box is smaller than the circumference of your mug so the laser doesn’t crash into the handle. Rotate your mug until the start position is just off your handle and the laser head is where you want it from the top of your mug, then set the origin point. That should get you going.
I see that you’re using a chuck rotary. I think a better workflow would be to set your job origin to left center point and position your handle straight down. Then set your origin accordingly.
Let me know if that helps you. It’s a lot to explain via the forum. I will try to make a quick video later. if you don’t understand my ramblings.
When I set the job to User Origin the green square goes completely away. If I try an run the job I get 'XY Frame Oversize. What you have explained makes sense but I cannot figure out how to set the Origin. tks
Delete the Guide lines and see if that brings the green square back into range.
Will removing the guidelines I zoomed way way out and the green square was way way out there. I moved it back and am making some progress. I will now try to set everything up and do a test. Closest I have been for two days now. Thank You very much. I will let you know how it goes shortly.
Well I think I am making some progress, but. I now have the green square that I can move the origin around the different positions of the outline size of my mug. However when sent to the laser the, the laser does not move to anywhere near the mug location, it starts at the far right of the X position… Question: There are two red squares in the upper right corner, I believe one is for where the laser starts according to the overall bed size (machine origin). The other I am not sure about but have somehow moved it and then when I hit machine origin it went back to the upper right corner. Question, where is the graphics I want to engrave to be placed on the screen to be where the laser is? tks
The red square with the small crosshairs is your laser position. You see that because you have show last position enabled. I rarely use that.
Did you set the origin with the laser in position over your mug? It sounds like you didn’t and the laser is calling the home position it’s origin.
I am guessing I don’t know how to set the laser origin. I have moved the laser head over the mug, Set start from to User Origin and moved the job origin to different positions. The laser always goes to the far right of the x position.
You have to do that from your machine control panel. Position the laser head and push the Origin button.
Ok, that has helped. Now back to making some progress.
I have success on a taped test mug. Thank You Very Much for your time and support…
You’re very welcome. Don’t be afraid to ask more questions. Keep on burning!
