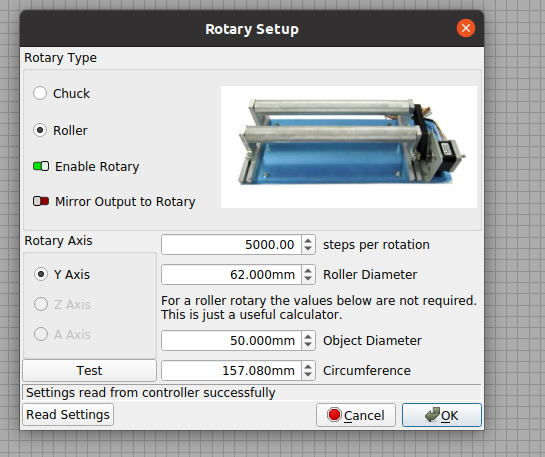
Since updating to ver 1.2.01 my rotary steps are way off. My steps for my chuck rotary were 360 and now it spins past the start point many times.
The diameter of my part is 24.6cm or 246mm. I have a line drawn 246mm high and it will not start, stop and return at the correct position
It was working flawlessly before the update and I haven’t changed anything!
60w yellow and black 6040 c02 with Ruida 644XG controller
Also, I notice that if I click Read Settings, it successfully reads the settings and changes the steps value to 10000. I’ve restarted the controller, lightburn, the computer, and nothing will change!
There is no way that on a Ruida controller your rotary steps were 360 per rotation. “360” is the default number in the LightBurn window when not connected to a laser, but as soon as the laser is connected and the settings are read from it, that value is replaced with what’s in the controller.
Are you using ‘Absolute Coords’ mode? You should use ‘Current Position’ mode when using the rotary, or it will first rewind to the origin, and since the rotary axis isn’t homed, it starts out at 10,000mm, which takes a long time to cover.
I know it worked flawlessly the last 5 times and then I updated the software. And I’m pretty sure 360 is what I had to change the steps to to get it to do a single full revolution afterwhich it was working right. Now it is doing a full rotation 8 times for a 246mm circumference. I’ve tried it on User, current and absolute.
So do I need to start at 10000 again and slowly adjust down from there?
I finally found a couple pictures I took when I finally got it dialed in a while back. One has the steps at 4100 and the other has the steps at 6000, not sure which would be correct. I am going to try one of those and see what happens….
That is very helpful and takes “guesswork” out of the equation. I tend to overthink things and end up making everything harder on myself. Thank you for this very helpful and easy to understand information!