Rotary Steps per revolution has changed?

Don’t normally post this, but I think you can handle it…

Ruida machine code


I’ve changed the values in the gui and the results show it must write them to the controller. When you change steps/rotation it’s immediately reflects on the device. I believe these are set within the Ruida, so it must write them back to the Ruida. This is especially true with the enable rotary button.

Machine isn’t powered up, so I can’t check… There is a section on the rotary in the machine settings. Check out the values and change the qui… if the value in the Ruida is changed… I guess you have your answer.

:smile_cat:

Just because the settings in the Machine Settings GUI may have changed, doesn’t mean they have actually been WRITTEN to the controller.

I have learned a long time ago that you first have to LOAD your settings and then must WRITE them to take effect. (IOW - Just LOADing the settings does nothing but bring them into the GUI). Please let me know if you think this is NOT true…

Because the drivers run in current-control mode, the winding current starts at whatever it was when the connector opens up. What does change, dramatically, is the winding voltage, which gets pushed skyward by the growing arc across the connector pins. Because

Ruida controllers use an undocumented binary command format, so you can’t hand them a snippet of G-Code.

You could add a simple switch to disconnect the stepper driver’s enable signal to disable the output, but remembering that might be even more difficult than doing the config file dance.

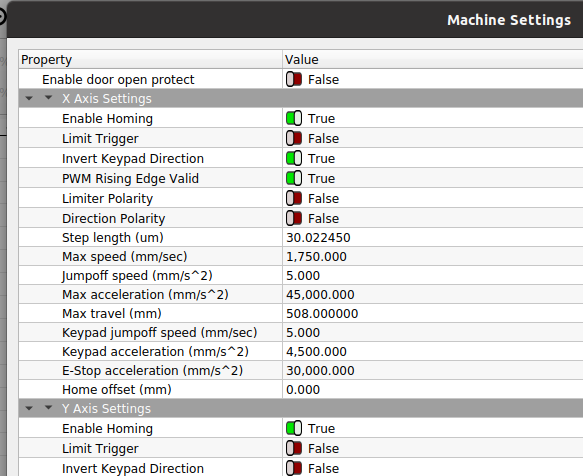
This surely depends on the specific controller, but on mine it’s the first entry in the axis settings:

Ruida axis home config

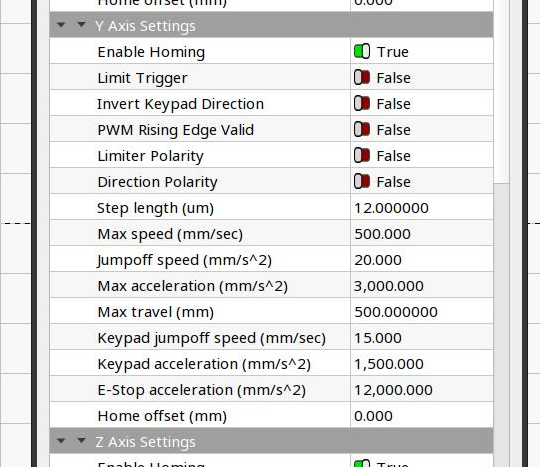
Shut that off and the Y axis does not home when the controller starts up again.

Now, to be fair, my config also has homing enabled for the U axis (which controls the platform motor for focusing) and that axis does not home at startup. Apparently, the word Enable does not always mean what I think it means. :frowning_man:

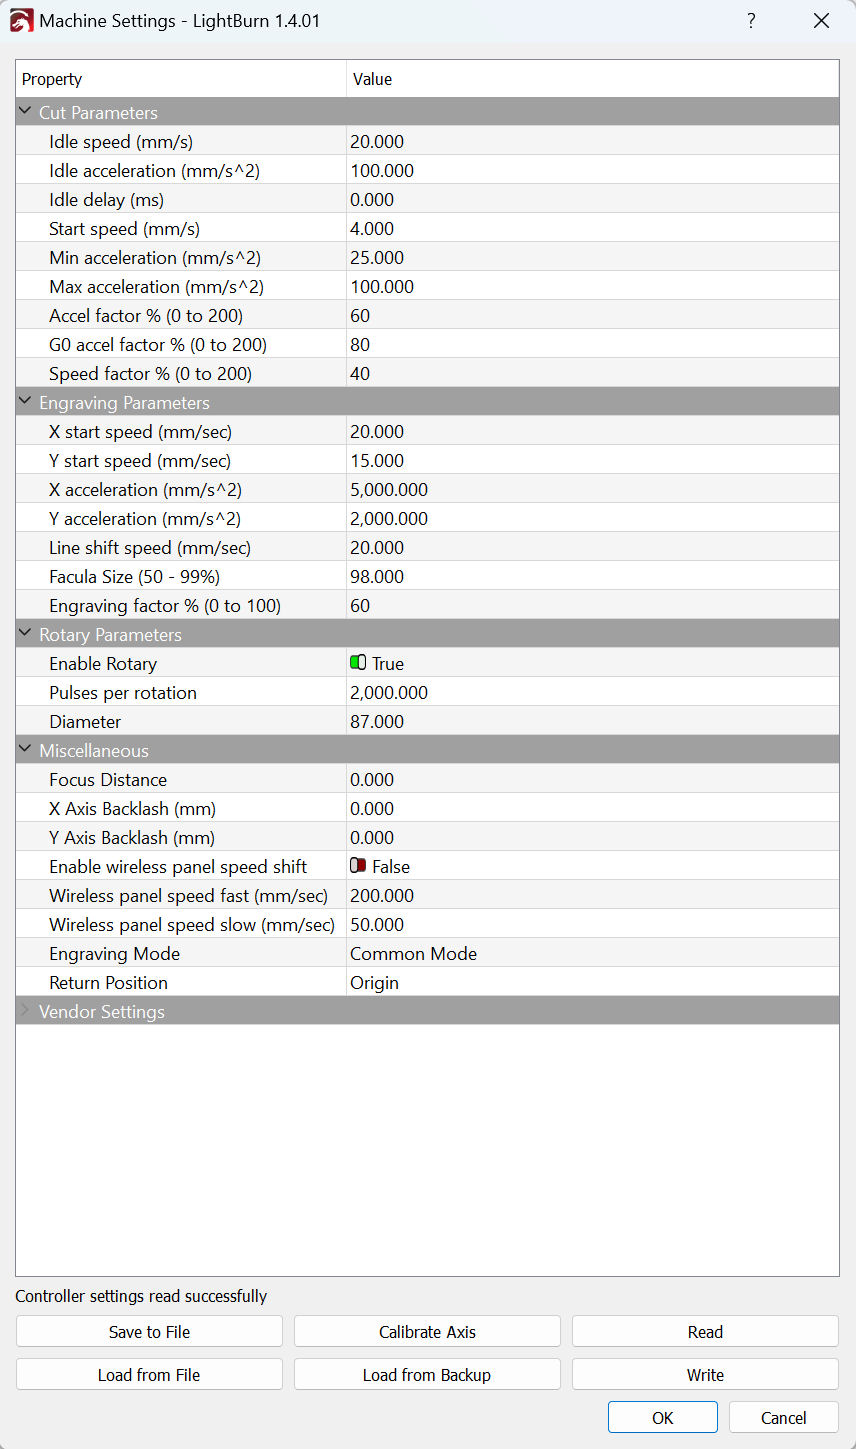
Terminology check: LightBurn loads from a config file, but reads from the controller. Similarly, it saves the config file, but writes to the controller.

With that in mind, some controller settings (not identified anywhere) require a power cycle to take effect, as the firmware apparently computes secondary values during startup and then never touches them again, even after you change the primary settings. IIRC, I ran headlong into this while fiddling with focus offsets.

Remember that you’re doing a lot of other stuff in addition to “just” twiddling the machine configuration, so pinning all your hopes on one step of the process may be leading you astray.

So far, we haven’t eliminated the impossible, so nearly anything could be the cause. :grin:

Yeah, but I’m doing all my testing in a very controlled sequence and documented fashion. I only do one thing at a time to see what THAT specific action might cause. I don’t do more than one test at a time. The machine was definitely behaving differently yesterday than the day before when following the same sequence of events. (Thats why I went into so much detail in one of my earlier posts). This isn’t my first rodeo…

I’m not “Pinning all my hopes on one {specific} step of the process” - I’m just trying to IDENTIFY a step in the process which makes the difference…

I don’t think you are trying to correct my LOAD/WRITE config terminology, right? What I did, and the terms I used, are exactly in agreement with your “Terminology Check”. There is nothing inaccurate about the terms I used and they correlate EXACTLY to what I did…

Thanks for the screen shot of your Machine Settings dialog. I don’t think I have a homing option for the Y-Axis on mine. (But I will re-check this). I don’t want to turn it off permanently (on the controller itself) cause it is useful most of the time (in linear mode). It would be particularly welcome if I had it available in my Machine Settings though…

I was making sure we all agreed on the terminology, because it seemed possible you expected a “load” to come from the controller. Glad to know we’re all in violent agreement!

That’s where having two different config files comes in handy: enable homing when it makes sense, disable it when it doesn’t.

I think the UI problem with rotaries comes from their collision with classic CNC machine usage. Laser users tend to regard a rotary as a trivial accessory, but CNC machines regard it as a different machine with a different configuration.

Yeah, and I’m OK with that (if its indeed possible with my controller). It’s just that I don’t want to have to be tweaking settings at both the physical controller panel AND Lightburn at the same time. If I can get it all done through the Lightburn settings then GREAT! If I have to go back and forth between the Ruida control panel and Lightburn then “not so much”…

I checked the machine settings, the rotary was set to 5000 steps/rotation, and the diameter of 50mm…

In the gui I changed it to 1000 steps/rotation and 40mm diameter and clicked OK.

When I then read the machine settings they have been changed.

Generally you are correct, having to write it back to the controller… the rotary gui does it if you press ok… If it didn’t modify the controller configuration, how could it enable the rotary?

:smile_cat:

As far as my controller goes, the Rotary does not need to be enabled, its simply plugged in place of the Linear Y-Axis.My rotary simply replaces the Y-Axis cable in its socket. My previous CO2 laser did the same thing. I don’t think its unusual…

I don’t actually have to enable anything to make my rotary “spin”. The rotation just won’t be scaled properly. For my machine, the only real effective “controller” parameter in the GUI (I believe) is the ability to swap the rotary steps/rev setting for the linear steps/mm. …and that is where this discussion actually began. :wink:

Additionally, I don’t believe the object diameter setting in the Rotary Dialog even makes it through to the controller. It’s likely just used internally by lightburn to convert a linear measurement (in the editor) to a properly scaled rotational movement for the stepper. IOW - Just used by Lightburn to calculate the needed steps of rotation to lay down a properly scaled flat image in the editor…

Why would the steps/rotation, diameter and enable/disable rotary be in the controller at all if it has no use for them?

:smile_cat:

Been following along, Interesting issue.
FWIW, I think the engineers that design microstep drivers would agree. And anecdotally we had a guy over on LMA that had one die same time he did it 2 or 3 times in one evening. May have been a coincidence, but who knows. The folks on the CNC zone say do not do it also. And there are about a million of those guys.

I don’t know if/what there is an argument about. I never stated that I suggest you hot swap them, in fact just the opposite. I just said I did. In fact I’ve always tried to add that you should power it down…

As far as @ednisley and I go, I think we mostly agree on things… just because I don’t heed all the warnings… I’m an adult and I pay for what I do… I also run my machine with most of the doors open… I’m not scared of it :crazy_face:

Do as I say, not as I do…

→ like my dad would tell me…

I’ve done this a couple hundred times or more, both Fiber and Ruida…I figure worst case I’ll lose a motor driver… $20 bucks…

Maybe I’m a bit more ruff on things…

:smile_cat:

Just because MY controller doesn’t need the “Enable” switch, others may… Some controllers have dedicated steppers just for rotaries. My Fiber and UV Galvos work this way. They have a dedicated rotary port. My CO2 does not.

Additionally, I expect LIGHTBURN needs to know when I’m using a rotary so LIGHTBURN can use the object DIAMETER to convert to a rotational value (using steps/rev and pi):

((Distance (in editor) / (Dia * 3.14159) ) * (Steps/Rev) = Steps required

Lightburn needs to know the object diameter so it can calculate the proper angular rotation of the chuck to produce a corresponding linear transition on the surface of the object. Different diameter objects will require different amounts of rotation to cover the same linear distance on their surface. If I don’t have the rotary option enabled, then Lightburn doesn’t need to do this extra calculation…

All my controller needs is the steps to move…

I agree. I just have to find a cold start method that does NOT try to home the Y-Axis (which is how my rotary is connected when in use)

I was going to put a 4 way switch on my rotary to temporarily disconnect so I could spin it by hand while framing. Data sheet advised against it “Do not install any means of disconnection between the driver and stepper motor”. Did it the right way and used the enable pins. 2DM556S

image

Just checked…

The “Machine Settings” Dialog for my CO2 (Ruida) do not offer a parameter to disable homing of ANY axis at Start Up.

I guess I need to research other options. I may have to go to the physical controller panel when “swapping my Y-Axis”. I was hoping to find some other way…

1 Like

What kind of controller do you have?

This is from my Machine settings and all axes can have the ability to enable/disable the home function …

image

:smile_cat:

Not on my Ruida RDC6442G-B. …and there is no way (I can find) to turn it off directly from the control panel on the laser either.

I just ran a startup test. I pre-loaded my Rotary “Machine Settings” (above) and shut the machine down. Then I attached the Rotary and restarted the machine.

The Rotary spun and spun and spun, eventually tried spinning some more at a slower speed, and then finally timed out. This process took about 3 minutes (est) instead of a normal start-up of about 15 seconds (inc homing).

Having “Enable Rotary” set in the Machine Settings doesn’t disable the homing operation at startup. I see no way to disable the start-up homing operation from the Ruida Controller Panel. I also see no way to temporarily disable the steppers (even from the Ruida Controller Panel).

It seems my only (safe) option (without hard wiring a switch to the “disable/enable” pin on the stepper driver) is to suffer the long startup and timeout with the Rotary Config loaded.

Stop the presses!

I found the Axis parameters after expanding the “Vendor Settings” on the Machine Settings Dialog (and behind a rather stern warning). That block was not pre-expanded like the rest. As such, I thought it was simply empty…

More testing follows…

2 Likes

Testing completed!

Once I found that I had to manually expand the “Vendor Settings”, and it was there where the axis configurations were located, I now had access to the “Enable Homing” options. Disabling homing (on both Axis) in my rotary settings now gives me a clean (and safe) way to plug in my rotary while cold and re-start. I did a couple of tests and the steps/rev is holding constant at 2000 (so far).

I am hoping that the deviation in the behavior I saw was instability due to hot plugging the Rotary. Time will tell…

Normally, I don’t go past “Beyond here be Dragons” warnings unless I’m very comfortable in doing so. As the screen captures folks posted don’t indicate where those settings might actually be buried, I just assumed that everything was being displayed as I looked at it. (Yes, I see the “>” and “V” now…). Not to be ungracious for all the attention and help, but it might be good to mention to expand the Vendor Settings and the subsequent Warning message before such parameters will be exposed. :wink:

But thanks everyone for all the attention to detail and thoughtful suggestions. I think I’m on to a viable solution!

1 Like