Ruida Z-move : still not working correctly

on previous (8.x) version of LB, Z-control was pretty unusable because it used absolute positioning and would not work without a focus sensor (will head-crash every time)

on 9.x, the “relative” Z move starts to be usable, BUT it seems somehow it botches with the material library.

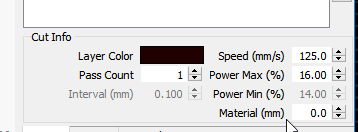
first test, i draw 3 circles of 3 different colors, assign the power from the same library element (which was cardboard 0.7mm), and set

  • first color with 2mm Z-offset
  • 2nd color with 4mm
  • 3rd color with 6mm.

as my “normal” focus is around 7mm from top surface to the bottom of the nozzle, i don’t take a risk… on last version i crashed the honeycomb in the head… i set my focus around 4cm to be sure to emergency stop the machine if z-axis goes crazy.

run, and so far, so good, the Z is moving, in the right direction, each circle is done with the offset ok.

BUT, after that, i try to use it in “real” condition, that is setting the focus height correctly for cutting.

and, it seems that whatever you input in the Z offset value, the height of the material is taken in account : i set the Z-offset at 0, do my focus, “origin” on the keypad, start my job.

and the first thing the machine does is moving the Z-axis!!! totally not what i want!

after that, at the end of the job, the Z-height is also not restored to its initial value. so, it is impossible to run many batches of the same job without doing the focus again and again.

i’m not sure, but i believe that somehow, the “height” of the material is taken in account and ADDED to the Z-offset.

the problem is that when you assign a cut setting from the library to the color, this value is never displayed. so, you have to somehow compensate for this.

real use case : i want to engrave a 2-color plastic and then cut.

i copy the setting from “plexiglas engrave” which has a height of -1 to the scan layer
i copy the setting from “3mm plexiglas cut” which has a height of 3 to the cut layer, and then change the power to reduce it (since my material is more like 1mm tall)

both layers have Z-offset = 0
i set my focus exactly (7mm below the head)

the job run, the scan is offset Z (probably around 1mm i guess), so the engrave is bad, and after that the cut is again Z-offset 3mm, and the cut is awful and totally burned.

the only way to prevent Z-move is to disable the Z-move option in the machine settings.

can we expect to have relative Z-move without any interaction with the material height saved in the library? obviously, i will do my focus ON the material, not on the empty table!

also, it seems very important to me that whatever the Z-moves are during the job, the table must be returned at its start position at the end of the job.

I think this might be your issue in its entirety, if I’m understanding correctly. Let me explain, and then you can tell me if I understand you, and if this could be it.

Ruida does not have a command to perform relative Z axis moves as far as I can find, so all Z moves have to be in absolute values, period.

Running with “Relative Z moves enabled” is a bit of a hack, intended to make this easier, but I haven’t explained it well. When you click the “Start” or “Send” button, the current Z height of your machine is read, and used instead of the “Material (mm)” setting as the base height for all other moves.

So, if I understand what you said above, you said “set the Z offset at 0, do my focus, origin on the keypad, start my job” - If you start the job by pressing start on the machine, it means you’re using whatever Z values were computed earlier, before you adjusted everything. You need to do all this adjustment first, then press Start or Send in LightBurn for it to get the correct starting Z height for the job.

Does that make sense? If that’s already what you’re doing then there’s something else happening, but if you’re sending the job to the machine, then adjusting the Z, and finally pressing start on the panel, you’re confusing the relative height calcs.

i might have been not clear, but the process is

  • setting the focus on the material (top of the material, not on the bare table), set the head X/Y at the intended start point.
  • hit “origin” on the machine (just for the sake of having a repeatable start point if necessary)
  • “start” the job from LB (start button with a triangle in the laser tab) (almost always i use “cut selected graphics” + “use selection origin”)

so, when LB starts, the focus is already done at the correct Z-height, and LB can read the Z before sending any instruction to the machine.

i don’t understand why/how the height of the material is accounted : this is only visible in the library, so if you assign the parameters of the cut to the color, you have basically no way to know what height will be used for Z-offset…

i’ll have to check if i used “relative moves only” option… but whatever the “intent” of this option is not clear.

at least, you could display the material height as a “reminder” in the laser power settings (if the settings is copied from the library)

maybe this is not the intended “use case”, but in my library i have many entries for marking/scanning with no material height, and entries for cutting with a height, and running scan + cut in one pass is expected to work without moving the Z axis unless this is explicitly required in the cut settings.

Material height is a global value, set here and visible at all times:
image

In the case of a Ruida system, that number is actually used as the starting Z value of the job, so it would be material thickness plus any focusing offset. In your case, if you are using a focus probe that zeros the Z, then zero in this material thickness should be the correct value to use as the starting height.

I apologize for the lack of clarity here - the Z control on Ruida is relatively new, and the limitations of the hardware make it more difficult for me to support it in the way that GCode systems work.

ok, somehow i totally missed the “material” zone, which is not displayed in the laser cut dialog window (where i was searching)

by the way, it seems that this value is actually the maximum of all layers. and there is only one value for all layers.

could you explain me the correct process to the following :

  • cutting, scanning and “marking”.
    for example, i have 3mm MDF (so a 3mm MDF material with “cut”), a “no thickness” MDF mark (= cut at low power), and a “no thickness MDF scan” in my library.

supposing i want to have perfect focus on the top of the material for cutting and scanning, and an offset of +1mm for “marking” (to allow for a larger stroke), what should i do?

obviously, the “material height” will be computed at 3mm, from the cut layer. will the head move +3mm at the start of the job? if i use “relatives moves only”, what will happen?

supposing both cut and scan layers are at Z-offset = 0, will they be treated the same, or the cut will be offset by 3mm (because of the material height?), and/or will the scan do the same?

does the “relative moves only” completely ignore the material height?

does each layer retain the material height from the library, even if not displayed?

can i work with at the same time the material thickness from the library (because it is convenient for sorting) AND the fact that i do the focus ON the material and not on the table? or should i always add -X as z-offset where X is the material height, to “trump” LB…