I’ve bought a Sculpfun S9 laser and would appreciate any assistance on power/speed settings from members using the same.
Any test cards for engraving and cutting on the different types and thicknesses would be a great help to start me on the right track
Thank you.
1 Like
Hey,
I also got a S9 since january and presets are not really helping.
Each wood, cardboard, etc behaves differently, also I use an air assist which influences these values as well as diode-lasers have some wear over time, so you need to adjust the presets at some point.
Long story short, you have to make your own presets.
Your best option is to use a test pattern, that you can keep for each material so you can get back to it, whenever needed.
Mine looks like this:
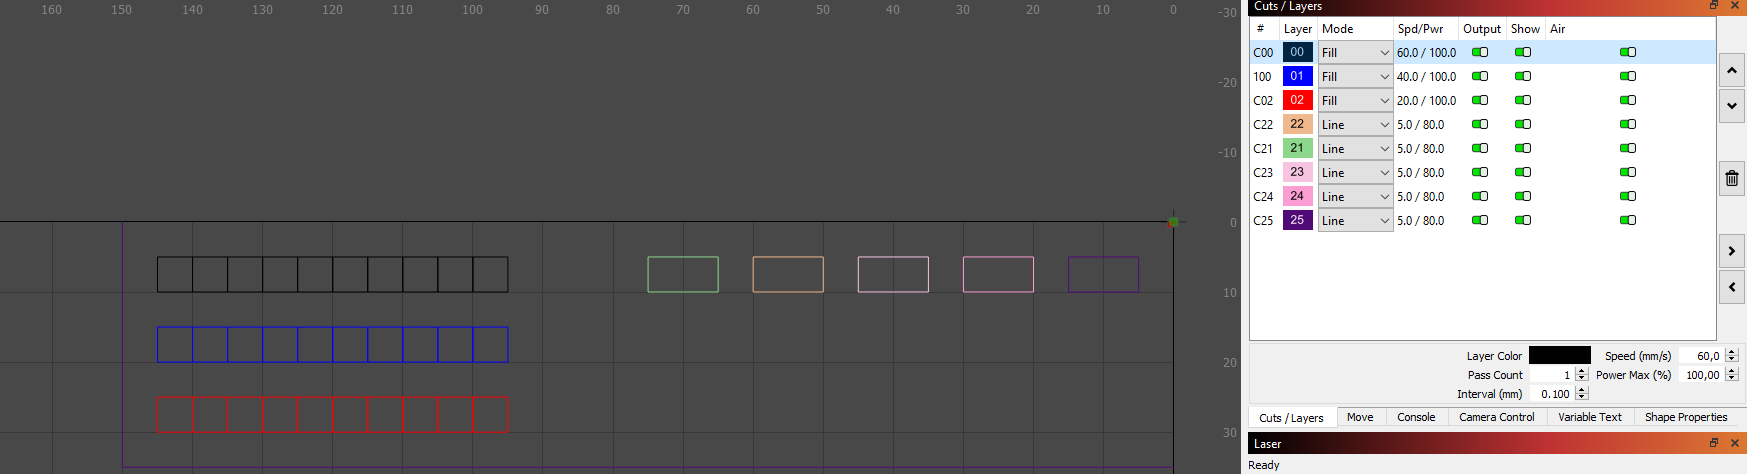
The 3 rows (black, blue, red) each consist of 10 5x5mm squares, where each square has its own “Power Scale” setting under “Shape Properties”. So starting from 10% to 100%.
The 3 rows just differ in speed 20, 40 and 60 mm/s.
This gives you a quite good representation on what speed/intensity you want to engrave, while still being very small and not wasting much material for tests.
The interval in the sceenshot is set to 0.1mm which is probably wrong and I’ll go with 0.2, until I can measure dot size / shape of the laser to correct it.
The right part is a cutting test at 5mm/s and 80%, but with increased pass count (1-5).
I can cut 3mm birch/mdf at ~4 passes and balsa at ~2 passes.
I’m not quite sure on what else should be part of the material test pattern yet, but there is probably something I m missing for now. Probably a small grey scale image and dot test would make sense.
Anyway, to get started and develop a “feeling” on values, this is a good starting point.
I still need to define
- tolerance when cutting precise parts to allow sliding or press-fit
- dot size / shape of the laser to precisely calculate dpi&speed for engraving images
Not sure if it makes sense to include in a material test or if it is the same for all materials.
If you happen to get some approx. values for those before me, I would love to hear them.
Sebi
1 Like
Thank you Sebi. I’ll setup a few tests for my machine.
I would highly recommend you to use a test card on every type of wood that you wanna engrave. every wood is different. Also make sure to always clean your laser lens after engraving or cutting with a q-tip and alcohol, because the smoke leaves stains on the lens which will reduce the power by time. Here’s the test card I use:
Since there are a lot of question on which settings to use with Sculpfun lasers, I collected some guidelines here: Settings guide - Diode Laser Wiki
2 Likes
Anyone knows what’s the max speed of the Sculpfun S9?
It depends on your definition of max speed ![]()
The factory default max is 6000 mm/min. From my experience, you nearly never can use that high speeds without sacrificing quality. For cutting, the speed range is 100-1000 mm/min, for engraving I recommend 1000-2500 mm/min. Depending on your time / quality requirements, you can go higher.
Of course, you can also set the maximum to 10,000 mm/min but I never tested if the mechanics can reach this speed…
1 Like
I have only done a few test engravings, but have noticed at speeds above 400mm/min I have a very pronounced wiggle in horizontal (x-axis) lines.
Any way to fix this?
You can try to reduce the acceleration of the x-axis to reduce the effect. You can also try to tighten the belts and wheels a little.
Of course, using the linear rail upgrade also helps a lot.
But as mentioned, usually, you should not go faster then 3000. Then you should be fine.
Appreciate the quick response.
I feel like that belt is about as tight as I can make it, I used pliers and I have experience from my 3D printer.
Like I said it looks really good up until about 450 mm a minute, then it has a very consistent wobble in the x-axis which makes me hesitate to think it’s an acceleration issue which I would expect to be inconsistent and greater near the beginning or end of a line. I will definitely play with those settings though.
Not sure I’m going to jump on linear rails unless I can find them cheaply. I bought this S9 because it was the first engraver I saw for under 300 bucks (my threshold for something that’s a toy/hobby item) that looked like it could do a decent job of cutting as well.
------------EDIT BELOW----------------
I found it for $50 shipped from the same place I bought the S9. I guess I would rather just have the kit then fiddle with settings all the time, especially when I barely ever have time for my hobbies to begin with.
Thanks again for the help.
True. Then it might be an issue with the wheels? Some minor defects which lead to distortion at high frequencies? Difficult to examine, I guess ![]()
In general, I’d say the S9 is a great tool for a start. And you have much room to enhance hardware and software on your own, because it uses mostly standard components. Next time, I’d suggest choosing the S30 5W, I think it’s also below 300 (at least below €300). That one includes the rail, limit switches and an air assist. But as mentioned, you can add all these manually at S9 as well. Here is a collection of things that I added to my S9: Laser Upgrades - Diode Laser Wiki (in the meantime, I switched to S10 and S30, but the S9 was nice as well).
I don’t want to hijack the topic, but as my question is about S9 and about settings… may be you can help me a bit…
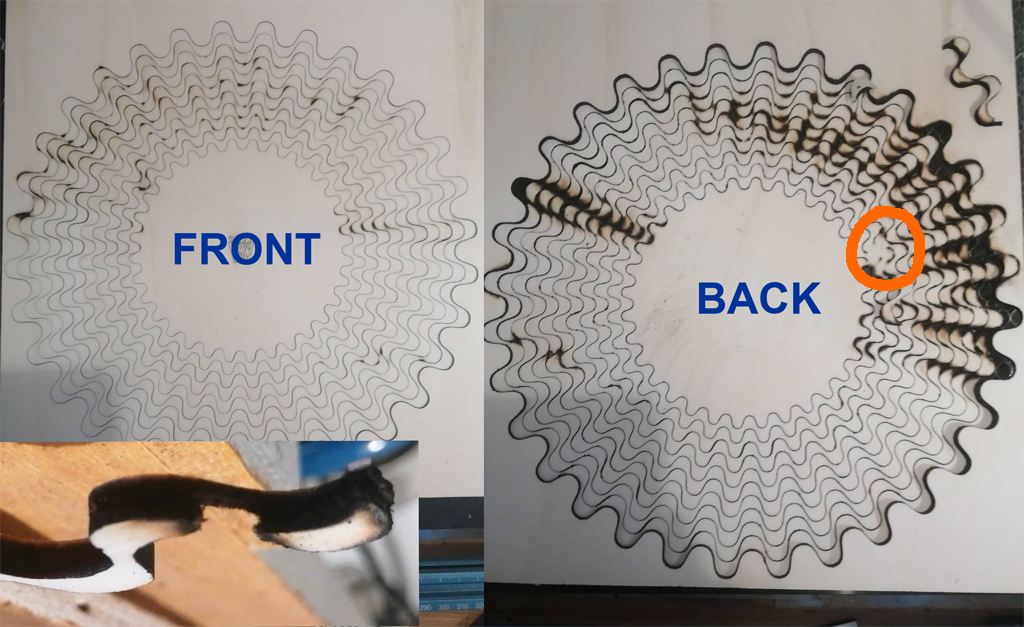
I bought some 4mm poplar ply (from a shop specializing in laser ply) to do some cutting. I used 3 passes with a speed of 100mm/minute @ 100% with air assist and the ply is laying on a honeycomb.
See attached photo. The top shows some minor issues, but the the back is a real mess. The inset bottom left is a detail, where you see that the middle layer is charred. So may be too much power / too slow? But then, in the red circle the laser doesn’t burn through the wood at all.
Any comment would be welcomed…
100 mm/min is far too slow. Additionally, it’s not recommended to use 100% power. Try 600 mm/min, 85% and see how many passes you need.
Next, raising the workpiece is also essential, use a honeycomb bed or some simple raisers if there is no bed available yet. See this guide:
There are a lot of utube videos for that. My favorite is Asher DIY. He has some for first time users, such as me. He also gives free test cards to burn. Very helpful. Check his site out.