Equipment: Atomstack A5 20W, Win 10, current ver of LB, no air assist (yet)
I’ve tried to find the answer in other posts, but I haven’t been successful.
When I burn an image and find it’s settings were too light (image isn’t as visible as I want) I make some minor changes and try to re-burn it over the first run (so as to not waste yet another piece of material). Without moving anything, laser, work surface, etc., the image burns ~1mm higher in the Y axis. I’ve tried to reset the laser from the exact same point manually, then selecting “go to origin” and resetting power and starting the exact same way as the original burn. But it always starts the 2nd burn off in the Y axis. Note: my Aufero Lu2-2 unit has never had this type of issue.
Assume your speed settings are not too high but does this change with slower speeds?
Do you have this problem with a 2-pass cut layer?
Do you have the laser head going to a set position after the job finishes? If so, try disabling that in Device Settings. Then try running the same job back to back. Does the problem occur still then?
Thx for the response last nite. Sorry for the delayed reply, I’ve been running, and re-running…, tests most of the day.
1 - checked and re-checked belts, pulleys, etc. All seemed properly set.
2 - ran tests today at various speeds (1000-2500 mm/m) with no variations between speeds (i.e., Y axis off at 2500 but not 2000) all test patterns were the same
3 - if the object is set to make multiple passes in the same run, there is no shift; only when the program has run and gets re-run afterwards.
4 - I tried various options here. I had originally set it to go to X:0/Y:0, but randomly it failed to make a precise stop at 0/0, rather it went to 0/1. If I manually adjusted the position (when noticed, oops) it ran further tests properly aligned. However, wanting to try to resolve this, I cleared all location settings (origin, finish, etc) and tried various end points: a) stop at the exact end of the run or b) shift to a position well away from the immediate work area (X: 250 Y: 200). Results were almost identical to the original tests, as in the laser would randomly finish off in the Y by -1mm.
During all checks I noticed I was getting “wobble” in the X axis, so I adjusted the pulleys, again.
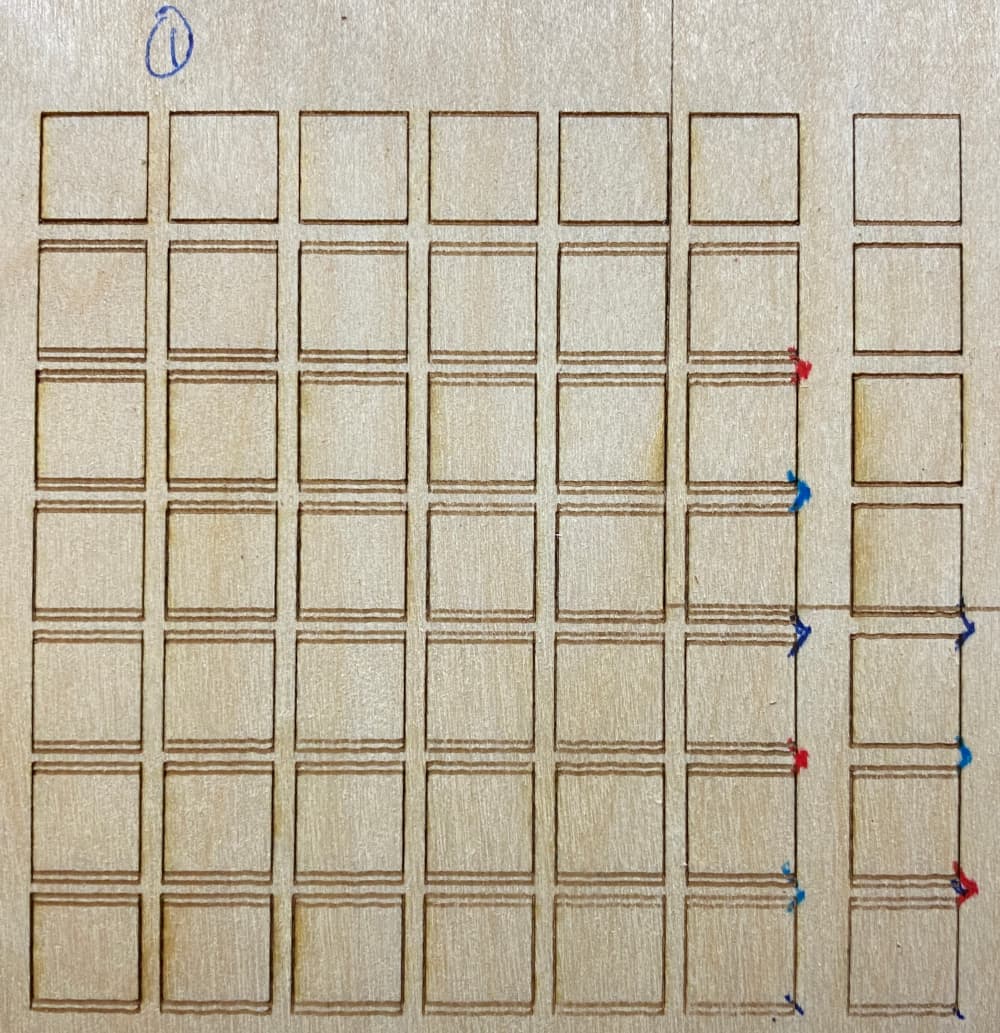
(bottom to top speeds are 2500-1000 in 250 increments)
710 was the first batch of tests, the Y offset is very obvious. The colored marks reflect the different runs
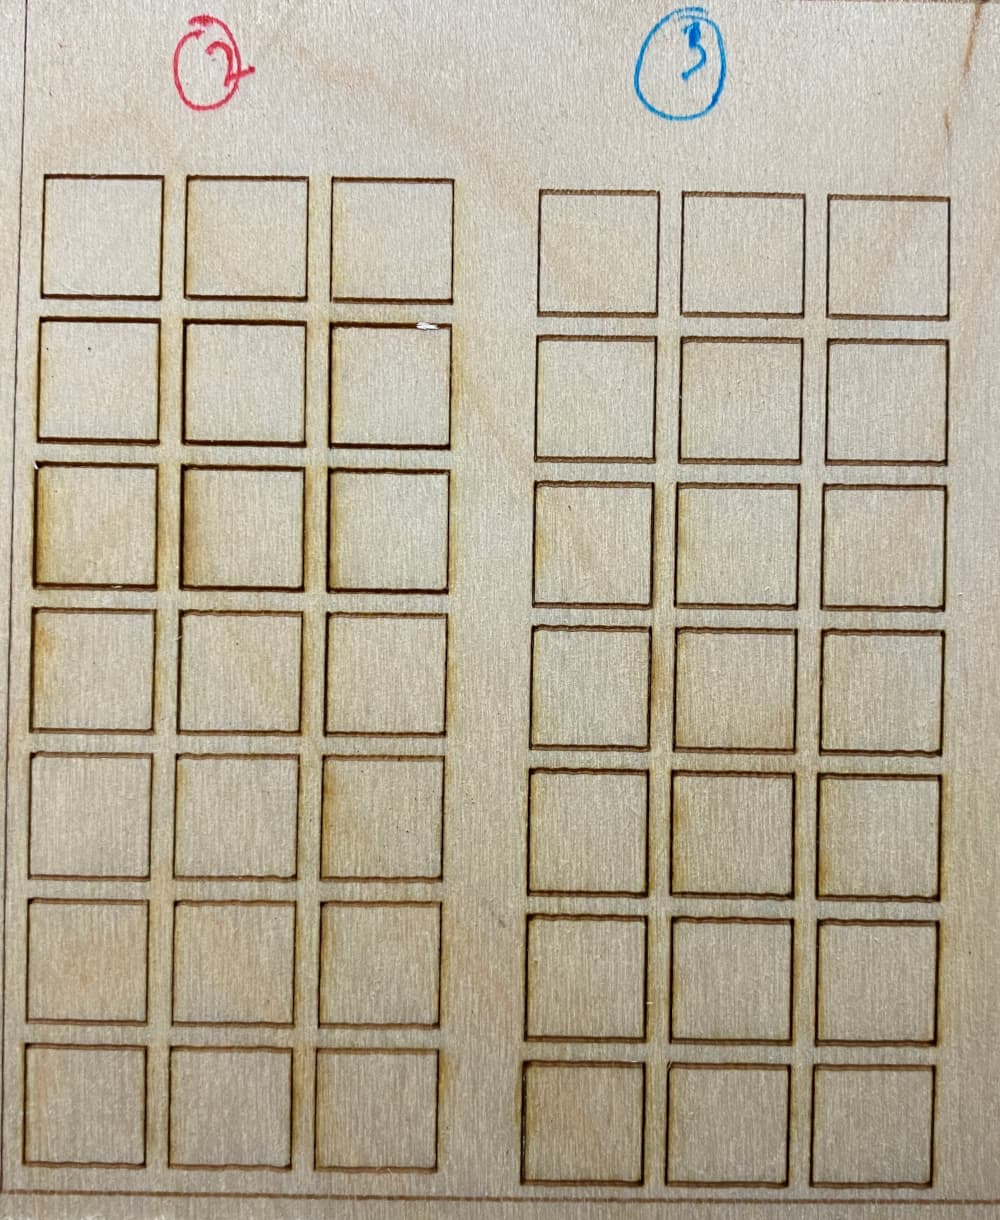
711 (2) the laser repositioned to 0/1 and all successive tests were aligned properly; (3) I manually adjusted the position to 0/0, then changed the end point to X:250/Y:200, all tests aligned properly (note the Y difference)
I guess the end result is that I need to be more aware of exactly where the laser if before re-starting a project over the existing image so as to avoid the Y offset.
I suspect your X wobble is due to one of the following:
improper tension in the wheels of the gantry where there’s a gap between your sheels and the railing
your wheels are attached at an angle
you have a distorted wheel
There’s some debris along the rail that’s interfering with the wheel.
I suspect the first since it’s gradually getting worse.
I find this point interesting. This tells me that you’re losing steps either at idle or due to some other movement of the laser head between jobs.
Are you saying the reported position would be 0,1 even after requesting 0,0? Or you somehow determined that it was 0,1 in some other way? If the former, that means the machine is keeping track of steps but is somehow drifting. Is it possible that you are overtensioned on the Y? Either the belts or the wheels. This could be causing binding and resultant missteps.
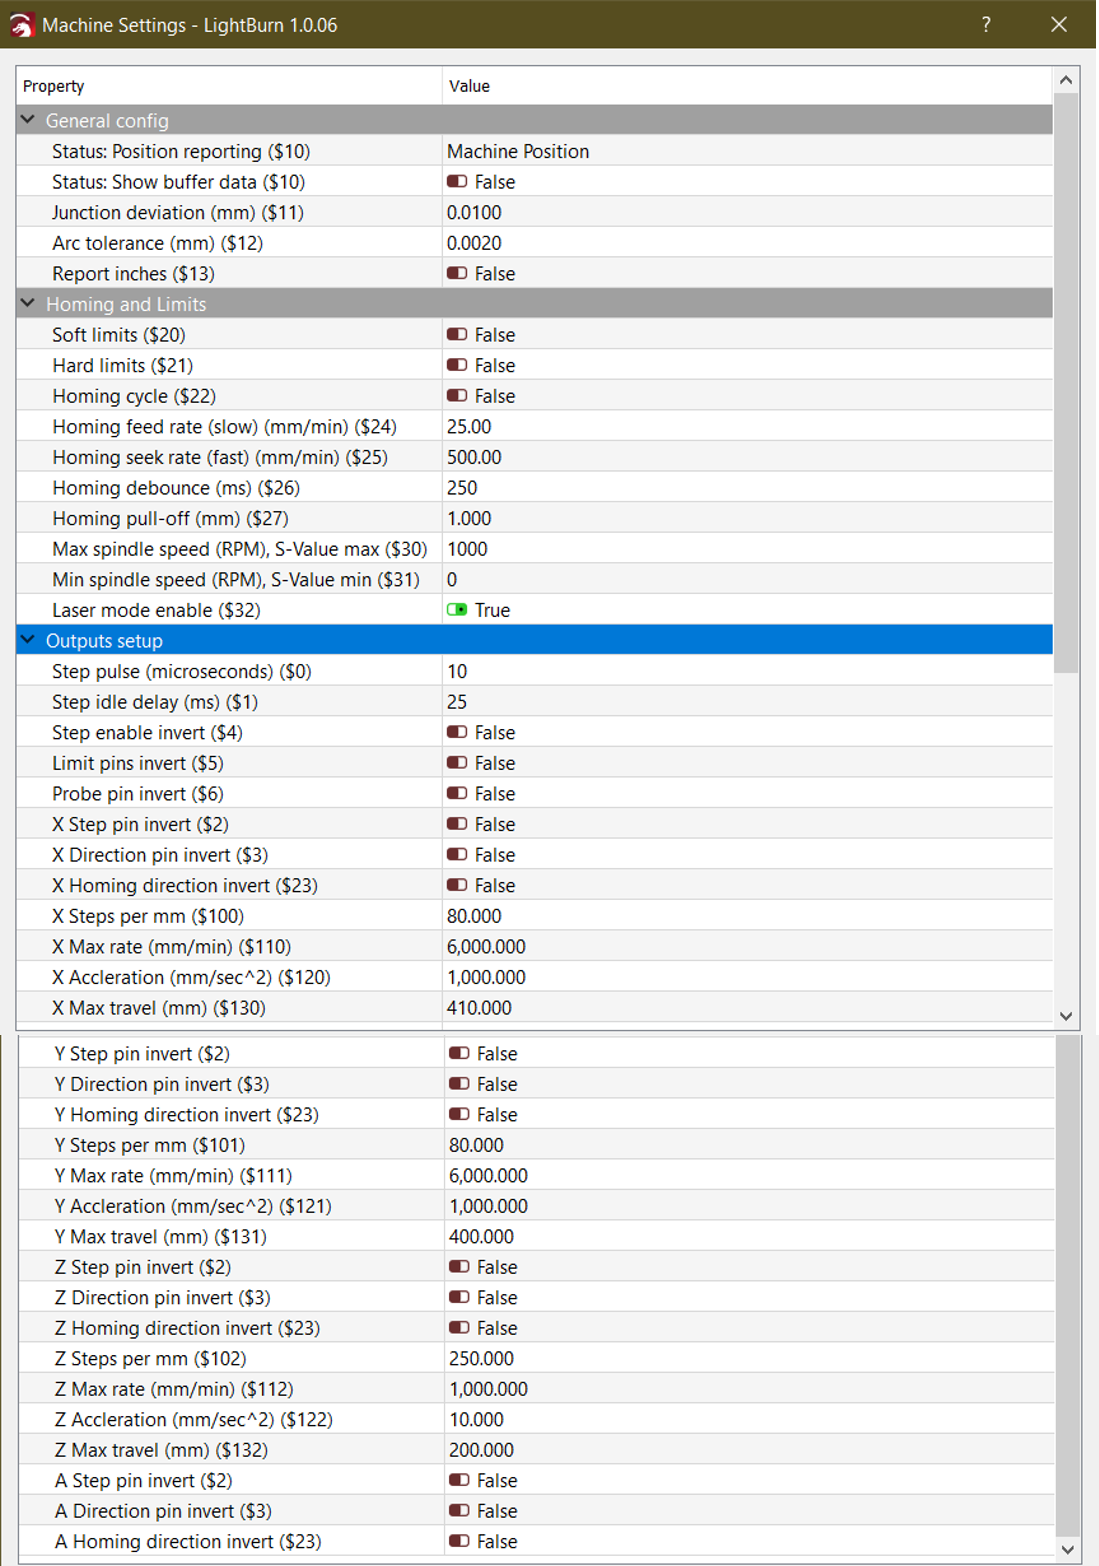
Also, can you check the value of $1 in your grbl settings? If this is too low your steppers could be relaxing too early and allowing ambient stress to shift position.
$1 - Step idle delay, milliseconds
Every time your steppers complete a motion and come to a stop, Grbl will delay disabling the steppers by this value. OR, you can always keep your axes enabled (powered so as to hold position) by setting this value to the maximum 255 milliseconds. Again, just to repeat, you can keep all axes always enabled by setting $1=255.
The stepper idle lock time is the time length Grbl will keep the steppers locked before disabling. Depending on the system, you can set this to zero and disable it. On others, you may need 25-50 milliseconds to make sure your axes come to a complete stop before disabling. This is to help account for machine motors that do not like to be left on for long periods of time without doing something. Also, keep in mind that some stepper drivers don’t remember which micro step they stopped on, so when you re-enable, you may witness some ‘lost’ steps due to this. In this case, just keep your steppers enabled via $1=255.
Having read many posts from people looking for assistance on various forums, I realize that if you ask an incoherent question, and respond to requests for better/more information in the same manner, you will get nothing good in response! Besides, 26yrs in the military taught me to be detailed…
Regarding the 0/0 vs 0/1…LB indicated the position was 0/0, but checking the Az/El scales, it seemed to be at 0/1. A small nudge corrected the condition.
I’m not sure how/where to read the $1 value. Do I need to run GRBL on the same computer for each laser?
This is actually disappointing but seemed more likely. It will be difficult for you to try to correct for this each time though, especially to sub mm precision.
The actual GRBL settings are stored on the controller. So you will need to have the laser connected to your computer to be able to read this setting. Whatever laser is plugged in and connected (make sure you’re on the right port for that laser) is the one you’ll be querying.
You can read this in 2 ways:
Edit->Machine Settings->Read
Type $$ followed by the Enter key into the entry field in the Console window. This will list all GRBL configurations by number.
So I ran a new set of baseline tests before making the adjustment as suggested.
Origin = 0,0
Finish = 250,200
Test pass output:
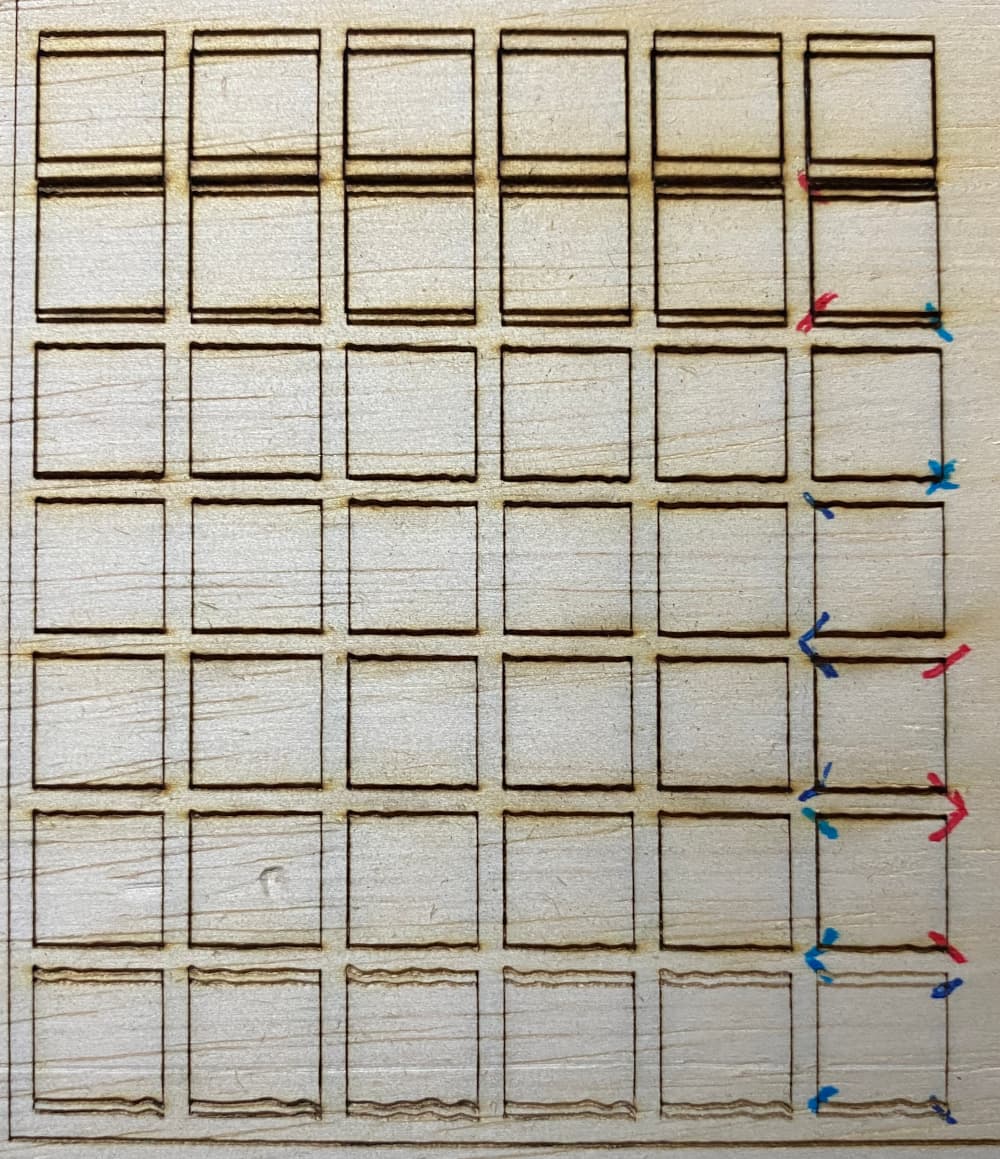
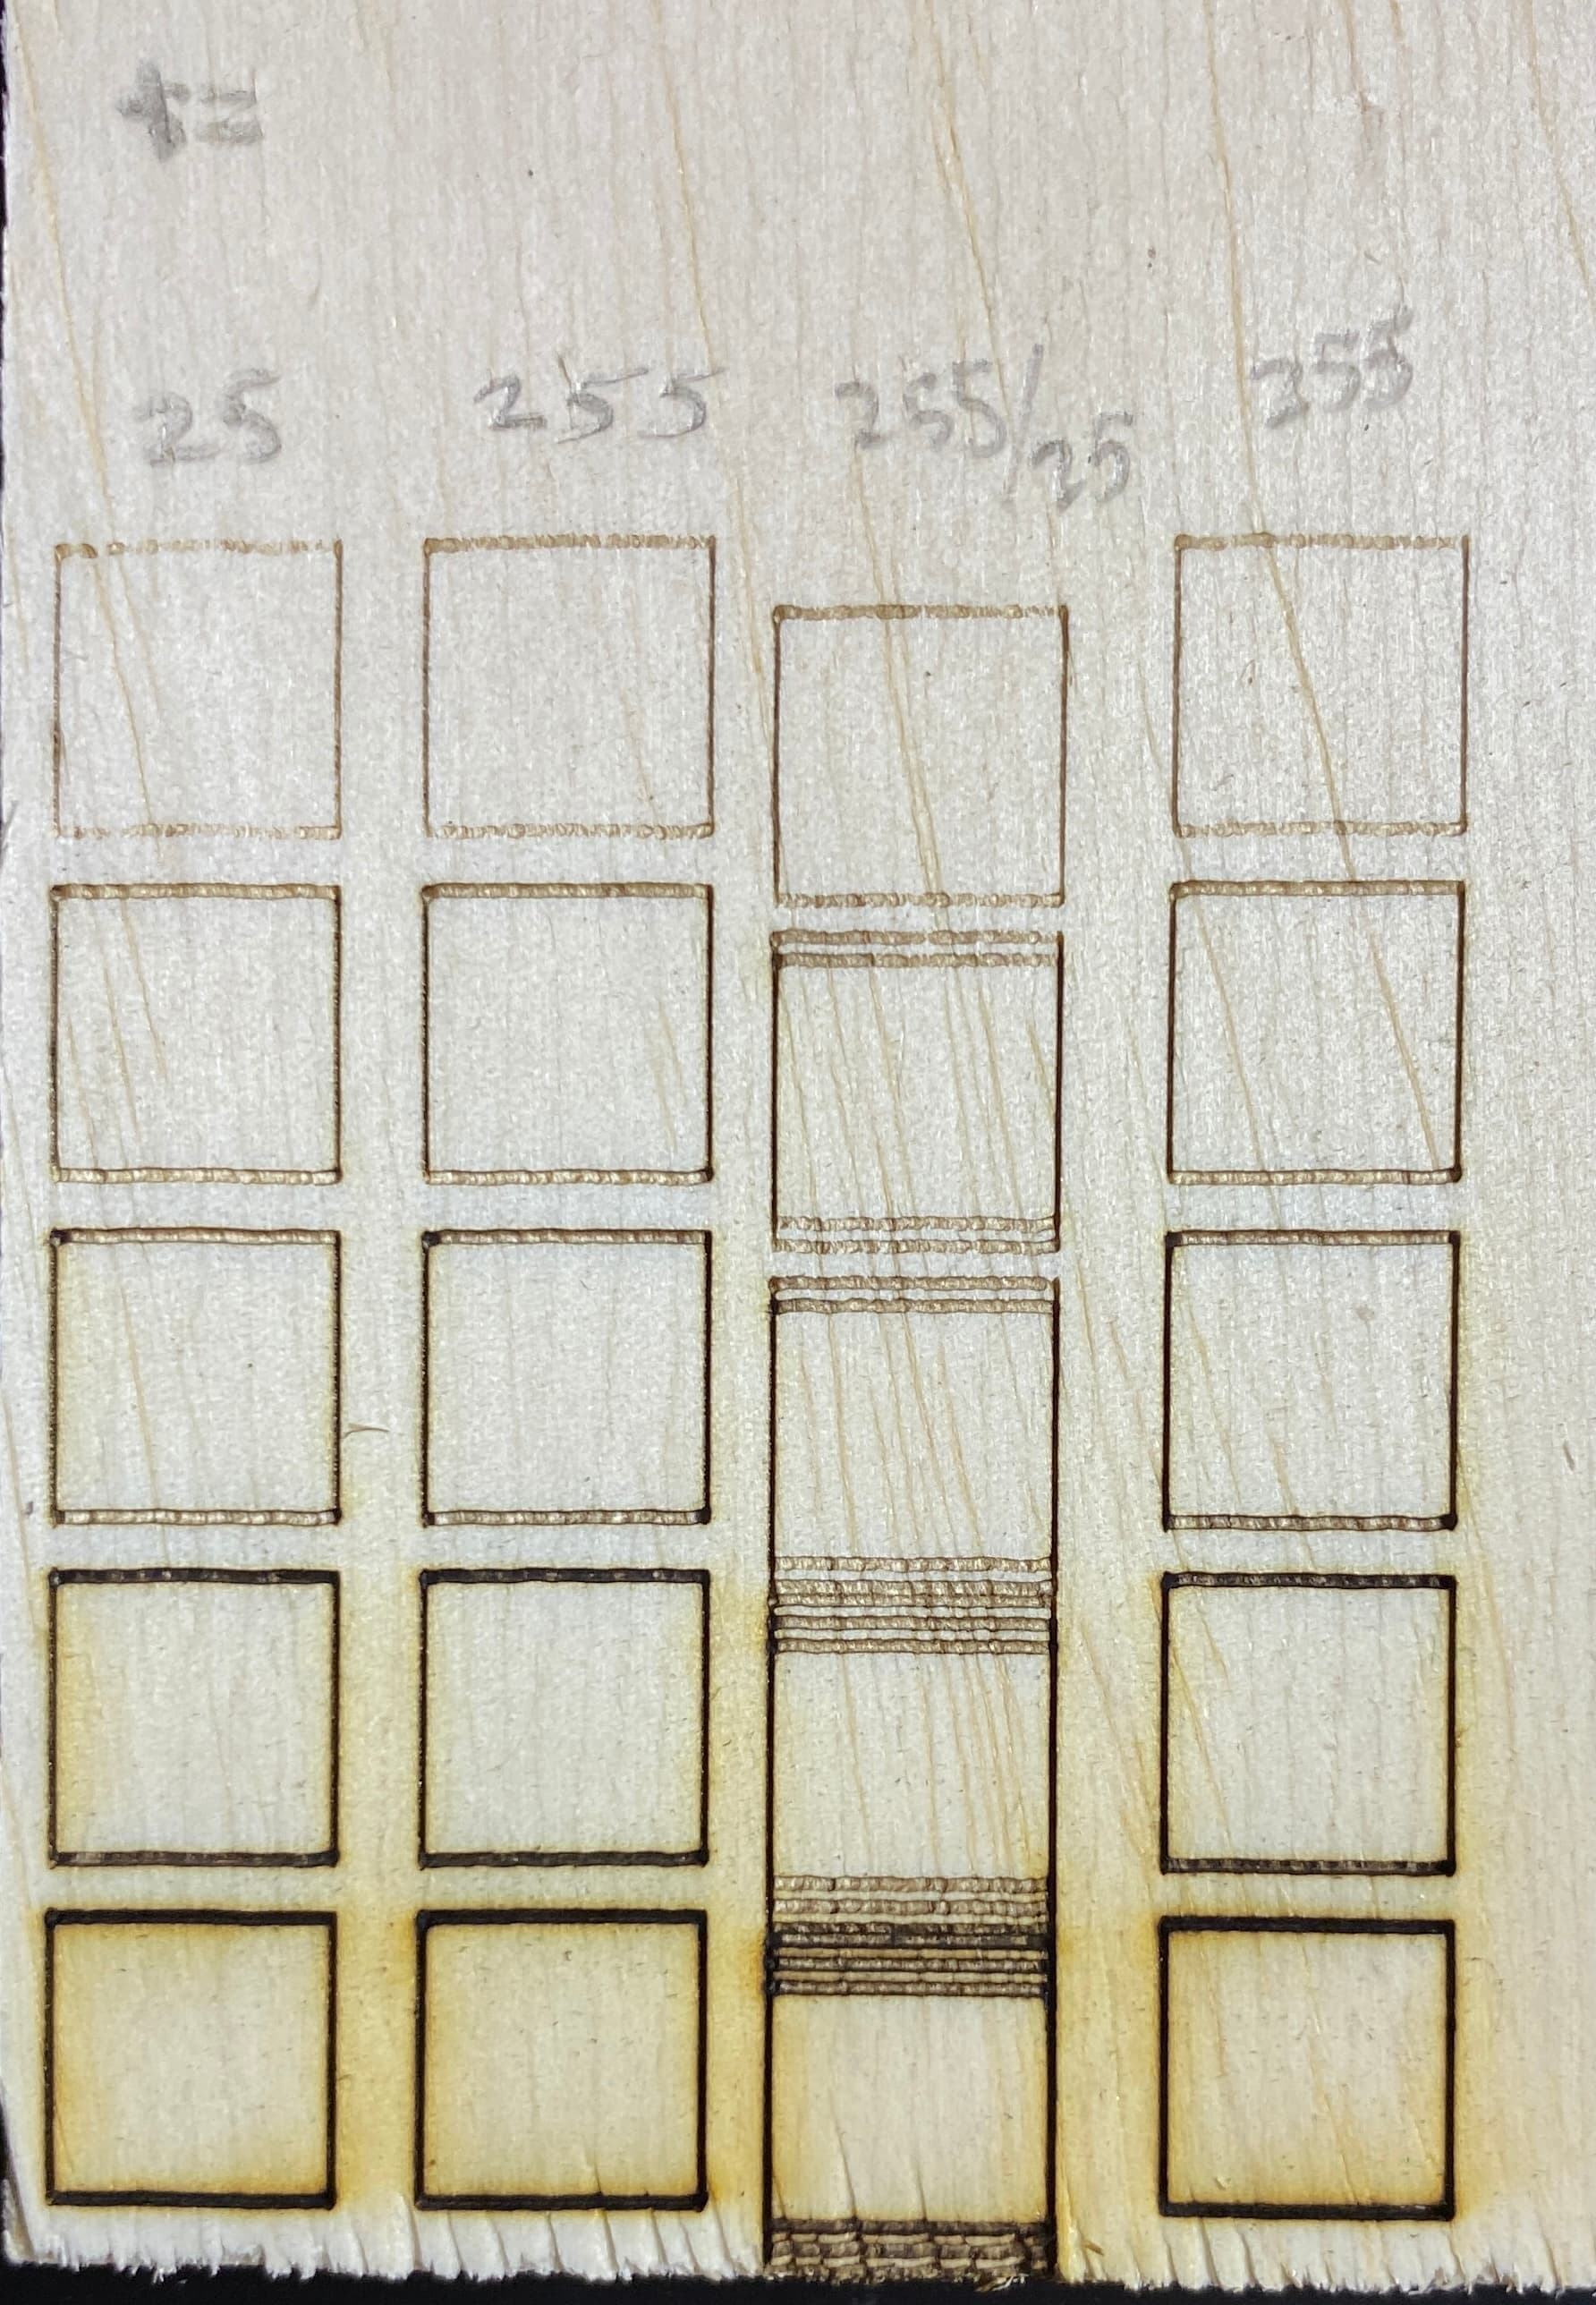
Bottom to top mm/m: 1000/1500/2000/2500/3000; Run 1 1000, run 2 1000/1500, run 3 1000/1500/2000, etc.
In the pic: (ignore the pencil marks) Column 1 was run starting at “origin” and default Atomstack setting of $1=25, and finishing the job as configured. As before, I checked the end position (all finished as configured), then selected “go to origin” before starting the next pass. Column 2 was run starting at “finish” and setting of $1=255, and finishing the job as configured. As before, I checked the end position (all finished as configured), then starting the next pass. Column 3 was run starting at “finish” and default Atomstack setting of $1=25, and finishing the job as configured. As before, I checked the end position (each pass was off progressively by ~-1mm, thus the visible differentiation) Column 4 was run again at the same settings as Column 2, just to validate the outcome.
So it seems that either a) setting $1 = 255 (every startup, since as you say the changes aren’t permanent) or b) verifying that I start every project, regardless of original pass or a successive pass, at 0,0 (which is probably what I should have done from the start, rather than relying on the “smart” equipment to know it was correct)
Thanx again for the help. It def helped me learn more about the equipment.
So it seems to me that you have something mechanical going on… I’m guessing something under tension. Or maybe your laser surface is extremely out of plumb. But something is likely forcing a slight movement when the steppers are not actively resisting.
You said you checked belt tension correct and you’re not overtensioned? You normally should be able to count on the controller knowing the proper position to within the microstep of your stepper. It’s the beauty of numeric control. But this relies on being able to account for all movement and steps.
Are you able to very freely move the head of the laser around all corners of the machine? It should be nearly effortless when the motors are not powered. You should also not have a lot of backlash. If not, looking for any mechanical causes.