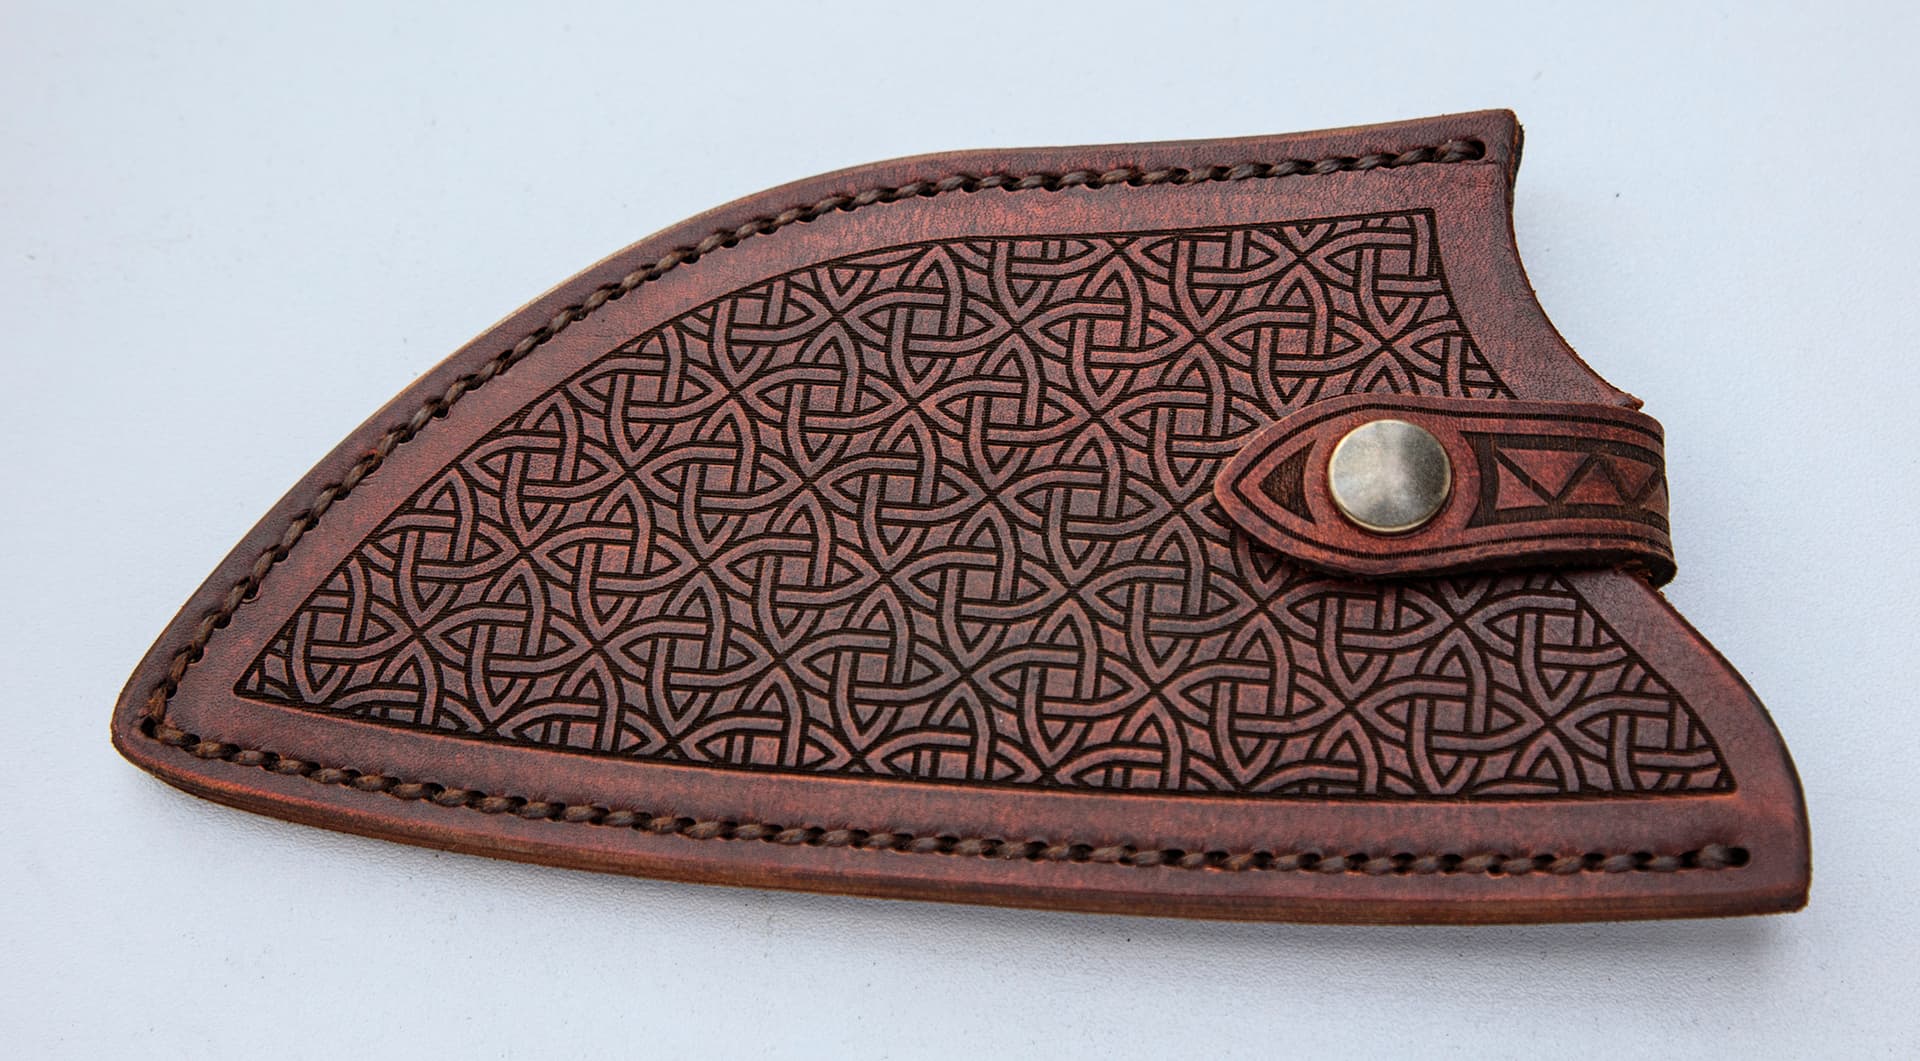
I am a knifemaker and i make custom knives of all kind. Most customers also want a custom sheath. There’s is were a laser and lightburn are time savers. While the sheath is been cut i have time to work/ finish the blades. All i need afterwards is to sow the parts together and color dye the leather. This is a sheath for a Serbian cleaver knife…its a sharp blade to cut food and meat.
14 Likes
I love to do leather work with my laser cutter too. I really like the knot design on this, would love to see a screenshot of your work on LightBurn. Any recommendations for attaching the pop-clip? I’ve found mine don’t work so well, but then they were very cheap from eBay!
I love the engraving on the clasp too, it looks great… doesn’t LOOK laser cut at all, but like a craftsman did it by hand.
Thank you for sharing this.
1 Like
Hi , thanks for your comment. I cut all parts using the laser ( Atomstack X20) . I first draw the outline of the sheath using Nanocad( free cad software) using the knife shape( that i drew when designing the blade) as a guide. I than load the Cad file (saved as a DXF file) into lightburn. A hole for sewing i add as an object to a path…a few clics and all holes are in place. I mostly use free seamless vector patterns that can be found on the internet to be lasered in the leather. Once all layers ( power and speed is set) i burn one side of the sheath…than i flip the drawing in lightburn and laser cut the other side. The welt ( in between layers i also do in lightburn using an altered sheat side.
The leather clasp has 2 poppers…so the customer can be left or right handed when opening the clasp. I buy the more expensive poppers these days…i also had some problems with the cheaper stuff. A few screenshots :


3 Likes

That is awsome… the knife if fab as well!!! Nice work.
1 Like
Thanks for the comment on my work ![]()
That really is lovely work. All around. I can’t do the forging work, but I do have a little experience with leather and have been considering trying to cut some patterns with the stitching holes already drawn in. I’d read that cutting leather was problematic so I haven’t tried. Sounds like I should give it a go!
It does work fine on vegetable tanned leather , but cutting engraving leather has a really awfull smell. That smell will remain on the laser device for a long while. Best do it outside of the house or in a well sealed enclosure. Make sure your air assist pump/device can not suck in the smoke and dust…it becomes like a sticky tar after a while.I use an enclosure and a vacuum cleaner to suck out the smoke fast. After engraving you need to clean out the engraved lines/pattern to flush out the black soot residu using water and a soft brush. I you want to color the leather its best do that before engraving . I also use resolene after coloring so that any soot deposited on the leather while engraving cannot get into the pores. Thats a must specially if you use that on very bright colored leather projects… because even with air assist there will be some discoloring right next to the engraved parts.
Amazing tips! Thank you!
I almost never do anything that isn’t dark brown or black. Mostly working man’s stuff. Dark and durable. I did a holster one time for my mom that was red. I think that’s the only thing ever remotely light.
Also nearly 100% veg tan. I did one motorcycle seat with chrome tan (it had the texture and stretch I wanted) and it was a hassle.
My 20W machine is very well vented thru the wall and I keep the enclosure closed to keep the smell inside it. Not a puff gets into the shop while running.
My air assist is from a remote air compressor with a filter/drier inline. Same source as I use for grit blasting and painting. The air is as clean as I can reasonably make it.
Thats the way to go using a laser to engrave or cut leather. Also what i found out after some mishaps i that not all veg tanned leather cuts engraves equal. I always start with a small material test when i get a new big piece of leather.
I’ve been wanting to make a variation of the Lost Dutchman Big Finn wallet but the pattern would be a pain to cut by hand. Probably a good place to start with laser…once I actually sit down and figure out the pattern.
I also made a small wallet with a few pockets ( for bankcards ) recently. If it has more than one pocket all align perfectly and are straight using a laser. If you also want to cut the stitching holes you can go very small. I made the holes in my wallet only 0.8mm diameter and 2.5mm apart. To my knowledge there are no pricking irons or awls that can go so small as 0.8mm. Best what i found is to cut those holes as a " fill" instead of a line…so the holes are completely burned clean. If you would cut a hole lets say 1.5-2mm big the part in de middle often remains in the hole attached with a small sliver , giving you problems when you are sewing. Downside of laser cutting leather is that the smell is also on the goods that you make and remains for a while… even if you clean the leather after cutting. Take precautions…the leather parts that are fully cut sometimes curl upwards and could hinder the laser head passing. I use some thin sheet steel or metal washers that i put on the leather next where the laser does cut.
1 Like
Many thanks for sharing your experience. It would be easy to keep trade secrets like this to yourself! Noting all of it for when I get there in my journey. Leatherwork is just a hobby for me that I share with close friends and family, so I don’t do all that much of it.
1 Like
@HoutmeyersP , beautiful! I’d love to see more of your work. Do you have a website you can share?
That is really nice !!! My brother plays with leather off and on. he made a holster for a 9mm with matching mag holder, it sold for 700 bucks on
gunbroker.com. As pretty as your work is, I would guess that would bring between 500-1000 bucks. I buy from gun brokers 3 or 4 times a year.
Randy
1 Like
Beautiful work, thanks for sharing.
1 Like