I had to change my speed and power to be able to cut through 4.7mm thick plywood. I did many test cuts to figure out these for various projects.
I figured I had everything worked out and was pleased watching the laser do it’s job.
When I looked at the back of the finished job I could see that the laser did not cut through.
On my test jobs I entered the speeds and power levels directly to the laser. This time when I ran the file I had figured that since everything was entered on the computer that it would laser to the same settings.
I can’t really see where I went wrong. Any ideas?
Thanks
I don’t understand what you mean by entering the speeds and power levels “directly to the laser”?
Were you adjusting the power/speed at the laser controller’s touch panel then holding down jog and pulse buttons simultaneously?
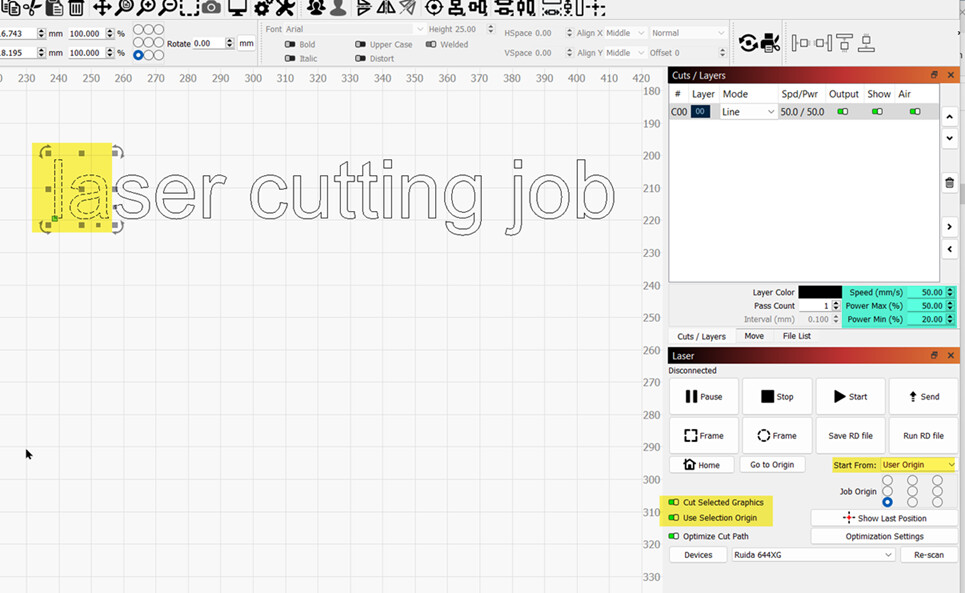
Why not run your test cuts from LightBurn?, enter the settings in the area highlighted green in the pic below.
If your job is all setup ready to run, and you wanted to double check it was going to cut correctly you always could select and send to the laser a very small part of job, e.g. select and send just a couple of parts to cut from a test area of the material. e.g.
I have been testing for depth of cut for inlay and just finished the Boxes.py Burn Test to fit Finger Joints, which cut completely through the 4.7mm plywood.
To be sure that I had everything entered into Lightburn, I also entered the min/max percentage and speed rate directly into the Ruida controller on my 60W Co2 Laser.
For the Boxes.py drill bit file I setup, I ran it from the Computer without entering the max/min and percent power levels into the Ruida Controller this time (which I was doing to be sure the file ran) and
the plywood barely registered any burn through on the backside after the job finished.
I was not sure that I could run from Computer alone.
Also, thanks for the tip on taking a small part of project to check on my settings.
The speed and power values within the file you send from the computer will be the only values the laser will take notice of.
If you send the file through to the controller and then push Enter at the controller a couple of times you can edit the power and speed for layers in the job (which I presume was what you were doing earlier) but it’s an awkward interface for making changes.
It’s better to make all job settings changes only at your computer in LightBurn, then re-send and overwrite the job at the controller - this way you keep all your changes in one place - the LightBurn project file.
If you really must, you can (at the Ruida control panel) pause a running job and using the panel keys change the power levels on the fly, although when un-paused, the change doesn’t seem to come into effect until a couple of laser moves later. You’d still have to remember to make the change also in your LightBurn file so it is correct for the next time.
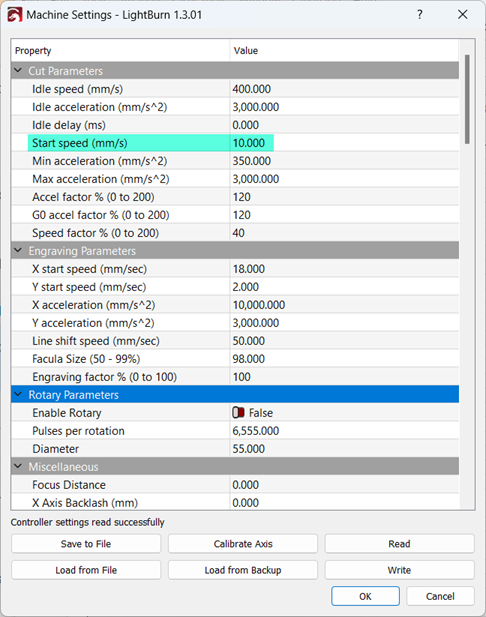
In case you are wondering, the ‘start speed’ setting Jack mentioned can be seen using LightBurn>Edit>Machine Settings, and usually is set at 10mm/s, so if you ever need to use such a slow speed just be aware that only min power will be used for that cut.