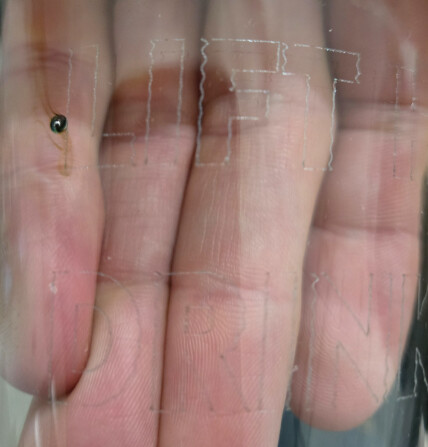
I’m new to laser engraving. I’m using an Ortur OLM3 with a 20W laser. I got a rotary Chuck to engrave on pint glasses. I’m using the cold galvanizing compound spray to engrave on it. But the lines on the letters come out shakey, jagged, not straight. This doesn’t happen when I’m using it on wood without the Chuck. Can someone help with this?
Most likely due to the material. Glass does not engrave/etch nearly as nearly as metal or wood.
Slow down the speed. There is a huge mass that you are turning on the rotary.
Are you moving the X or the Y axis as your primary?
Please SHOW us what you are telling us. Screen shot of settings, photos of your results.
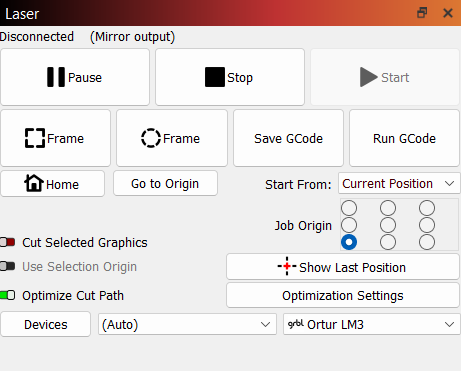
I set my speed to 10000mm/m and my power to 100%. This was in reference to the chart that came with my laser engraver under “glass” these are the minimum it said to use. It said to set my interval to 0.12, but that box is greyed out and I couldn’t figure out how to make it active… Sorry I’m so ignorant about this stuff.
Edit: that defect black spot was on the glass when I got it to practice with. it isnt a result of the laser
The wobble is from a harmonic vibration from acceleration - aka: your belts or set screws are loose or your table is not steady. Turn on overscan and set it to 10% - that will make the laser head move 10% past the end of the burn, to allow the system to dampen out the oscillations.
Best thing to do is identify the loose connector or frame part and remedy that.
Please ask for clarification. We don’t mind questions, and we want you to succeed. BUT we don’t have any idea of your level of experience or the particulars of your settings. FWIW, I lost my crystal ball in a boating accident on the Rio Grande…
1 Like
I’ve never used social media, and I’m not a texter either, so i dont know what FWIW means, I’m sorry. I’m not very good at text-based communication - more of a talker. You need to talk to me like I am 16 years old because all of this like speaking a foreign language to me.
I put the laser engraver together according to the instructions, it is as tight as it can be, the belts are extremely taut. How do I turn on overscan?
My level of experience is zero. as was stated at the beginning of my initial post “I’m new to laser engraving” I apologize if I should have made that more clear. maybe I should start by saying, “I just recently started learning about this whole thing where you use those special bright light machines - you know, the ones that make pictures and words show up on stuff by burning tiny little marks into them? I’m really just at the very beginning of figuring out how all of this works, and honestly everything about it is completely new to me. Every single time I look at one of these machines that uses the super bright light to make designs, I’m still trying to wrap my head around all the different buttons and settings and ways you can make it do different things. I’m basically still at the point where I’m learning what all the parts are called and what they do, since this whole world of making designs with bright light is something I’ve only just started to dip my toes into.” I hope that illustrates my experience level better than “I’m new to laser engraving.”
I’m also new to this forum. Learning how to attach a photo was something that isn’t obvious to me. I didn’t see a button to attach something, so I had to figure out to copy and paste a photo, and then I had to figure out how to do that. So I guess I’m just so terrible with texting that I should just kill myself, hu? I bet if we spoke about these issues, I’d be able to communicate better…but nobody can speak these days, and they don’t even want to. I’ve tried paying a hundred bucks for a phone call from tech support, but nobody will take my offer. SO, anyways, I guess I’ll go f myself.
Ok amigo, slow down on the self-flagellation. We all started somewhere and no-one is judgmental here.
FWIW = For What It’s Worth.
This hobby is no different from any other hobby - you won’t get much out of it without putting SOME effort into it. You found the best forum in the World for Lightburn help.
Step 1 is done, check it off the list. Let’s move to step 2.
Belts and bolts need to be the right “tight” - to loose is bad and to tight is bad too.
This little doohickey -  - is the upload file button.
You can easily take a screen shot by pressing SHIFT+ALT+S (that will open a drag window that you drag around the item to be caputred). WHen you click and drag and then let go of the mouse button, the image is stored on your computer memory “clipboard”
Come to the discussion forum, open a chat box in the forum and press CTRL+V to put that screen shot in the chat.
We are willing to help you find success.
Drop your speed to 2000mm/m and see if there is an improvement.
2 Likes


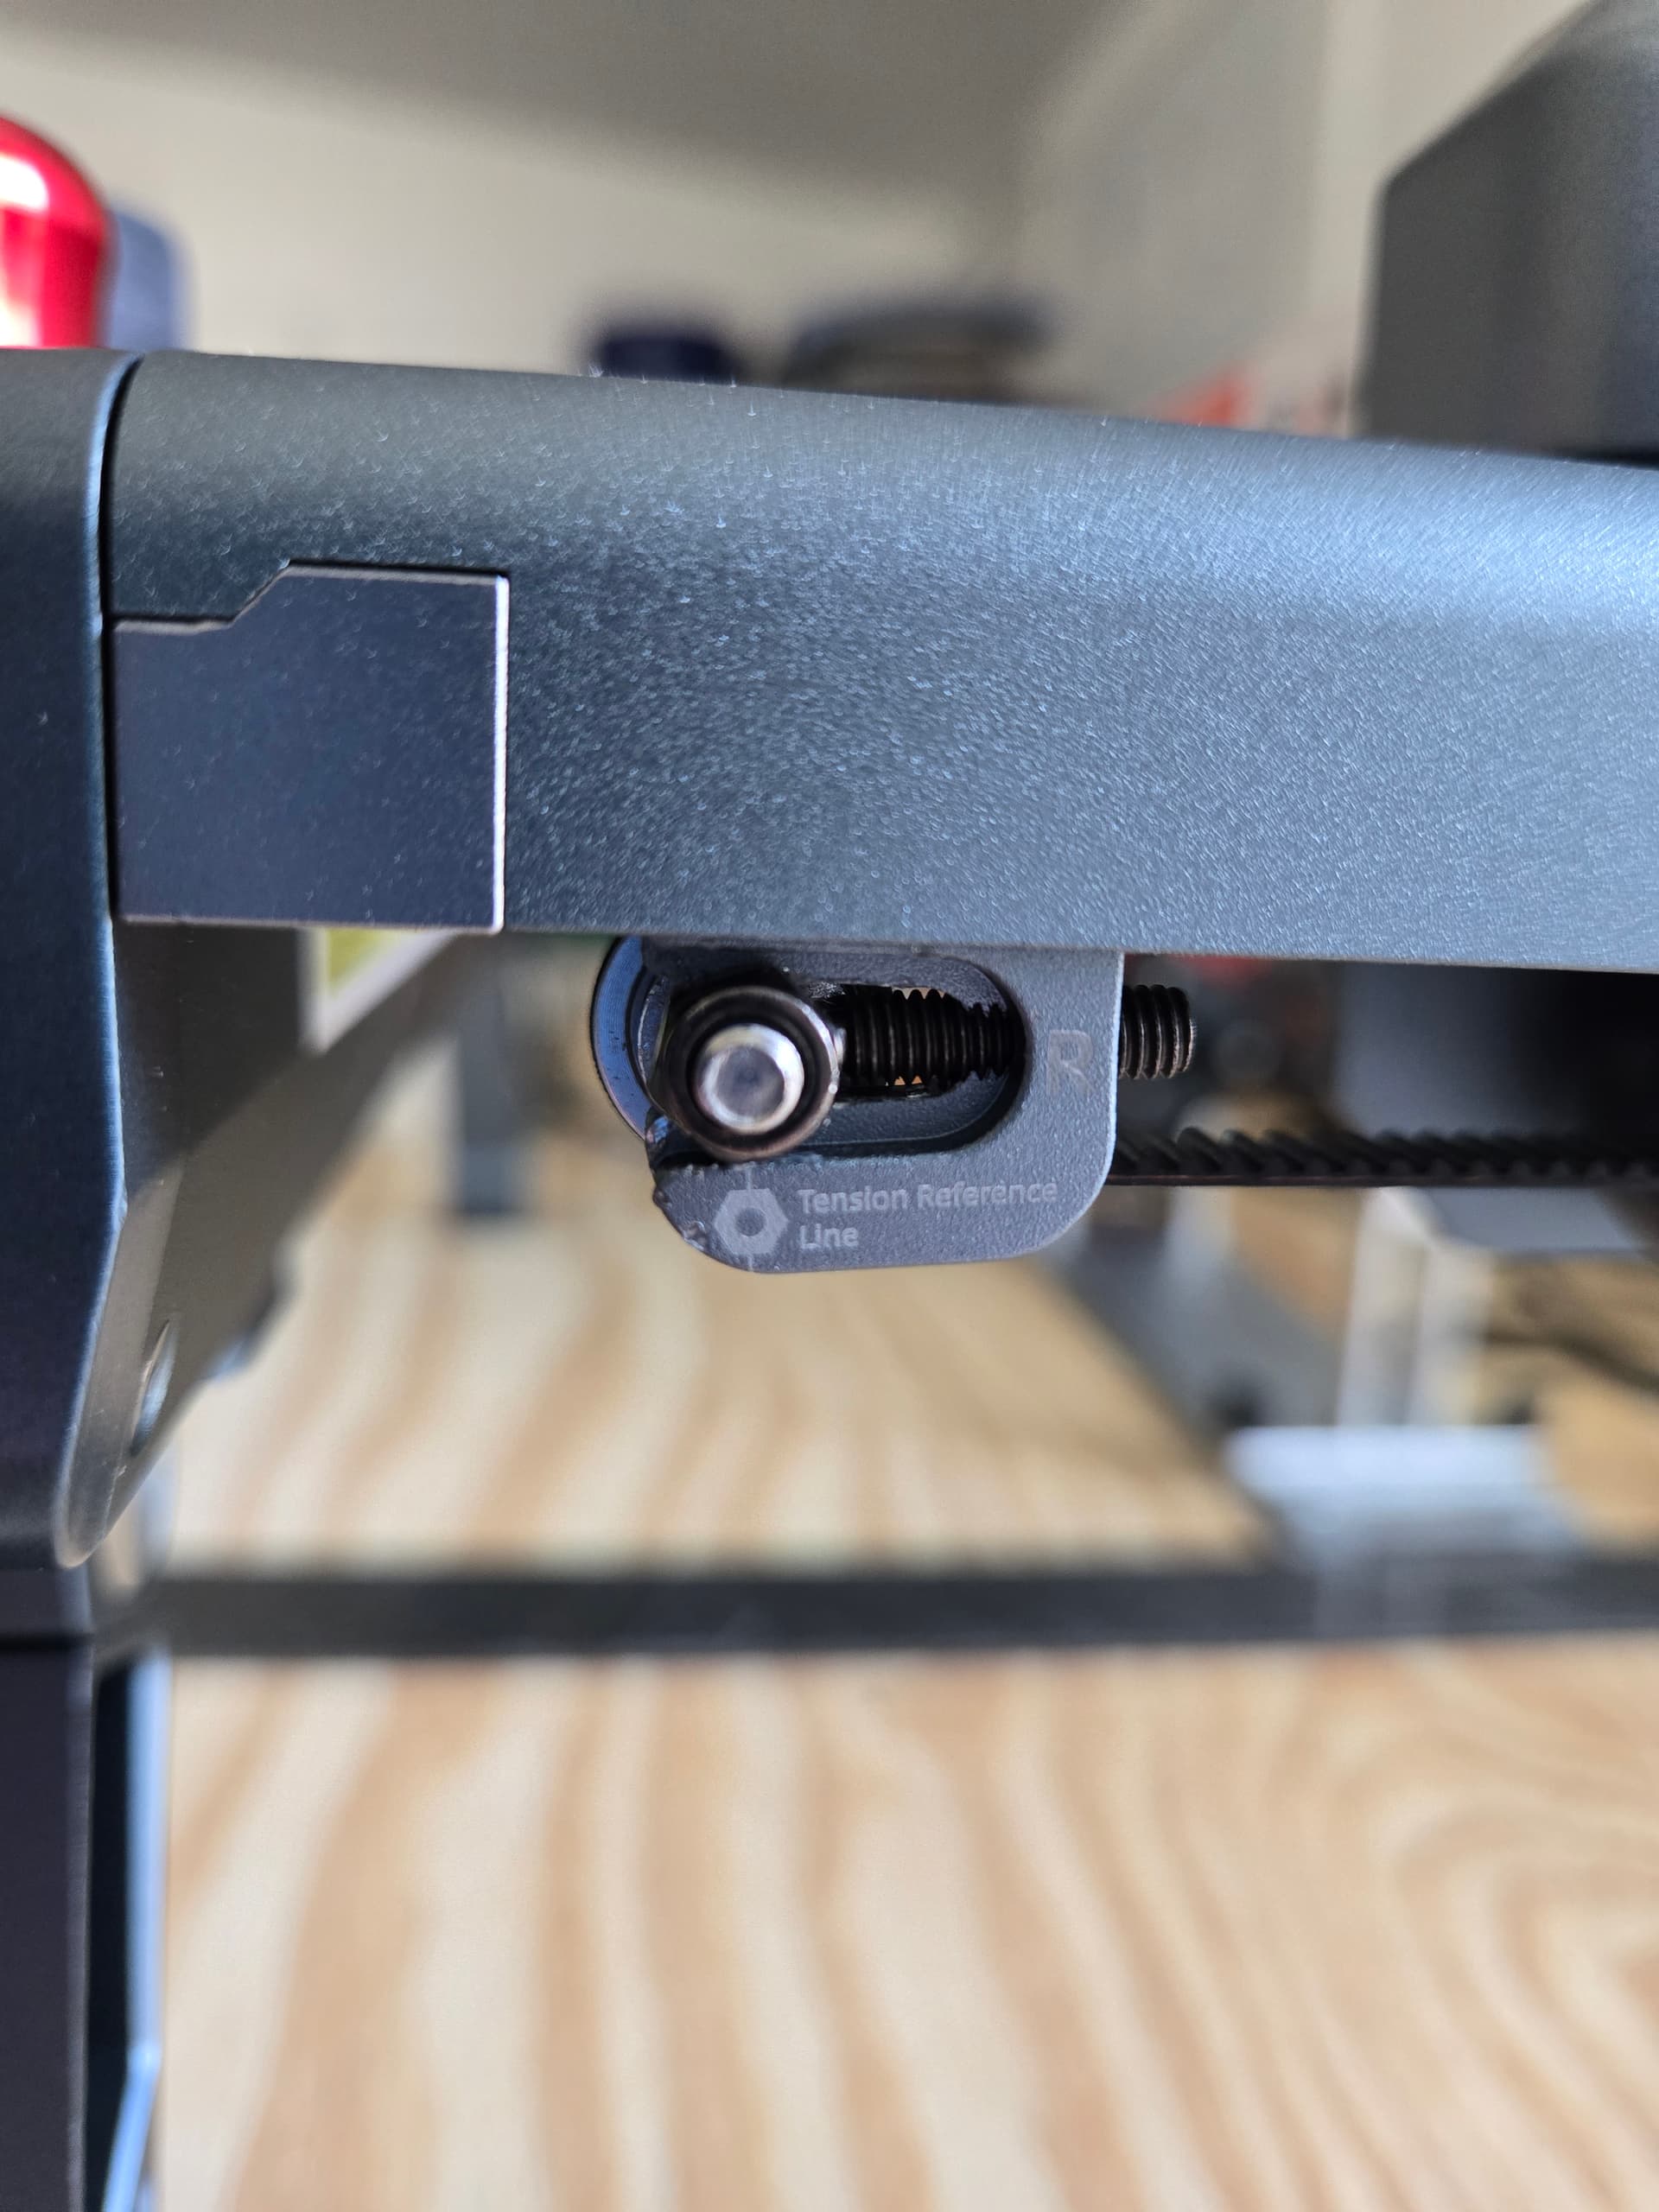
Thanks for showing me how to upload photos. I took a photo of the sides of the engraver where I had to set the tension for the belt. The bolt is exactly where it indicates it should be for the optimal tension.
The workbench is a bench I build specifically for this engraver to be placed on. It sits on a concrete foundation. It doesn’t wobble. Do you think the rotary Chuck should be screwed down into the table? There are screw holes… I didn’t see anyone on YouTube screw theirs down, but maybe I have to screw mine down?
Also, How do I know what settings to use depending on the material I’m engraving? Is it just trial and error? The papers my engraver came with don’t seem to be of much use, as it says 10000mm/min for speed on glass. And the engraving didn’t go very deep on 100% power. I assume power is how strong the laser will be.
I also never found the overdrive setting you recommended.
The speedometer on my commuter car goes to 140mph, short of being dropped out of an airplane that car is never gonna see 100mph, much less 140mph.
The max speed that the software controller can handle is 10,000 mm/m, but the laws of motion and the limitations of the hardware will not support the sales brochure.
Unfortunately, each machine and material will vary slightly in its output. I have found that even a different temperature can affect my results. Engraving tumblers that are at or below freezing temps makes it harder for my engraver to get clean results as the material being ablated reacts differently at zub freezing temps. There will always be a little exploration needed to get the best results.
The first thing I suggest is come down off the max speed. Get good results at slower speed, then we can hit the gas pedal, ok?
I am on mobile at the moment, but I will come back to the PC this afternoon and I can take some more screenshots to show you where to adjust you settings.
Sorry for jumping into the high level topics of discussion before addressing your needs as a new user.
It’s okay. Sorry for overreacting. I don’t like texting because I’m not good at it, but it’s difficult to get a phone call these days.
Everything you said makes a lot of sense. I’m going to play around with it and see what works. Thanks!!
1 Like
Expanding on this, 10000mm/m is stunningly fast for a rotary. The inertia of the glass will surely cause slip.
It will not be very deep. You will only, and should only, fracture the surface to get the frosted effect. Too much heat will fracture the glass. I have a 2-part shot glass to prove it.
You did not mention any surface coating. A diode laser cannot etch glass without it. Your results can vary a lot depending on what coating you use.
I am 78 and hate texting too. Change is hard, no?
2 Likes
Lol it’s rough! But I’m trying to adjust to the times and not be a curmudgeon.
I didn’t realize 10000mm/min was super fast. I am using cold galvanizing compound on the glass before I laser it. Do you recommend something else? I saw some guys in YouTube using a black acetone paint. Is that better? Thanks for your help!
Here’s a link to video I thought I’d share to help explain the overscanning that James mentioned.
LightBurn has a variety of helpful videos on YouTube.

1 Like
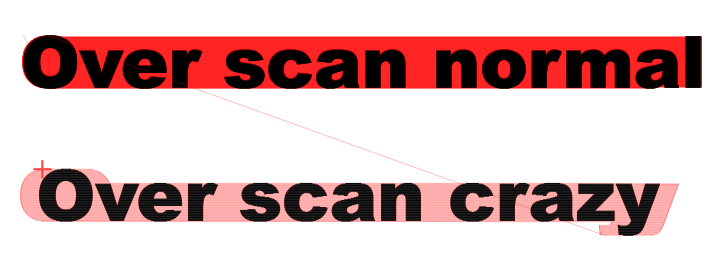
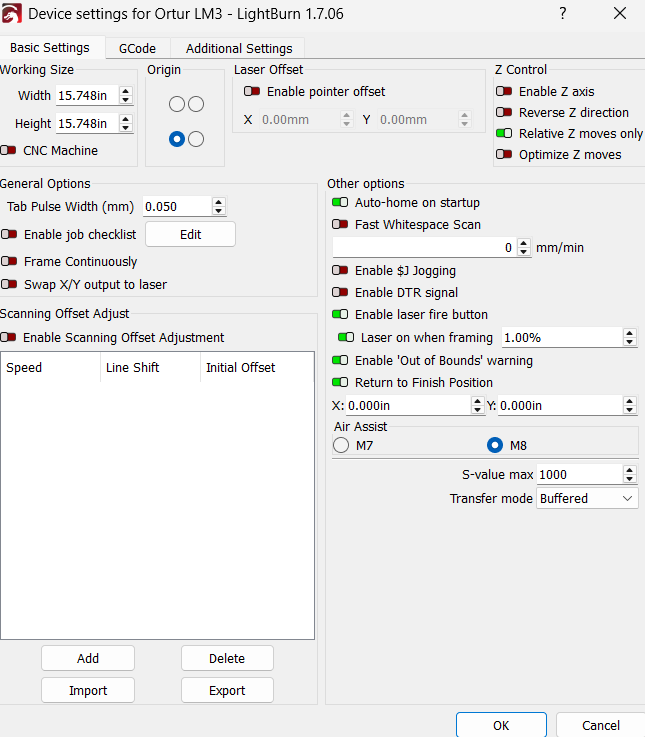
Same speed for both text lines. Overscan makes the laser head travel past the end of the burn. The ovescan can cause issues if it crosses the work area boundary - i.e. makes the laser head run into the side of the frame.
Double click on the layer in the CUTS/LAYERS window to open layers settings
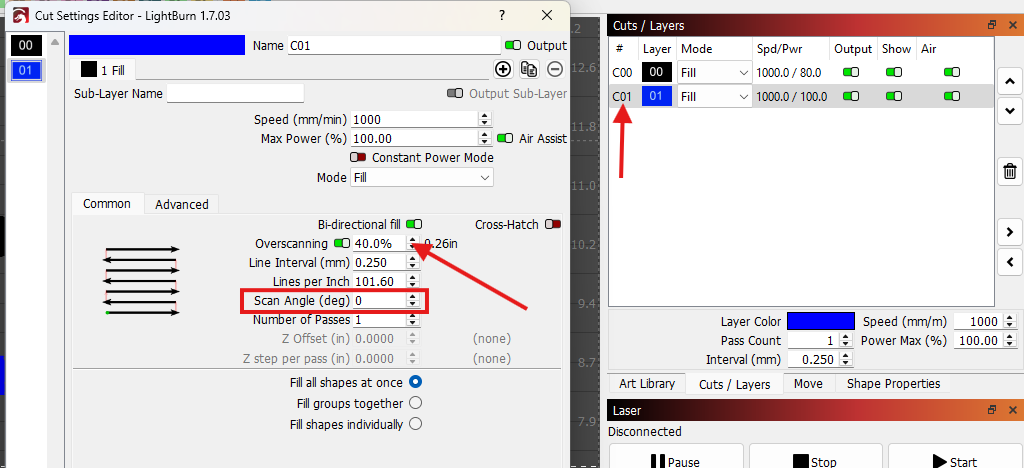
Notice the OVERSAN setting - normal is 2.5%
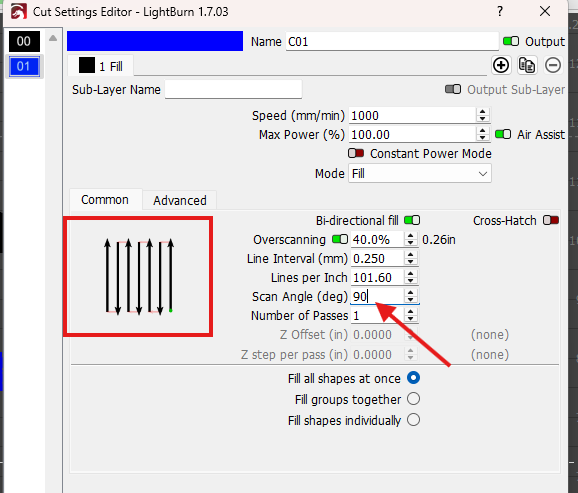
Scan angle is where you change from X to Y as your primary axis. 00 is flat on X axis, 90 is straight up and down on Y axis.
I just use, for ALL projects, something that can be removed with water.
Glass:
- Acrylic paint, various brands
- Black EXPO Bold Color Dry Erase markers, (my favorite)
Wood:
- Acrylic paint, various brands
- Saman water-based Wood Stain
Metal:
- CerMark Black Laser Marking Spray (mild steel, stainless, and yes, some aluminum)
You have to use something on wood and metal too? I thought it was just glass. I have a lot to learn.
P. S. Slowing the speed to 2000mm/min worked well! No more shakey lines, but my text is coming out wavy and smooshed. So I fixed one problem, and created another…

Is the tail of the tumbler supported by rollers? That is a lot of overhang for the plastic chuck jaws to hold tight.
This amount of overscan is not crazy, that is pretty normal. especially if you are using a co2.

1 Like
I would like you to turn the glass around if you can. When you frame the job, does the glass rotate in one orientation - i.e. does it wobble? The heavy end should be the part in the chuck jaws.
Does you laser head go from top to bottom of the glass, or does the glass rotate back and forth?
It rotates back and forth when I frame the job. doesn’t appear to wobble to me. when I frame, it goes from top to bottom to top again.
Noted that the bottom of the glass should be the end in the chuck jaws.
True about the CO2 - was using a diode as an example of 2.5% vs 40% on the same laser at the same speed and power. Not trying to get lost in the variables with too many details.