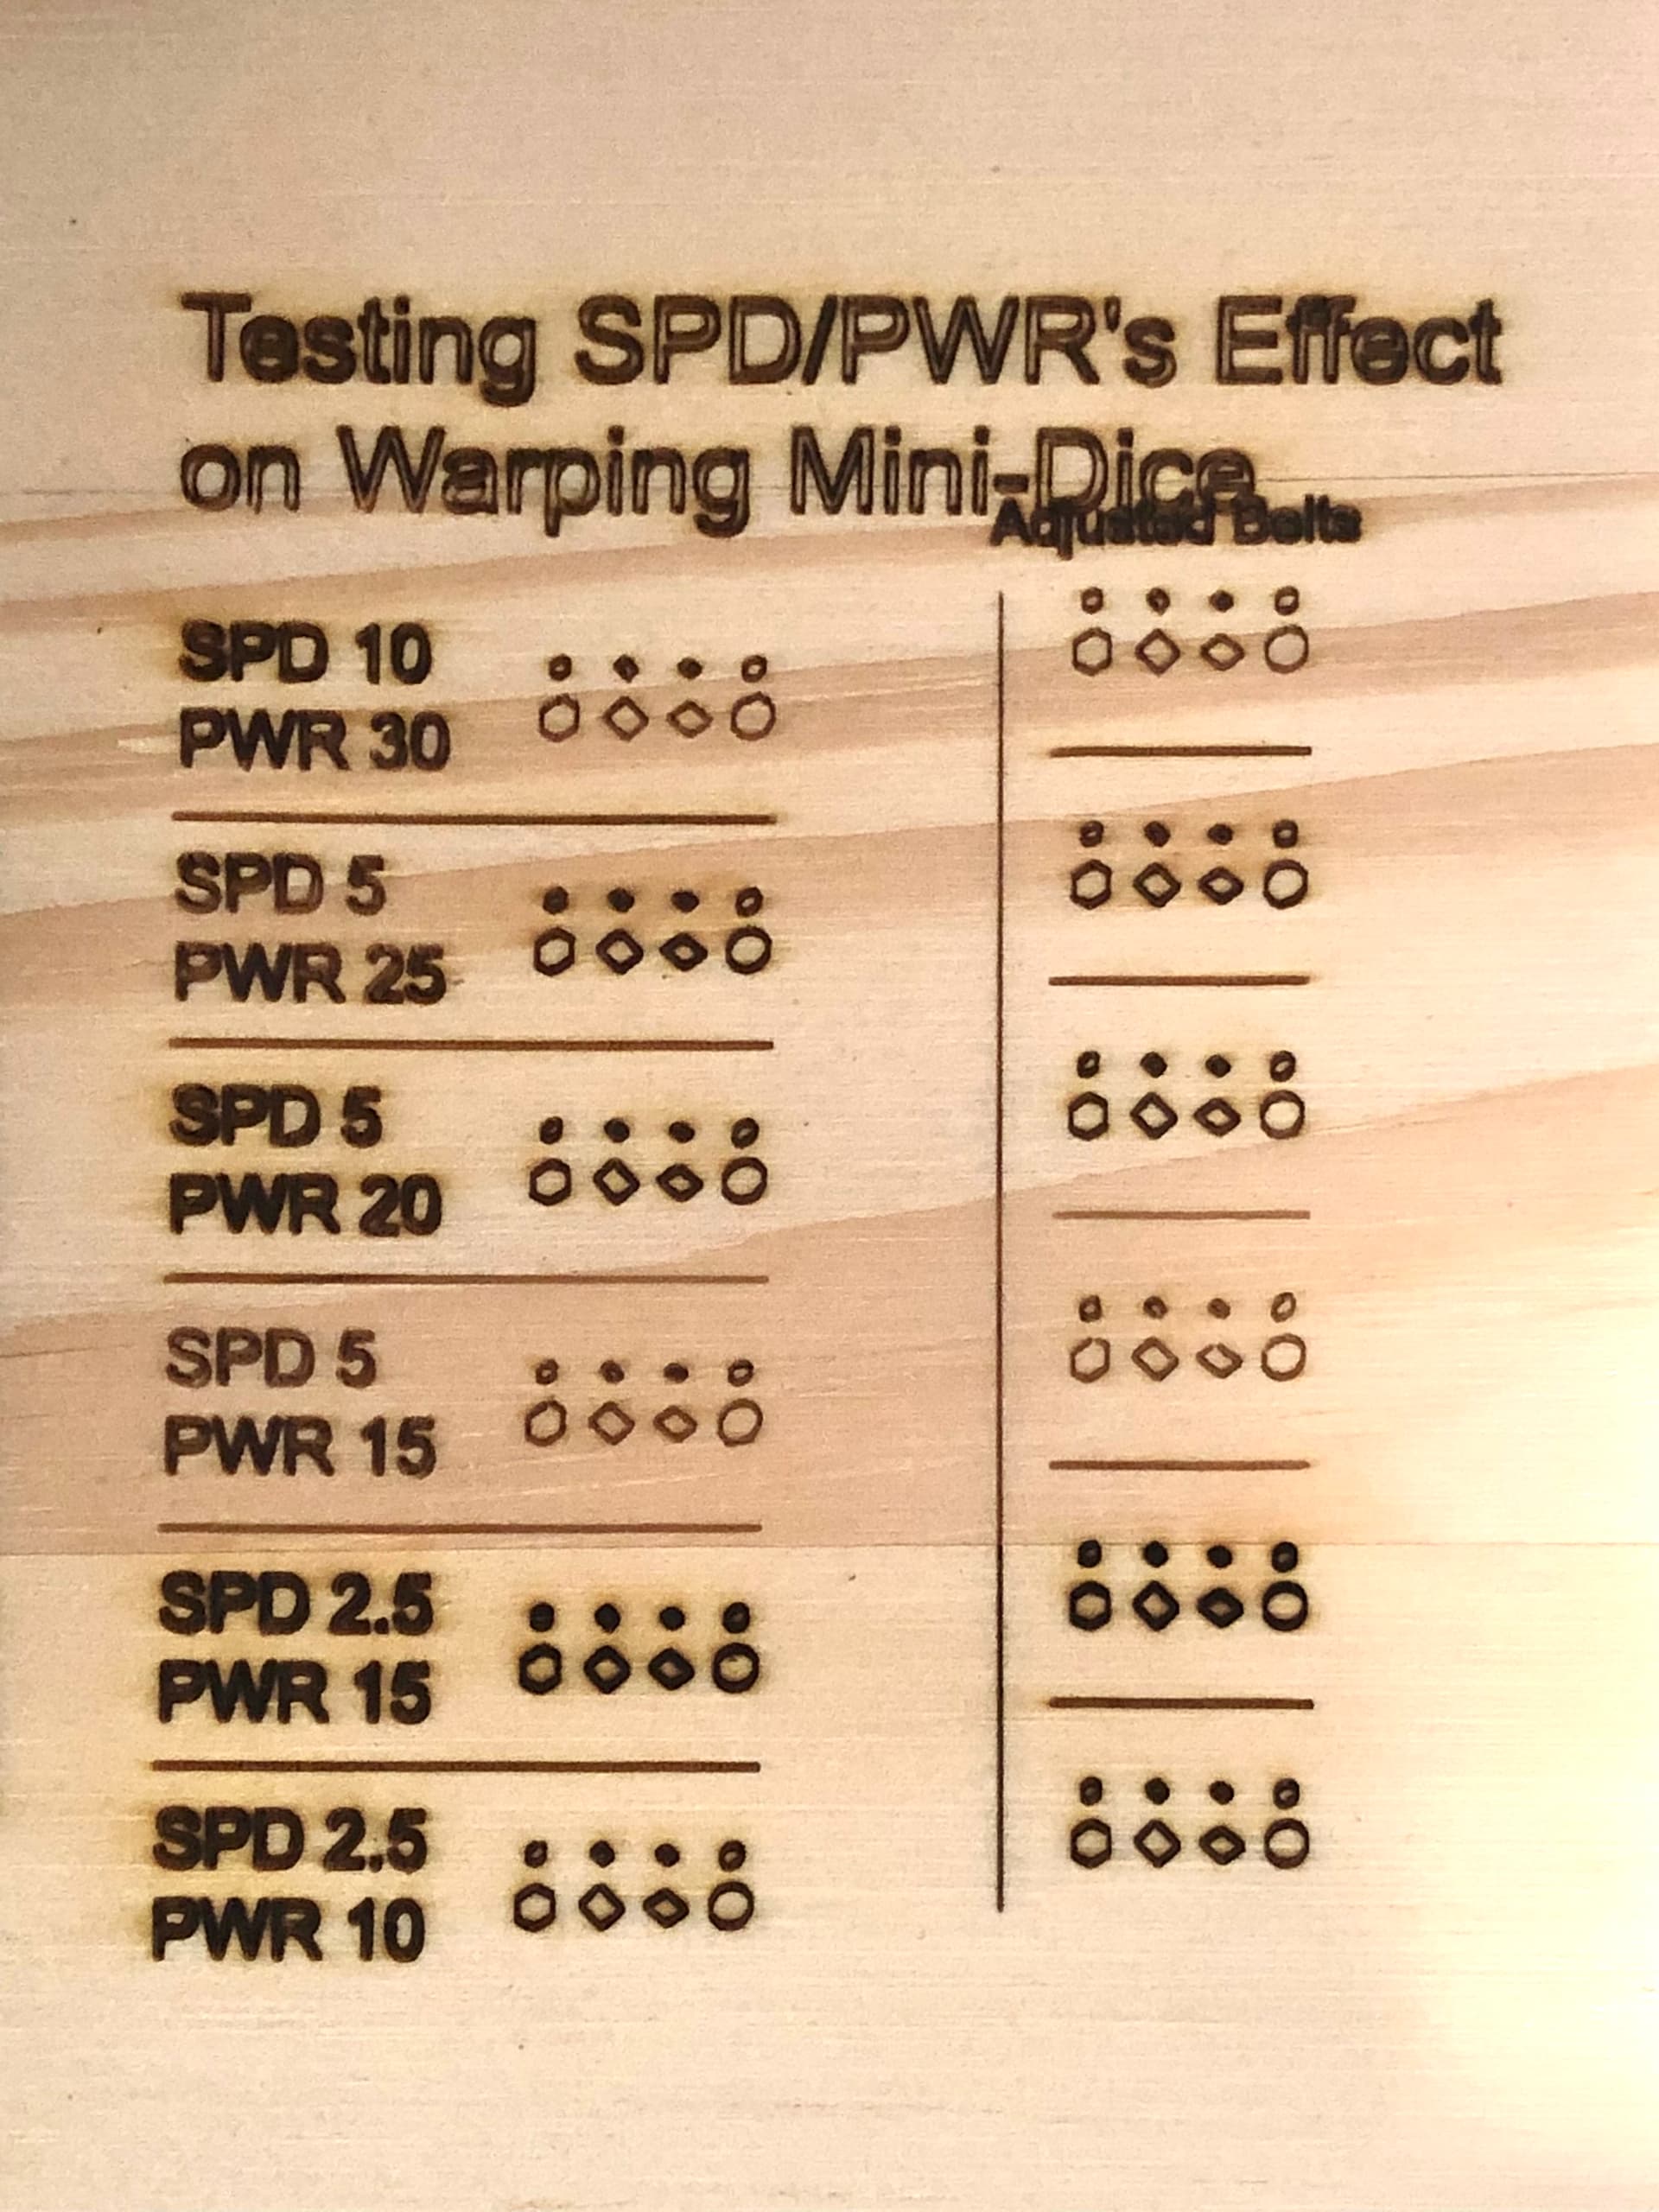
Hello! I’ve been trying to engrave some very small shapes with my Atomstack A5 and LightBurn 1.1.03, and they’ve consistently turned out misshaped/warped. I’ve tried engraving them at multiple different speeds (set as mm/sec), but they had little to no effect on correcting the warping.
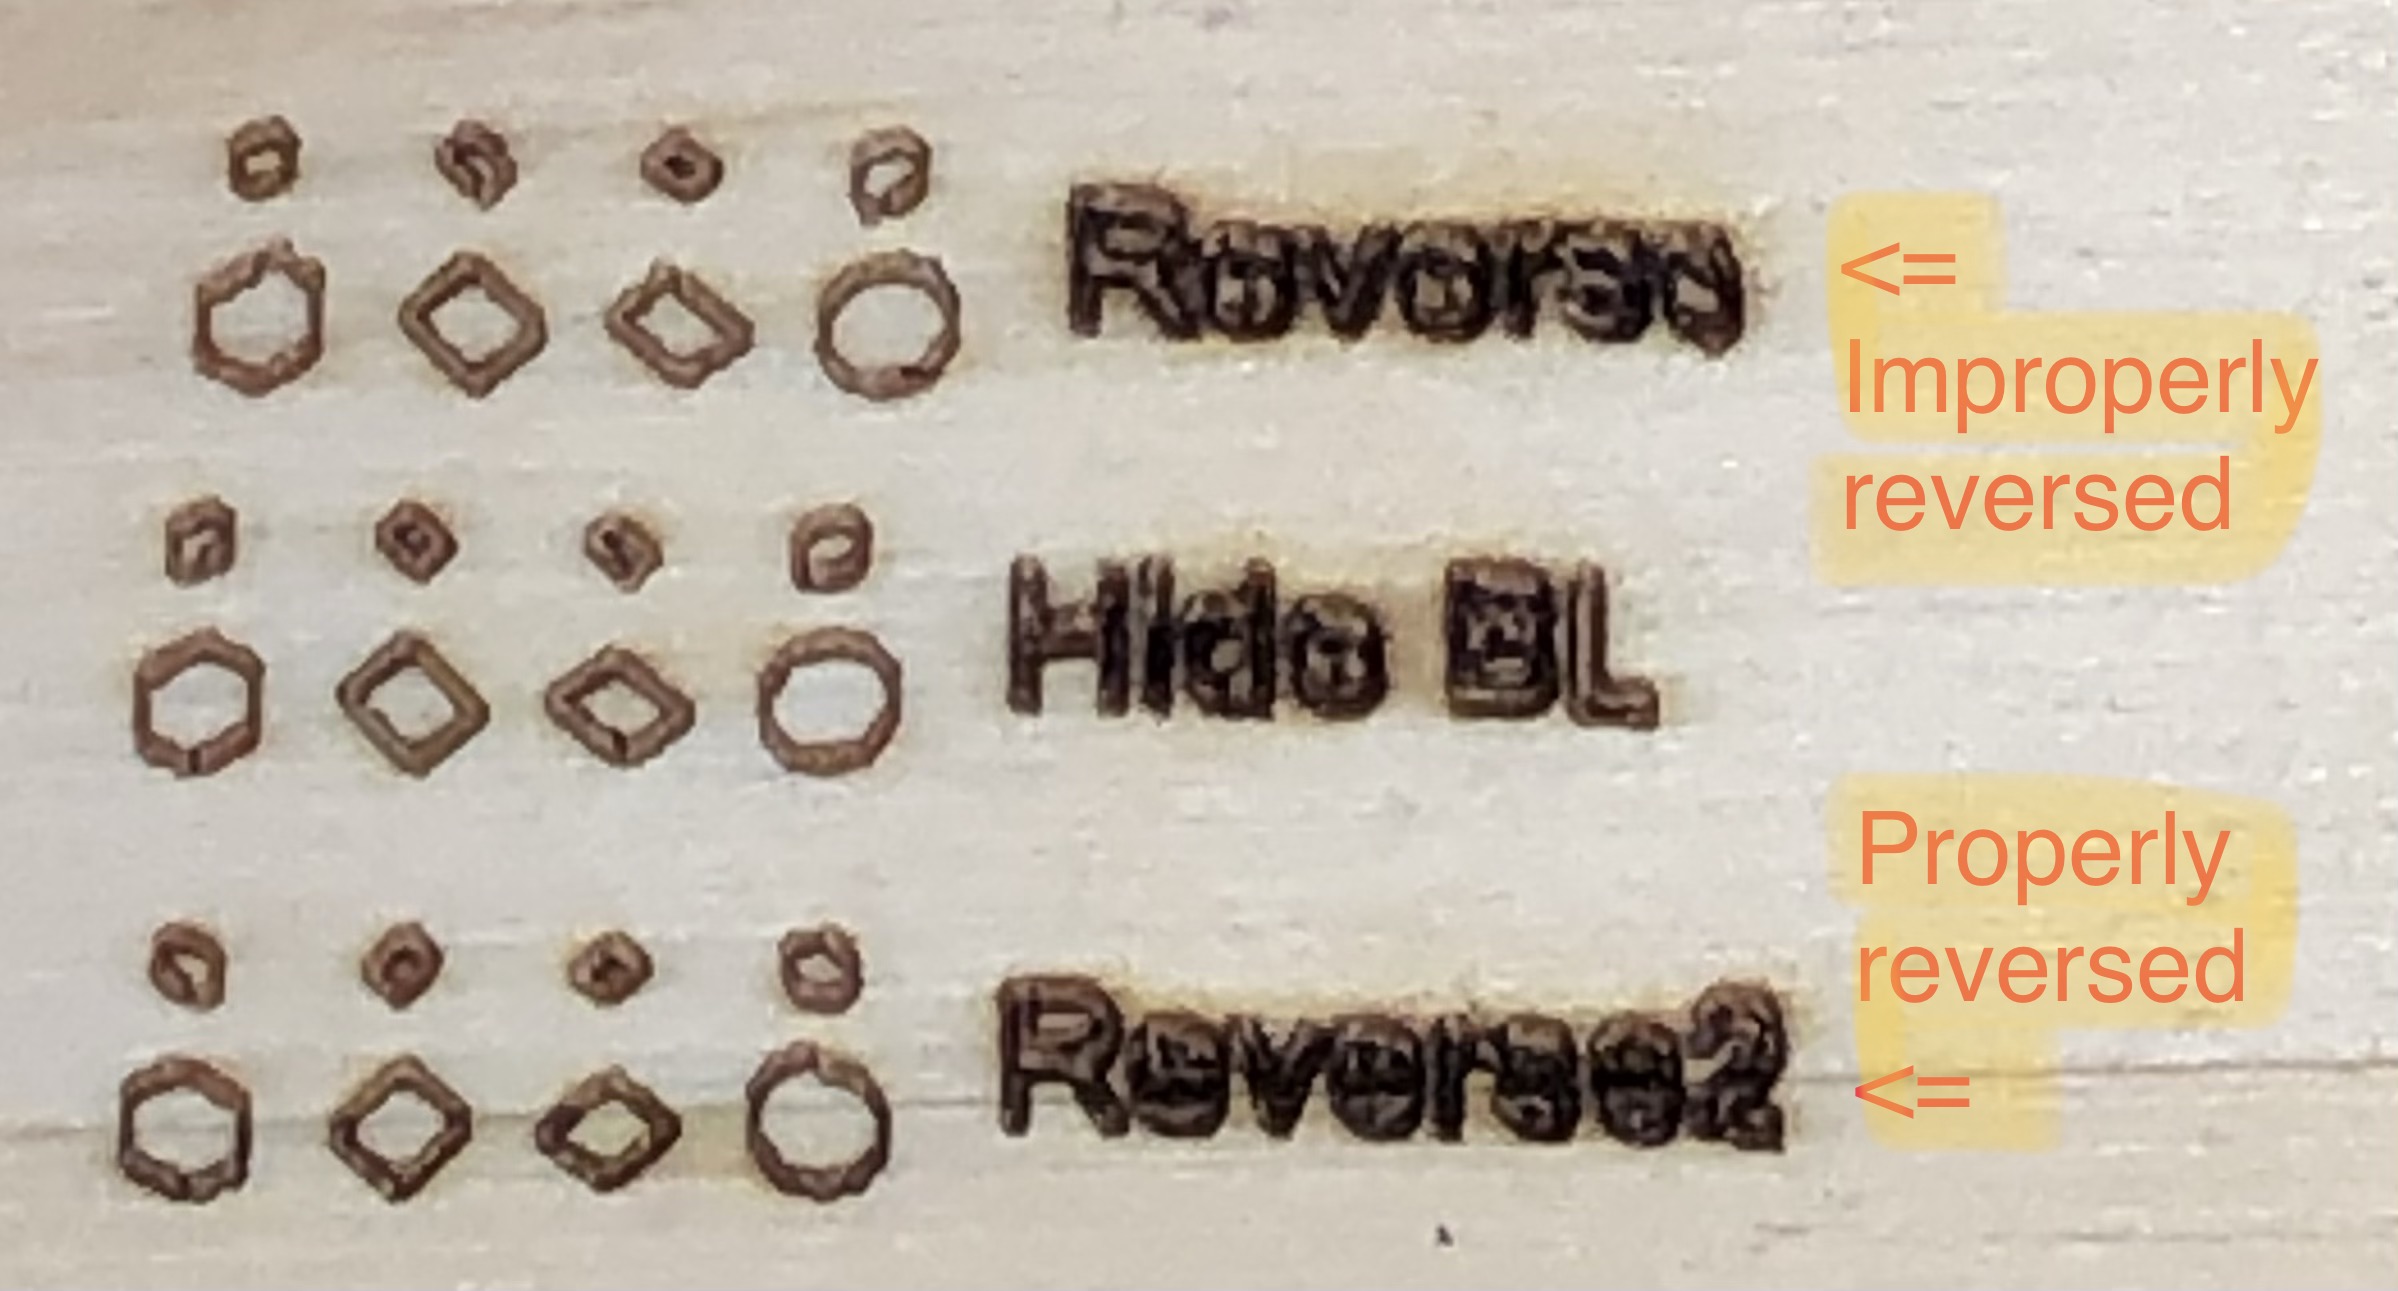
Below are pictures of the results (first picture) and the projected results (second picture). Having thought my one of my belts were loose, the first column contains tests before I tightened it, and the second column contains those engraved after they were tightened (that’s also why the second column is off in the results picture, since I re-aligned my machine incorrectly). As you can see, there’s no difference between the quality of the shapes, so I know that’s no the issue.
Looks like backlash to me. In your case most likely from the pulleys on the stepper shafts. Check the pulleys to make sure the pulleys are not slipping on the shaft. Reseat the grub screws and make sure they’re tight against the flat portion of the stepper shaft. It’s possible that you’ll have 2 grub screws stacked on top of one another in which case you need to back-out the first one to get at the second to tighten it properly. No amount of wrenching down the top screw will get the bottom screw to tighten down in that case.
Thank you for the quick response! I will be sure to check this out as soon as I can tomorrow. At a glance, the grub screws appeared to be tight and in their proper places, and I’ve re-tightened the belts along the stepper motor’s shaft to make sure that they won’t slip while engraving.
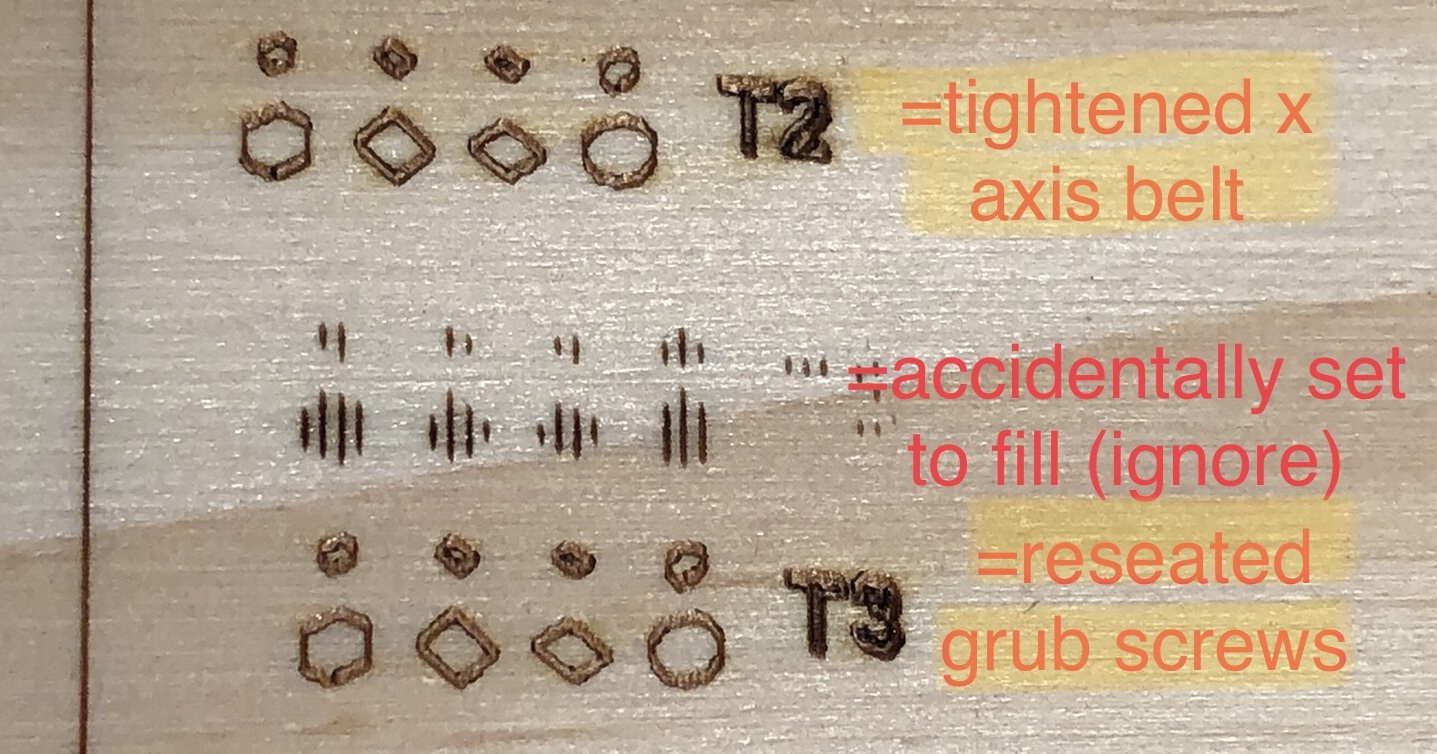
Okay, so I reseated the grub screws and unfortunately, there is no difference in performance. Do you have any other ideas as to what the problem could be? Below are pictures of the test results (first picture) and pictures of how the grub screws are seated on the stepper shaft (second and third pictures) – as a note, there’s only one flat side of the shaft, which the rightmost grub screw in the second picture is securely tightened against.
Also, thank you for explaining how the grub screws worked – I’ve never used them before, so it would’ve taken me a lot longer to figure out how to unscrew them if you hadn’t directed me
If you try rotating the pulley does the stepper shaft move perfectly along with it without any delay or slop? Or can you feel any give at all before the shaft changes direction? If so, then there’s still a problem.
If not for any of the pulleys look for other areas where there might be backlash.
Do you have a coupling that links one side of the Y axis (motor side) to the other of the Y-axis? See if there’s any backlash in the coupling.
One test to run. Try reversing the direction of the cut path for the engraving test. See if the distortion mirrors. If so, then you can confirm that it’s an issue with backlash and need to keep hunting that down.
If you can’t find any more opportunity for eliminating backlash you might just have a loose setup. You can try to alleviate backlash with “Hide backlash” in optimization settings. You really want to try to reduce mechanical backlash as much as possible before resorting to this, however.
The stepper shaft appears to move in tandem with the pulleys; I do not feel nor see any delay between their movements when I roll them along their axis. The same can be said for the pulleys moving the X axis, and the Y’s coupling is quite tightly secured.
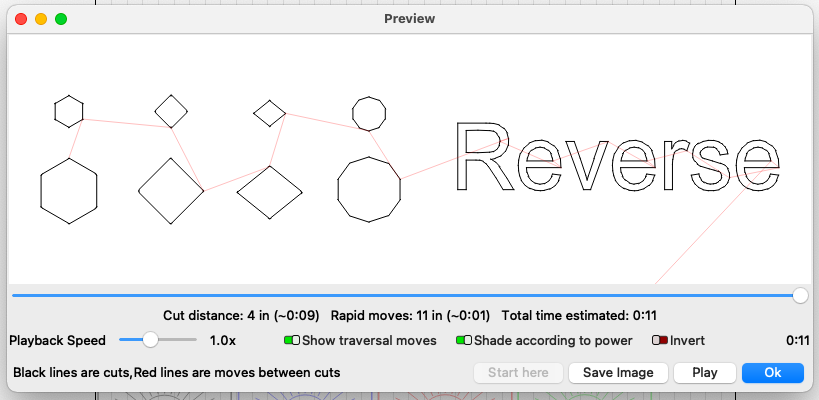
When I reversed the laser’s cut path (right to left), the results weren’t mirrored, though some of them are distorted slightly differently than if they were cut from left to right (ex: the first and third shape of the second row are a little bumpier than usual; could this be significant?). Additionally, “Hide backlash” had no effect on the distortion. Pictures of both of these tests can be found below.
If this really is due a loose set up (which is strange, as larger shapes cut perfectly fine), do you have any advice on how to fix it? At this point, I feel like I’ve retightened/readjusted everything that this machine has to offer – belts, screws, eccentric nuts, etc… unless I’m taking the term “loose set up” a bit too literally, that is.
I can’t quite tell from the preview. Did you reverse the cut direction using the Set Shape Start Point tool?
Check this screenshot. Note the direction of the arrows for each shape. I’ve also highlighted the tool.
That’s good. If you’ve covered then perhaps not a backlash issue. And looking at the last screenshots perhaps not the issue I thought it was.
I meant it literally. Every machine will have points where error is introduced. Any slight backlash, uneven tension, even the shape of the gear teeth. Just a matter of trying to reduce all these potential weak points until you get to the tolerance level for your needs.
Looking more closely at the view this may be just about tension… or rather overtension. Either in the belts or possibly the wheels being overtightened against the rail. Based on the tests I would say more likely on the X-axis. Check that your laser head moves freely and without interruption to all corners of the machine. There should be very little resistance when the motors are not engaged and should move very smoothly. If you’ve overtightened this will feel like binding and gripping.
This could be from belts or wheels but not certain which. For the wheels, there is an eccentric nut that sits between the wheels and the mounting plate. It will appear almost like the wheel’s shaft. Adjust those until there is no gap between wheel and rail, removing and slop but not any more than that.
For belts, make sure that there is no slack, belts should be taught but not stretched.
One thing that bothers me about the last set of photos, though, is that Hide Backlash did nothing. It should have made it look a little wonky if there wasn’t a problem… No need to focus on it for the time being though.
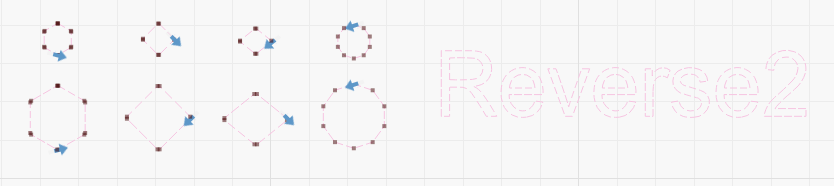
Oops, I originally “reversed” the cut by going into Optimization Settings, turning on Cut in Direction Order, then set it to cut from Right. My apologies for the mistake – as you can tell, I’m quite new to all of this. I’ve now tested it by using the Set Shape Start Point tool, and just as you predicted, the cuts have flipped (see the “Reverse2” result below)!
The wheels I am certain are tight enough; when I first started testing the machine a couple of days ago, they weren’t, and caused several of my lines to cut unintentionally wiggly. However, ever since tightening them, they’ve been cutting exactly as intended, save for these smaller shapes.
At this point, I’m a little unsure of what is considered a loose, taught, or stretched belt, so I’ve put together a little picture (found below) of what the X-axis belts look like normally (left) and what they look like when pinched (right). Physically, both they and the belt on the Y-axis feel equally taught, though I was unable to get a picture of the belts on the Y-axis due to its being walled by metal on either side.
Hard to tell from the photos but those might be a tad tight. This is something you’ll be able feel more than anything as you move the head. If you hold the floor of the laser at 20 degrees does the laser head start to lose traction and move?
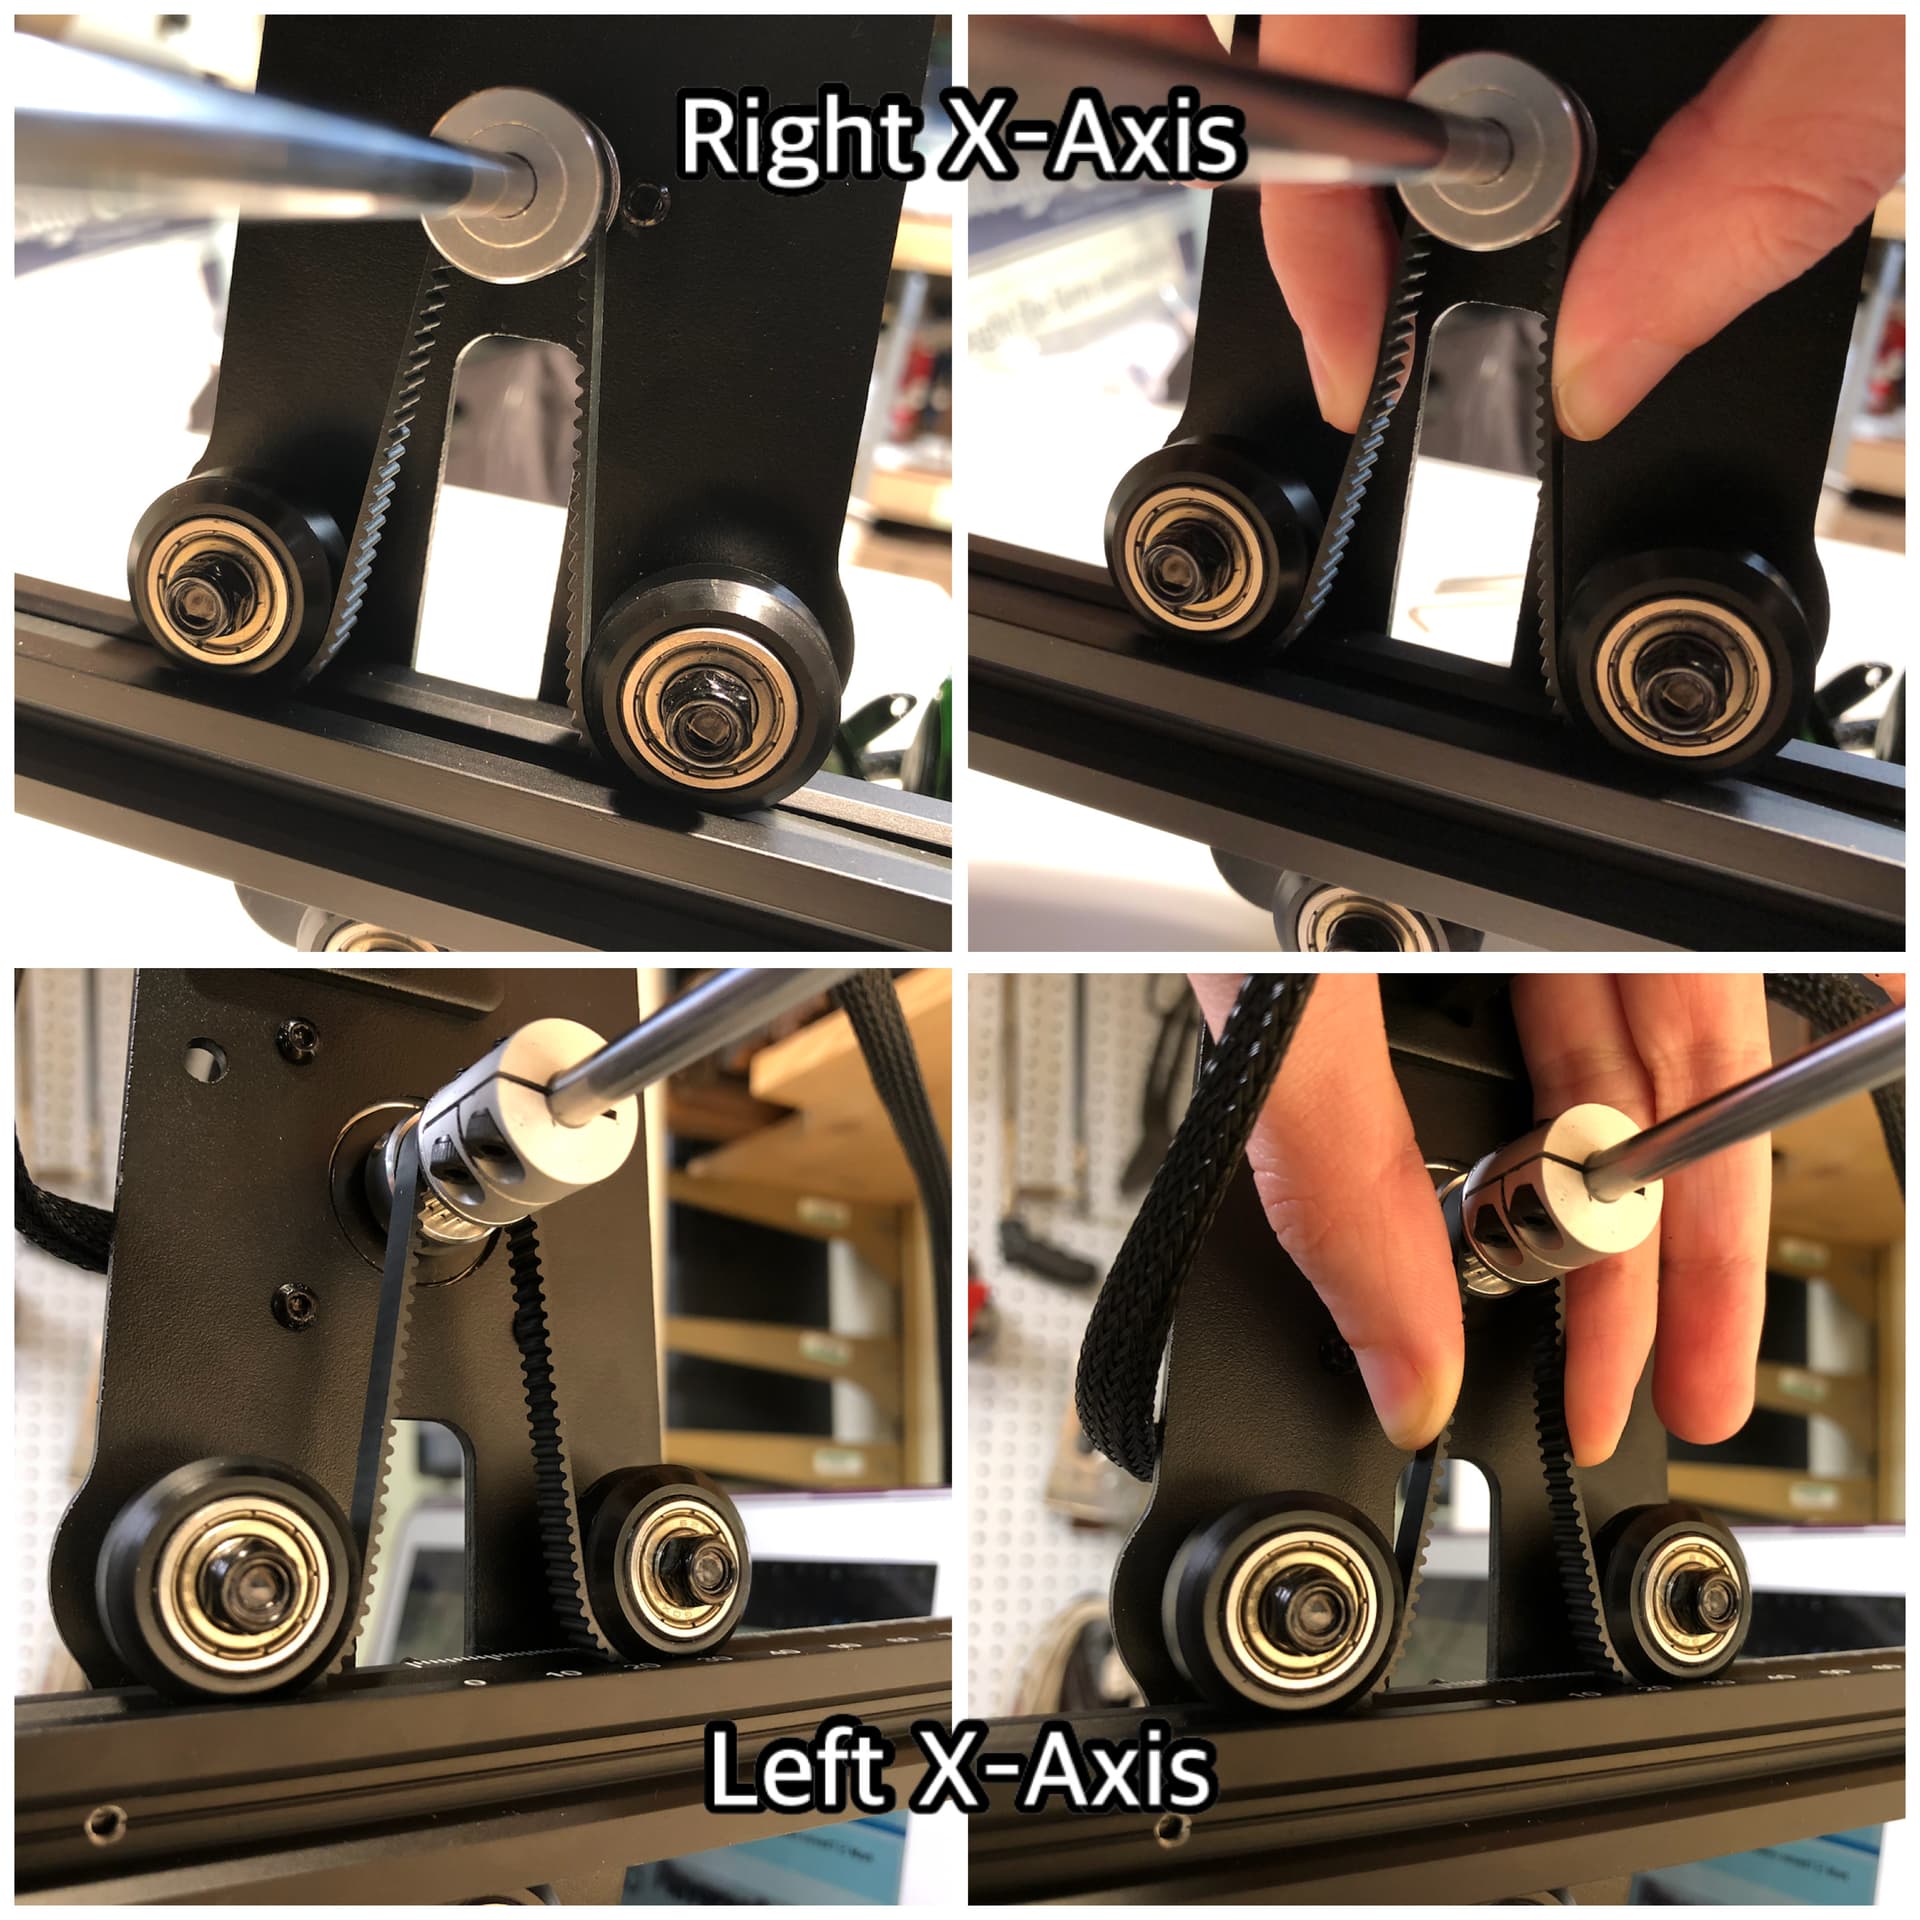
By the way, when I said X-axis I meant running along the gantry whereas you’ve pointed out the left and right Y-axis belts.
Definitely finish the mechanical check for belt tension and wheel tension but… I’m going back to the reverse test. this to me points back to this being a backlash issue.
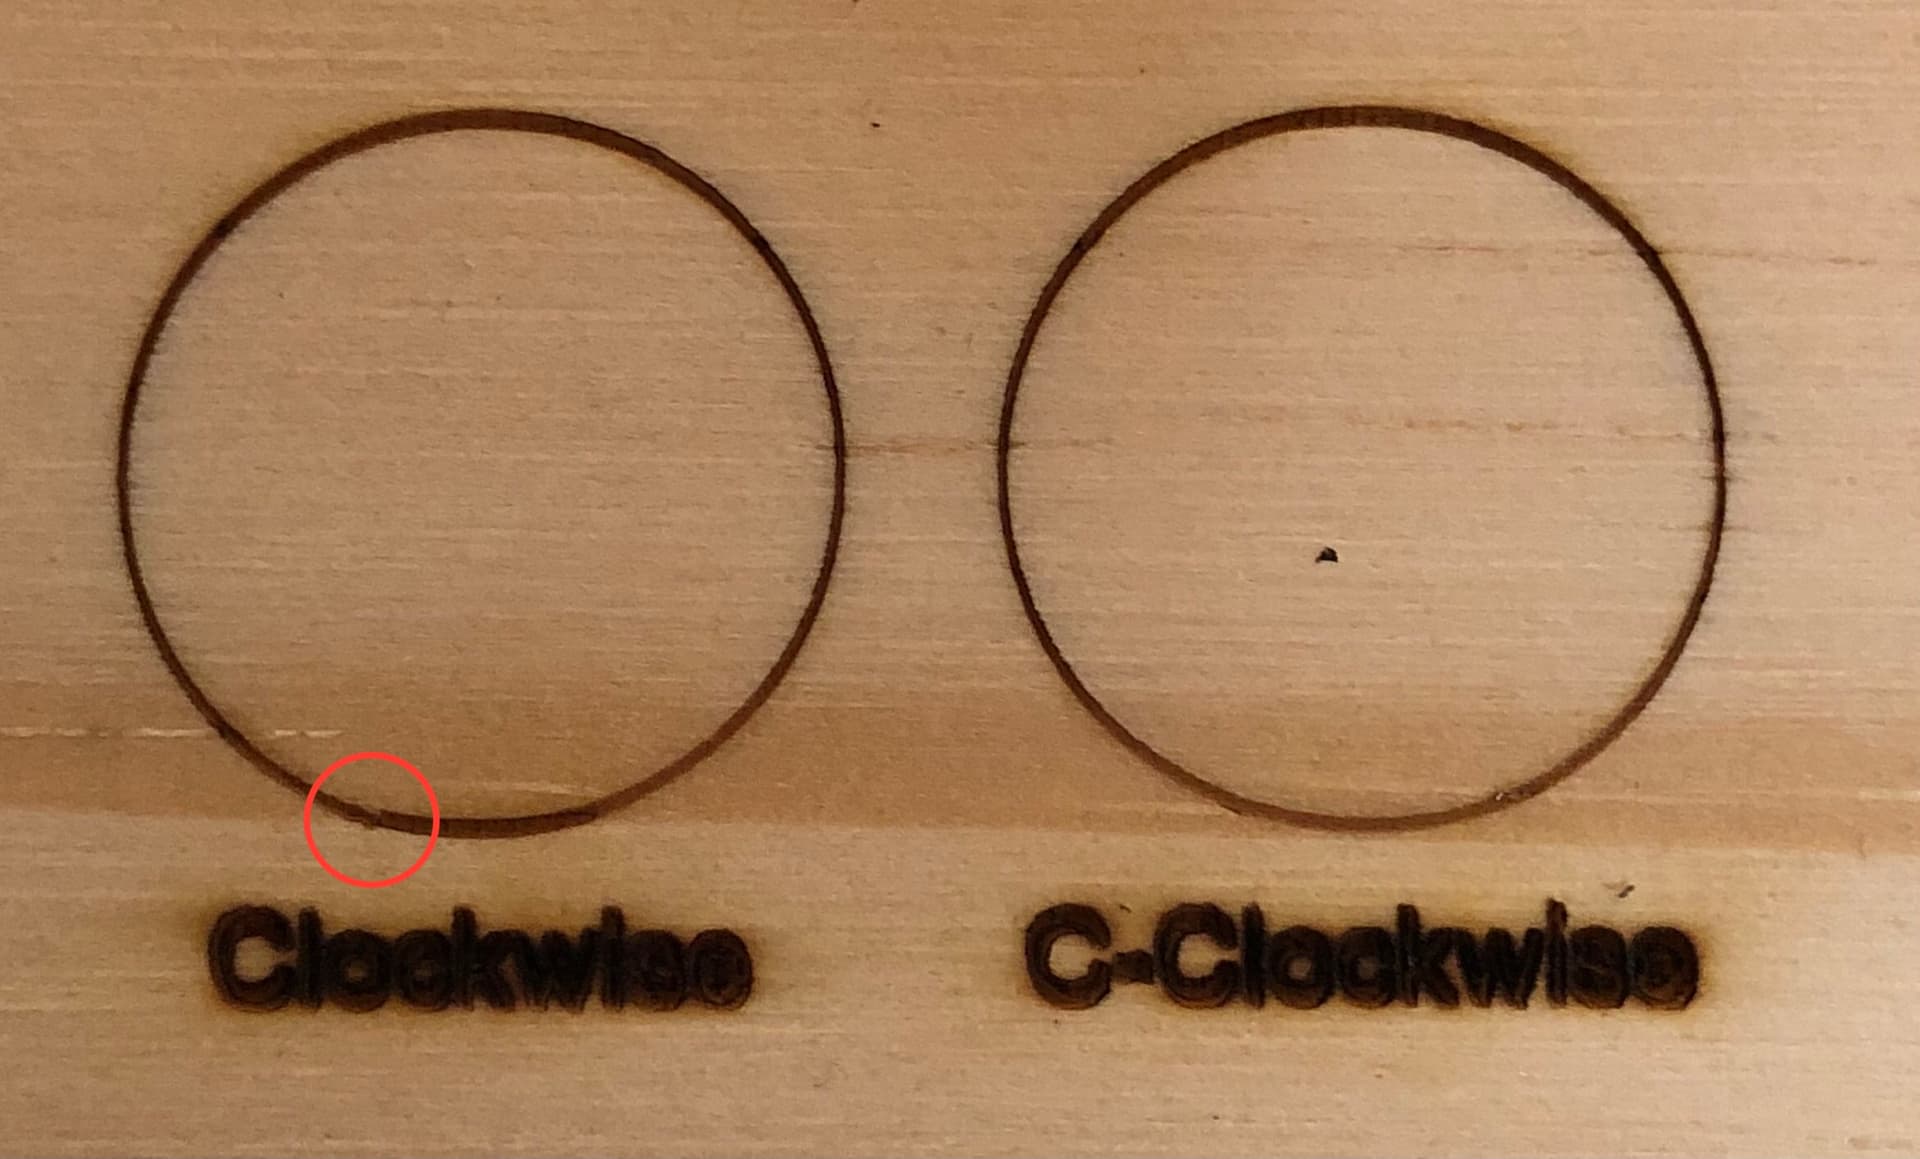
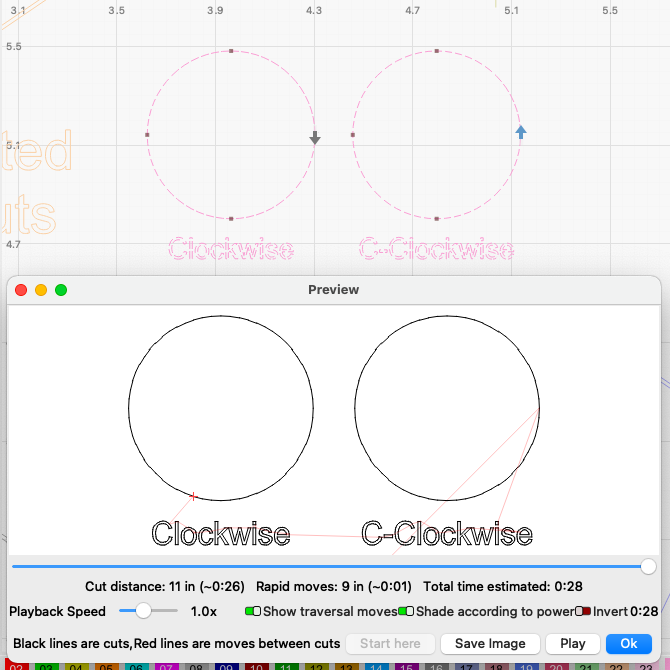
Can you try burning a pair of larger circles? One clockwise and one counterclockwise? If the issue is backlash the “ends” of the circles will not meet. Make sure “Hide Backlash” is not on when you run the test.
I have now loosened the belts a little more. At 20 degrees, the laser head stays firmly in place, and only begins to roll down the track around 45 degrees (albeit unevenly, as it rolls a little, slides to a stop, then sometimes continues its journey along the axis; a prod typically prompts it to resume).
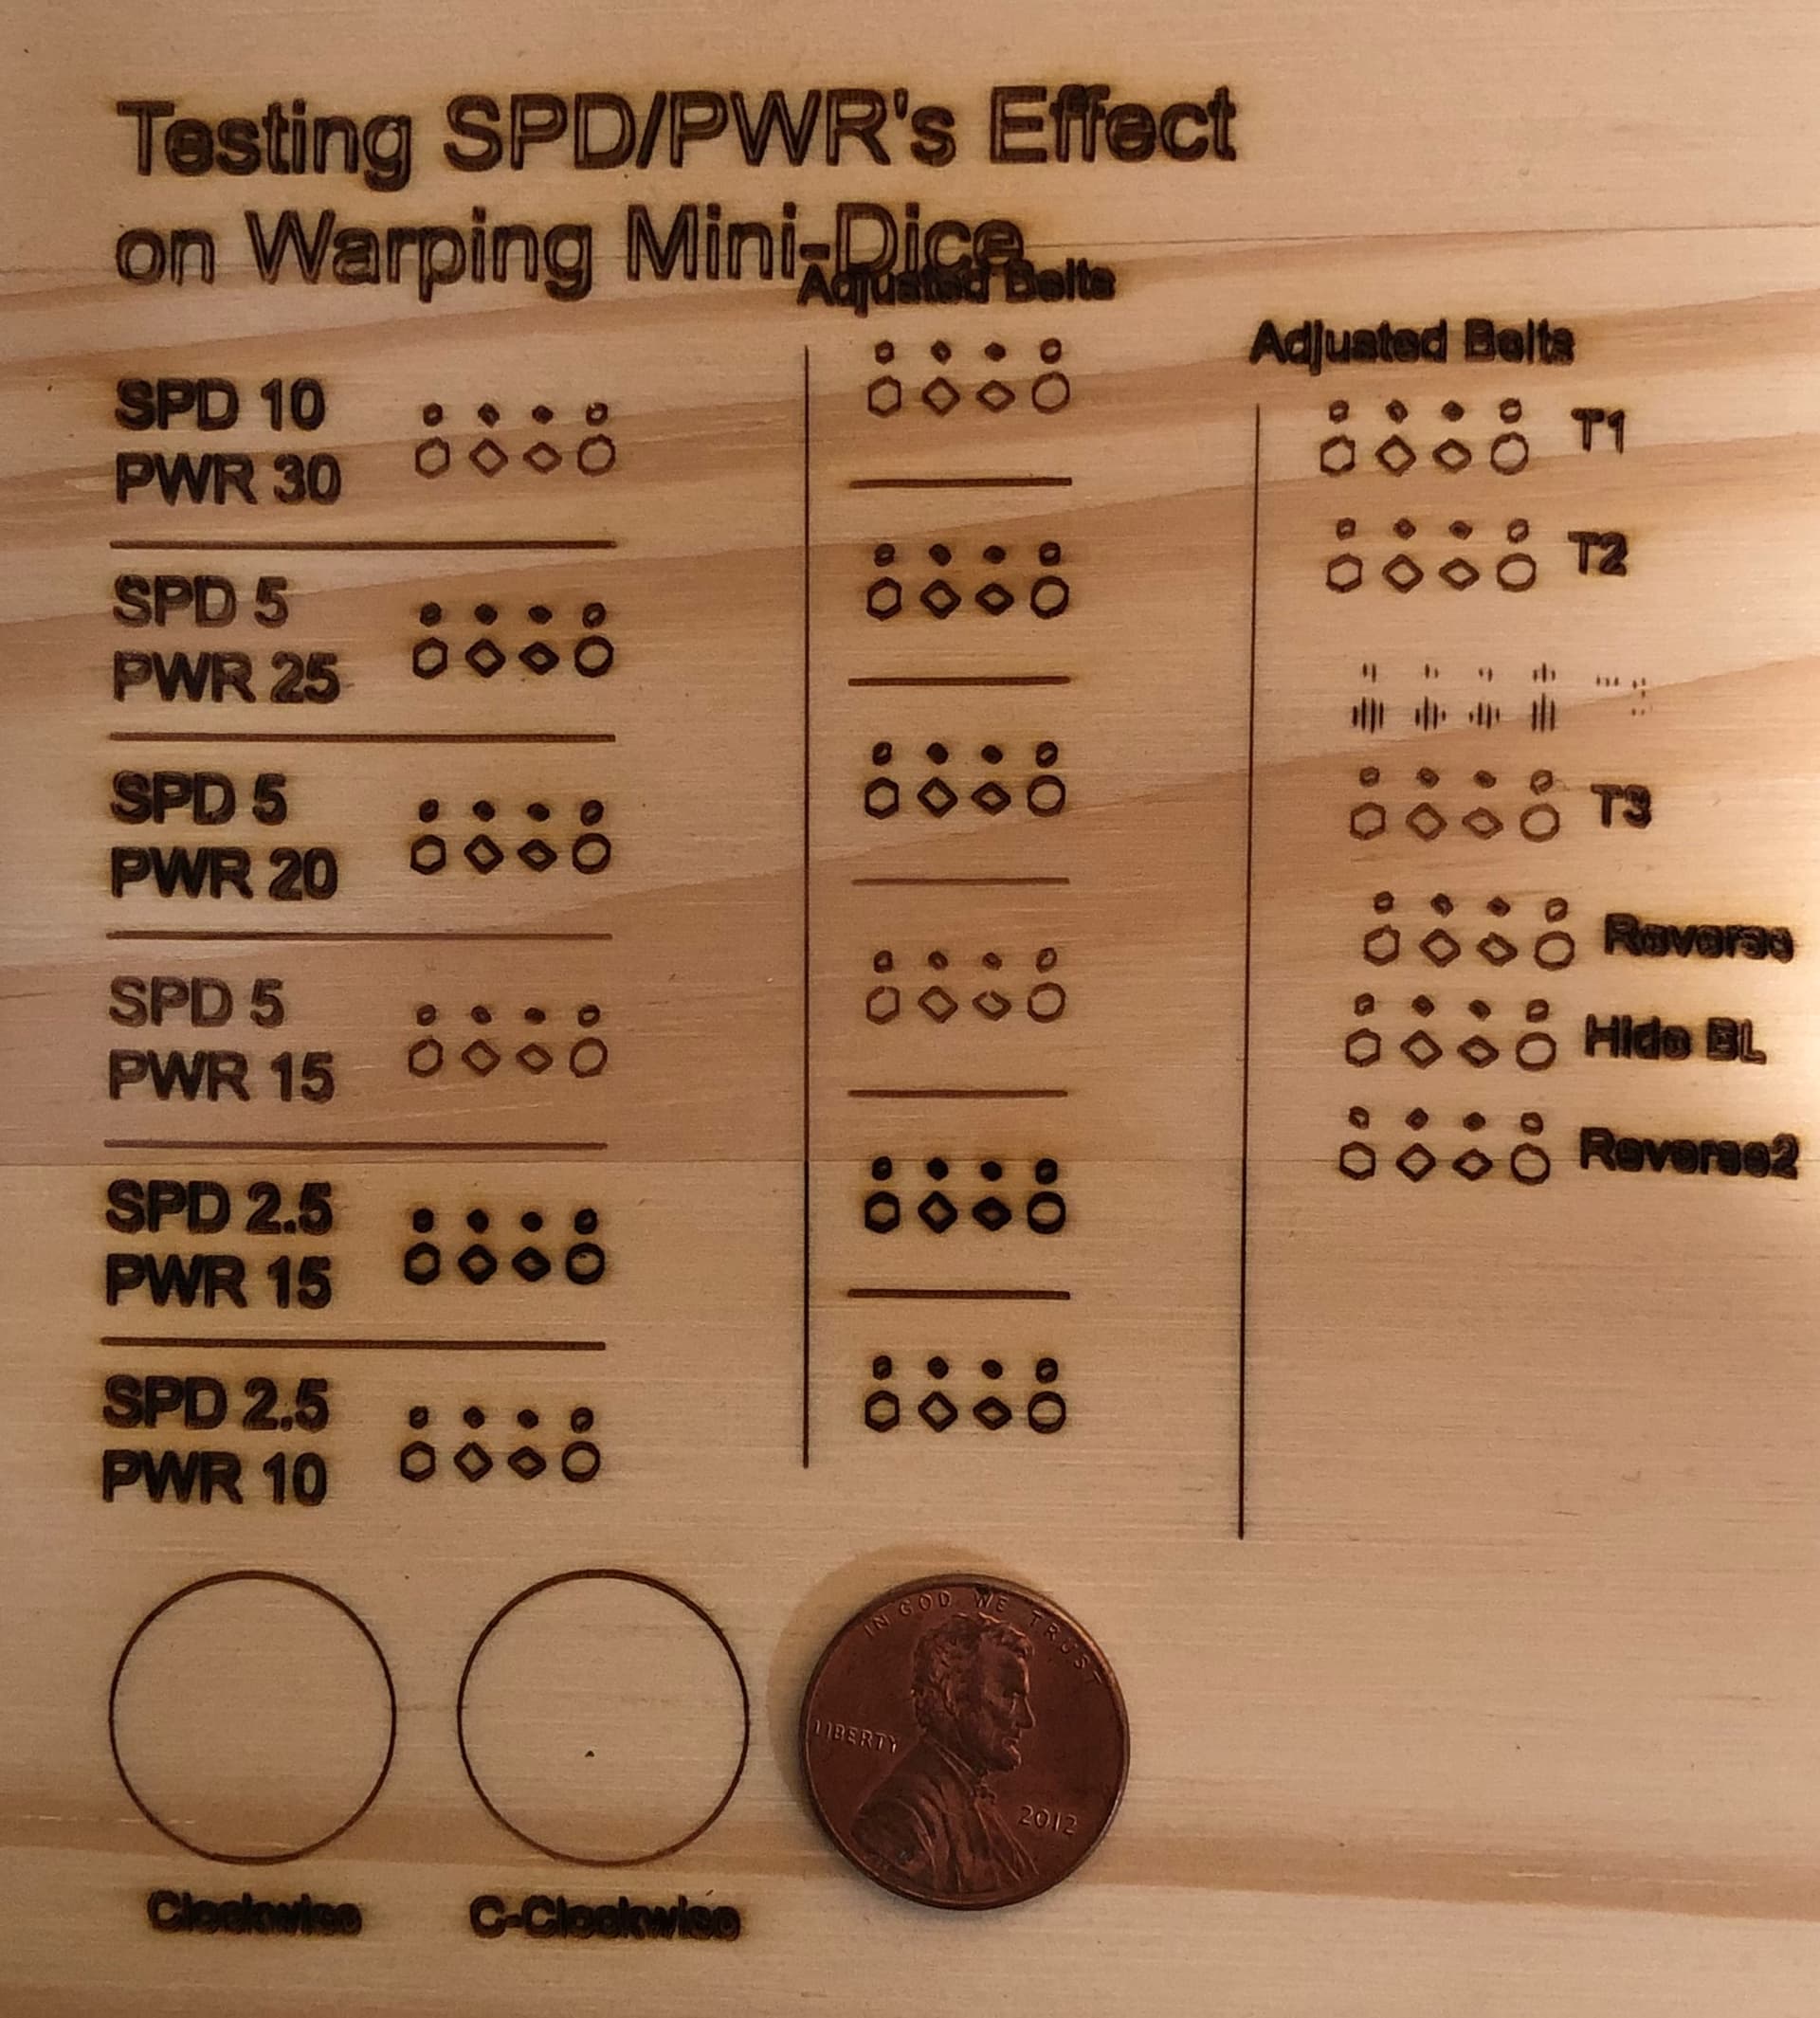
Of course! After making sure that “Hide Backlash” was turned off, below are pictures of the results (first), the set up in LaserBurn (second), and all of the test results so far with a penny for scale. From what I can tell, the ends of the Clockwise result (which I’ve circled) appear to be off slightly.
It looks like you may have a small amount of backlash still in the system but it seems quite minimal. I was expecting a larger gap in the larger circle test. With the penny for scale I’m wondering if you’re just working within the tolerances of your laser.
That seems a little excessive but not too concerning as long as it’s smooth and moves with little effort to each corner.
One thing I’m noticing is that your horizontal lines seem to wider than your vertical lines. Is your laser focus dot much longer vertically than horizontally?
Instead of trying to engrave these as lines you might want to convert the design to be fillable and running a scan operation to see how uniform the design looks. You can do this easily by selecting each shape and doing an inset and outset by the desired thickness and changing the layer to fill.
Hmm, as I mentioned, it doesn’t consistently roll smoothly from corner to corner; as such, I may loosen the belt a little bit more to avoid damaging it/the machine. But back to the matter at hand…
I believe that my laser point is 0.16mm x 0.19mm, so its horizontal lines will always be 0.3mm thicker than its vertical ones. Do you think that that + the minor backlash is why my smaller shapes have been turning out so strangely?
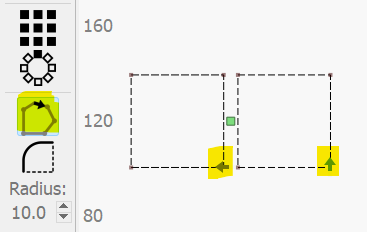
Would I do this by using the Offset Shapes tool (highlighted in the first screenshot below) and setting Direction setting to Both? Because when I do this and change the layer to Fill, it looks like it would cut the same as the other non-Offset Shapes shapes.
Line thickness would affect general look but not the distortion. I think that’s still from the backlash but might be inevitable at that scale. I suggest you try other engravings and see what sorts of results you get.
I think it’s because you end up having 3 shapes there, not 2. You need to delete the middle line or select “Delete original objects” to avoid that. You can get a preview of this if you enable a “Filled” View Style under the Window menu.
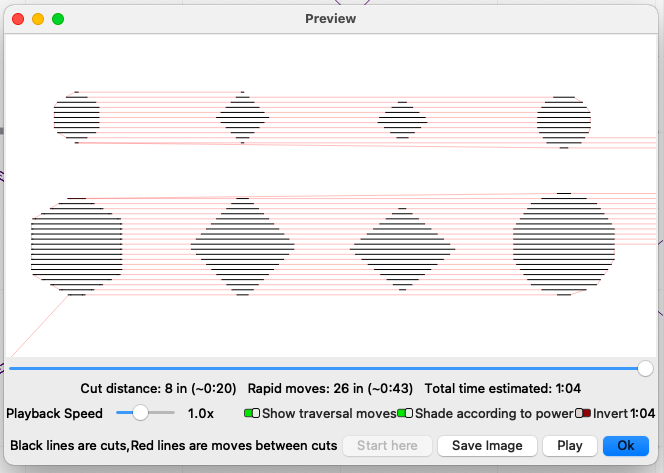
Thank you for clarifying that. I got a little curious about how the different “Fill” and the other Fill-related cutting modes would effect the results, so I did a few extra tests with these Offset Shapes, as pictured below. The first set is set to Fill (Interval 0.1), the second to Fill + Line, the third to Offset Fill (Power 30), the fourth to Offset Fill (Power 15), the fifth to Fill (Interval 0.075), and the sixth to Line.
Honestly, I’m quite pleased with the Offset Fill results, as their silhouettes are precisely the shapes I desire! As such, I think I’ll handle cutting smaller shapes that way* from now on. I truly can’t thank you enough for taking the time over these past three days to help a complete stranger out, @berainlb – I would still be hopelessly stuck if not for your advice!
*TL;DR: Since making small shapes via Line mode alone seems to be pushing my machine’s limits, the solution we’ve concluded is to 1) change the desired shapes to offset shapes via the Offset Shape tool (be sure to set the Direction to “Both” and turn on “Delete original objects” under Options), 2) set the layer mode to Offset Fill, and 3) cut it at half your originally desired Power.
Nice… although kind of odd because I assume the offset fill path is basically concentric shapes which I would think would have the same artifacts as your line engraving. Trying to work out in my mind if that changes anything… but nothing comes to mind.
Nice summary. Glad I was able to help. Keep exploring the laser. It may reveal more which can guide further tweaking.