Hello @LightBurn and friends,
I tried to send this as a message but the forum would not let me, so a post it is.
TL;DR
This is not a noob request for help, but an offer to help with snapmaker debugging…
Hi, I’m Vincent from Belgium. I’m a webdeveloper which means I know how to write a bug report or help debug issues.  I’m also the creator of this tutorial which helped many Snapmaker users on the official fb support page connecting there machine to Luban for 3D printing (update comming soon). I also helped fixing some minor bugs in the SnapmakerGcodeWriter plugin for Cura which adds the nessecary headers to the Cura gcode file for the Snapmaker machine to display correct values on screen etc…
Anyways… I just installed your lightburn trial and so far I seem to understand the basics and was able to do some test cuts on my Snapmaker A350. I have some suggestions for small improvements,
but first of all I want to point out a “bug”.
The bug
… is probably not a software bug but a hardware bug.
Updating the machine hardware greatly reduced the issue to “barely visible”, so …
Original bug report
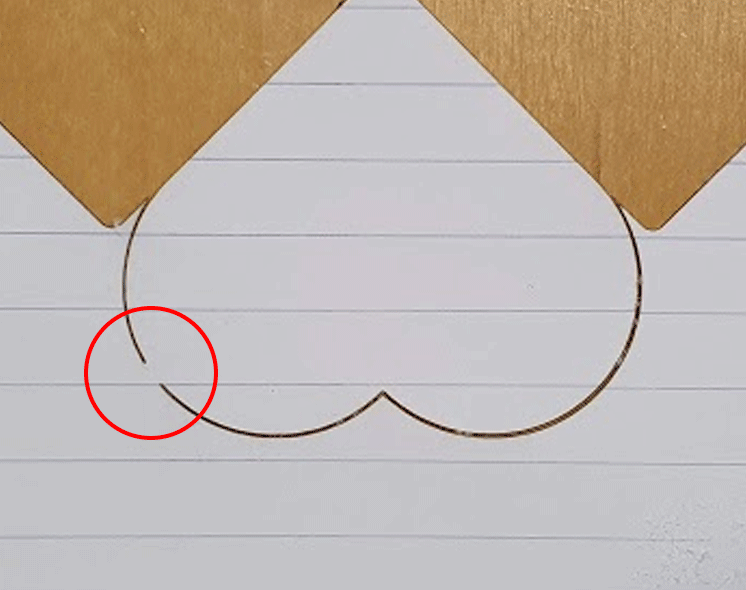
I’m rather sure that it is a bug because the “buggy” behaviour is exactly the same as in the previous version of Luban (The software from Snapmaker to create gcode for their machines) which they recently fixed. The issue beiing: “The first sub-line of a lasercut is drawn without laser power”, and therefore the cut is not a closed line. In the gif below you can see the lightburn preview on top of the actual result. You can clearly see that the first sub-line of the hearth shape is missing.
(Yes, it moved downwards from the starting position and started with the gap)
Snapmaker recently had exactly the same issue with their own software, although I’ve never discovered in time what the actual issue/fix was. So I just exported a gcode from Luban and Lightburn to check for differences. I’ve not yet pinpointed the breaking difference, but here you can see my comparisson:

The most noticable differences:
- You switch to relative positioning while the Luban software keeps it in absolute mode
- Luban declares the G0 and G1 speeds before starting the laser, while you only declare a G1 speed, on the first move instead of before, and only after starting the laser.
If I find the time next weekend I’ll manually edit and test the lightburn gcode to pointpoint what is causing the issue. Or maybe you have a better understanding or idea on what could be wrong.
Suggestions to lure the snapmaker community to lightburn 
-
As you can see in the Luban gcode the snapmaker software generates a preview/thumbnail image. It is a base64 encoded image (720 x 480) that get’s displayed on the screen of the snapmaker machine. I noticed Lightburn has a “save image” button in the preview screen so I think you already sortoff have that in your software. It would be a nice addition if a base64 thumbnail could be automatically added as a gcode header when a Snapmaker machine type is selected. I speak from experience when I say that it’s really handy if you have many gcode files on the Snapmaker machine to visually distinguish which is which variation of a gcode file.
-
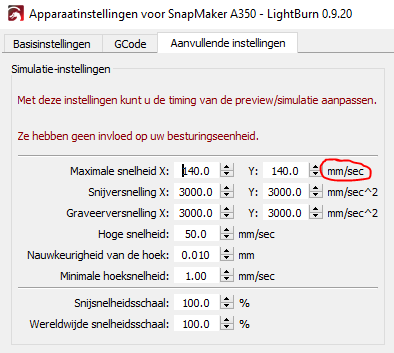
Although some header value’s generated by the Luban software are not useful, the following values are all shown on screen and it would be a great help those could be added to the gcode header as well:
- work_speed
- jog_speed
- power
- (Thumbnail as said before)
- estimated_time
An example of what that would look like:
-
As mentioned in this topic the snapmaker machine has a “focus height” which it clearly displays on screen. It would be very usefull if the “Move” panel of lightburn could display an input field for that value if a snapmaker device is selected. And automatically add it to the material height if a value is set. For my machine the “focus height” is 21.5mm, which is about 1~2mm above the bed of my machine. If a beginner would use the button to lower it to position z = zero he/she would crash his/her laser head 2cm into the machine bed and probably destroy something. If an input field was clearly displayed where the user is required to add the focus height. Your move panel could use that value as a minimum value - or even better consider it as z = zero - and help people not destroying their machine. And it would also be much easier to set the correct starting point when having a known material thickness, not having to calculate/add the focus height to the material height. One less thing to worry about i.m.h.o.
Possibly you can even get/read that value with a gcode command. I’d have to check that.
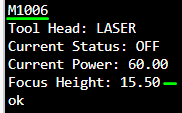
EDIT: When sending the “M1006” command to a snapmaker machine it will return the tool head information. That response has a Focus Height when the laser is mounted. In my case it is 15.50 which is weird as the same Luban software clearly displays “Laser Height: 21.500mm” at the top of the screen. I have no idea where the 6mm difference comes from. Maybe somebody else with the same machine (but with a different Laser Height value) can check with the M1006 command if the 6mm difference is a hardcoded value, which I assume it is.
-
If adding a Focus height field is not possible, would you please consider improving the move panel of the software? By that I mean:
- Provide a Z input field so we can type a value to go to.
Currently only X/Y values can be given. - Is it possible to auto update the position labels when using the arrow/updown buttons?
Now we have to manualy click the “get position” button after each move to check where we are and if we are close to ramming the printbed.
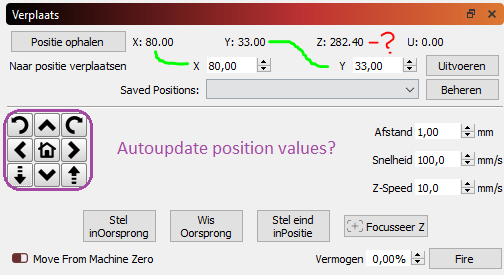
- Provide a Z input field so we can type a value to go to.

Just like the Cura tutorial that I mentioned above I’d like to make a Lightburn tutorial soon for the Snapmaker community. The Luban software by Snapmaker is limited but so are good instructions on alternative software solutions, and I think I can help with that. I hope to hear from you soon about my above suggestions and bug. And I will start writing my tutorial soon. Let me know if you have any other questions or need more testing from my side. I’d be happy to help.
Thanks
Vinobe93

 →
→