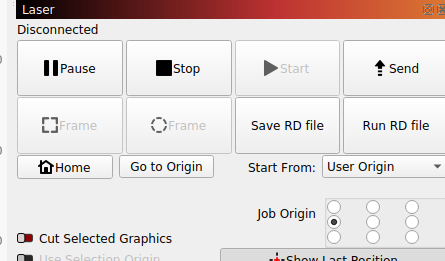
Hello, I am getting a little frustrated. I am trying to engrave a tumbler with logo. I set it up using the current position but when I frame it the head goes out of the engraving area. I don’t know if I am missing a set up. I’ve trying several times but I do not get the results I want…please, can you help me figure this out. Thanks
Is it going out of the machines work area?
I follow this process… With ‘Start From’ and ‘Job Origin’ set like the following

Once the rotary is setup, I move the object to the center of the Y range (assuming you’re driving it off the Y axes).
I ‘move’ the Y gantry over the mug and position X with the console and press ‘origin’.
I set my mug in with the logo centered at the top.
It should frame and run ok.
So it’s framing, there is no Ruida controller error?
There isn’t much to go on, as I can’t tell most of your settings.
It’s always helpful to the .lbrn2 file is possible so I can see what you are doing…
Like what/how does it go out of the engraving area?
I’d bet money you forgot to press ‘origin’ once the axes were set…
What kind of rotary do you have, a link would be nice.
I have a PiBurn on my China Blue 50 watt.
![]()
Hello Jack, thank you for your response! You didn’t hear from me because I was trying to figure it out by myself how to make this work. I was able to engrave a yeti cup but using “current position.” I tried several times with “user origin” but still don’t get it right. Answering to your question, yes, the laser head goes out of the machine’s working area.
I did not understand…so I need to use also the Ruida controller to set the origin?
I have an OMTECH 70watt blue and grey
I have a four wheel rotary.
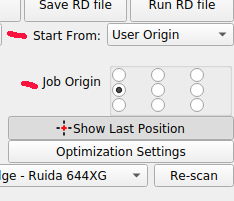
Yes, you will need to press ‘origin’… On mugs I use these settings for ‘Start From’ and ‘Job Origin’

As an example I use a mug with a logo and want the logo centered under the graphic. Also that my image is now rotated 90 deg to the right.
I have 300mm of Y area, so I figure the center of the Y axes to 150. This is the center of the Y axes on the table… also on the mug
Keep in mind the machine still thinks it’s using the Y axes and your ‘work area’ values are still valid limits.
Set up the rotary, move the Y coordinates in the machine console to the ‘middle’ of your Y axis ‘size’, in my case 150mm.
I have to physically move the Y gantry over the part, unknown to the machine.
I move the X axes just over the logo, or the bottom center of the ‘image’. The ‘Job Origin’. tells the software where to start the job related to the to the image.
Press ‘origin’ to set the machines ‘user origin’
This step is commonly forgotten. You must press origin.
It should frame and operate at this point.
Make sense?
Basically, rotaries are classified a ‘wheel’ or ‘chuck’ types. Doesn’t matter how many ‘wheels’ ![]()
Good luck
![]()