I just acquired an “Atomstack” rotary kit with chuck and roller units to use with my Longer B1 30. I’m starting with the supplied “black” cable for third party machines and have not yet powered anything on. Question, with the Y axis cable now connected to the chuck rotary, what now happens when my Longer B1 starts communicating with LB. Normally, an X and Y homing occurs, but, now with the X axis gantry not moving - to hit the Y limit switch, how would I proceed? Do I “trick it” with a finger press or W H A T?? Thanks for the advise that SOMEONE has experienced before… Hank P.S. Would/should I disable “HOMING” upon startup? Seems like I may have answered my own question, but reply’s are welcome…
Well, WE all know guys are damn impatient and after ANOTHER YT video, I discovered that while normally not recommended to “hot swap” devices, I re-enabled the home at startup, powered on, after homing I swapped the Y Axis cable from the lasers servo motor and plugged in the Atomstack chuck rotary. EUREKA… Now I’m good-to-go burning up some glassware. P.S. The “standard white” cable that came with the Atomstack did work properly and the “third party cable” did not play. Thanks to all for “almost” answering my question… BUT, I will Beee Baaack…
1 Like
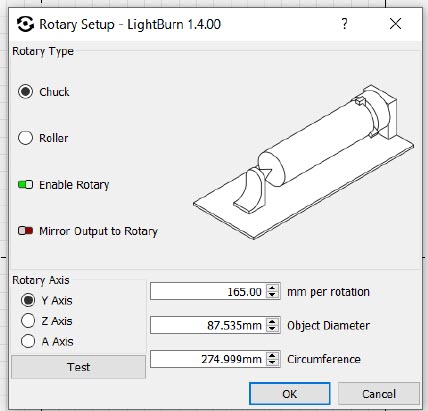
There’s no need to home when using the rotary. Just turn that off. Enable the rotary Set the MM per rotation and do a test. The rotary should do a rotation in one direction then the other direction and end up where it started. My setting for the Atomstack is 165 mm but yours may be a little different. After that measure the circumference of the object you are burning and enter that into the circumference field. After parameters are set up manually move or jog the laser where you want to start. Then change from Absolute to Current Position. You should be good to go
So heres the steps:
Plug Y Axis Cable from MB into Rotary
Open Lightburn
Turn off Home at startup
Turn on machine and connect to lightburn
Change from Absolute to Current Position
Enable Rotary
Set MM per rotation (165)
Do rotation test. (I put a little marker dot on top of the chuck to see start point)
Set Circumference of part
Mount and level product
Manually Move or jog laser to position you want to start
Focus Laser
Do Frame to check position
Adjust as necessary
Run Job
PS: I wouldn’t hot swap stepper motor cables. May create arcing between contacts and cause connector to fail.
I followed your steps and when I tried to burn, I received an error message - not moving due to out of bounds or similar message. I will probably figure this all out when I get a bit smarter, but for now, my work-a-round is to incorporate a 4 pole - double throw - ON/ON toggle switch with the controller board, pins 1 through 4 connected to the “center” switch position and the corresponding Y servo motor and rotary motor pins 1 though 4 to either side of the switched positions. I may still have procedural issues, but, with the Y axis servo being selected, start the laser - with homing ON, then after homing, throw the switch to enable the rotary. As there is no current flow to either servo when stationary, using the switch will “save” on connector wear and “should not” cause problems. My Longer B1 may have it’s own “mind” when it comes to communication protocol, but, being just a couple of weeks into this hobby, I still have plenty to learn… Thank you for your reply… Hank P.S. For my particular useage I always use the “current position” option when aligning a job with my crosshair laser. I have the laser offset distances dialed in to a pen point bullseye… I did have a brain fart when trying to use the crosshair laser but then remembered the X gantry (Y) motion was assigned to the rotary, Duh…
On my machine i sometimes get the message about out of bounds. But i just ignore it and it doesn’t prevent me from burning the job. I think its because i dont home the machine so it doesnt know where its at. I believe that message can be turned off.
Thanks. With only a couple of weeks messing with this hobby, I’m doing good, but, way more to learn…
OK. Here is my theory. When you set LB to NOT home on startup to use the rotary, the machine “thinks” it is at X=0, Y=0 , WHEREVER the laser head is located. ANY positive move in the Y (now rotary) direction is a valid command and the rotary moves “up”. When you command the X to move positive, all is good. IF you were to initially try to move the X or Y any negative amount right after startup, the “out of bounds” message appears. My “burn/rotary” switch box works great without having to dick around with cable swaps, and now that I understand that starting with NO homing, ALL X and Y movements need to be positive. Start with the X (laser head) mostly all to the left then electrically move over the rotary to the engraving field and then move the rotary positive at least a revolution or so, then any X or Y movement commands WILL be positive and will not display the out of bounds error… With this “revelation” I will switch/select the rotary before turning on the laser to eliminate the hot swap from the machine Y stepper to the rotary stepper motor; which may not be a problem but selecting the rotary with the power off is preferred…