I want my stepper motors to stay locked after completing movements. I have set $1=255. After homing, I am still able to move the head by hand with no resistance, as if it was never set.
I am using the Monport k40 pro (LB compatible version).
Is this a GRBL version issue?
I’ve also tried to use $H as part of the start gcode before the job as a workaround. That has it’s own issues:
I don’t know that board, but I guess it uses a custom firmware? Then maybe this feature was not implemented at all / incorrectly?
The parameters are standard in the original grbl firmware, but if it was ported to other mainboards, it might have been changed and some settings are not usable anymore…
I can HOME and then use MOVE TO POSITION in the LB interface.
I can also do that by seperate commands in the console,
but $H with G0 movement in one command, I get the alarm:3
Those commands can’t be executed together. $H starts the homing cycle that is running automatically. You need to wait until it’s finished to start the next command.
Not much, it’s just the version string, indicating that it’s indeed a grbl variant, but that doesn’t say anything about how the stepper control is implemented. You might ask the vendor which firmware they used or if it is released as open source.
You should not need to HOME at the start of every program if you do not touch the laser after homing the first time,
$1 =255 is telling GRBL to store the parameter as FF, which means no timeout. In the Console, enter $1=0 and then test if you can move the gantry. You might also try $1=256. I don’t think any other value would be used by the software developer.
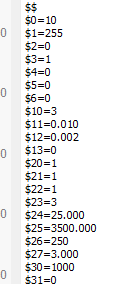
$1=0, followed by $$ gets me $1=0
$1=1, followed by $$ gets me $1=1
$1=255, followed by $$ gets me $1=255
$1=256, followed by $$ gets me $1=0
$1=1023, followed by $$ gets me $1=255
$1=1024, followed by $$ gets me $1=0
All of which still not able to lock the gantry.
Seems like it only stores 8 bits of your input.
Why do you need the stepper motors to stay locked?
Is it because of the alarm? If so, then the actual problem to solve is why the GRBL system was reset during a movement in the first place. Because even if you did have your steppers always on when idling, they would still get killed and lose position anyway during a reset while in motion.
The idea is to have no unlocks after homing until the job is complete. Unlocks cause unwanted movement due to the force of the cable chain and air assist hose. The idea is to have the same job be consistent across multiple runs especially during experimentation of trying different variables such as power, number of passes, material, and depth of cut needed.
Sometimes I need a certain movement at the beginning of the job, such as lasering the valley portion of a U shaped object, and a direct line of travel would crash the nozzle into the material. Imagine homing, then unlocking, then jog to the top center, then unlocking again, then finally starting the job and traveling to the valley of the material. These multiple unlocks are losing a lot of precision and it has shown my my results as what looks like small layer shifts similar to FDM 3d printing issues.
I see, well in that case since it seems that you are currently not able to completely disable the stepper timeout then maybe just set $1=254 and then your plan to include the home command and your setup move in the GCode Start Script is a good idea to try and minimise idle time.
I’m just not sure why you are getting the reset, maybe try rearranging the GCode slightly?
What happens if you change it so the G0 is not immediately after the $H, like this:
Or maybe it would make a difference to use a slower more controlled G1 move?;
That is only 1/4 second. I doubt it will solve his problem. Maybe the vendor knows leaving the motors powered up will smoke them. I cannot think of any other valid(?) Reason for the change.
You could try a different approach , from a different starting point… if you were to manually move the laser head to the rear-right corner until it stops is it less likely to move due to pull from the cables?
If so, you could opt to use that corner as a start point by using “Current position”, and the first layer is a 0% power move from that corner to wherever you needed to go, for example, here the red line is my custom start travel, and the blue is the job.