STL slicing /workflow Help

I have a 3d object that I want to make out of a 5mm black acrylic sheet which cuts well with my diode laser.
I have the STL file and I want to slice it into 5mm sheets then stack and glue them together for the final object .

It is a gear with a hub so all cuts will be straight down .
What method is recommended?
I have and older version of aspire ,lightburn of course ,inkscape ,coreldraw .
I have found that superglue creates an excellent bond on the acrylic .

Thank you for any help here.

Subscribing, as I have been contemplating some projects like this as well. I assumed I could slice the STL and export layers “somehow”, but haven’t actually tried or researched it yet.

I have an old (1997) chipboard-based model/puzzle of Darth Vader’s head that inspired the idea.

same! this will be interesting. I believe importing STL is already supported under the hood but not sure the work flow

Although I’ve only dabbled with it, Kiri:Moto may be what you’re looking for:

It is, as they say, opinionated, but seems to get the job done.

AFAICT, it does not automagically add locating pin holes, but that may be better handled manually in the original STL where you know what’s critical.

1 Like

In my rudimentary musings, I had assumed I would create the alignment features either at the model level or as part of the slicing. I have really only worked with PrusaSlicer and that’s been a few years. I came to the conclusion that hobby/consumer FDM couldn’t do what I needed and haven’t used my printer since.

I don’t know if you are familiar with it, but there is an online program called Tinkercad. It will allow you to import an .STL file, edit it and then export as an .SVG (which you can then import into Lightburn). I’ve used this process when it was much quicker to cut out an object from a piece of acrylic than print it on my Ender 3. I was putting a larger fan over the mainboard on my Ender, three hours to print it, less than five minutes to cut it out on my 60W CO2 laser. I found the Ender 3 mainboard cover .STL file on Thingiverse. Also, I’ve found that this glue works very well on acrylic: SC-125 Acrylic Solvent Cement Adhesive - 1/4 Pint (4 fl oz) | eBay

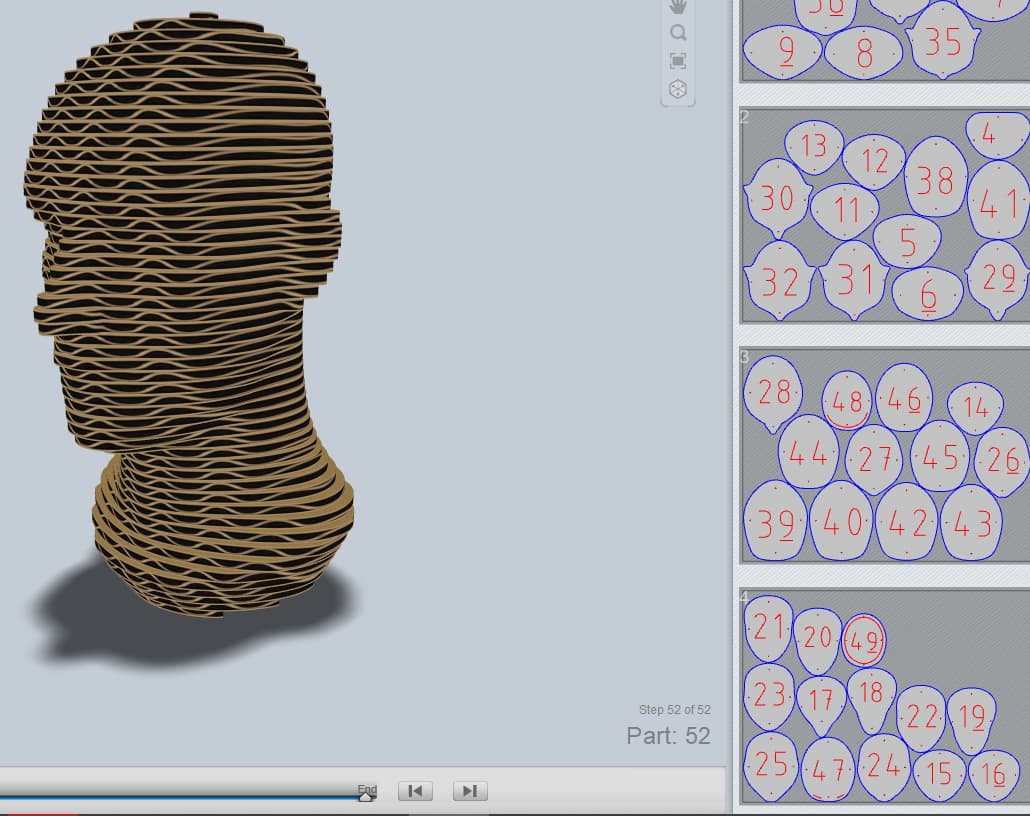
You mean like this? With self-nesting auto-dowel marks and assembly instructions?


this looks nice, what program is this please?

The best-kept secret since the Big Bang :smile: .
It was part of a collection called 123D, but Autodesk discontinued it and now has a slicer for Fusion. I don’t know if it has the same options.

123D Make can now only be obtained on the gray internet, but is and was free. I have version 1.6.0.

Tutorial

instructions

instructions_1

projects

1 Like

Did you get this to work? I can only get it to output gcode… not very useful if you can’t actually use it…

I set it for the only laser it had, but even all the other outputs appear to be only gcode…

Did I miss something.

:smile_cat:

The Export tab can spit out SVG / DXF / G-Code and, AFAICT, at least the first two import into LightBurn. I haven’t yet carried anything through to actual cutting & assembly.

I now have a lot of cardboard from all the moving boxes, so expect some truly grotesque lawn sculptures as Halloween approaches … :supervillain:

If one is adventurous, there are two somewhat involved options that I’ve used in the past. One is a free multi-platform program called OpenSCAD. One imports the STL file, then positions the model in the desired location in Z-space and performs a projection. This creates an outline which can be exported as SVG. Each Z-movement can be used to create a new exported file.

OpenSCAD is a text scripting language that has plenty of online support. One would create loops to perform the Z-shift and projections.

The other option is to use PrusaSlicer, configured with an appropriately large bed size for your model, set to match the resin printer native to Prusa. Layer heights would be set to match your requirements. The STL slice results creates a single file, which when renamed to .ZIP, allows one to extract the .PNG files, which are easily converted to SVG.

Not a simple point-and-shoot for either one, obviously.

Dragoncut showed how to use 123Make here:

It seems you can download it legally, still. The video is in German, but you can turn on English subtitles.

Those who never went into the dark side of the internet that throw the first failed engrave!

2 Likes

I’ll leave here the link to version 1.6.0 for Windows.
If anyone has it for MAC, please share it.
Thank you.

1 Like