I want to start filming my projects, but I would like to do them in time lapse. I have seen a plugin for 3d printers called Octolapse that uses the code to take a picture when the print head is in a set location so that it’s not in the way of the picture. Does anyone know if it is possible to read the location of the laser head from the controller and use it as a trigger to take a photo? I assume python programming would be involved, Is there already a program that does this for lasers?
An Example:
Generally speaking, the Ruida loads the file then executes. The only knowledge of what it’s doing is via the out1, out2 outputs… The status is active when it’s running a job and wind when a layer with air assist is executed.
When Ruida is running a job, it doesn’t seem to like to talk… it speaks UDP.
This is the only way I know of talking to it…
![]()
How would you envision this working? 3D printing has a natural transition period between every layer change.
Laser cutting is is typically a 2D operation. You wouldn’t want to interrupt a cut to take a picture so that’s not really an option. If there were multiple cuts then you’d basically have a slide show of newly cut pieces.
This could potentially work for scanning operations where an engraving would appear over time although this would dramatically increase job time if you had to park the laser head after each scan to take a picture. Assuming this could even be done. In reality, I don’t see how this could be done conventionally with Ruida controllers. If you were motivated, you could attempt to run a single scan line at a time per job, take a photo, and then repeat this for every single line of the design.
Every time I’ve wanted to do something similar to this I just did a traditional timelapse. Frankly I think this works better for how lasers operate anyway. The novelty of the approach for 3D printing is seeing something appear out of nowhere but the same thing doesn’t quite happen with laser engraving.
Basically I was thinking that it would take a photo when the laser head transitioning to the next layer of the engraving. Not stopping it, just timing it so that the photo happened when it was as far to the left ( or right depending on how you wanted to think of it ).
In that case I think an integrated software solution is unlikely as I don’t think the Ruida is really designed to handle this or exposes the capability to do so.
A custom hardware solution may not be that difficult. For example, by adding an optical sensor near one edge that triggers a photo to be taken every time it’s tripped. The photos could then be stitched together to create a timelapse.
Do do this, it would have to be in a scanning mode of the same side position every time… Many of my engravings do not reach the same side locations to make using some type of optics or something really useful.
I’d try it with just a camera and see if was worth even dealing with… might have a couple interruptions… That would probably relate to speed and frame rate issues…
Good luck
![]()
you could use the DIR signal on the stepper driver. In this way you would know when the head is changing direction, so get a picture at the end of every scan line even if they are not the same length
I have to look up half the words you used, but yes… That sounds like what I’m looking for. When the motor moves from left to right, take a picture. So I might want to look up m how to intercept the signal from the controller to the x-axis motor… ![]()
Ruida from my reading here can’t do it (never used, dont own one) , but what you can do is a process to get the picture you want.
First you know in the gcode when the laser is going on and off, you can add a set of custom commands to trigger a switch on the pi, which then in turn triggers the camera. think of it as a find and replace in notepad once you figure out the movement to clear the laser head out of the way that can upgraded as you learn.
I have see @jkwilborn and others posts on Ruida where it basically preloads the entire program, which is why i suggest adding in a trigger routine to the movement, if needed you can use programs like pronterface which while for 3d printing allows you to visualize the gcode to find the spots you want to take pictures of.
If i need to explain better let me know and i will post an example for you
Alas, Ruida controllers don’t use G-Code and editing the undocumented binary file structure isn’t feasible.
I’ve never looked at the direction pin on the motor driver… have you?
![]()
So if I can’t access the Ruida binary code, is there a way to tie into the output signal for the motors? If I know that the transition to a new line (and therefore the most proximal location on the x-axis of the laser head) is the signal to the y-axis stepper motor to advance, can I capture that signal and use it to trigger the camera to take a picture? I know this is beyond the scope of Lightburn but your responses have helped me narrow down my problem, thank you.
Both stepper have a direction input… I haven’t looked at this, but the idea might work…
When the motor is stepping in one direction it’s likely scanning… When the direction input changes the motor goes the other way…
I asked @ednisley if he’s tried to look at it… I haven’t…
![]()
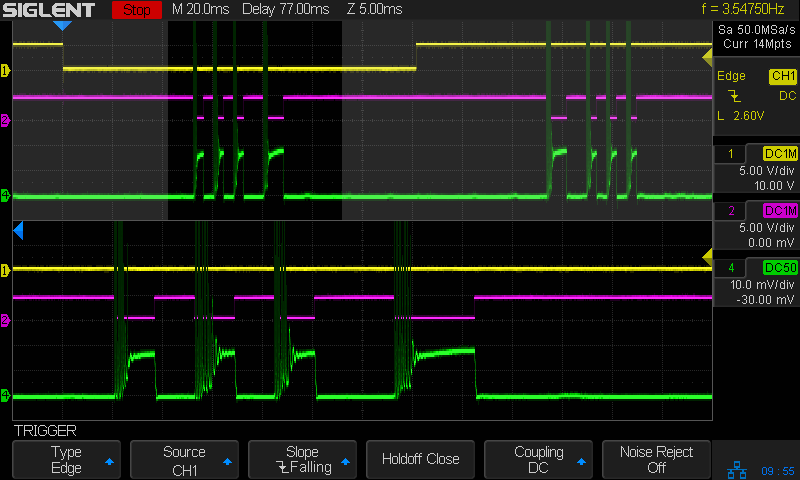
I used the X axis DIR pin for scope sync while watching the beam current across various targets. It’s the yellow trace on the top, triggered on the falling edge:
The gotcha: the DIR signal just indicates when the X axis is moving in one direction, regardless of where the laser head might be, with a transition whenever it changes direction. For an engraving, the Y axis always moves in the same direction, so its DIR signal never changes.
I could get away with triggering on the X axis, because the engraved patterns had very structured layouts intended for this purpose:
A vector layout would produce random triggers with the head anywhere on the platform. Just firing the camera at regular intervals would probably be better.
This topic was automatically closed 30 days after the last reply. New replies are no longer allowed.


