I am having trouble cutting cheap 3mm ply cleanly. I am running a 60W co2 at 45mm/s and 80%, 2 passes with 1mm z each pass, and I cannot find a nice balance between a clean through cut, and burning the surface.
More speed needs more passes or more power = burn
Less speed needs less power = bad cut
Less speed with less power and more cuts = burn
Do I need to go faster, same power, but lots more passes?
Can anyone with a similar machine give me some direction please?
It also does the multiple cuts on each part of the object moving z between each cut,rather than the whole object then move z.
Is this because its set to optimize cut path and its already at that point?
I cut 3mm on my 60 watt at 15mm/s and 60 % power in 1 pass using a 2 1/2 inch focal lens. I also us air assist at 30 to 40 psi. The air assist makes a huge difference, and I plumbed my laser to my shop air compressor with a pressure regulator so I can adjust pressure as needed. I think your 45mm/s is way way way to fast.
This is not exactly the same, but still useful. I cut 3mm on my 40 watt at 12mm/s @ 50% power in 1 pass using a 2" focal lens. Although I’m not exactly sure of my power setting because I haven’t connected up my mA meter yet - I imagine it’s higher than 50%. Also with air assist.
I second @weber 's settings including the air assist which is vital to clean cuts.
The quality of the plywood makes a big difference too. Birch Plywood with thin layers and very thin glue lines will cut cleanly, junky three ply with thick glue layers won’t.
I cut 3mm basswood ply at 20mm/s@70% (~ 30 watts) very cleanly. I also run 60psi for air assist when cutting most material.
The lower cost of the plywood the more ‘variations’ of it’s construction and the cut and cleanliness will suffer. I’ve had the more expensive types fail to cut and found a ‘wad’ of glue in some crevice.
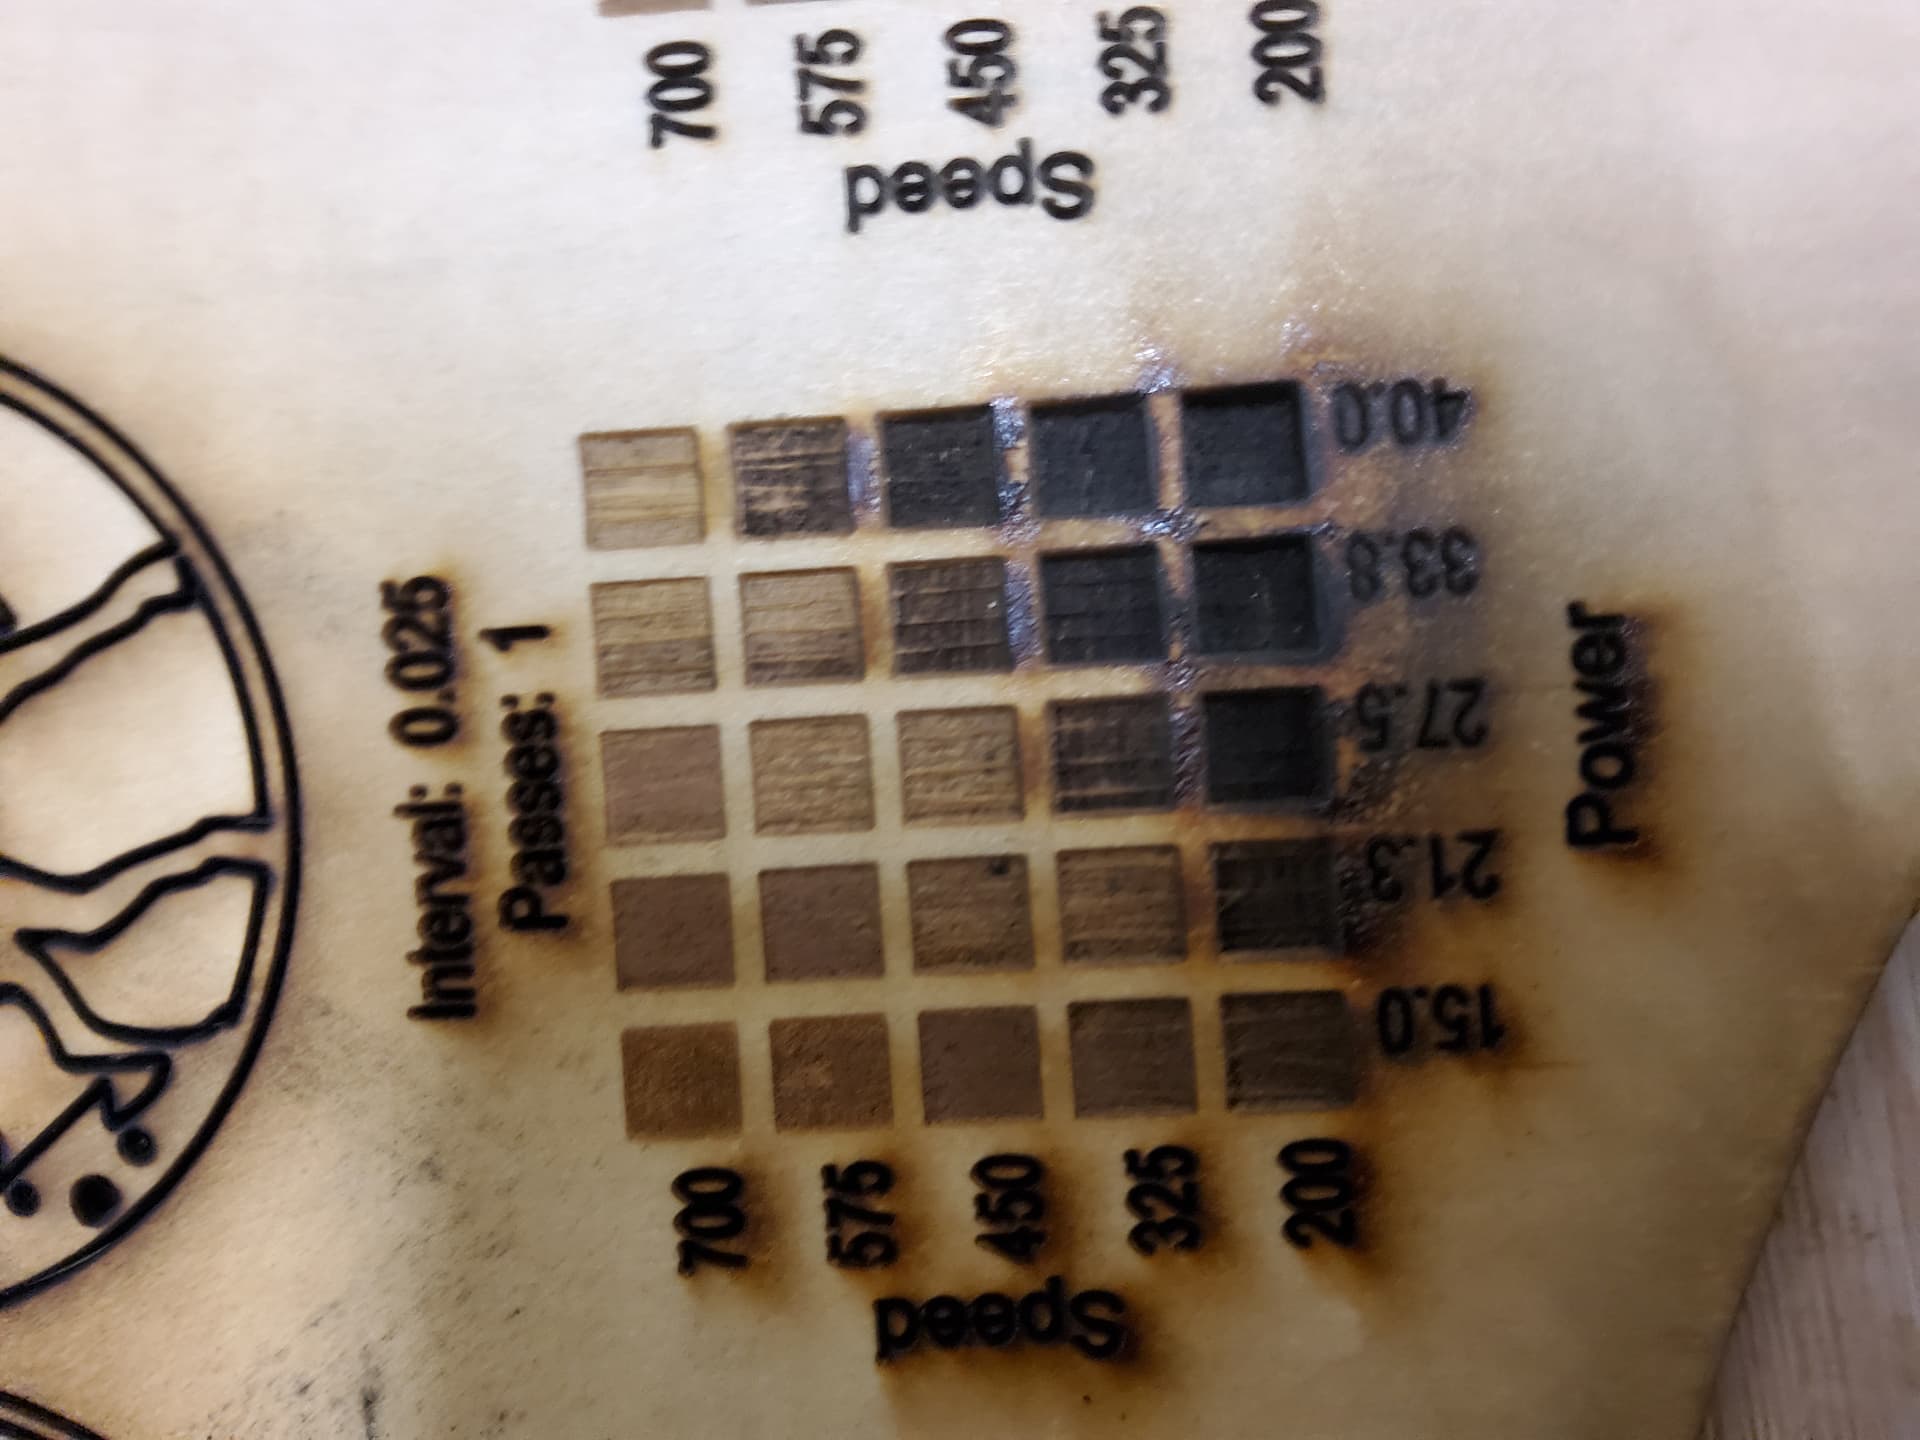
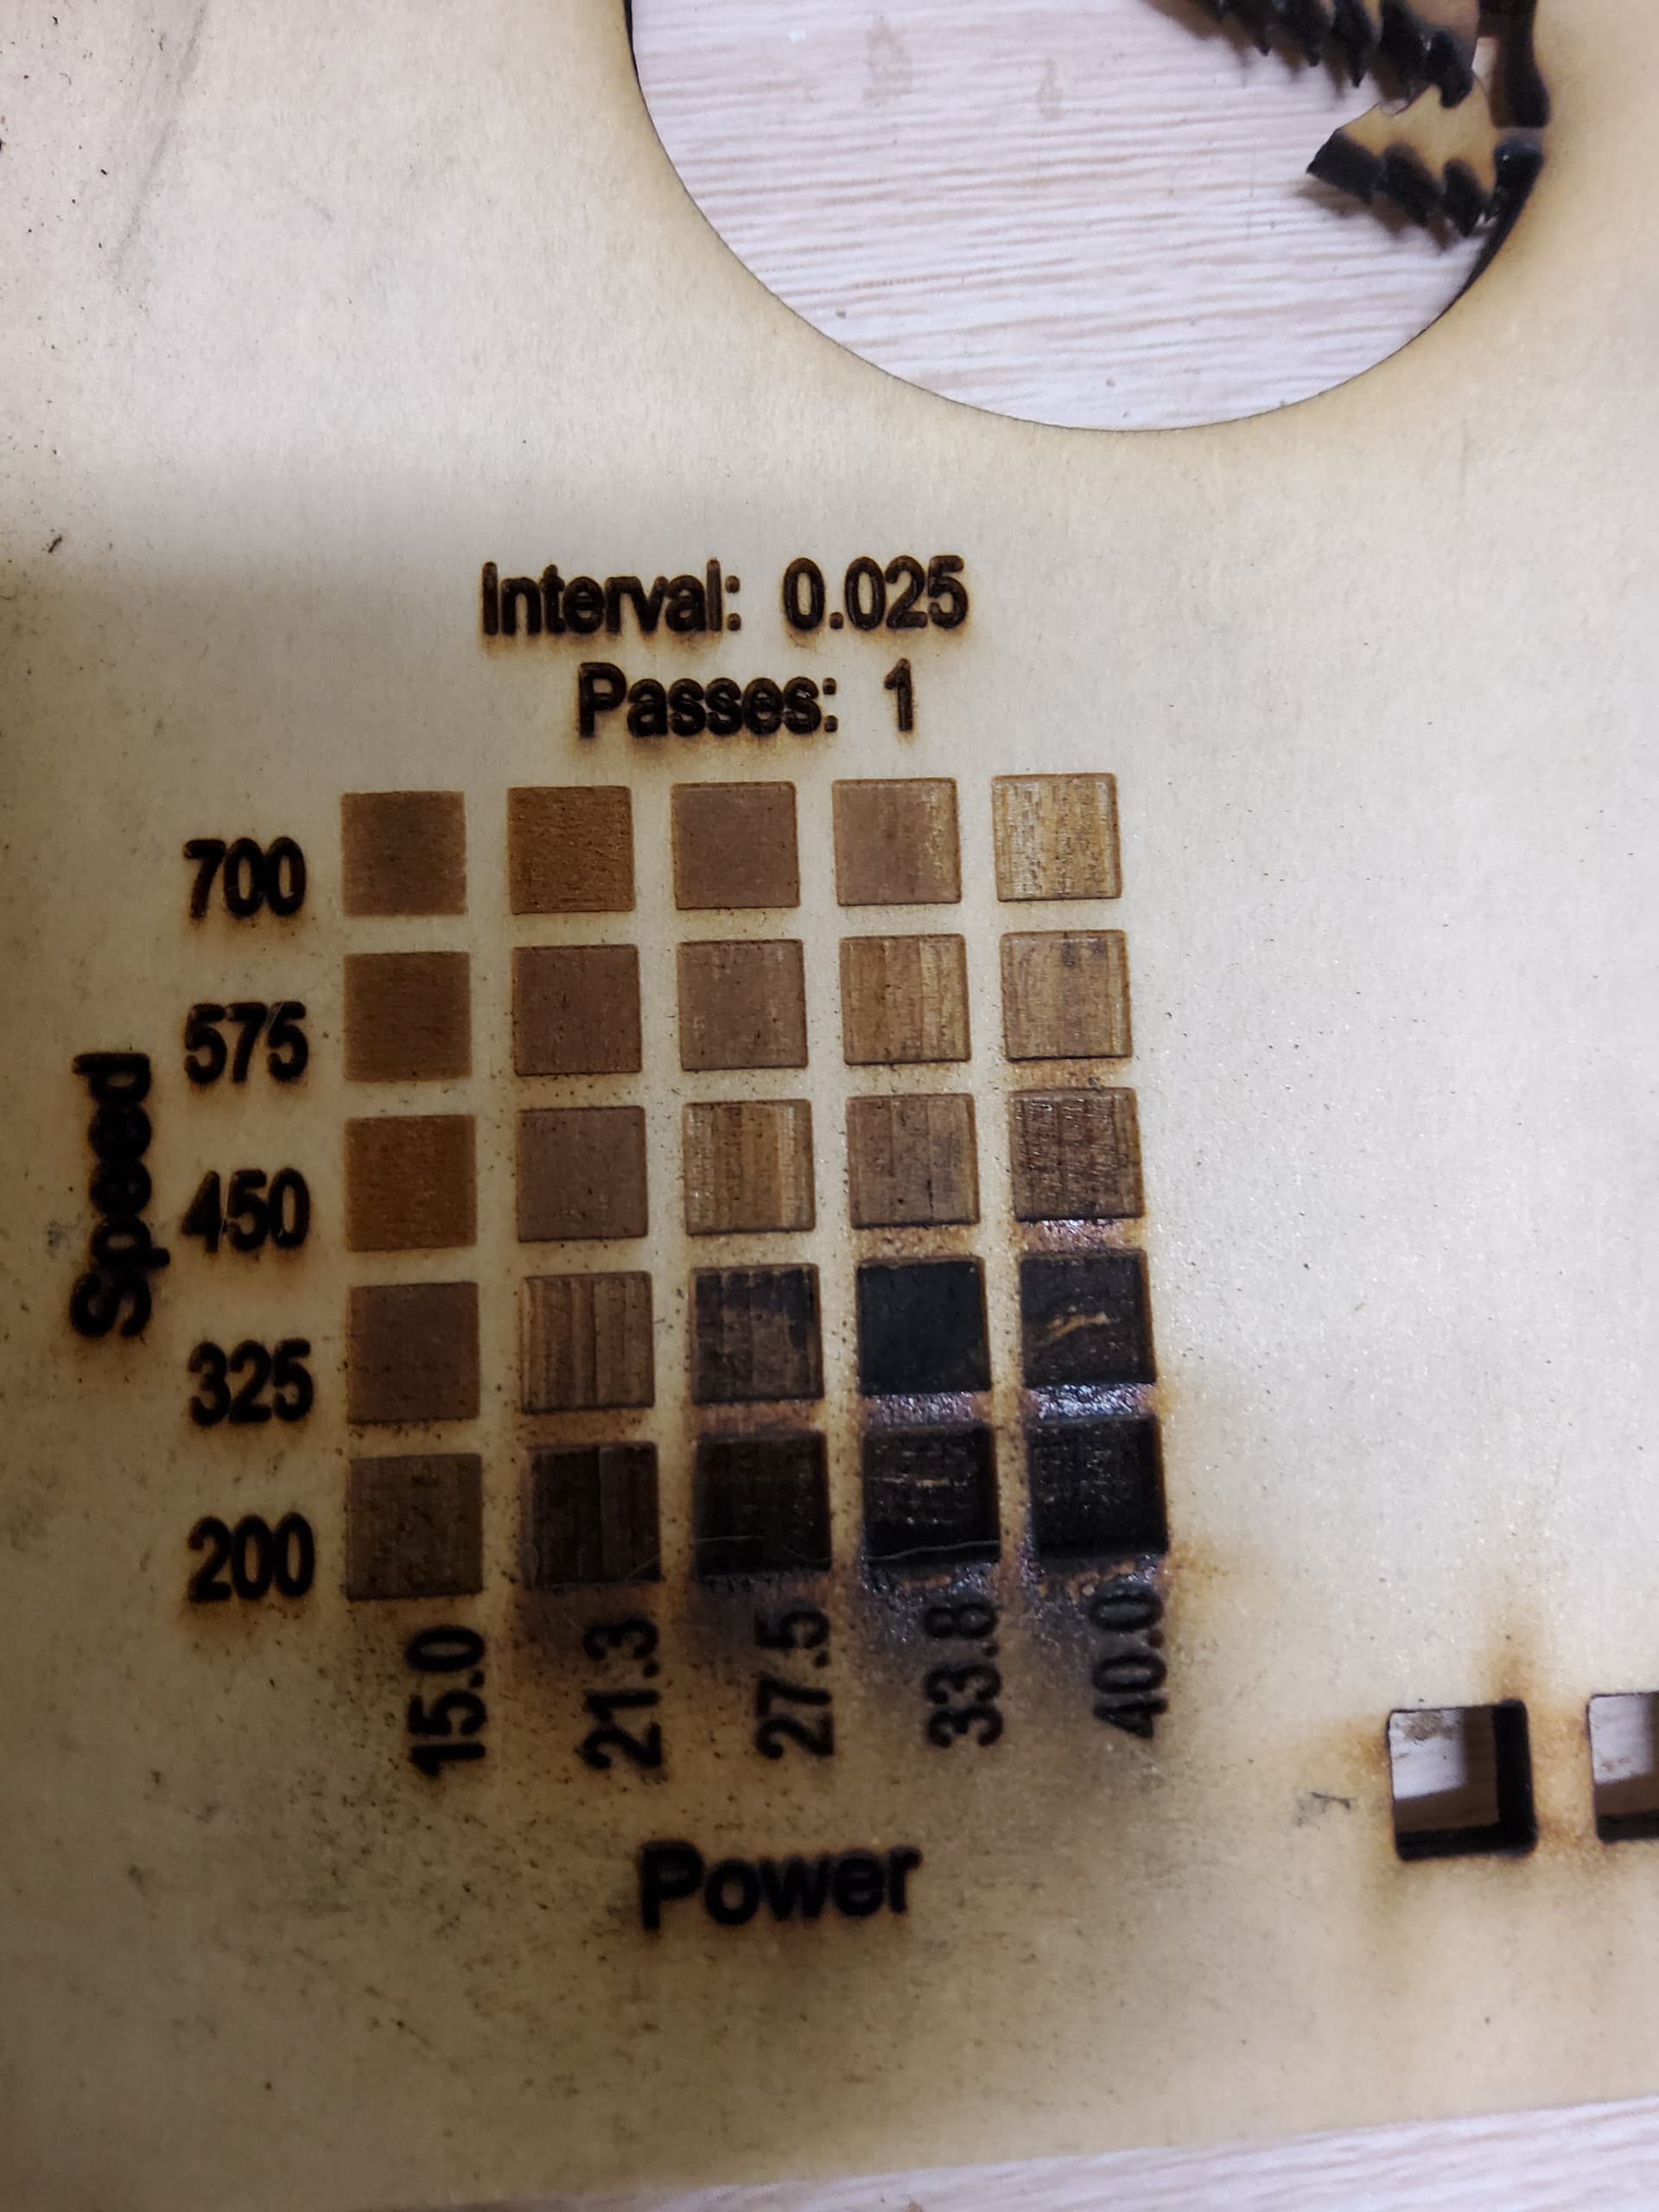
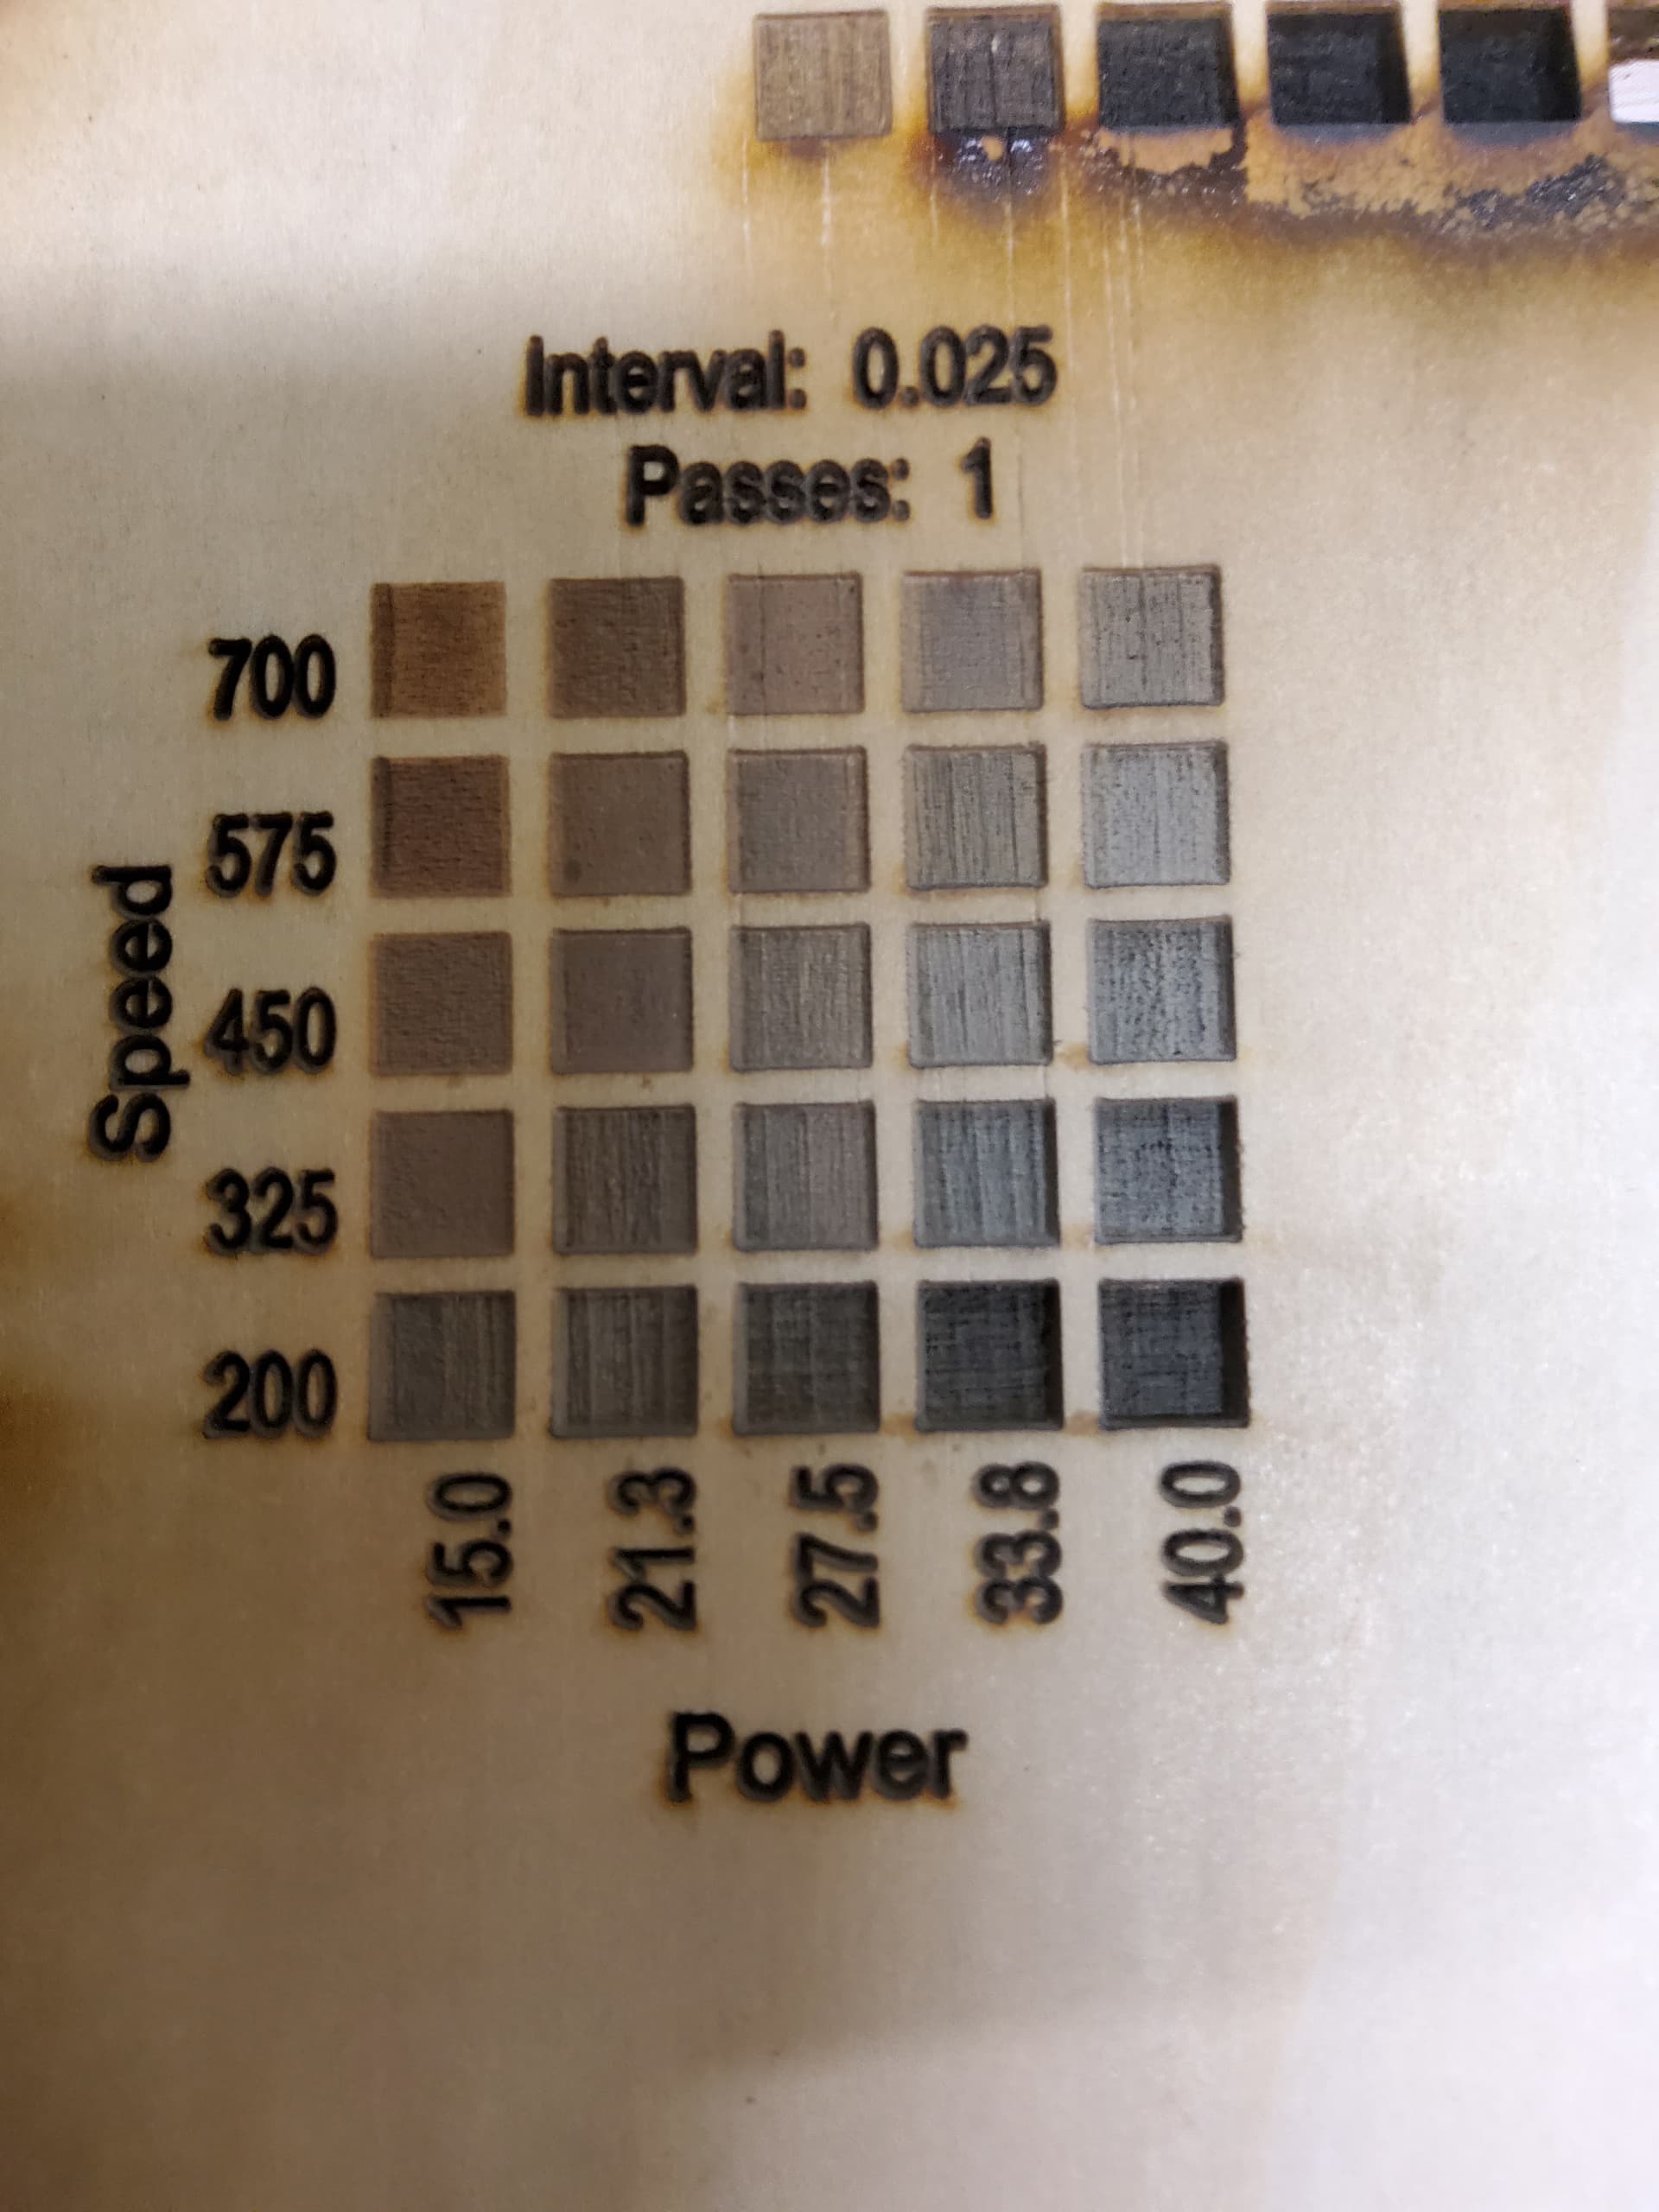
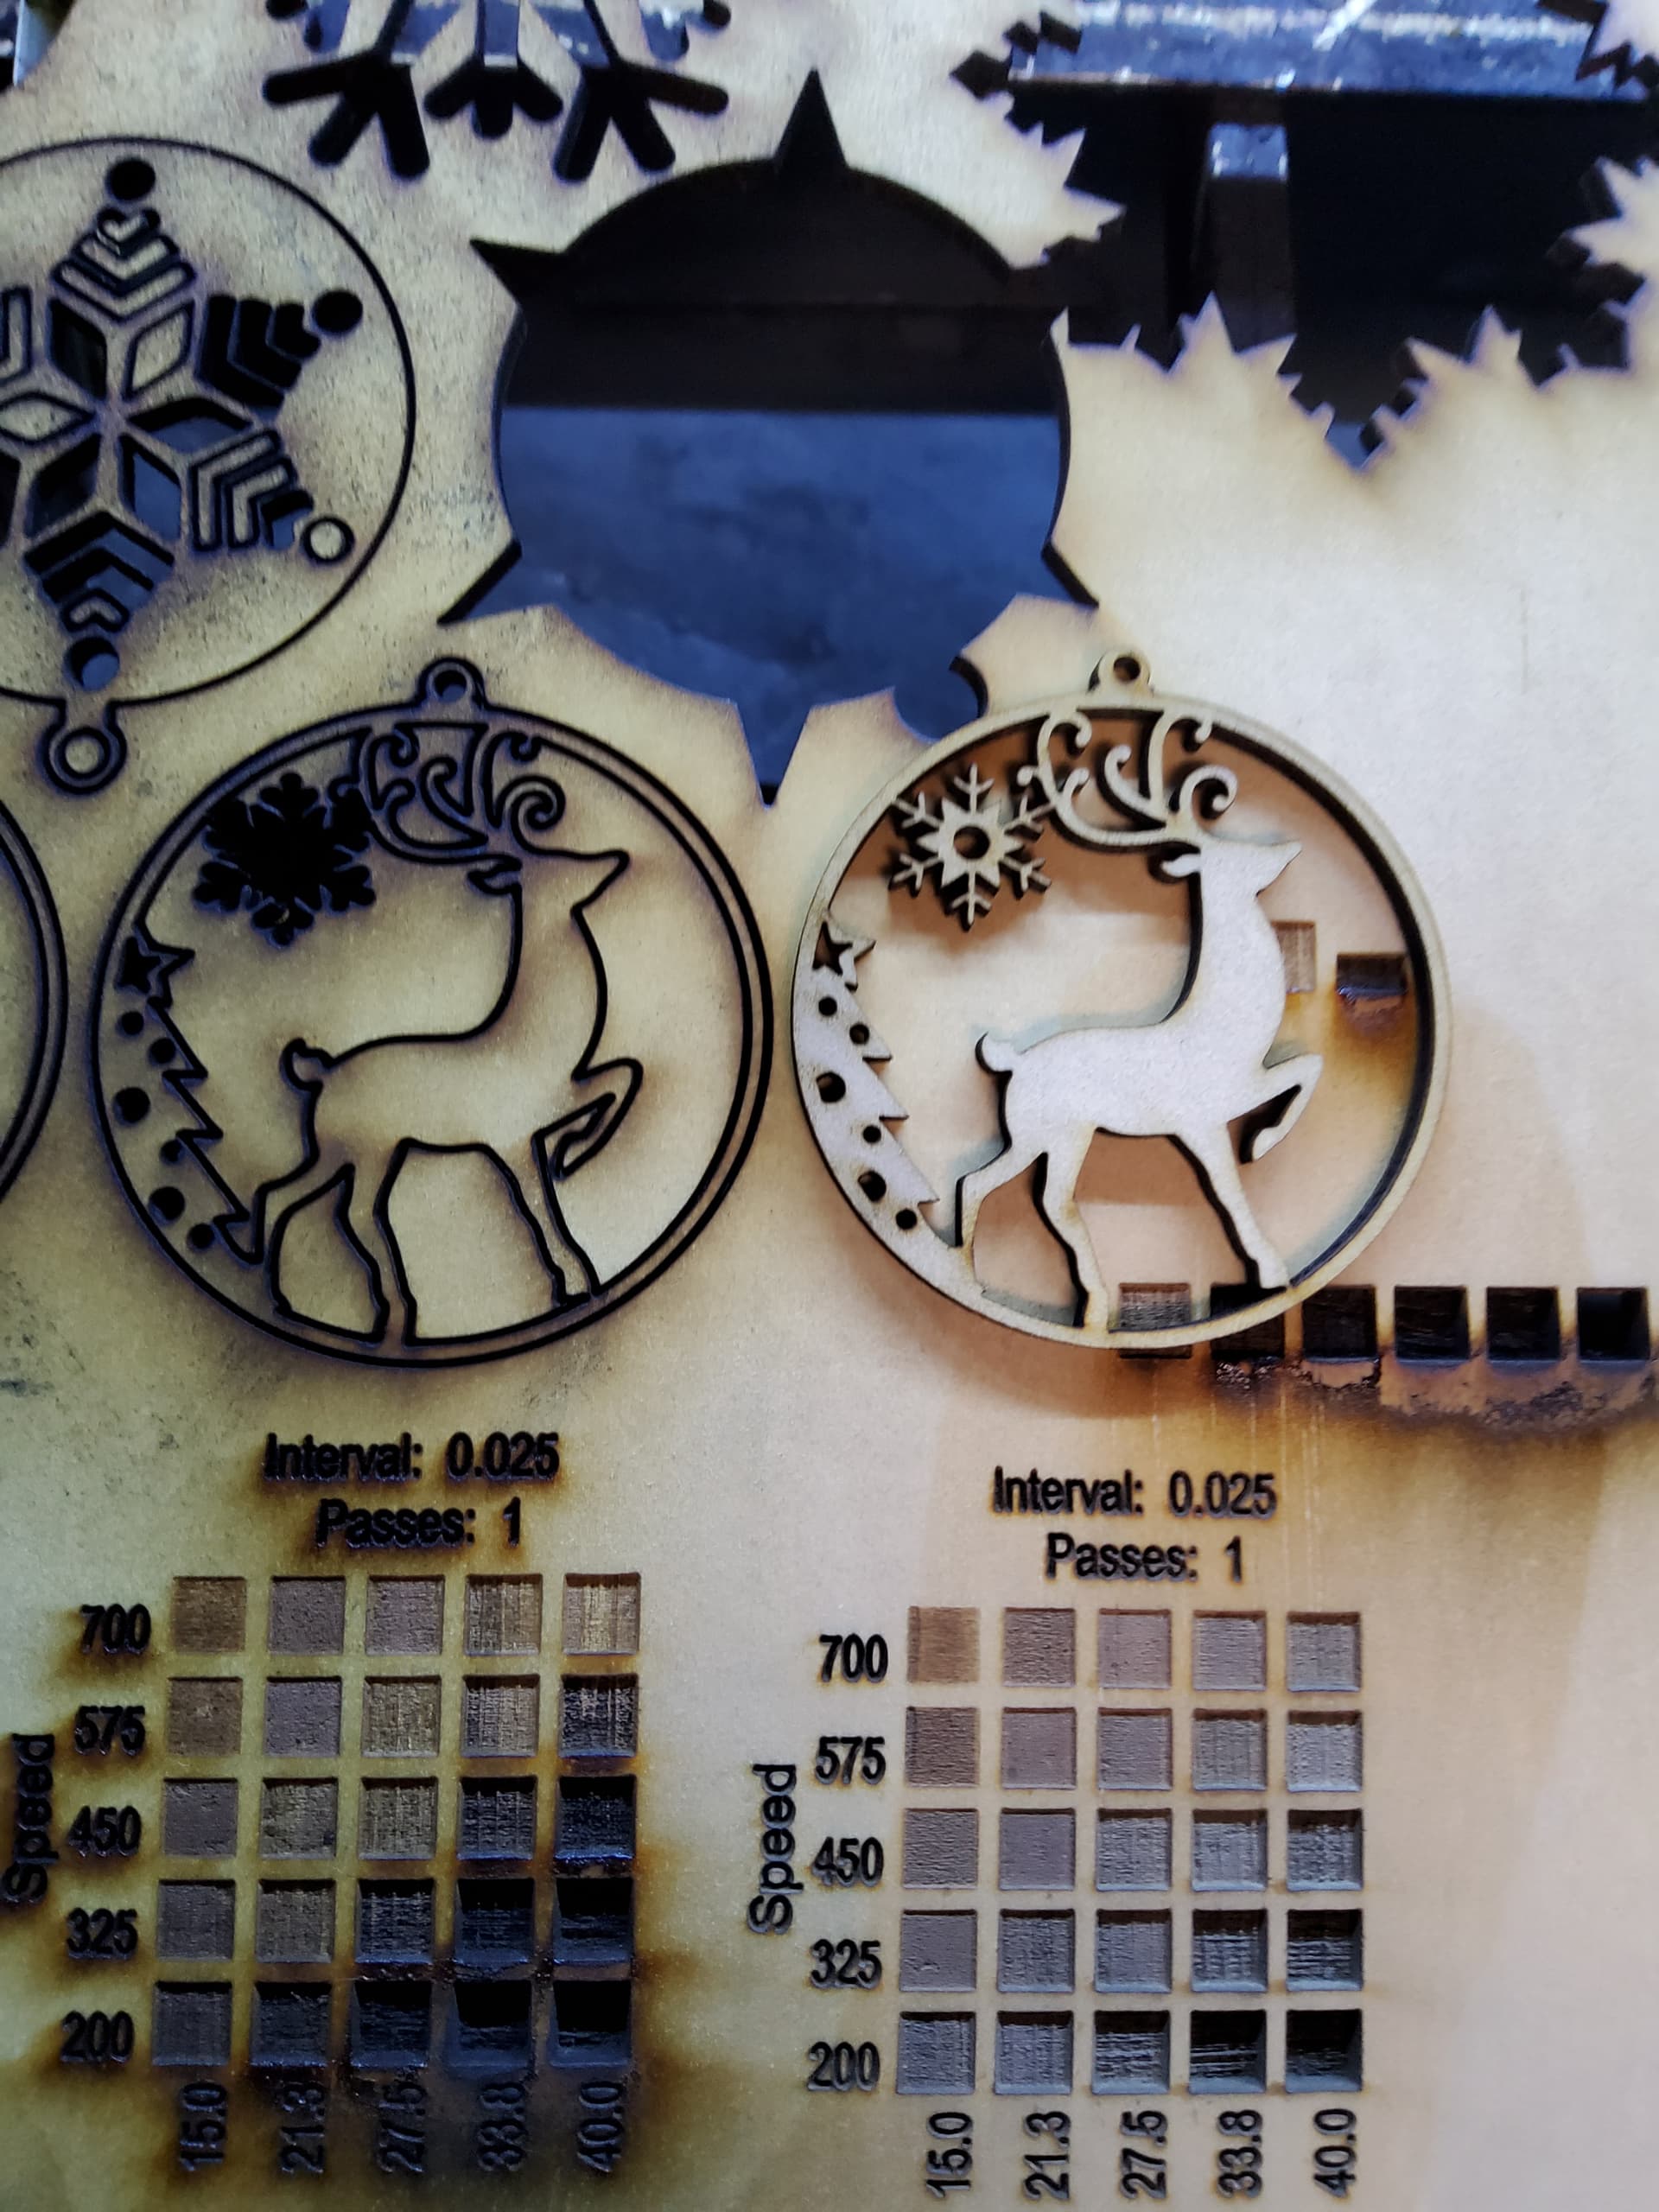
As with any machining operation ‘speeds and feeds’ are critical to good results. Generally we think of speed as the tool rpm and the feed is the rate material is driven into the tool or vice versa. Same operation occurs in a laser but it’s more difficult to ‘compute’ the proper speed (laser power) and feed (material speed) like it is for a tool bit. There is also the material variations that can’t be computed.
I can cut this material with lots of variations in power and speed, but only one combination gives me the best results for the cut.
I can wipe a tissue across the cut of my plywood and there is no soot, good cut. It also doesn’t ‘stink’ as bad…
IMHO, with a cut, the faster at the highest power you’re comfortable with is in the area you need to be.
I just send a line to the machine and cut ‘strips’ off the end of a piece of material, repetitively modifying speed/power on the console until I get a clean cut…
All good suggestions above. Overall you should be able to cut 3mm easily with a 60W CO2 laser in one pass. It will tend to burn without air. You didn’t mention with air or no air.
It will struggle to cut if mirrors are dirty, mirrors are out of alignment, the beam hits something or the tube is bad.
Material is not consistent. It’s helpful to save test material so In the future you can check the machine.
I do have air, but its set at about 10psi by the guy who set up my machine. He told me not to go higher, cant remember why, but i have 120psi available so ill do some playing.
Hmmm, maybe I should pay a bit more attention. The air pump has a max of 4.6psi, I think it better suited to an aquarium. Ill fix that on the weekend and update the results.
Thanks Steve,
It was serviced a couple of weeks ago when 2 mirrors and the lens were replaced. The machine is only a year old.
I have been using engravelab (only because it came with the machine) and have never had anything but mediocre results, but their chronic lack of documentation and support finaly gave me the permanent irits so I looked into lightburn that I used with an emblaser2 and set it up on the co2.
I can now etch glass to near the quality I have always wanted to, but cant seem to make the same improvements to cutting ply.
The air pressure I am getting at the nozzle is pathetic at best, and I have my workshop compressor sitting 5’ from the laser, so its not mutch work to try decent pressure, and the only thing I havent tried is more air.
That about right. I’ll have to say that this doesn’t add up. Good power, good focus if you can engrave glass. Good alignment and clean if it was just serviced. Have air directed down on the cut. You should be able to easily cut this material unless this ply has many layers and lots of glue (aircraft ply).
When you can, let’s take a look at the beam coming out of the tube by test firing into a piece of wood before the first mirror. Post the pattern here.
If tube fires properly (TEM0 state), clean optics and properly aligned… it will cut this, no problem. One of the key parts listed is not operating properly.
Lens selection is helpful, but I’ve cut 3mm ply with my compound, which is the worst for thick materials.
Start, as @dean448 advised, check the tem state at m1. I use watercolor paper cut out to fit in the mirror hole. I can also mark the center of the target.
You can use anything, but keep the power to a minimum so the mark is brown, not a ‘blown’ through hole.
Finish up with an alignment check. I assume you are a newer user, so ensure you know how to do an alignment properly… Here is a good method by Russ Sadler. He’s using some specific hardware you may not have, but the procedure it good.
Ensure the optics are clean.
These are required for it to work, one or more is not.
Alignment has been done when mirrors and lens were replaced a cvouple of weeks ago, and i do check alignment periodicaly.
Im getting fittings this morning for a different air supply, as everything else checks out. It should be all back together today ( baring the usual crisis )
Hi, have you cleaned your mirrors, and is the beam straight, and is the lens clean to allow the light pass unhindered. If not try these steps and it will ease your problems, do not blame the wood or the machine,